|
|
Expert 5K+
Posts: 8443
    
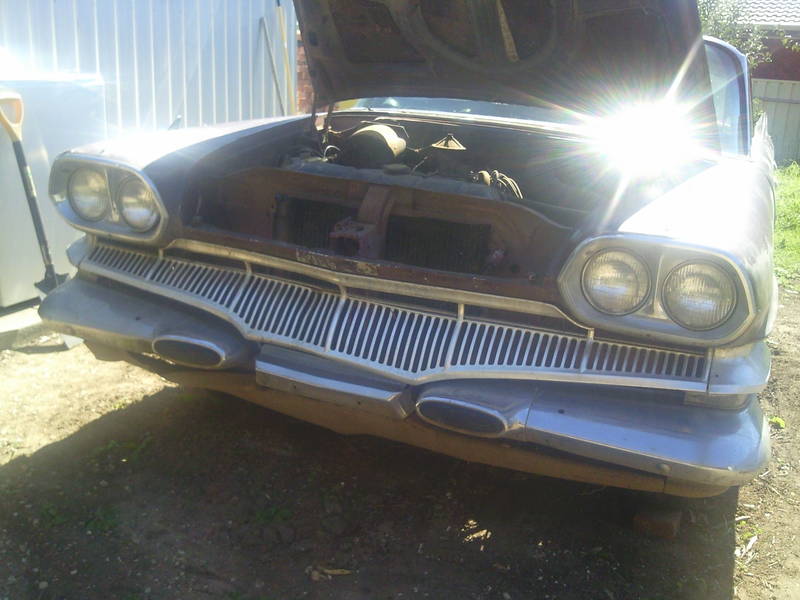
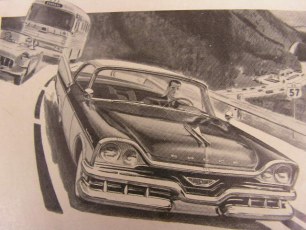
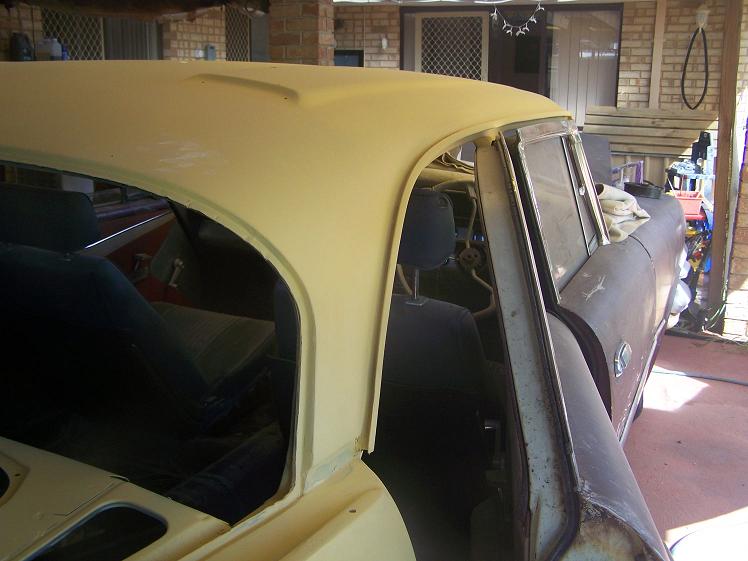
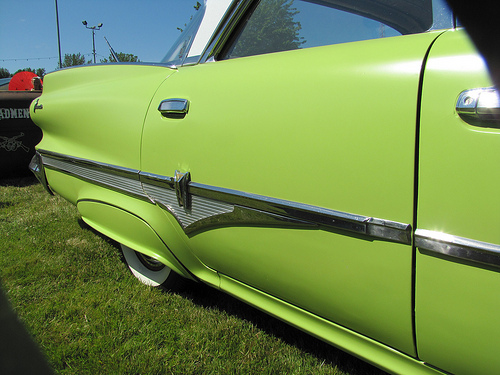
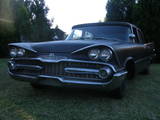
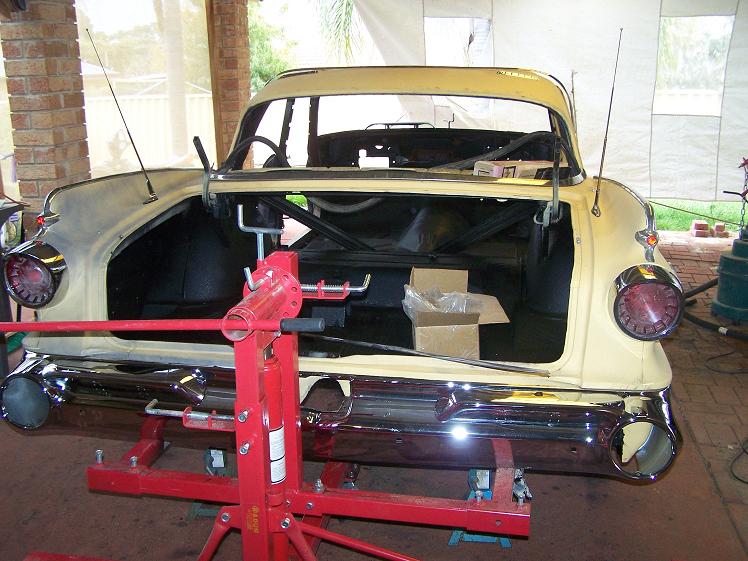
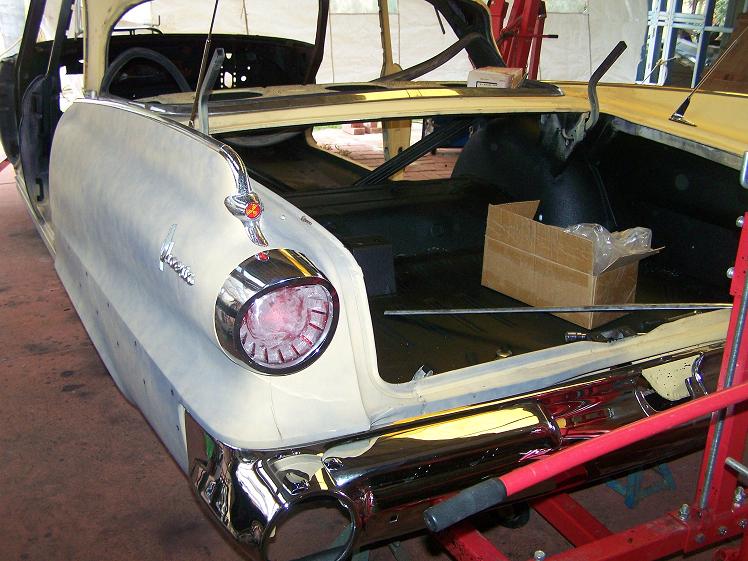
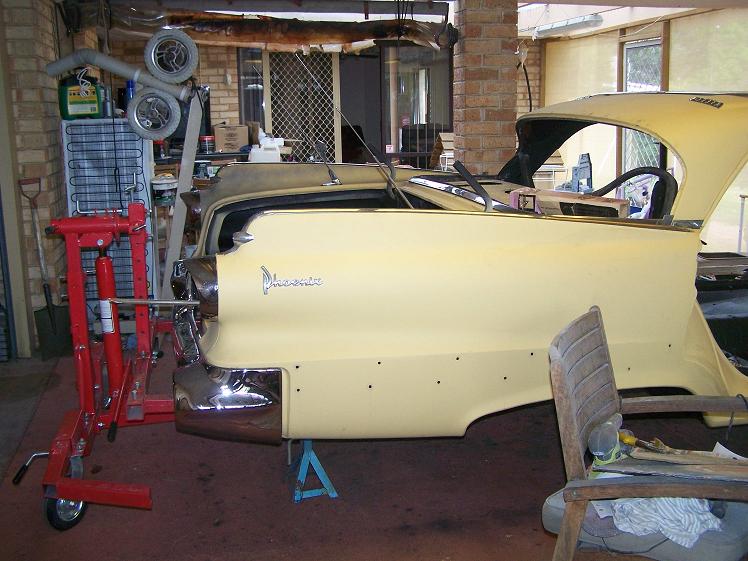
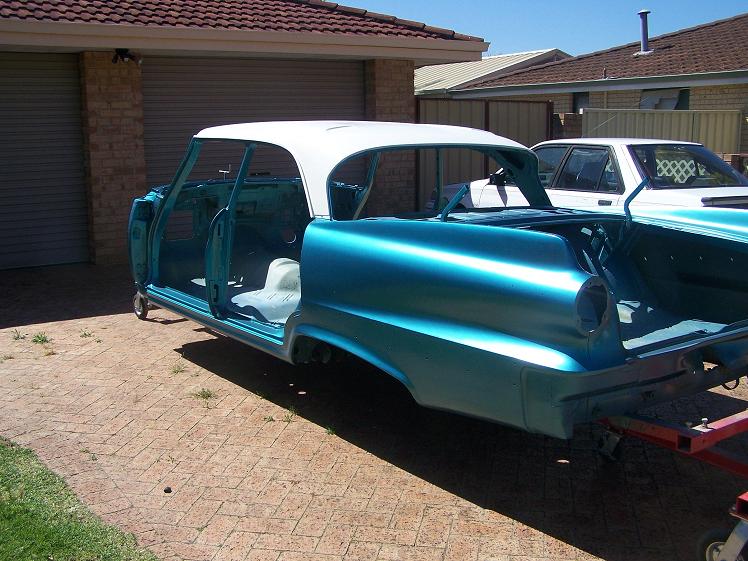
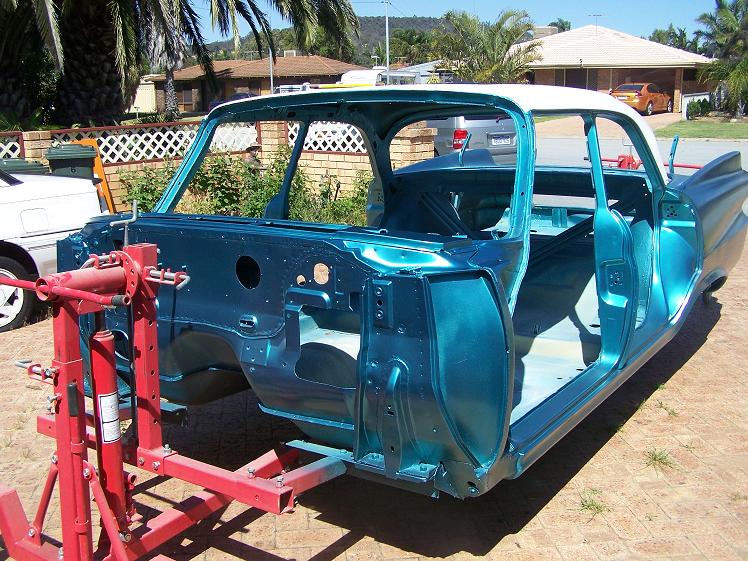
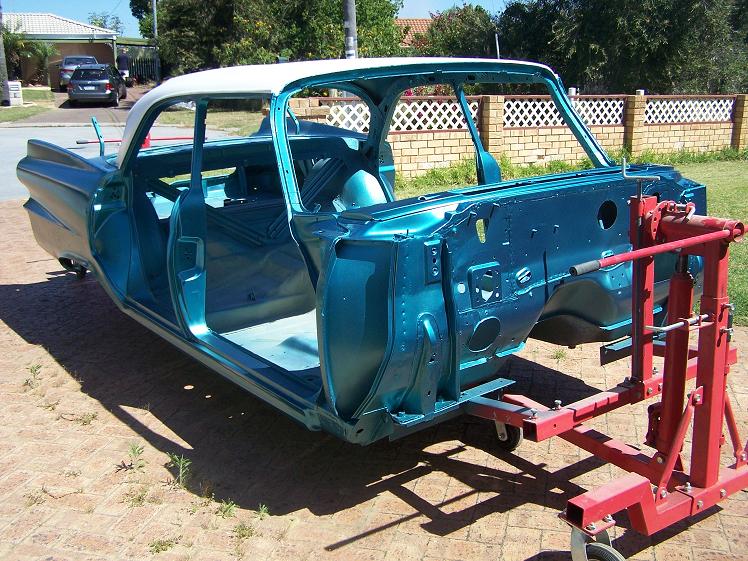
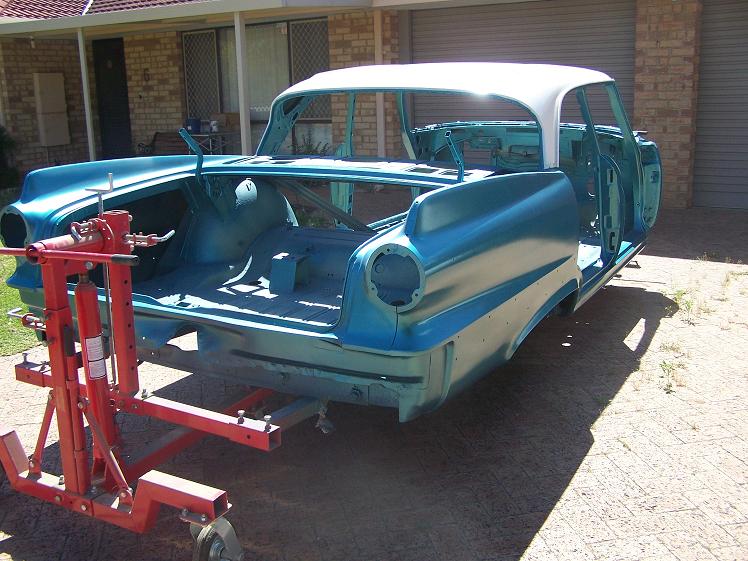
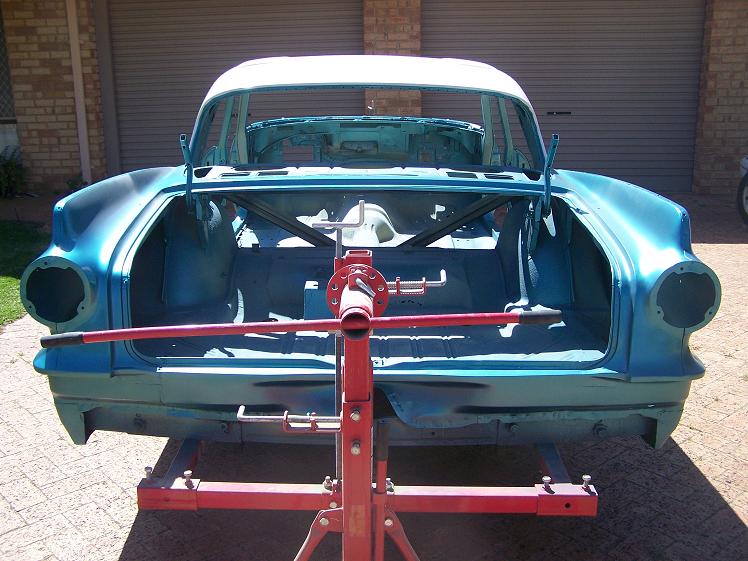
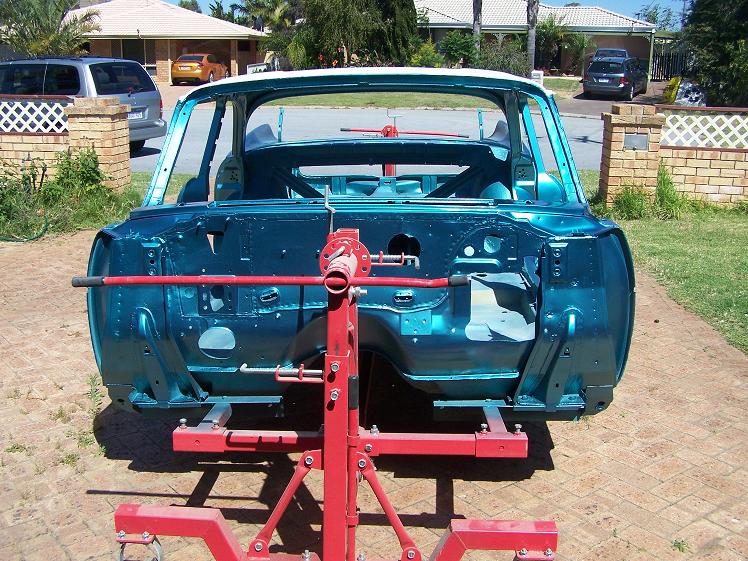
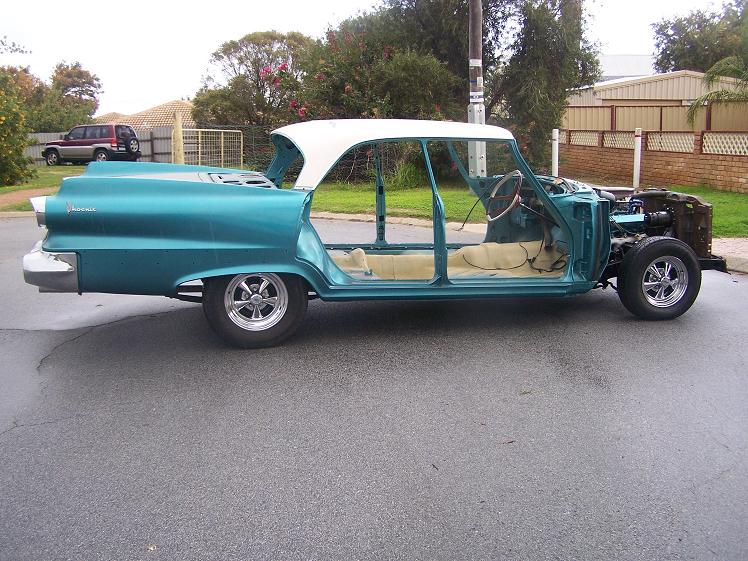
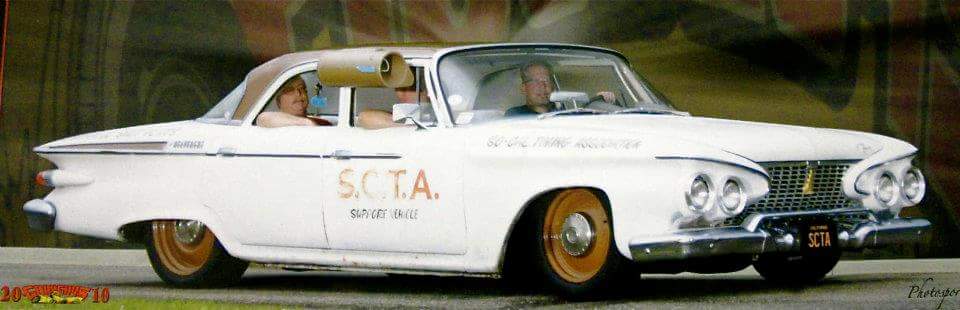
Location: Perth Australia | I just bought this car
Its 2000 km from me right now, but my brother lives sort of close, so it will go to his place first.
He wants to see if he can get it going (hasnt ran in 10 years).
He has ideas of driving it over, but I think its more likely going to end up on a truck.
When I get it here, I will decide wether it will be parts for my plymouth or be fixer up.
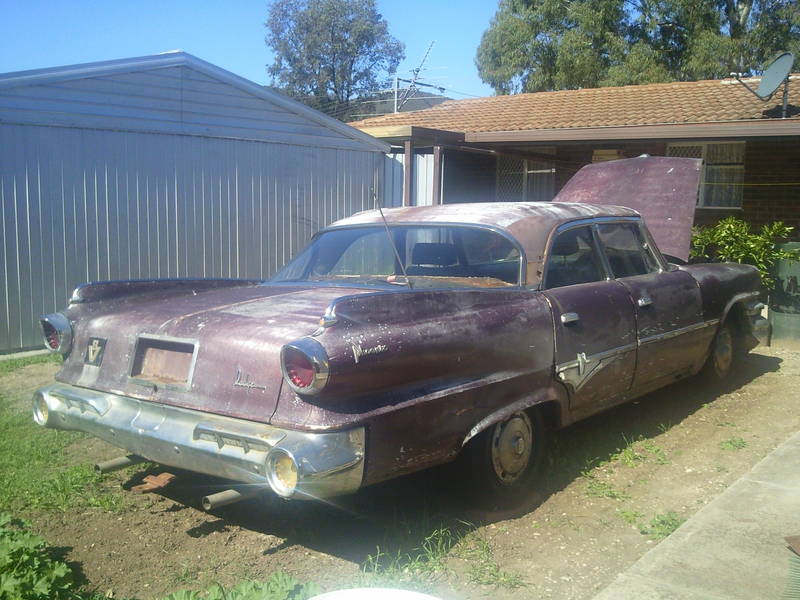
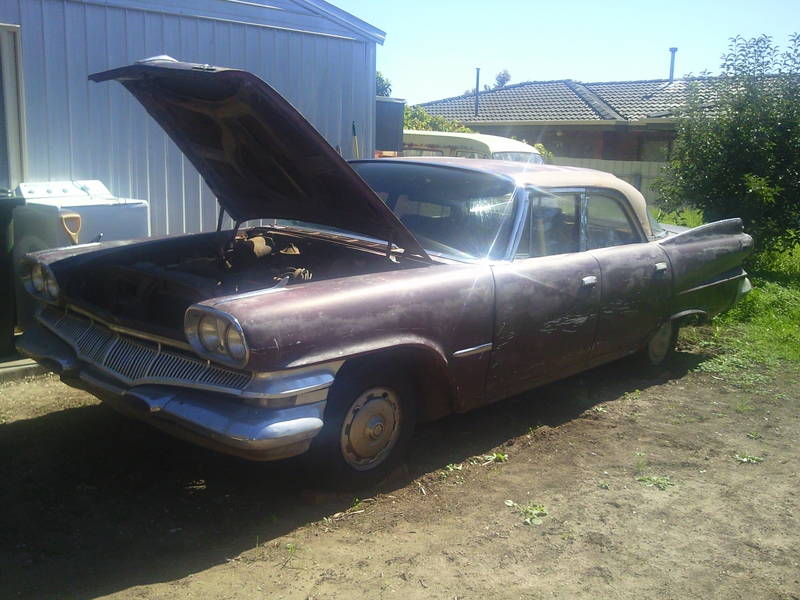
In the pics, it looks to good to kill.
Its a rare car here as not a lot have survived.
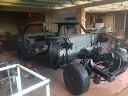
I was orriginally interested in it for the windscreen and the steering.
 (60 phoenix1.jpg) (60 phoenix1.jpg)
 (60 phoenix2.jpg) (60 phoenix2.jpg)
 (60 phoenix3.jpg) (60 phoenix3.jpg)
 (60 phoenix4.jpg) (60 phoenix4.jpg)
 (60 phoenix5.jpg) (60 phoenix5.jpg)
 (60 phoenix6.jpg) (60 phoenix6.jpg)
Attachments
----------------
 60 phoenix1.jpg (45KB - 454 downloads) 60 phoenix1.jpg (45KB - 454 downloads)
60 phoenix2.jpg (79KB - 463 downloads)
60 phoenix3.jpg (52KB - 431 downloads)
60 phoenix4.jpg (69KB - 446 downloads)
60 phoenix5.jpg (57KB - 451 downloads)
60 phoenix6.jpg (75KB - 449 downloads)
|
|
| |
|

Expert
Posts: 4533

Location: Ripon, WI | darn! It has a hitch, I would love to find one of those for my car. Looks to be in decent shape man, depending on how soft everything underneath is of course. |
|
| |
|
Expert 5K+
Posts: 8443
Location: Perth Australia | Hey Mike
Dunno if you have seen one befor, but I dont think it would be that hard to knock one up or get made.
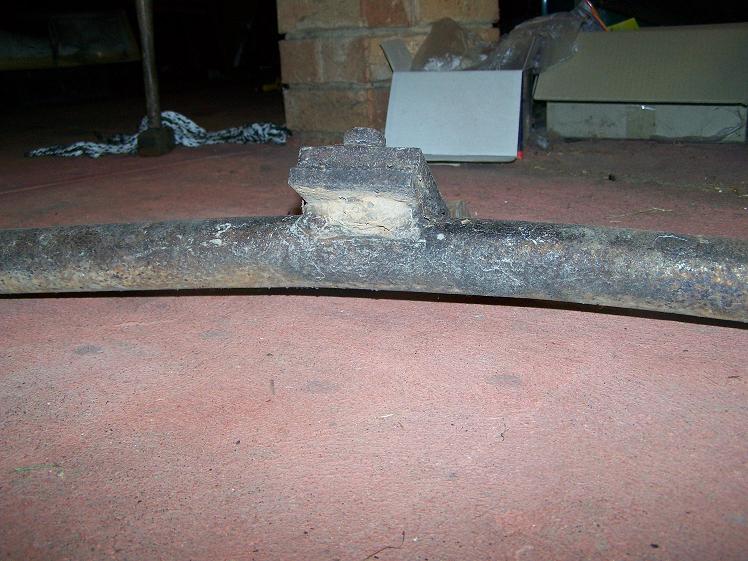
Heres a pic I have of one if it helps.
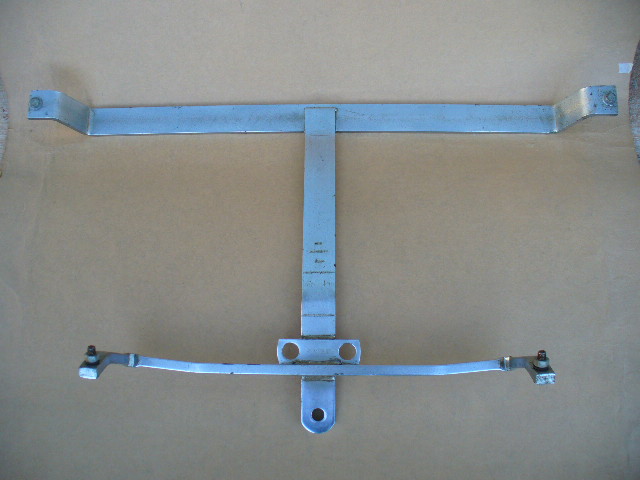 (60 plym tow bar.jpg) (60 plym tow bar.jpg)
Attachments
----------------
60 plym tow bar.jpg (83KB - 447 downloads)
|
|
| |
|
Extreme Veteran
Posts: 421
Location: N. Georgia | Looks like a keeper to me. Shucks, I've bought daily drivers that looked worse than yours! |
|
| |
|
Veteran
Posts: 188
Location: Adelaide Australia | hi mate you wont be to disapointed it is very rough. I looked at this car about three weeks ago. It was dropped there in that spot 10 years ago and that was that. It was gona be restored . As the story goes another 60 Phoenix bites the dust. It would be a good parts car if you got one ,but to hard to restore if you dont. When iI was there wasnt able to turn motor by hand and brakes were sized . But at the right pricr would make agood parts car. |
|
| |
|
Expert 5K+
Posts: 8443
Location: Perth Australia | Hi Fins
can you elaborate a bit more about it?
I have dived in head first on this one, mostly for the right hand drive stuff.
I get it for a fair bit less than his asking, but I still have to get it here yet.
But as far as a hard restore goes, you havnt seen that much of my plymouth then 
This ones almost showroom compared to that.
|
|
| |
|
Regular
Posts: 87
| Aint that the truth---good parts car and good project depends on where you and the car are.
On the Rustang sites these guys out west are parting cars guys here in michigan would stab each other over. lol |
|
| |
|

Expert
Posts: 1622
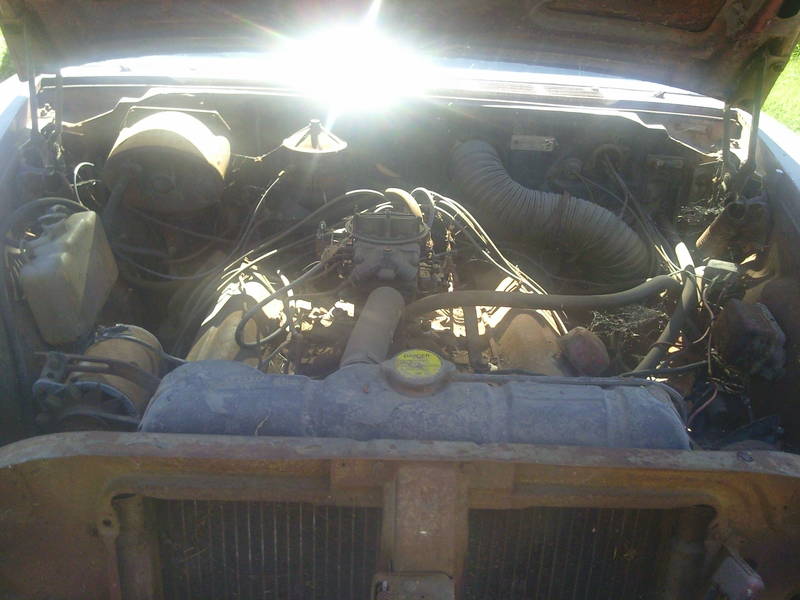
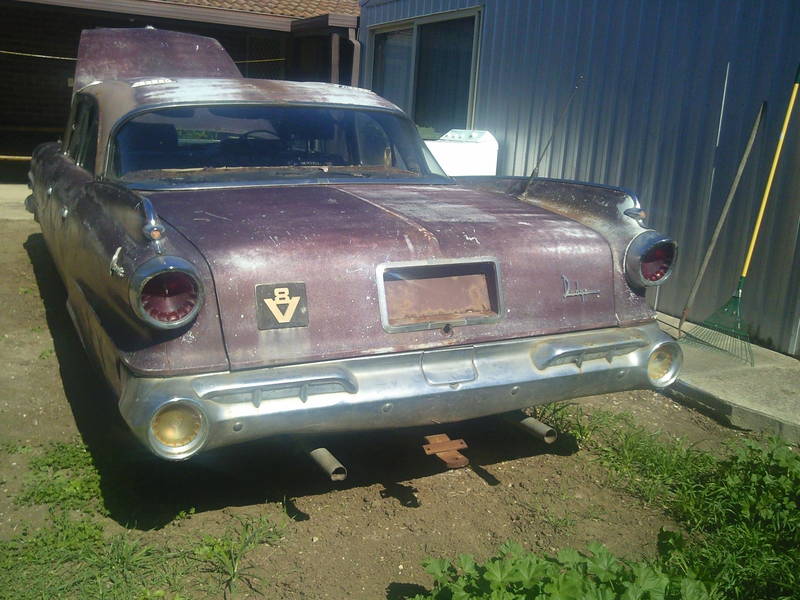
Location: Seville, OH | No question that it has a V8 in it! |
|
| |
|
Exner Expert 19,174 posts. Neil passed away 18 Sep 2015. You will be missed, Neil!
Posts: 19146
Location: bishop, ca | ...The Twice Pipes a give-away, on it?
|
|
| |
|
Veteran
Posts: 188
Location: Adelaide Australia | Hi Mick PM sent |
|
| |
|
Veteran
Posts: 161
Location: Melbourne, Australia | Mick, Great score on the Dodge!! I am so jealous.....  How did you find it? Sent you a PM How did you find it? Sent you a PM |
|
| |
|
Expert 5K+
Posts: 8443
Location: Perth Australia | Hi Frank
I sorta found it by accident, I was looking for parts for my plymouth and got bored looking
at the same ones in the states, so i looked local and there it was.
If it was not the Aussie one, I would have passed, but when I saw the dash, I thought cool parts for my plymouth.
I will wait till I get it here to decide what to do with it, but it does roll and the engine turns by hand, so it might survive yet
|
|
| |
|

Expert 5K+
Posts: 7807
Location: Williams California | Good find, Mick!
I would imagine lucking to this on your home turf would be somewhat of a miracle?
---John |
|
| |
|
Expert 5K+
Posts: 8443
Location: Perth Australia | Thanks John
Not a lot of these around, Its going to help with the plymouth r/h/d problem a lot.
I have to get around to getting that stuff you have for me shipped over one day.
I am sort of dragging my feet on that a bit, but this dodge should give me some direction
now.
Just have to see if its a fixer or parts, but it is looking more like a fixer.
My brother said the engine ran for about 10 seconds yesterday then lost spark (as far as he got)
|
|
| |
|
Expert
Posts: 2633
Location: Minor Hill, TN | Good Luck with the restoration please keep us posted |
|
| |
|
Expert 5K+
Posts: 8443
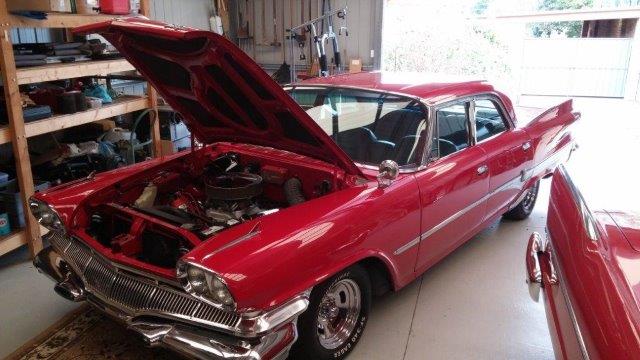
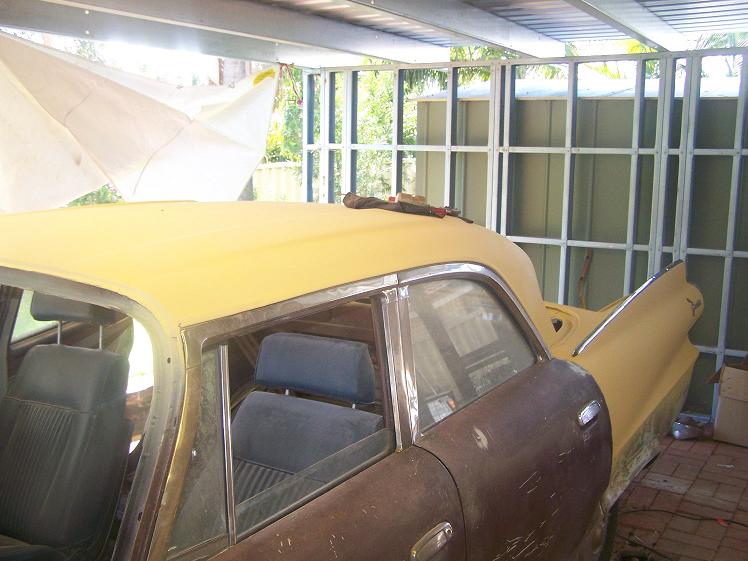
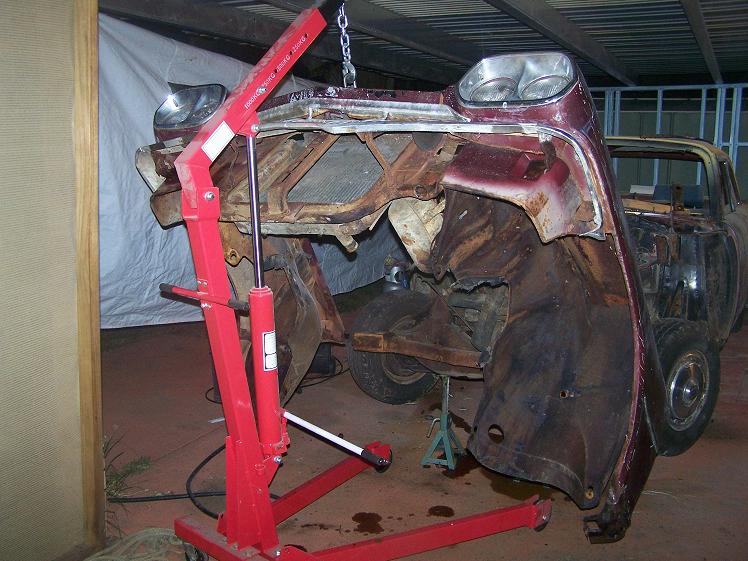
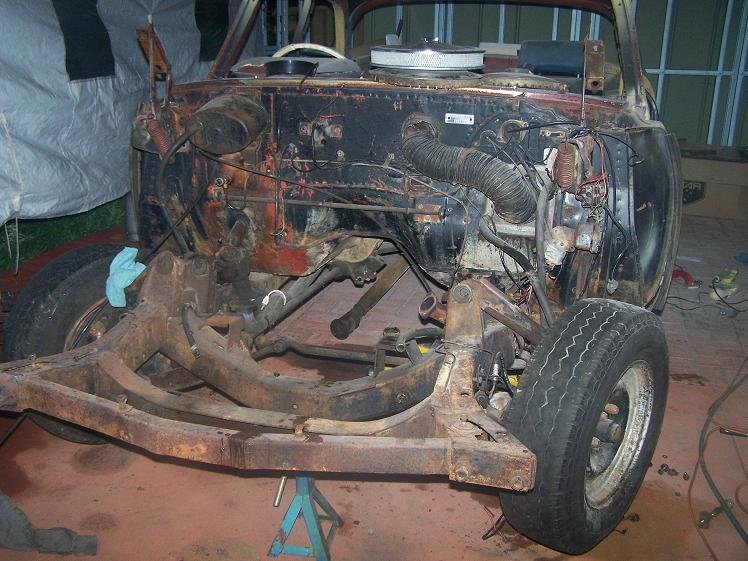
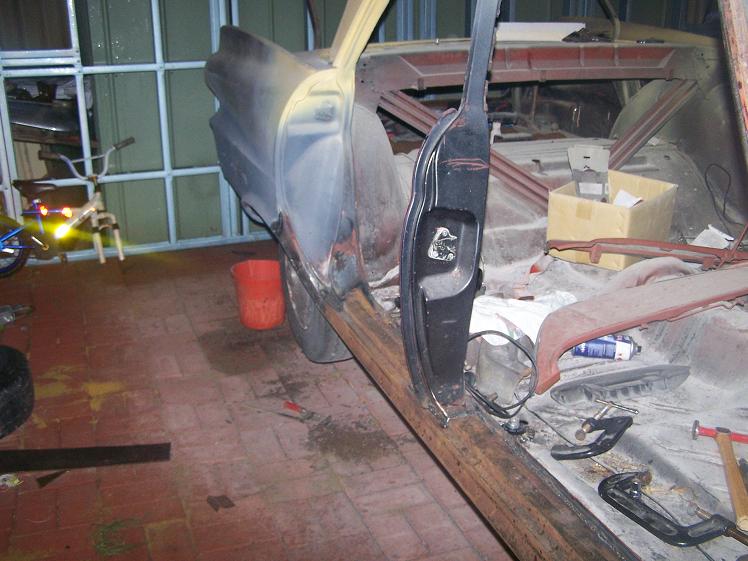
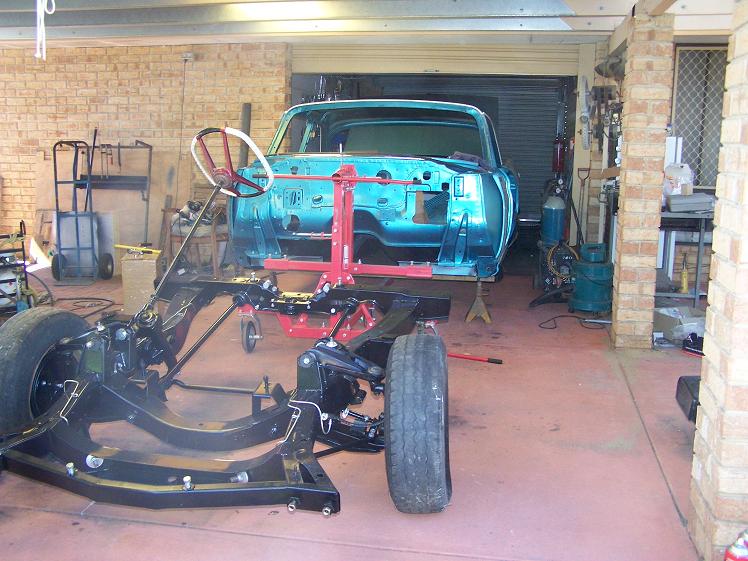
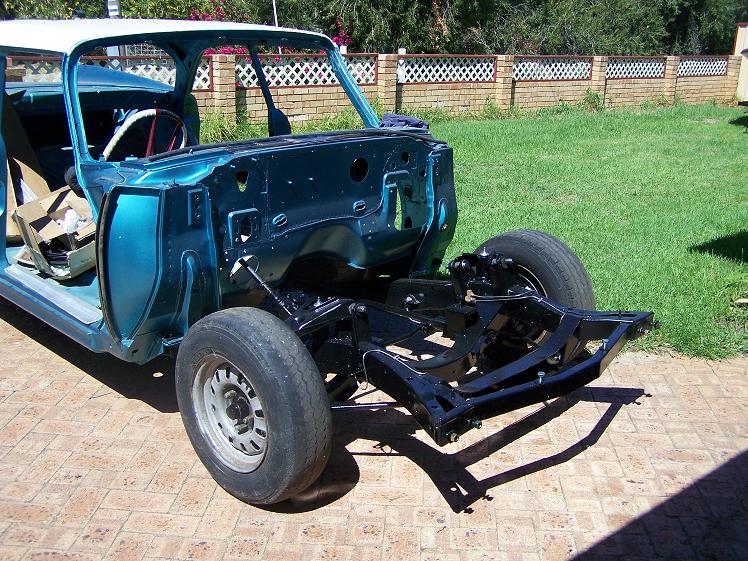
Location: Perth Australia | I have just got home from going and visiting my brother to get the dodge ready for transport
and a general tinker.
Rust is a bit of an issue mostly around the roof. Its suffered mostly along the left side drip rail.
right side rocker isnt very good and the hood tried to fold in half when I went to close it (the hood frame is rusted at the hinge mounts)
The good stuff is the floor and trunk looks fine
No issues with the dash
same with the sub frame
Engine runs (sort of) its in bad need of tune up stuff.
I couldnt run it for to long because the water pump bearings are shot.
Trans works forward and reverse (I didnt get it to change gears)
The park brake works after I adjusted it, but does need new linings (1 lining fell off when I took the drum off)
Its mostly complete, missing floor coverings, Rear quarter mouldings, Front seats are out of something else, dash mirror is missing
It uses a dodge truck heater, not the same as the US heaters and the fan works and it didnt leak any water.
The steering felt good, but I think its a manual box only (Had power steering once but it must have failed and been replaced). I will
look into that further when it gets home (About 3 weeks I think).
The Pot metal parts have suffered from being out in the weather to long, most is badly pitted.
the rear bumpers not bad, just one of the things on top of the bumper has rusted through.
That funny looking V8 badge on the trunk looks like it may have been either dealer intalled or put on not long after new.
Its not going to stay though, but its bolted on.
There will be quite a lot of work needed to get it back on the road (fingers crossed that will happen), mostly will depend on
what I find with the rust in the roof.
I did see a really badly beat up 60 dodge convert for sale for $1000 over there somewhere, could buy that and
use this as a parts car for that hahahahaha
Now I have the long wait till it gets here, the fix it or part it argument will go on in my head till its here and I
can evaluate it better, but I really do want to save it, Being R/H/D I guess makes it especially rare in world car terms.
I was wondering if the dodges in Canada still did the plodge thing in 60?
I dont recall ever seeing a 1/2 60 plym/dodge combo
If worse come to worse, I could make an Australian 60 crusader 
Enough of my rambling for now
|
|
| |
|
Expert 5K+
Posts: 7207
Location: Victoria, BC, on Vancouver Island, Canada | Michael, in 1960 the Canadian built Darts were the same as the US cars' sheet metal. They did, however use a Plymouth dash board and upholstery, and Plymouth steering wheel. The Aussie Darts at least used a Dodge str. wheel. So really what the Dart was for 1960 was a Plymouth but with Dodge styled sheet metal, basically what had been going on in Canada for years - a short wheelbase Dodge to compete with Plymouth, albeit finally with Dodge sheet metal all the way for 1960 in Canada instead of Plymouth sheet metal from the cowl back. |
|
| |
|
Expert 5K+
Posts: 8443
Location: Perth Australia | So If I put the dodge front on my fury, I could have a 1 of 1 car, cool
Dont worry everyone
Kidding, but the dodge front sheetmetal is better than the plymouths except for the hood
|
|
| |
|
Expert 5K+
Posts: 8443
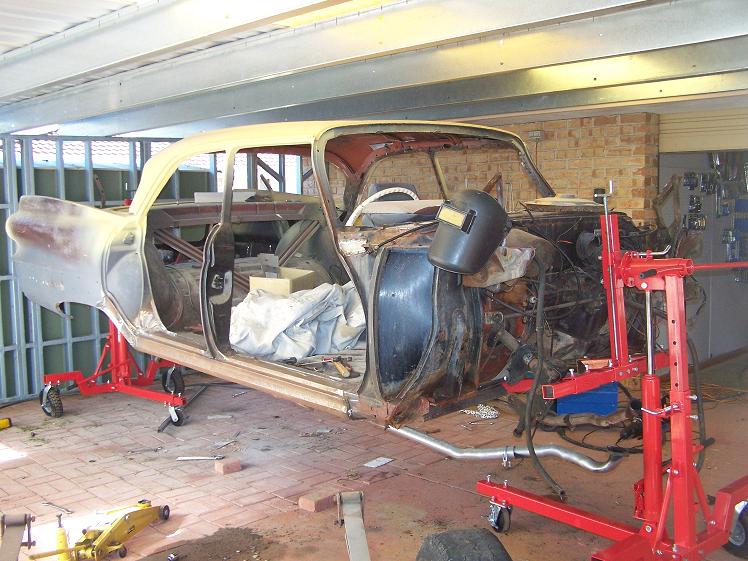
Location: Perth Australia | The Phoenix finally turned up at home today
I was like an expectant father last night, kept driving past the freight yard to see if it was here lol
Anyway, today was help the engine day mostly, put a new water pump on it and basically got the cooling system to hold water.
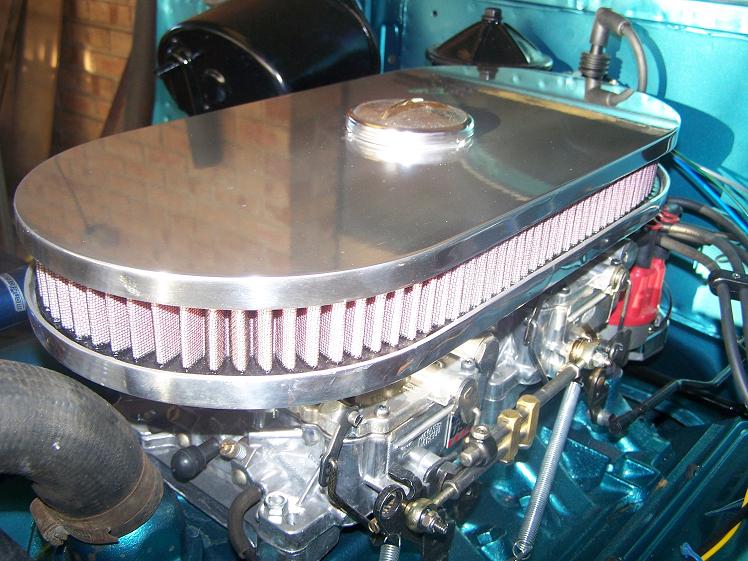
I also got a air cleaner for it (orriginal type wont fit because it has a 350 holley on it)
The air cleaner is the shiniest part of it lol.
The rust in the roof is quite bad, be a bit of work there
The bonnet (hood) is pretty much shot, I think I'll be better off with another one.
The engines pretty smokey still, but I think its starting to clear up a bit and it really will need a full tune, It sounds like christine
when Arnie first got it.
All in all, its been a good day
|
|
| |
|
Expert 5K+
Posts: 7207
Location: Victoria, BC, on Vancouver Island, Canada | What's wrong with the hood, is it rusted out as well? The roof rust on your Aussie cars amazes me. I live on Vancouver Island, on the coast, pacific Northwest, that has a fairly wet winter climate, dry in summer though. I've never seen any roof rust on any cars in this area, lived here all my life. |
|
| |
|
Expert 5K+
Posts: 8443
Location: Perth Australia | Yep, the frame is rusted out where the hinges bolt on.
At the moment, I have to use a wrench on the hinges to close the hood or it will just fold in half.
L/H/R door was stuck as well, but I got it open with the carefull use of 2 pry bars.
The locking wheel was ciezed. That door now opens better than the others now.
Bathurst (touring car race) is on today, so there wont be to much happening, but I do want to seal up the exhaust.
This car will not be a cherry resto, more a cleaned up driver.
|
|
| |
|
Expert 5K+
Posts: 8443
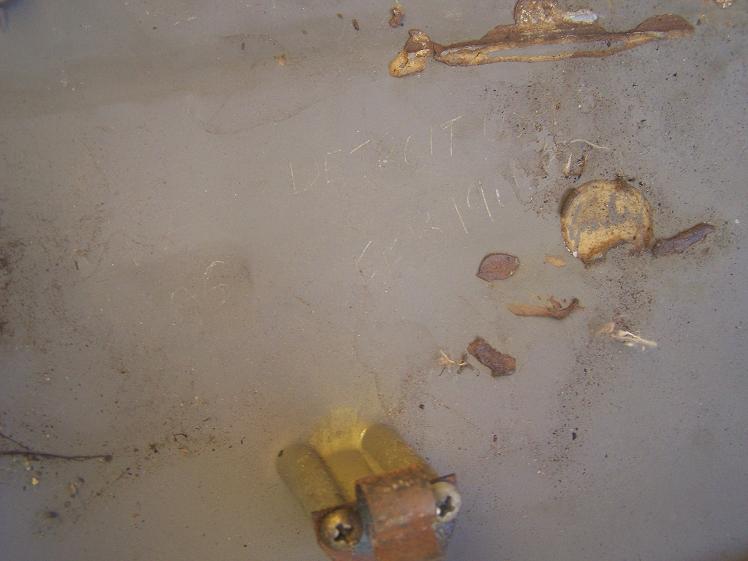
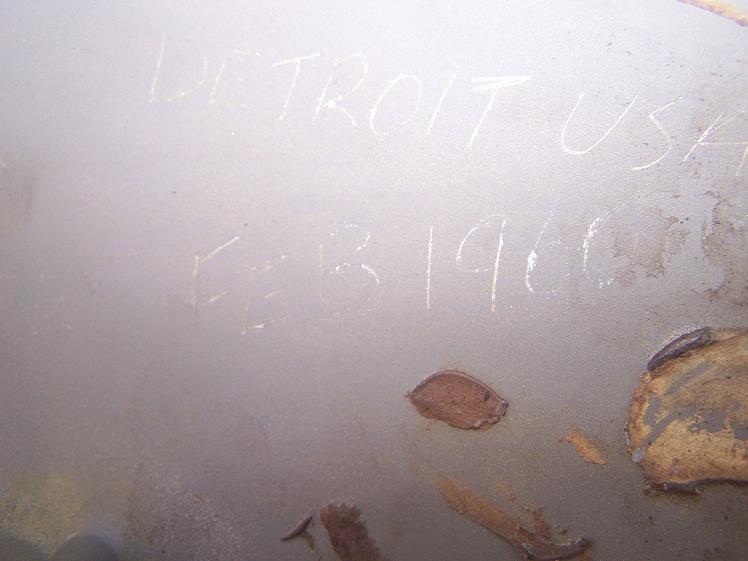
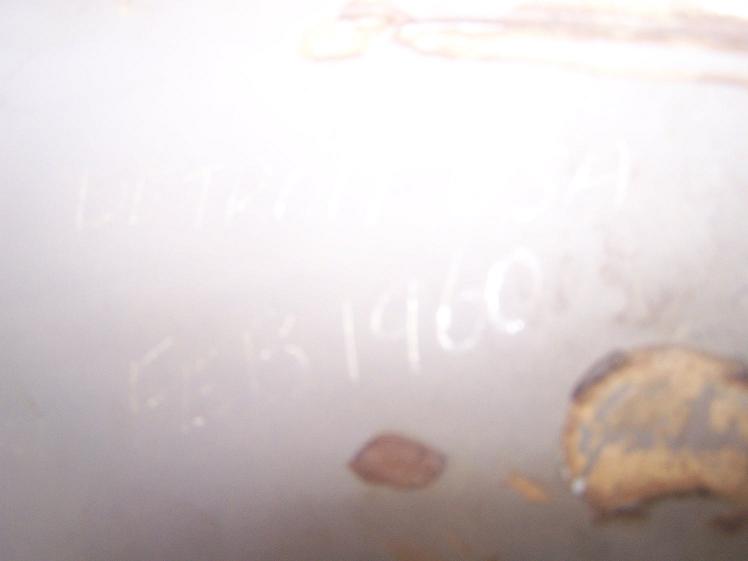
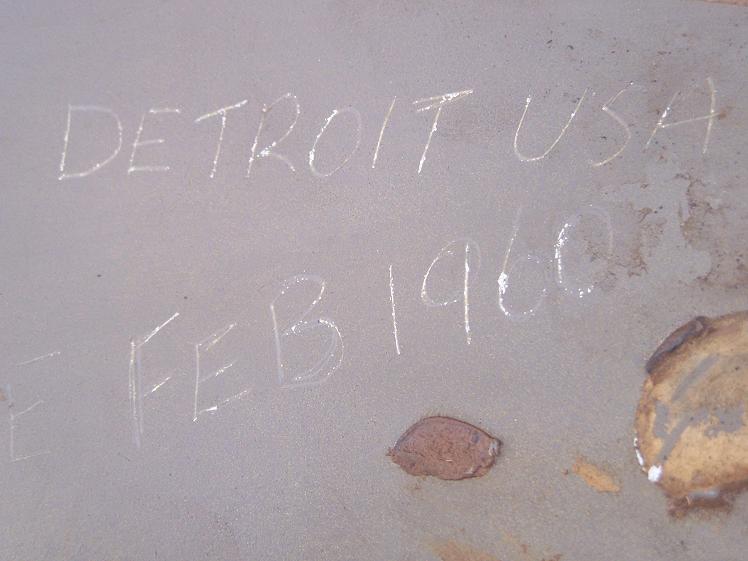
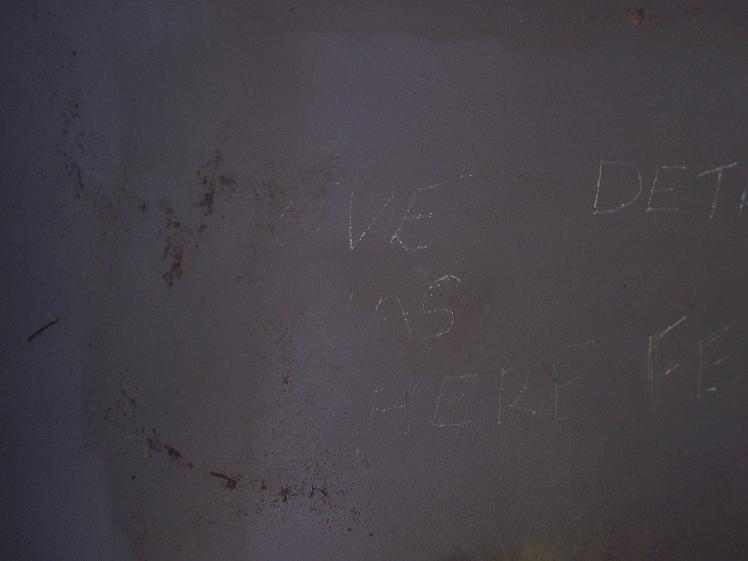
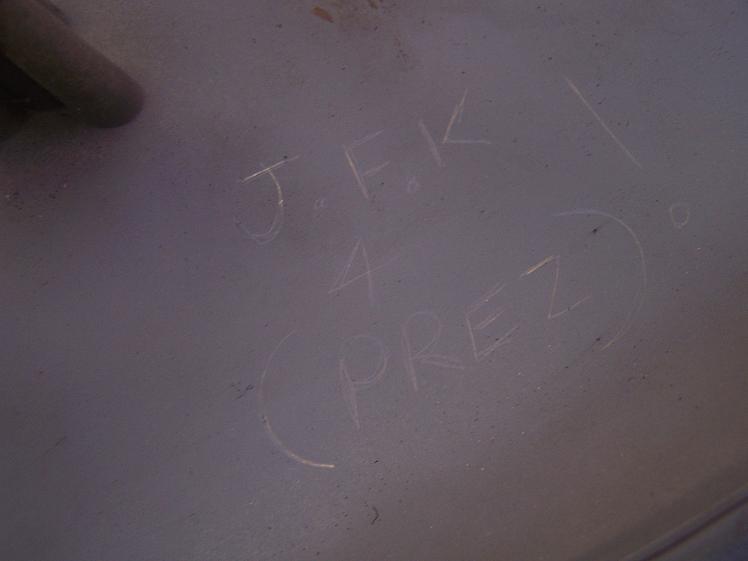
Location: Perth Australia | I was tinkering with it a little yesterday and I found some factory graffity
Scratced under the cover for the speedo (60 plym dash) was
Steve was here
Detroit USA 1960
JFK for pres
I am guessing that the dash had an export tag or something on it, which is why the "detroit USA" bit
I thought it pretty cool when I found it
|
|
| |
|

Elite Veteran
Posts: 726
Location: Some Island called Prince Edward | That's awesome! Can you post a pic of the graffiti? |
|
| |
|
Elite Veteran
Posts: 726
Location: Some Island called Prince Edward | That's awesome! Can you post a pic of the graffiti? |
|
| |
|
Expert 5K+
Posts: 8443
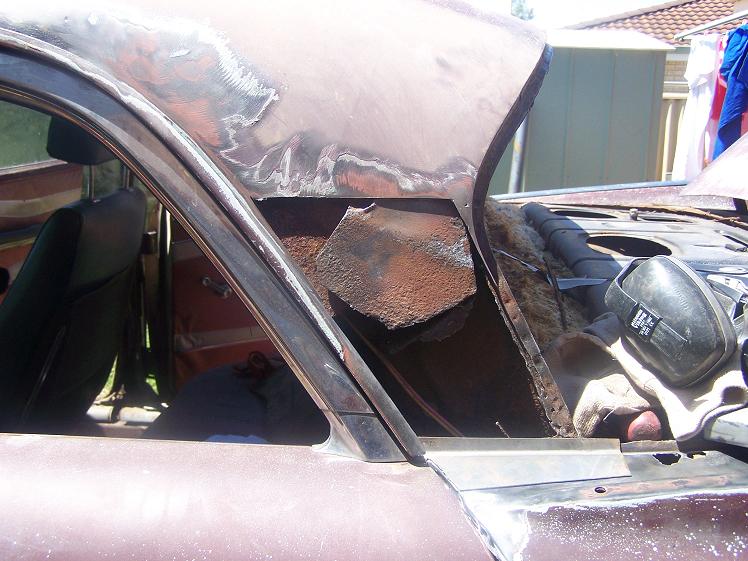
Location: Perth Australia | Nearly lost it today
I decided ti fix the hole in the roof, so I released the roof lining back a bit and pulled the insulation out ect and
ground off the paint and all the other stuff you have to do.
After welding in a repair section that I made, I ground the welds down and found i had a couple of small holes to fix.
I fixed the first one, but when I was fixing the second one, the weld fell in and somehow caught the roof lining on
fire.
I didnt know this had happened until I lifted the helmet to see if i needed to go further.
Thats when I saw a good portion of the front of the roof burning.
Naturally I tried to put it out.
First by trying to blow it out, that wasnt really successful (bit bigger fire than a candle)
Then I did a stupider thing and started trying to rip the lining out and only succeded in burning my hand, then
I got smarter and got the hose.
The damage thankfully is only to the roof lining that needed to be replaced anyway, but I was trying to save it as a patern.
I guess my hand will hurt for a while, but I have burn cream on it now that is helping a lot.
My turn to be my signiture thing today lol
|
|
| |
|
Expert 5K+
Posts: 8443
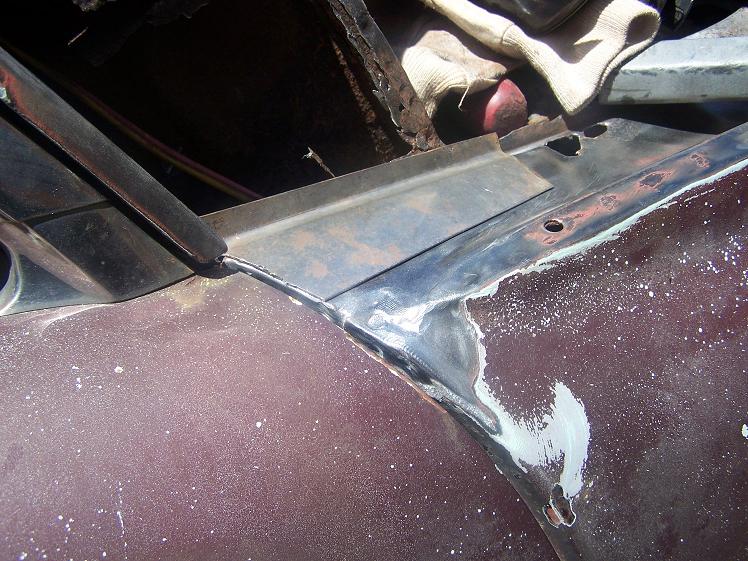
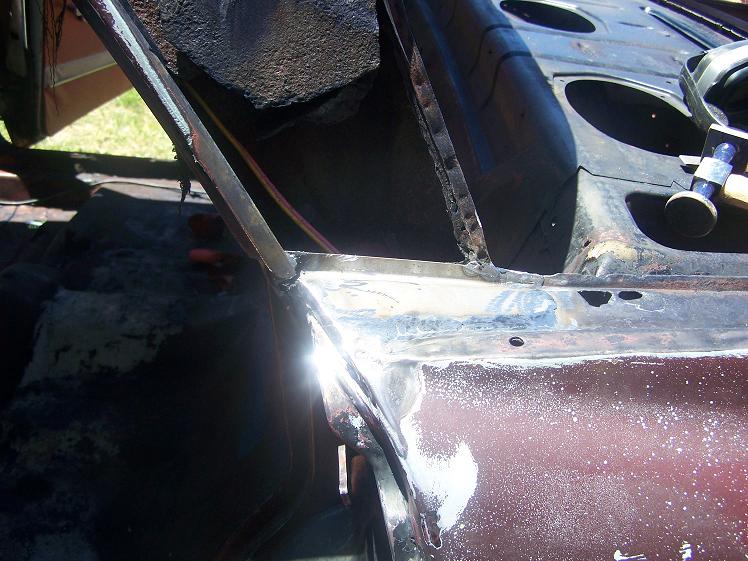
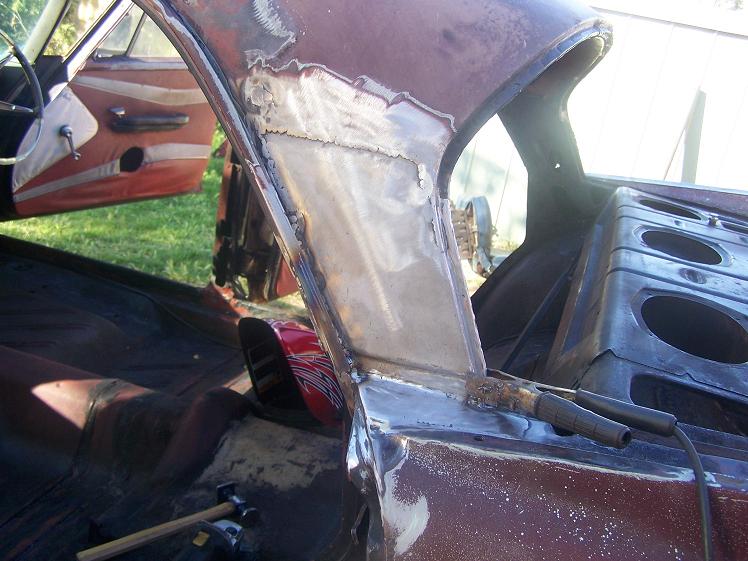
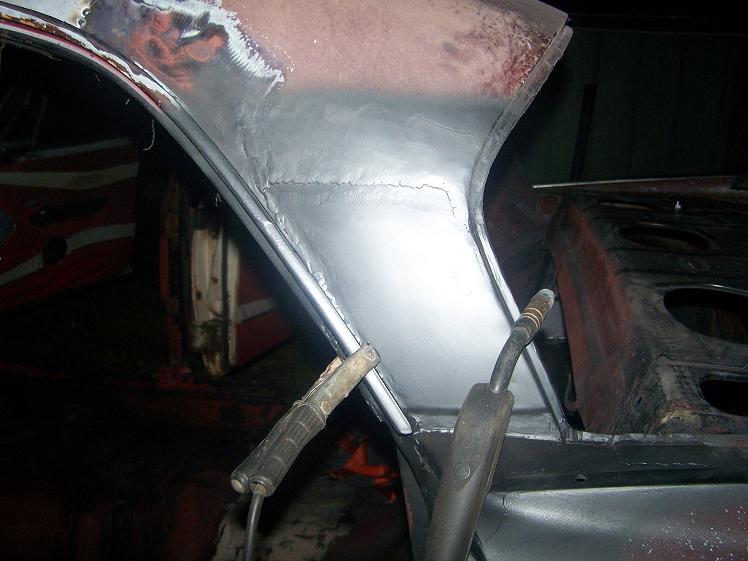
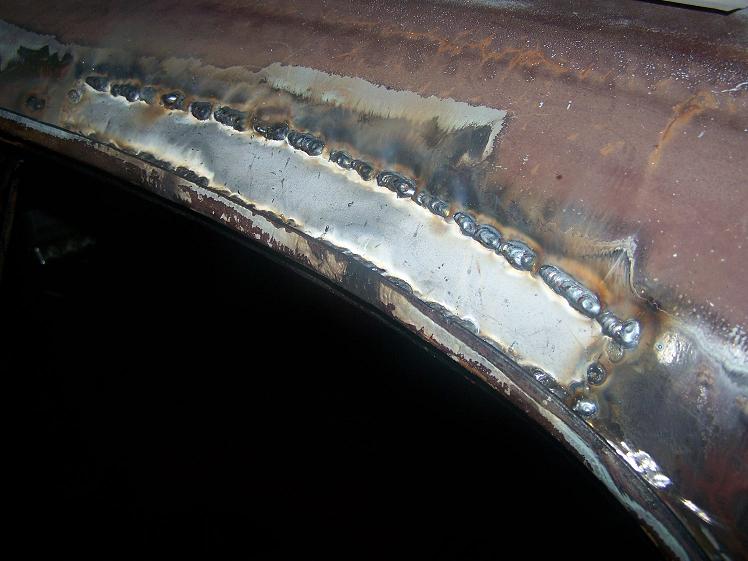
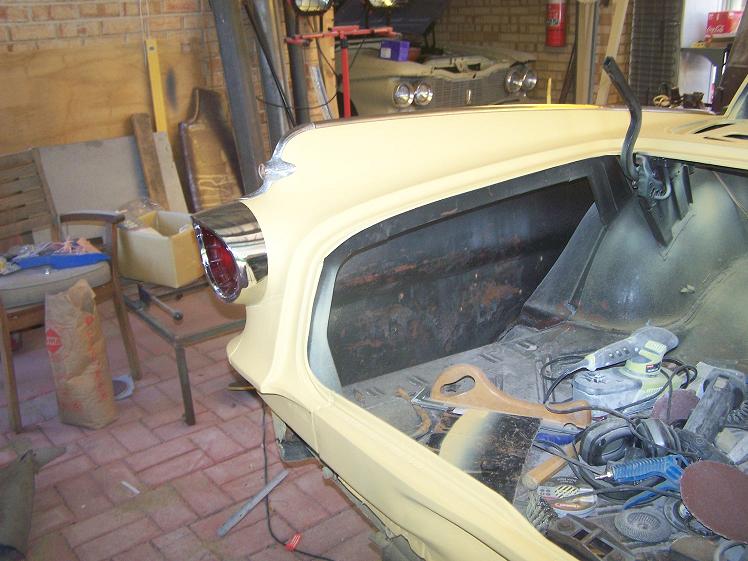
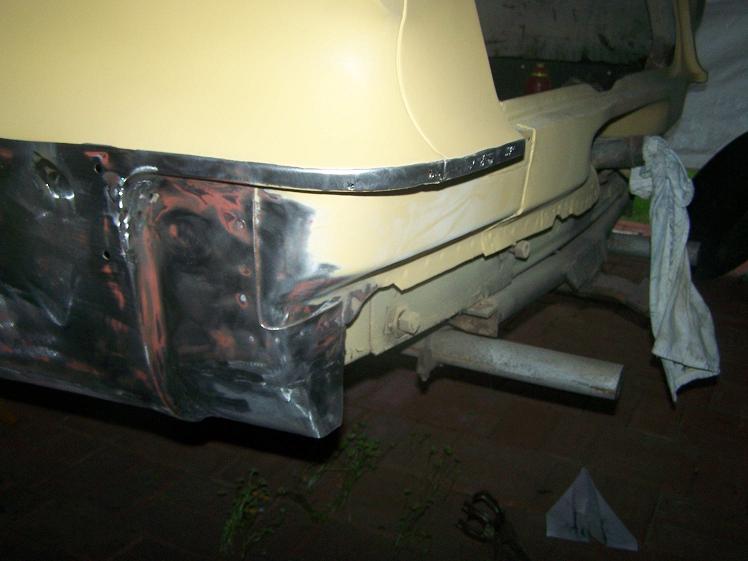
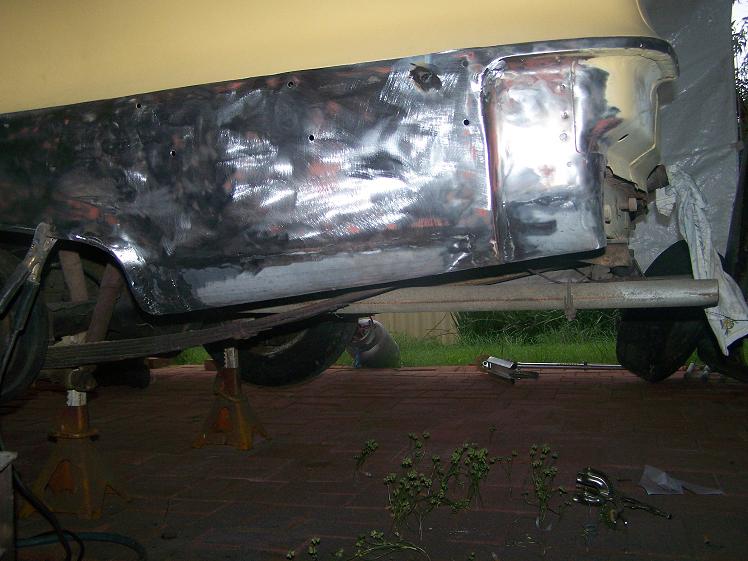
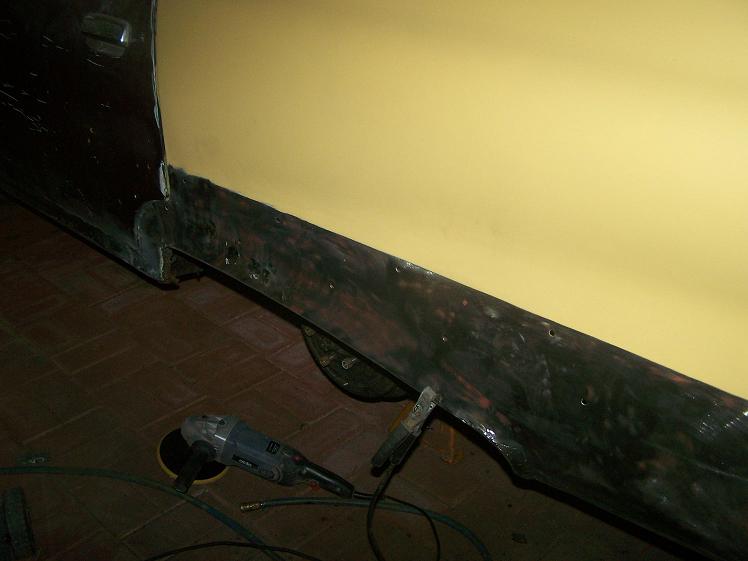
Location: Perth Australia | I have been busy with it this weekend, Stripped out the interior and the rear window and got stuck into cleaning it all out
to get serious with the roof repairs.
After a good clean and vacuum out of the loose rust, I practically sprayed the entire car with rust converter to slow down the cars decintergration.
I then got stuck into the rust repairs, pretty happy with the outcome so far, but still a long way to go.
Oh, and by the way, I managed to not set the car on fire this time
 (dodge lh roof repair 001.JPG) (dodge lh roof repair 001.JPG)
 (dodge lh roof repair 019.JPG) (dodge lh roof repair 019.JPG)
 (dodge lh roof repair 028.JPG) (dodge lh roof repair 028.JPG)
 (dodge lh roof repair 030.JPG) (dodge lh roof repair 030.JPG)
 (dodge lh roof repair 034.JPG) (dodge lh roof repair 034.JPG)
 (dodge lh roof repair 038.JPG) (dodge lh roof repair 038.JPG)
 (dodge lh roof repair 040.JPG) (dodge lh roof repair 040.JPG)
Attachments
----------------
dodge lh roof repair 001.JPG (88KB - 446 downloads)
dodge lh roof repair 019.JPG (65KB - 432 downloads)
dodge lh roof repair 028.JPG (113KB - 411 downloads)
dodge lh roof repair 030.JPG (92KB - 443 downloads)
dodge lh roof repair 034.JPG (84KB - 426 downloads)
dodge lh roof repair 038.JPG (61KB - 455 downloads)
dodge lh roof repair 040.JPG (63KB - 407 downloads)
|
|
| |
|
Expert 5K+
Posts: 8443
Location: Perth Australia | Just found this thread
Looks like he went through pretty much the same lot of repairs as I am doing to my dodge, except
he had a better start (not quite as bad as mine)
http://www.forwardlook.net/forums/forums/thread-view.asp?tid=18710&...
|
|
| |
|

Expert
Posts: 2308
Location: The Bat Cave, Fairborn, OH | Yes, I remember that car. He started out with what appeared to be a pretty decent 1960 Dodge Phoneix, but once he got into it it turned out to be quite a project. There was a lot of rust and bondo that he had to cut out. The last post in that thread was from May 2008, so he may have finished the car by now.
|
|
| |
|
Expert 5K+
Posts: 8443
Location: Perth Australia | Looks like it got sold as an unfinished project
http://www.forwardlook.net/forums/forums/thread-view.asp?tid=29773
So I dont know if it ever got back on the road, hope so
|
|
| |
|
Expert 5K+
Posts: 8443
Location: Perth Australia | I have been putting more steel into the roof on the other side while I have had some time
No real need for pics as it really looks about the same as the ones above.
The right C pillar is a bit worse though, about all that was holding it was the water chanel and the window lip.
Both inner and outer skins were not much thicker than tin foil where there was any metal. A lot of filler in there though.
Should have the outer skin done today, then comes the fun bit of makeing an inner skin right out to the water chanel.
At least I am getting good at useing my bender, I can get pretty close to the shapes I want now
All good practice for when I get stuck into the plymouth again
|
|
| |
|
Extreme Veteran
Posts: 320
Location: lakeview, ny 14085 | imopar380 - 2011-10-08 3:08 PM
What's wrong with the hood, is it rusted out as well? The roof rust on your Aussie cars amazes me. I live on Vancouver Island, on the coast, pacific Northwest, that has a fairly wet winter climate, dry in summer though. I've never seen any roof rust on any cars in this area, "lived here all my life".
not yet I hope!!!!!!!! |
|
| |
|
Expert 5K+
Posts: 8443
Location: Perth Australia | Just reached a small mile stone today
The roof is finally in primer ready for the cosmetic repairs
NO MORE WELDING ON THE ROOF YAAAAA
It will get fibreglass filler over the welds then normal filler then primer again
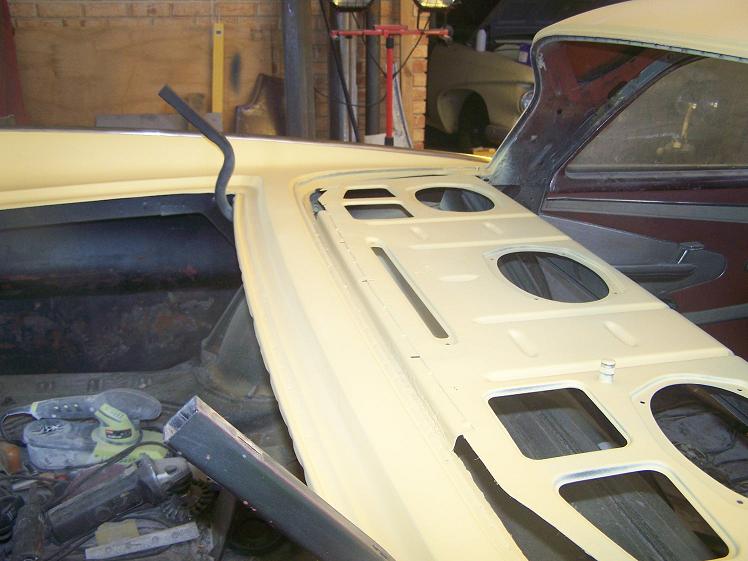
before I move onto the next bit which will be the parcel shelf and the bit
between the back window and the front of the trunk.
|
|
| |
|
Expert 5K+
Posts: 8443
Location: Perth Australia | Got the camera working today
Above I was asked about the graffiti, better late than never
Sort of progressing with the panel work slowly
Be getting into the rear panels in the next week or two.
John is sending me a good hood, so that bit should be easier, got new rocker panels waiting to go on and I
made a L/H dog leg and thats welded into place.
I have got onto a better (not rusted out) set of rear over riders for the bumper, so when they turn up, it will
be a trip to the chrome platers to see what they can do.
Still tons to do, but it is good looking at stuff done
 (dodge 001.jpg) (dodge 001.jpg)
 (dodge 002.jpg) (dodge 002.jpg)
 (dodge 003.jpg) (dodge 003.jpg)
 (dodge 004.jpg) (dodge 004.jpg)
 (dodge 005.jpg) (dodge 005.jpg)
 (dodge 006.jpg) (dodge 006.jpg)
 (dodge 007.jpg) (dodge 007.jpg)
 (dodge 008.jpg) (dodge 008.jpg)
 (dodge 009.jpg) (dodge 009.jpg)
 (dodge 012.jpg) (dodge 012.jpg)
 (dodge 013.jpg) (dodge 013.jpg)
 (dodge 014.jpg) (dodge 014.jpg)
Attachments
----------------
dodge 001.jpg (73KB - 434 downloads)
dodge 002.jpg (73KB - 421 downloads)
dodge 003.jpg (81KB - 422 downloads)
dodge 004.jpg (68KB - 413 downloads)
dodge 005.jpg (64KB - 405 downloads)
dodge 006.jpg (50KB - 457 downloads)
dodge 007.jpg (49KB - 408 downloads)
dodge 008.jpg (27KB - 412 downloads)
dodge 009.jpg (54KB - 396 downloads)
dodge 012.jpg (34KB - 408 downloads)
dodge 013.jpg (31KB - 400 downloads)
dodge 014.jpg (69KB - 396 downloads)
|
|
| |
|

Extreme Veteran
Posts: 337
Location: UK | Looking good Mick. Great pics. |
|
| |
|

Expert
Posts: 2788
Location: USA - KY |
Wow...it's great to be seeing all of this progress that you've been making.
Keep the photos coming, Mick!
|
|
| |
|
Expert 5K+
Posts: 8443
Location: Perth Australia | Thanks for the encouragement
I try to get something done each sunday
|
|
| |
|

Elite Veteran
Posts: 957
Location: Signal Mountain, TN | littlecarl - 2012-05-07 1:52 PM
Looking good Mick. Great pics.
What he said... looking much better already. 
|
|
| |
|
Expert 5K+
Posts: 8443
Location: Perth Australia | Got a bit bored with panelwork today so I did something different
 (dodge front clip 046 small.JPG) (dodge front clip 046 small.JPG)
 (dodge front clip 047 small.JPG) (dodge front clip 047 small.JPG)
Attachments
----------------
dodge front clip 046 small.JPG (94KB - 421 downloads)
dodge front clip 047 small.JPG (106KB - 395 downloads)
|
|
| |
|
Expert 5K+
Posts: 8443
Location: Perth Australia | Been at it a little more today
I am getting all the rust out of the left rear 1/4, almost there.
My head is itchy now from the grinder sparks, so I might have to take to wearing a hat.
Makeing the bottom part of the rear wheel arch was a huge chalenge, what I ended up doing
was to cut a strip of metak and then put cross cuts along both sides in towards the middle so I
could bend and tist it to get the shape.
Took lots of welding then to close all the slits, but it looks pretty right.
I have thought about haveing another go at getting a set of fender skirts to use as a judge
for the shape, but after 2 tries so far, its getting annoying.
Anyway, another few pics
 (dodge left rear quarter 001.jpg) (dodge left rear quarter 001.jpg)
 (dodge left rear quarter 002.jpg) (dodge left rear quarter 002.jpg)
 (dodge left rear quarter 003.jpg) (dodge left rear quarter 003.jpg)
Attachments
----------------
dodge left rear quarter 001.jpg (51KB - 397 downloads)
dodge left rear quarter 002.jpg (74KB - 401 downloads)
dodge left rear quarter 003.jpg (43KB - 429 downloads)
|
|
| |
|
Expert 5K+
Posts: 8443
Location: Perth Australia | First major bit of chromework has been kicked off today
Took the rear bumper to the chromers and 1 extra set of overiders to see if they were fixable and left them there
Its going to cost a bit but it will be the first major bit of bling
When I get it back, I will (no doubt) stare at it for hours
|
|
| |
|
Expert 5K+
Posts: 8443
Location: Perth Australia | for those that are not sure, its these trims I am on the hunt for
 (polaraFender Skirts1.jpg) (polaraFender Skirts1.jpg)
Attachments
----------------
polaraFender Skirts1.jpg (118KB - 402 downloads)
|
|
| |
|
Expert 5K+
Posts: 8443
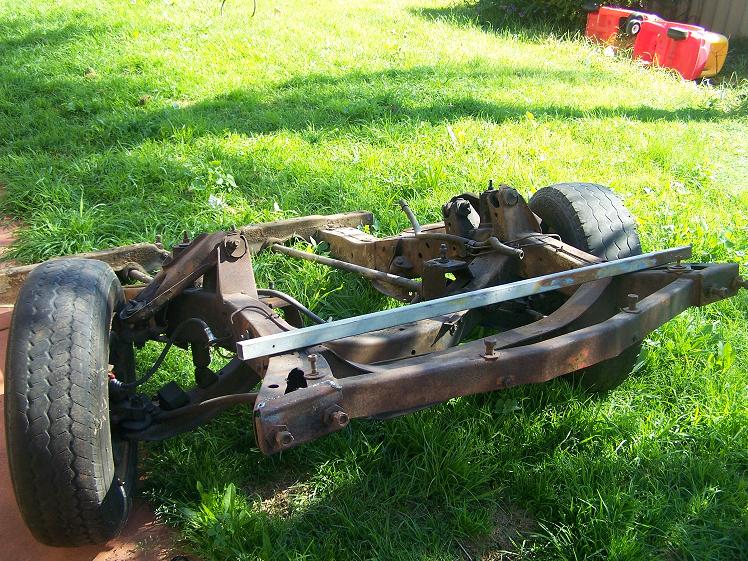
Location: Perth Australia | Got home a little early today so I thought I might try to loosen the ball joints (heard they could be a pig), anyway, bit of an anti climax really.
The socket I got to do the job was the right one for both upper and lower ones and I used a 3/4" L bar and a 4' long piece of tube and the loosened without a fight at all.
I hadnt removed the engine yet because I wanted the weight of it there incase the ball joints gave me a hard time.
So now its going to be all guns blazing as I get the engine and sub frame ect off.
I am going to get the sub frame and other stuff media blasted and some of it powder caoted while I do the rear fender work.
I am having trouble getting the wheel cutout right (I have made it 3 times now), it looks kinda right, then I look at it again and compare sides and to the plymouth and start again.
I recently got a set of steel fender skirts and am now using that as a template for the shape.
I am 1/2" to long for the skirts now, so I have to work out where I got it wrong as I had to make both ends of the cutout
I have thought of just adjusting the size of the skirts to fit, but I want to make it right
|
|
| |
|
Expert 5K+
Posts: 8443
Location: Perth Australia | Left quarter is done now, so I have moved onto the other side.
The right sides not quite so bad, but I have still had to replace the lower section behind the wheel.
That went really well (I must be learning), only about an hour of massaging to get it almost ripple free.
The dogleg is quite a surprise, Its been done before, and only has a little bit of rust, so easy to fix.
The person that did it before, only tacked it on, so I am fully welding his repair and I hope that will stop any futher rusting there.
I have 1/2 welded on the new sill (rocker) on the right side and will continue shortly (I hope).
Its pooring rain here right now and even though I am under a big roof, I havnt got walls all around me and I am getting a slight mist blowing onto the car thats annoying the welder, so I am having a rest (and a scotch).
Getting so close to rust free (sorta) cant wait
|
|
| |
|

Expert 5K+
Posts: 8947
Location: WHEELING,WV.>>>HOME OF WWVA | man , you got some heavy duty work goin on . you're lookin good so far . ---------------------------------------------later |
|
| |
|
Expert 5K+
Posts: 8443
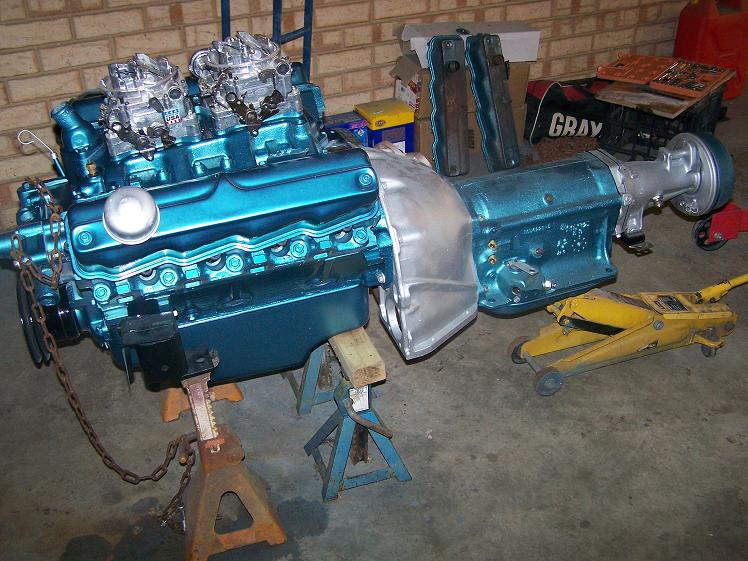
Location: Perth Australia | Allrighty
When rain stops 1 bit of play, you move onto the next thing
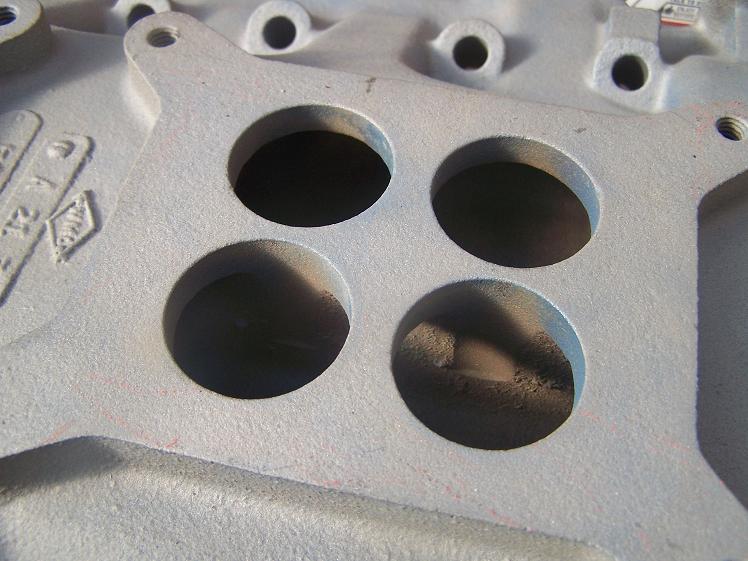
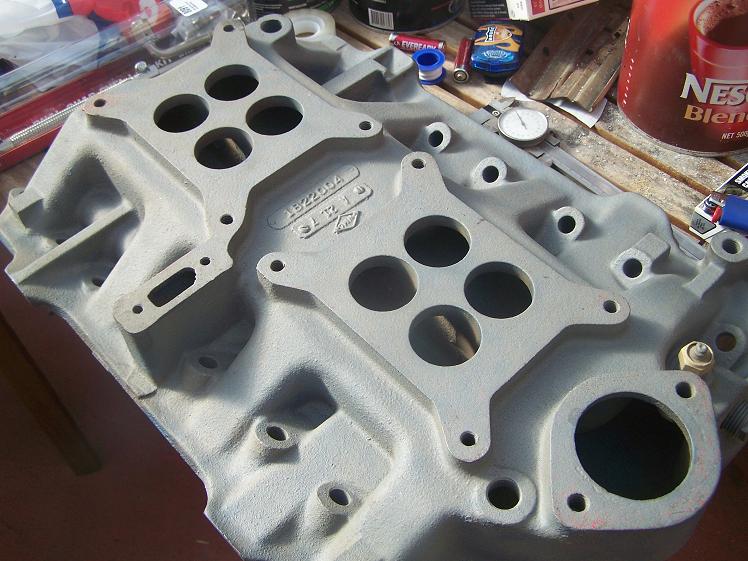
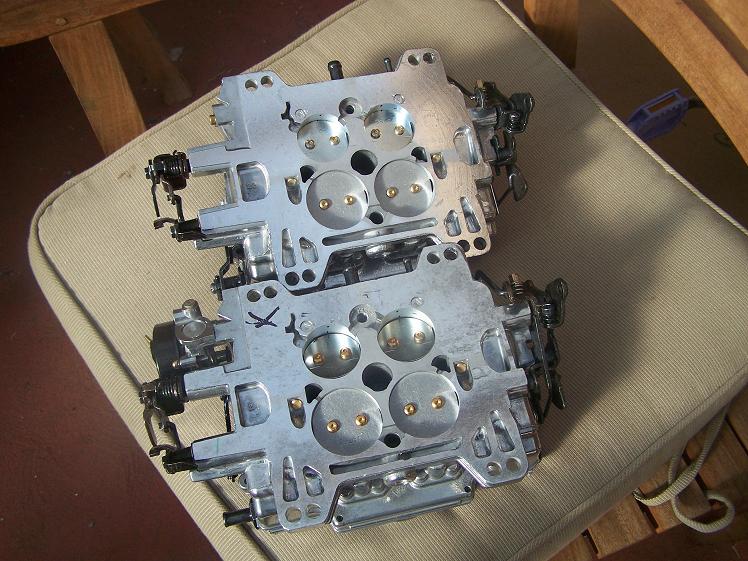
Oh and heres where I am at with the 2x4
I am going to block the ports and have done with it
 (Dodge 12 8 001.jpg) (Dodge 12 8 001.jpg)
 (Dodge 12 8 002.jpg) (Dodge 12 8 002.jpg)
 (Dodge 12 8 003.jpg) (Dodge 12 8 003.jpg)
 (Dodge 12 8 004.jpg) (Dodge 12 8 004.jpg)
 (Dodge 12 8 005.jpg) (Dodge 12 8 005.jpg)
 (Dodge 12 8 012.jpg) (Dodge 12 8 012.jpg)
 (Dodge 12 8 013.jpg) (Dodge 12 8 013.jpg)
 (Dodge 12 8 014.jpg) (Dodge 12 8 014.jpg)
Attachments
----------------
Dodge 12 8 001.jpg (116KB - 405 downloads)
Dodge 12 8 002.jpg (75KB - 410 downloads)
Dodge 12 8 003.jpg (89KB - 389 downloads)
Dodge 12 8 004.jpg (102KB - 406 downloads)
Dodge 12 8 005.jpg (101KB - 403 downloads)
Dodge 12 8 012.jpg (97KB - 393 downloads)
Dodge 12 8 013.jpg (98KB - 424 downloads)
Dodge 12 8 014.jpg (79KB - 386 downloads)
|
|
| |
|
Expert 5K+
Posts: 8443
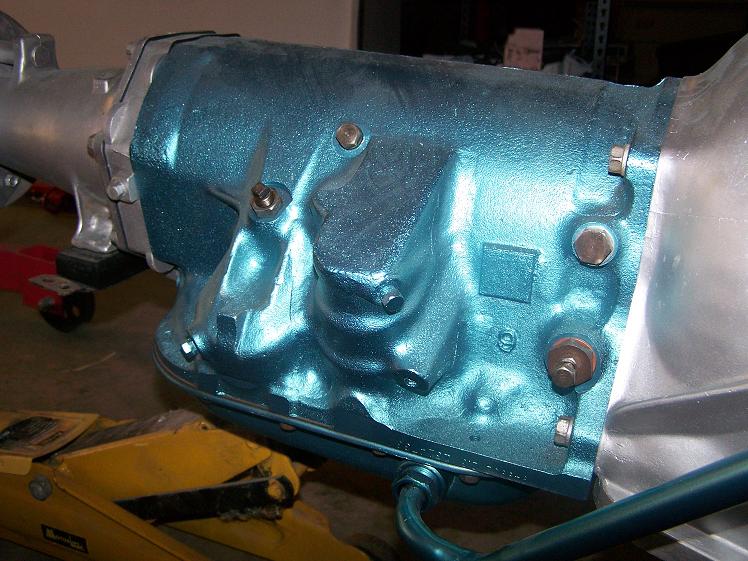
Location: Perth Australia | Dont know if its getting better or worse
 (Dodge 26 8 004.jpg) (Dodge 26 8 004.jpg)
 (Dodge 26 8 005.jpg) (Dodge 26 8 005.jpg)
 (Dodge 26 8 006.jpg) (Dodge 26 8 006.jpg)
Attachments
----------------
Dodge 26 8 004.jpg (101KB - 390 downloads)
Dodge 26 8 005.jpg (101KB - 392 downloads)
Dodge 26 8 006.jpg (152KB - 422 downloads)
|
|
| |
|
Elite Veteran
Posts: 982
Location: Upper Hunter NSW Australia | ttotired - 2012-08-26 4:38 PM
Dont know if its getting better or worse
...................
...........
Nah, you're getting betterer Mick !!
Rotisserie looks good, something that's on my wish list.
And speaking of rotisserie, if I can offer you some advice................
See if you can get a steel bar between the two bottom legs of both rotisseries if you can.
I made a rotisserie a few years back for a mate for his LC Torana out of two engine stands and didn't make a connecting bar between the two rotisseries and it nearly collapsed on him one day when he was turning it.
Hope that helps.
..................
...........
.
Support bar fixed the problem........... wouldn't like to see your pride and joy do the same thing. |
|
| |
|
Expert 5K+
Posts: 8443
Location: Perth Australia | Thanks Terry
It does have the conecting piece, it telescopes out, but I didnt have it conected up because I just finished pulling the rear end out.
It was a big day
|
|
| |
|
Expert 5K+
Posts: 8443
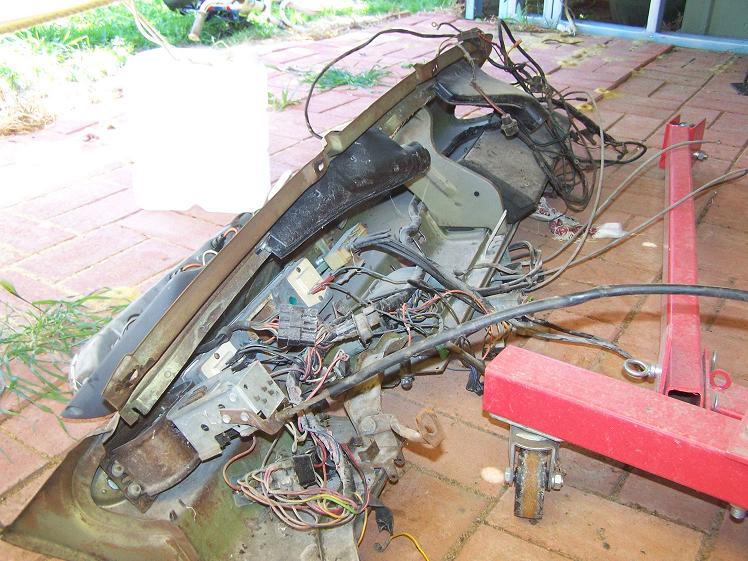
Location: Perth Australia | Decided this morning (public holiday here) to get stuck into removing the stuff from the firewall and getting the dash out.
While I was at it, I thought seeing as how the hood hinges were still attached to the firewakk, I would see if I could rig something up to get the springs off and hold them open for cleaning and painting.
The pics below show how I did it.
Getting the dash out was a bit of a mission, I wanted to keep as much still attached to it as possible so when I get to painting the dash and genarally getting all the stuff ready, I wouldnt forget how it all went.
I have taken over 60 pics of this, so if anyone wants a pic of something in particular, I will probably have it
OH and of coarse everything is backwards for the people in the states.
Edited by ttotired 2012-10-01 1:39 AM
 (Dash removal (37).jpg) (Dash removal (37).jpg)
 (Dash removal (38).jpg) (Dash removal (38).jpg)
 (Dash removal (42).jpg) (Dash removal (42).jpg)
 (Dash removal (47).jpg) (Dash removal (47).jpg)
Attachments
----------------
Dash removal (37).jpg (87KB - 397 downloads)
Dash removal (38).jpg (72KB - 395 downloads)
Dash removal (42).jpg (100KB - 402 downloads)
Dash removal (47).jpg (108KB - 415 downloads)
|
|
| |
|
Elite Veteran
Posts: 654
Location: NC | My hat is off to you, your expertise, your patience and your passion. It's been almost 13 months (in 10 days) since your 1st post. I certainly wish that I could do what you are doing and have done. I salute you!
Dave in NC |
|
| |
|
Expert 5K+
Posts: 8443
Location: Perth Australia | I didnt realise it had been that long already
Almost a year since it arrived, wow
I hope I get it back together faster than it came apart.
Thanks for the compliments as well, the "Skills" are really being learnt as I go, this welding
sheet metal sucks :), I will be very happy when thats bits all done.
Then I can start all over again on the plymouth 
|
|
| |
|
Expert 5K+
Posts: 8443
Location: Perth Australia | I have given the body shell another go with the rust treatment in the hope (if I dont find something to stop me) that I
can spray all the non shiney parts of it in body deadener this weekend.
I intend to spray under the roof, floors insided and out and I am going to try to get inside the rocker panels to try to
save that job from ever being done again as well.
As I have said in the chrome thread, I got the rear bumper back the other day (well most of it) so I want to do the
blackouts and assemble it as much as I can so its ready to go back on.
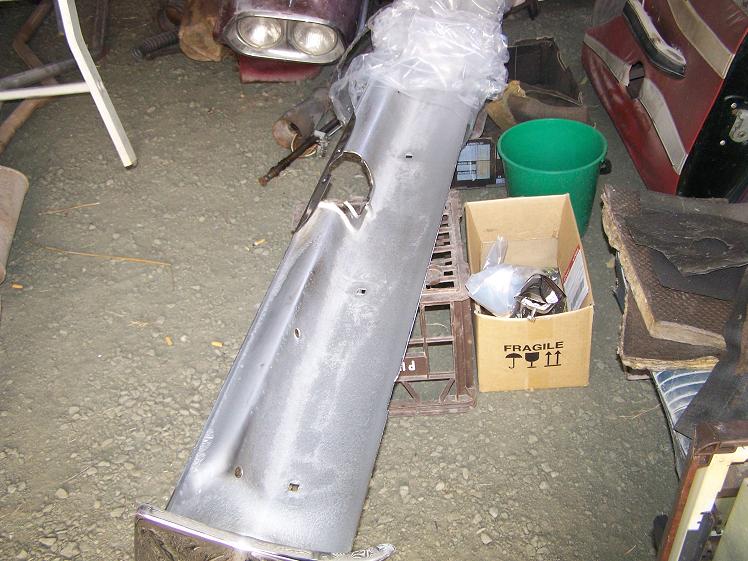 (rear bumper 001 small.JPG) (rear bumper 001 small.JPG)
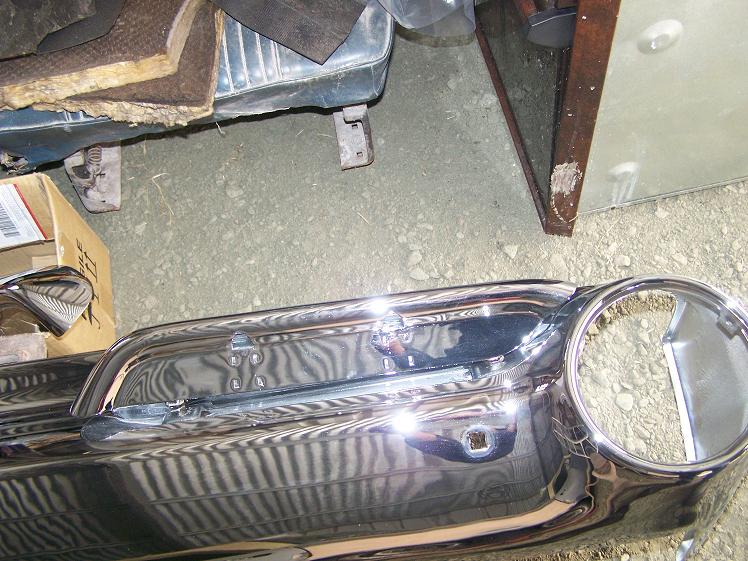 (rear bumper 005 small.JPG) (rear bumper 005 small.JPG)
Attachments
----------------
rear bumper 001 small.JPG (94KB - 363 downloads)
rear bumper 005 small.JPG (106KB - 384 downloads)
|
|
| |
|
Expert 5K+
Posts: 8443
Location: Perth Australia | Oh I have sent an email to Big M to see if he has these parts, but If anyone else has them (or whatever) please let me know
|
|
| |
|
Expert 5K+
Posts: 8443
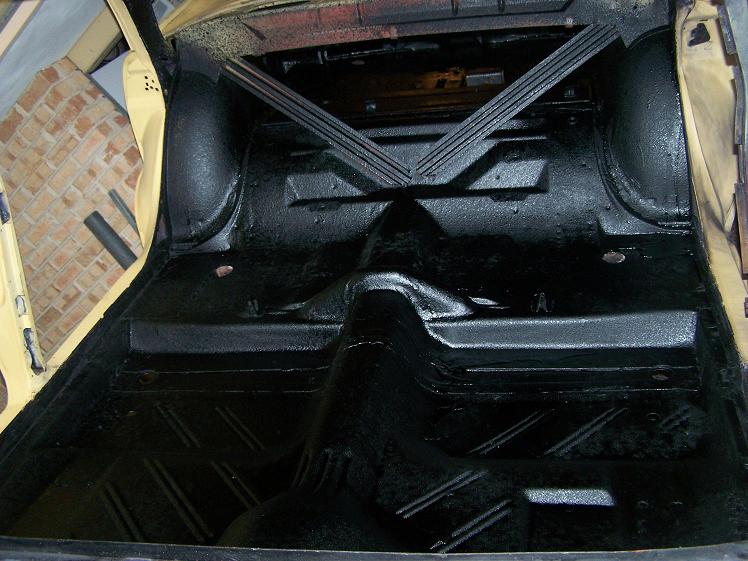
Location: Perth Australia | Did one of the messiest, yuk jobs today
Put body deadener/under coat pretty much everywhere
Even with paper overalls ect on, I am sure I wont rust now
 (Body deadener 001 small.JPG) (Body deadener 001 small.JPG)
 (Body deadener 002 small.JPG) (Body deadener 002 small.JPG)
Attachments
----------------
Body deadener 001 small.JPG (87KB - 376 downloads)
Body deadener 002 small.JPG (117KB - 375 downloads)
|
|
| |
|
Expert 5K+
Posts: 8443
Location: Perth Australia | Bit of a trial fit of the shiny stuff today just to see what I missed and fitted the dual antennas.
Getting closer to actual paint, a few tidy ups and I will bite the bullet on colour
 (Rear trial fit 001 small.JPG) (Rear trial fit 001 small.JPG)
 (Rear trial fit 002 small.JPG) (Rear trial fit 002 small.JPG)
 (Rear trial fit 003 small.JPG) (Rear trial fit 003 small.JPG)
Attachments
----------------
Rear trial fit 001 small.JPG (94KB - 399 downloads)
Rear trial fit 002 small.JPG (94KB - 384 downloads)
Rear trial fit 003 small.JPG (86KB - 383 downloads)
|
|
| |
|

Elite Veteran
Posts: 1120
Location: Brisbane, Australia | It is starting to look the part, Mick
cheers
Bob
PS I imagine after all that extra body deadner on you all you need now is feathering!!! |
|
| |
|
Expert 5K+
Posts: 8443
Location: Perth Australia | Seeing as I have really spent the day just messing around, I thought I might look at how low I would like it
A little lower might be better?
 (Rear trial fit 4 small.JPG) (Rear trial fit 4 small.JPG)
Attachments
----------------
Rear trial fit 4 small.JPG (77KB - 380 downloads)
|
|
| |
|
Veteran
Posts: 234
Location: Chambersburg,PA | Nice work,looks great!
Edited by Desotorandy 2012-10-28 11:09 AM
|
|
| |
|

Expert
Posts: 1730
Location: Michigan | I wouldn't go any lower than that. Assuming your going to have nice wheels, you want to see them. It's part of what makes the car. You already have 1/3 of the wheel hidden. |
|
| |
|
Expert 5K+
Posts: 8443
Location: Perth Australia | Nothing much to report this week
I got the new fuel tank for it and have sat it in place to check the fitment, it looks fine but I will have to see once the bumper is on properly.
It has a slightly shorter and straight filler neck, the original one has a slight bend.
I also took the fuel door and a couple of reverse light rings to the plater to get done (to replace the ones he lost) and the
vent from under the windscreen.
Not sure if anyone has seen it yet, but there is a front bumper set on ebay now that I am negociating with the guy about.
The ones off mine are pretty bad and I think this will be a cheaper option.
The other thing is they wont have holes for the front over riders and the over riders off mine are bad.
The plan is to repair and fit them later (once the car is going again).
|
|
| |
|
Expert 5K+
Posts: 8443
Location: Perth Australia | I bit the bullet
Paint colour was chosen and bought
Got stuck into it and put the paint on.
 (1HR after paint 001 small.JPG) (1HR after paint 001 small.JPG)
 (1HR after paint 002 small.JPG) (1HR after paint 002 small.JPG)
 (1HR after paint 003 small.JPG) (1HR after paint 003 small.JPG)
 (1HR after paint 004 small.JPG) (1HR after paint 004 small.JPG)
 (1HR after paint 005 small.JPG) (1HR after paint 005 small.JPG)
 (1HR after paint 006 small.JPG) (1HR after paint 006 small.JPG)
 (1HR after paint 007 small.JPG) (1HR after paint 007 small.JPG)
Attachments
----------------
1HR after paint 001 small.JPG (122KB - 392 downloads)
1HR after paint 002 small.JPG (97KB - 376 downloads)
1HR after paint 003 small.JPG (131KB - 372 downloads)
1HR after paint 004 small.JPG (131KB - 379 downloads)
1HR after paint 005 small.JPG (95KB - 369 downloads)
1HR after paint 006 small.JPG (92KB - 374 downloads)
1HR after paint 007 small.JPG (136KB - 363 downloads)
|
|
| |
|
Elite Veteran
Posts: 1172
Location: Georgia | Wow! Nice colors, Michael! She'll be stunning!
Pete |
|
| |
|
Elite Veteran
Posts: 1120
Location: Brisbane, Australia | Gees doesn't that colour lift it. Great colour choice Mick, cant wait to see it in the flesh!!! you are no slouch!! |
|
| |
|
Extreme Veteran
Posts: 314
| Love the color! Where did you get the rotisserie? |
|
| |
|
Expert 5K+
Posts: 8443
Location: Perth Australia | The rotisserie came from a tool importer in Perth.
Wasnt a bad price either, but the car is a little heavy for it.
The cars colour is actually metallic green, but it really looks blue depending on what angle you look at it from.
|
|
| |
|
Expert
Posts: 1730
Location: Michigan | Jeez if thats green my monitor is color blind... very vibrant blue to me. Looks great though! |
|
| |
|
Expert 5K+
Posts: 8443
Location: Perth Australia | The colour seems to depend on the light its in
In the pics, it looks like a really nice blue to me as well, but it is green.
I have been re assembling the diff ect the last few days so I can get it at least 1/2 off the rotisserie.
I started to polish it to see how I did, I think I need to cut it back a fair bit and re clear it, to much orange peel.
I think the jet on the gun I used was to small, but I didnt get even 1 run, pretty happy about that.
|
|
| |
|
Location: Parts Unknown | I haven't looked at this thread in a long time. When I saw the recent posts, I had to go back to the
beginning to remind myself on exactly which car this was.
Wow ! You dun made that nasty POS look real good !!!!
Very inspiring, indeed. 
|
|
| |
|
Location: North Australia | Doc, you are as smooth as hessian undies!
Mick, she is looking good, and I agree, inspiring.
Steve. |
|
| |
|
Location: Parts Unknown | Burlap jockstrap ? 
Hey, they're all POS's when we find them in barns and fields. At least all the ones I find are !
|
|
| |
|
Location: North Australia | 'Doc. Thats because you are concentrating on those silly old obsolete Desoto's, start looking for an IMPERIAL!
Steve. |
|
| |
|
Expert 5K+
Posts: 7807
Location: Williams California | That is going to be a nice color combination, Mick!!
---John |
|
| |
|
Regular
Posts: 92
Location: montevallo, alabama | like i said i gotta quit bitchin about my little car after seeing you guys cars, oh and I want some of those purdy shiny
chromy thingys for my car too. My bumpers really are tired and fading . how much are you guys typically paying for rechroming bumpers and headlite bezels and etc. wonder how hard it would be to put some of those roof vents on my 2 door. I think they are so cool. what do ya'll think about it, and yes i said ya'll cause im from alabama and its legal down here to say words like that. lol
Edited by recondo 2012-12-06 11:02 PM
|
|
| |
|
Expert
Posts: 2788
Location: USA - KY |
Wow! Amazing progress there, Mick! Nice job!
I'm liking that colour combo...snazzy!
BTW...fender skirts will be winging your way VERY soon! (I know, I know...what's the rush? )
|
|
| |
|
Expert 5K+
Posts: 8443
Location: Perth Australia | The bumpers were pretty expensive, the rears I got done here, the fronts came up on ebay at about 1/2 the price (including shipping) that it was going to cost for the same guy to chrome them.
Those roof vent things are only held on with 2 self tapping screws, so easy to mount, but putting the ridge into the roof for them to fit into would be a big mission.
|
|
| |
|
Expert 5K+
Posts: 8443
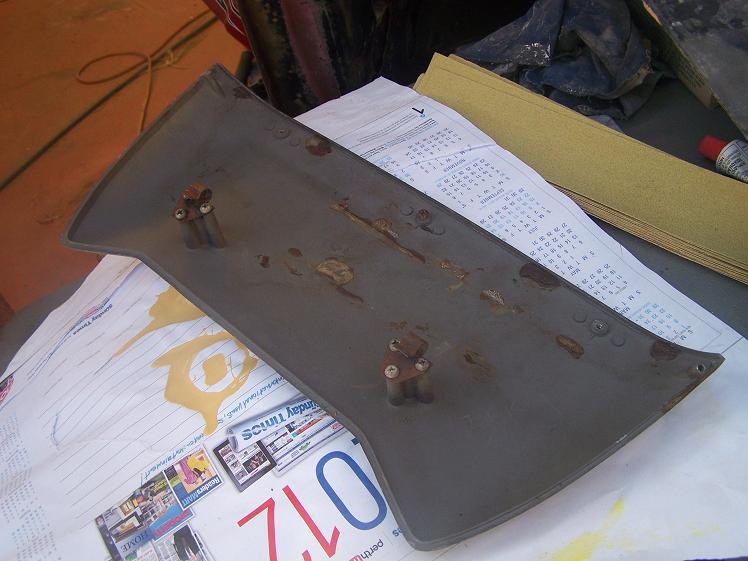
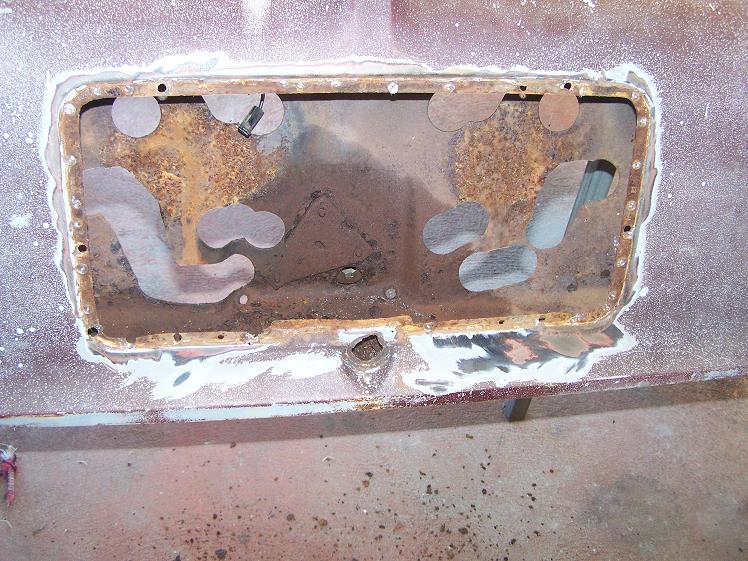
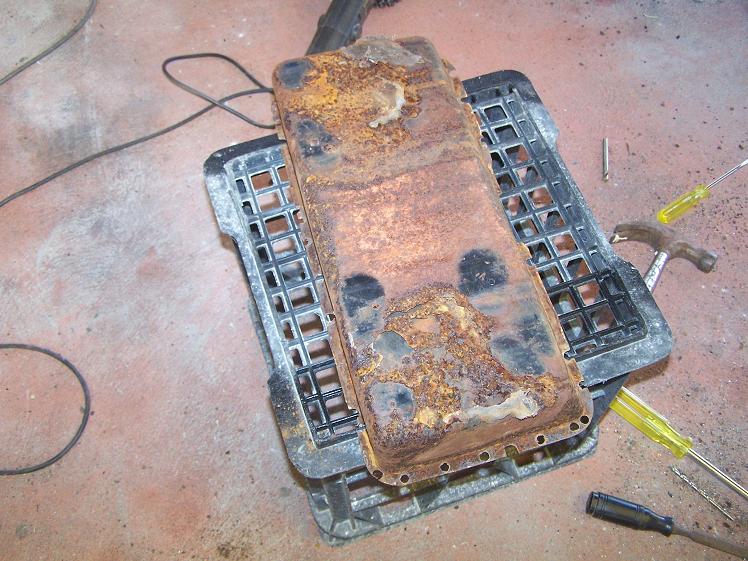
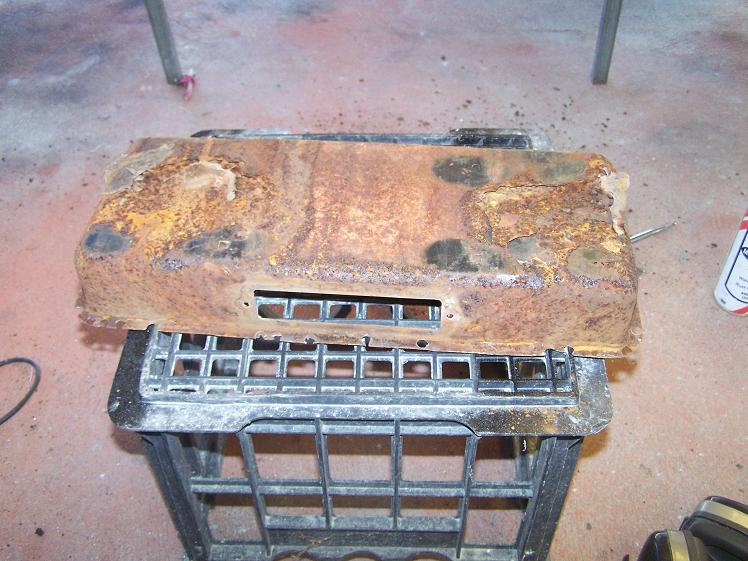
Location: Perth Australia | Ok heres the next bit to get the treatment
The boot lid isnt to bad from what I can see (see what its like with no paint).
The license plate housing is very sad though.
Funny thing is, as this is an Aussie Dodge, they modified the license plate housing to suit our plates.
Its longer by about 2-3".
 (Boot lid 001.jpg) (Boot lid 001.jpg)
 (Boot lid 002.jpg) (Boot lid 002.jpg)
 (Boot lid 003.jpg) (Boot lid 003.jpg)
 (Boot lid 004.jpg) (Boot lid 004.jpg)
 (Boot lid 005.jpg) (Boot lid 005.jpg)
Attachments
----------------
Boot lid 001.jpg (89KB - 356 downloads)
Boot lid 002.jpg (115KB - 341 downloads)
Boot lid 003.jpg (121KB - 365 downloads)
Boot lid 004.jpg (103KB - 376 downloads)
Boot lid 005.jpg (92KB - 347 downloads)
|
|
| |
|
Expert
Posts: 1730
Location: Michigan | Sand blast and powder coat.... |
|
| |
|
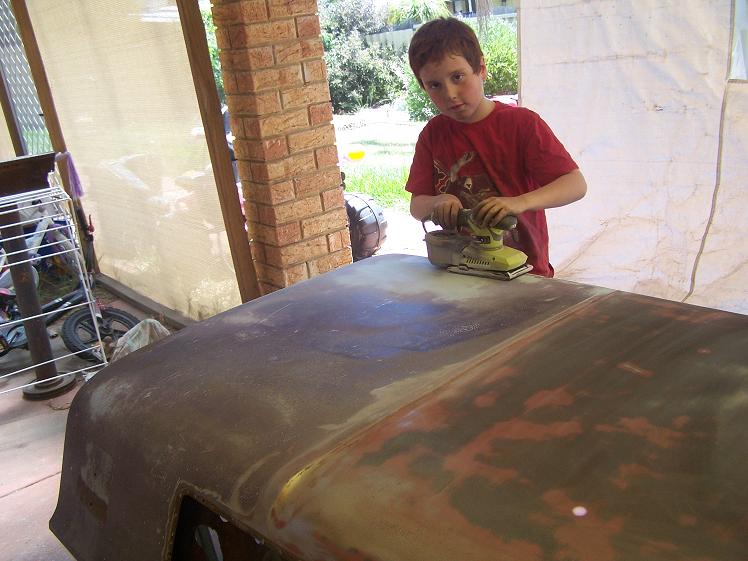
Expert 5K+
Posts: 8443
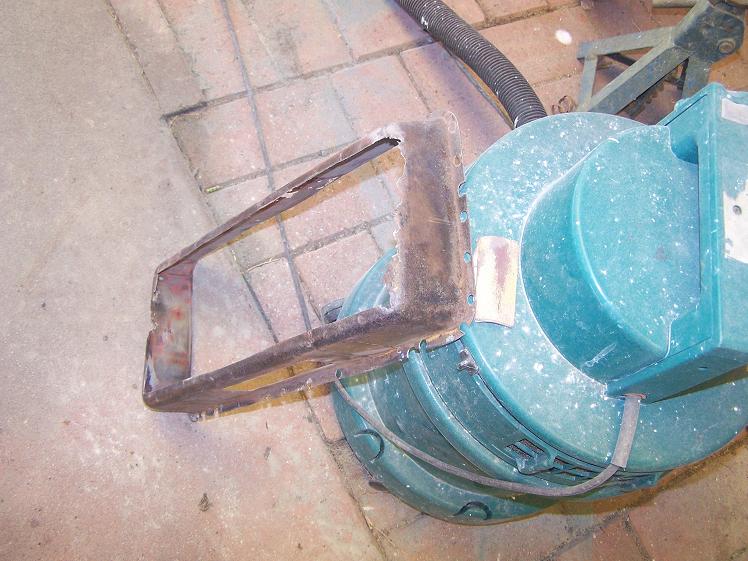
Location: Perth Australia | I am fixing the number plate recess
And I have been getting a little help from my youngest son
 (Boot lid repair 001.JPG) (Boot lid repair 001.JPG)
 (Boot lid repair 004.JPG) (Boot lid repair 004.JPG)
 (Boot lid reair 005.JPG) (Boot lid reair 005.JPG)
Attachments
----------------
Boot lid repair 001.JPG (81KB - 370 downloads)
Boot lid repair 004.JPG (88KB - 353 downloads)
Boot lid reair 005.JPG (75KB - 366 downloads)
|
|
| |
|
Veteran
Posts: 116
| Are you leaving it right hand drive ? I would change mine to right hand drive |
|
| |
|
Expert 5K+
Posts: 8443
Location: Perth Australia | Oh yes
I think its what makes it rare
Only reason that its still a car really.
I was going to wreck the car for my plymouth, useing all r/h/d stuff on it so the plymouth would have had a period
correct conversion useing all mopar parts.
Its amazeing how much they did change to accomodate the r/h drive and the laws of the day.
The basics of the car are the same, but things like the number plate recess, r/h front floor, heater and fresh air plenum, even the park brake
system is different.
Just lots of stuff you dont really realise until you really look.
The plans for the plymouth now are to take it back to l/h/d because the conversion that someone started is pretty bodgy and
I think it will be easier to put back to standard.
|
|
| |
|
Expert 5K+
Posts: 8443
Location: Perth Australia | The boot lid is finally painted and back on the car, that number plate recess was a real pain.
I have not cut the paint back yet though, I want to let it all harden fully first.
Today I got stuck into the sub frame, stripping all the suspention and brackets and stuff off it.
lower ball joints were really bad, but they are off the lower control arm now.
I am planning on getting the sub frame blasted, but still not really sure (depends on how lazy I get)
No pics today, nothing that exciting to see
Oh, just for intrests sake, I found the vin number stamped on the L/H rail just near the idler arm
mount (where the steering box would be on a L/H/D car)
Not sure if it was an Aussie only thing or not, but whe I get the chance, I will have to go look at the plymouth and see if it has one there
|
|
| |
|
Expert 5K+
Posts: 8443
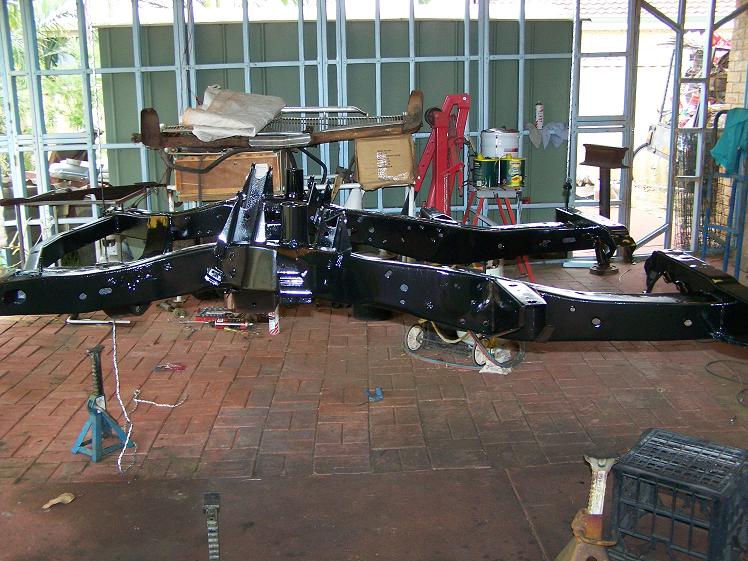
Location: Perth Australia | No numbers on the plymouth, so I guess it was an Aussie thing
Anyway, I have been slowly attacking the subframe with a wire brush and whatever else I could get my hands on to get the rust and crud off and its looking a lot better
I have also given it a rust treatment.
I am going to paint it basic black (hopefully on the weekend), but cant sort of work out how best to hold it.
At the moment, I have it hung by chains from the rafters but it still wont be easy to get to a lot of it.
I was going to put it on my rotissory, but it wont fit without a lot of modification.
I got another present today from the US, the lower dash gauges part (Remember, this is an Aussie dodge, so it has a 60 plymouth dash) with a clock in it.
First thing I did was tried the clock, didnt work, checked the fuse and found that it lost connection because the holder was rusty.
Sand blasted the fuse holder and tried again, this time, it sounded like a machine gun, so I opened it up and found that the catcher tooth thing that holds the gear back when it energises was faceing the wrong way.
Looking closely at it, the shaft that the gear is on could move up and downd a bit, so I turned the tooth the right way around and tightened up the end play on the shaft and tried again.
It worked yahooo I have had it going now since 9.30 am and its now 9.45pm and its kept time up till now.
I also gave it a light oiling
Pretty chuffed
|
|
| |
|
Expert
Posts: 2788
Location: USA - KY |
I'm chuffed for ya, Mick!
Great progress...thanks for the update!
Post more pic's when you can!
|
|
| |
|
Expert
Posts: 2633
Location: Minor Hill, TN | Good choice for colors looking good |
|
| |
|
Expert 5K+
Posts: 8443
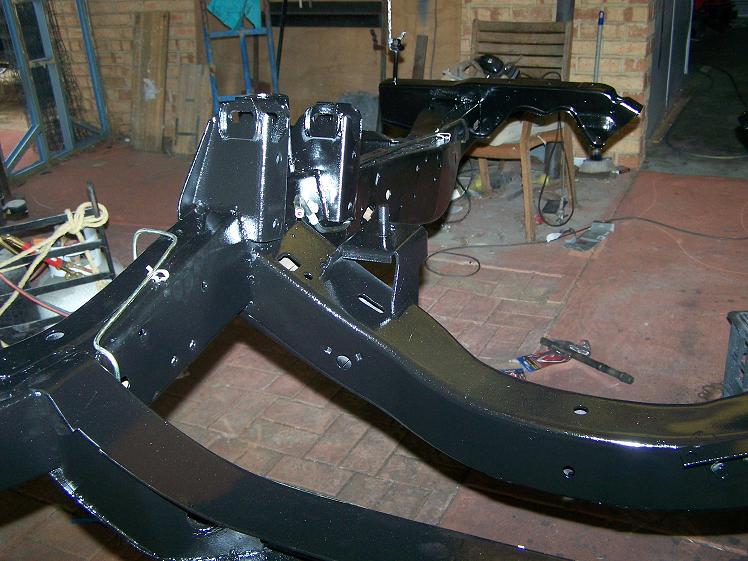
Location: Perth Australia | Pained the subframe today and made up new fuel and brake lines for it
Now comes the front suspention
50 odd year old dirt and grease dont come off that easy, but better than rust
 (subfame 001s.JPG) (subfame 001s.JPG)
 (subfame 002s.JPG) (subfame 002s.JPG)
 (subfame 005s.JPG) (subfame 005s.JPG)
 (subfame 006s.JPG) (subfame 006s.JPG)
Attachments
----------------
subfame 001s.JPG (94KB - 345 downloads)
subfame 002s.JPG (106KB - 350 downloads)
subfame 005s.JPG (79KB - 362 downloads)
subfame 006s.JPG (89KB - 342 downloads)
|
|
| |
|
Location: North Australia | Looking good Mick. Hopefully, one day I can park my 60 next to yours.
Steve. |
|
| |
|
Expert 5K+
Posts: 8443
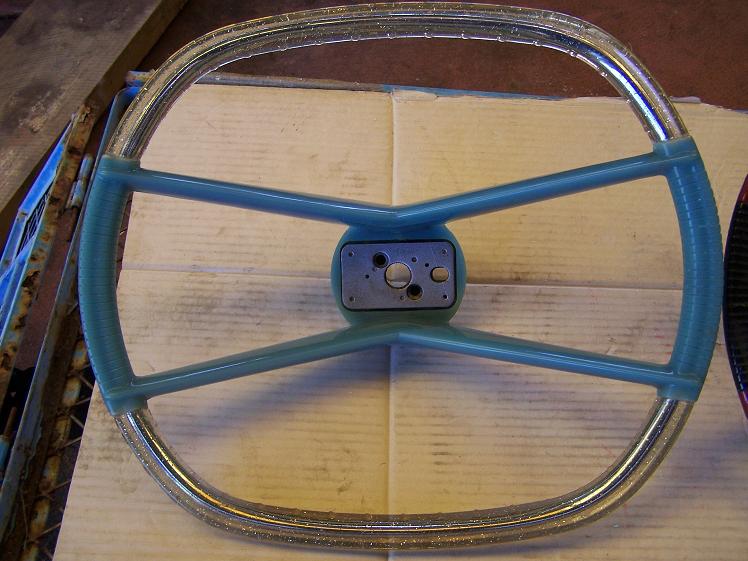
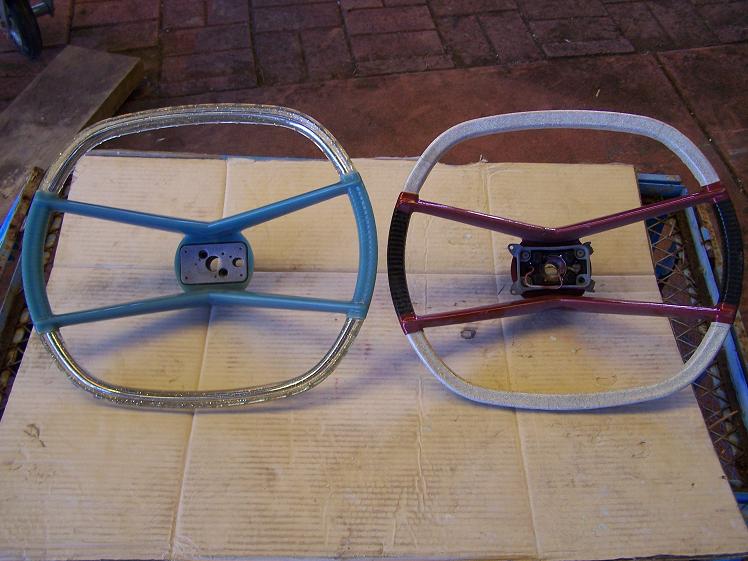
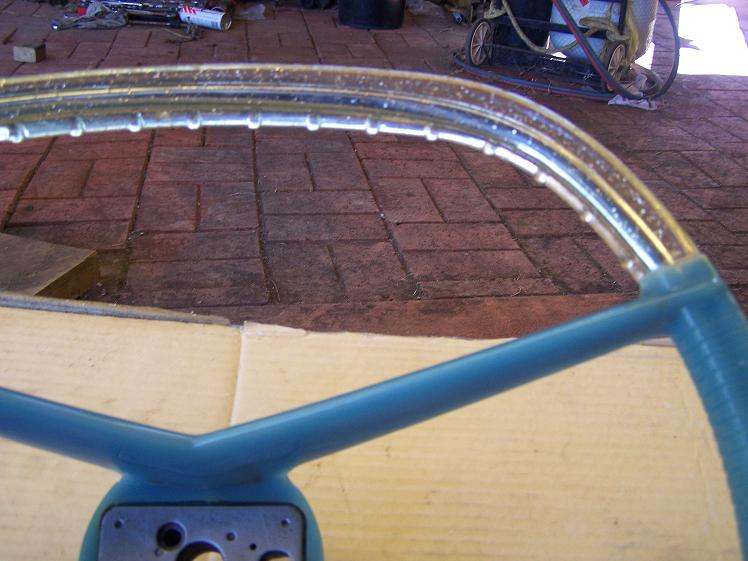
Location: Perth Australia | I got my NOS Plymouth aero wheel today from George Laurie, Awesome
Only slight yellowing and no cracks
I have ideas to use this wheel to fix the other piece of rubbish I bought and use the recast one
on the dodge to go with the plymouth dash it has.
Just have to find all the bits that go with the wheel
 (Aero wheel 001s.JPG) (Aero wheel 001s.JPG)
 (Aero wheel 002s.JPG) (Aero wheel 002s.JPG)
 (Aero wheel 003s.JPG) (Aero wheel 003s.JPG)
 (Aero wheel 004s.JPG) (Aero wheel 004s.JPG)
 (Aero wheel 005s.JPG) (Aero wheel 005s.JPG)
Attachments
----------------
Aero wheel 001s.JPG (80KB - 358 downloads)
Aero wheel 002s.JPG (76KB - 372 downloads)
Aero wheel 003s.JPG (83KB - 330 downloads)
Aero wheel 004s.JPG (71KB - 337 downloads)
Aero wheel 005s.JPG (79KB - 325 downloads)
|
|
| |
|
Expert 5K+
Posts: 8443
Location: Perth Australia | I went out and bought the materials to make the mold ect
The guy was telling me how to make the mold, wow, its going to be a mission
I will stick that in the future projects section for now.
I'll do it when I am feeling the need to create something
|
|
| |
|
Extreme Veteran
Posts: 337
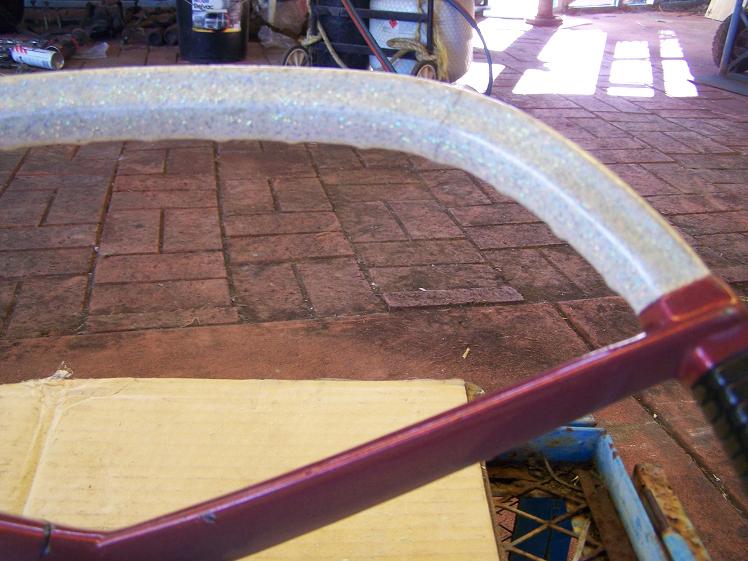
Location: UK | The blue wheel looks the nuts.. Not sure about that red one.. What has happened to that?
Coming on Mick. I like it.. Looks like you're having better weather than here in the UK.. We are still having snow!! |
|
| |
|
Expert 5K+
Posts: 8443
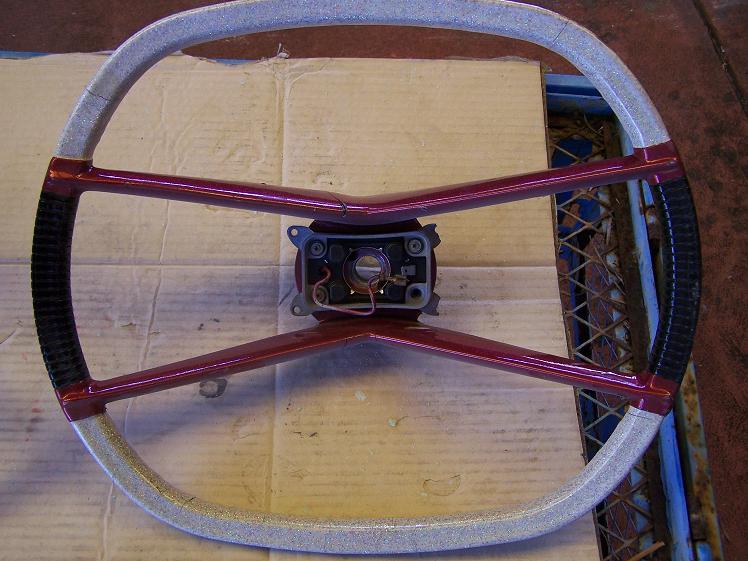
Location: Perth Australia | The red wheel was bought that way from someone that called it a restored wheel
When I first got it, there were no cracks in it
I was planning on useing it in the plymouth and painting the centre section to match the car.
As you can see, the wheel cracked up just sitting in the garage, so now I will try to re mold it.
We will see how it comes out. surely, I cant make it worse
|
|
| |
|
Extreme Veteran
Posts: 337
Location: UK | No quite lol.. Keep us posted on that.. I'm still looking into doing my dodge one that is sat under my dining table (I never eat at it) and everytime I look under the table and see the wheel I'm itching to do it.. Such a cool looking wheel (along with the plymouth aero one of course!!). |
|
| |
|
Expert 5K+
Posts: 8443
Location: Perth Australia | My dodge one needs to be done as well
Pretty much all the clear (yellow) has fallen off one side of it
Not sure what to do about that one
I would like to fix it, but I might send that one out, dunno yet
|
|
| |
|
Expert 5K+
Posts: 8443
Location: Perth Australia | A bit of a mile stone today
The ol dodge has 4 wheels again
 (subframe install 004s.JPG) (subframe install 004s.JPG)
 (subframe install 006s.JPG) (subframe install 006s.JPG)
 (subframe install 008s.JPG) (subframe install 008s.JPG)
Attachments
----------------
subframe install 004s.JPG (96KB - 354 downloads)
subframe install 006s.JPG (141KB - 343 downloads)
subframe install 008s.JPG (141KB - 353 downloads)
|
|
| |
|
Veteran
Posts: 107
Location: Australia | Starting to look like a bought one, she's a ripper. You asked earlier in the thread for some rear wheel spats, did you get a set or are you still looking if you are still looking let me know as a mate of mine has a real nice set (stainless Steel) looks smik, he has got them made for others so if your interested let me know. Also the dual quads on the 318 I have done the same but I am concerned about the calibration of the 500's, it would be good to keep in touch. |
|
| |
|
Expert 5K+
Posts: 8443
Location: Perth Australia | Hey Eric
I have the stainless ones, but they are for the plymouth, I have a set of the normal steel ones which I am
going to use on the dodge (just have to get around to painting them).
The 2 500s are going to be a bit of a mission, I think.
I have a staged throttle linkage for them, but I did read somewhere that you can get chokes to bring the secondaries down a bit.
A total of 1000 cfm would be quite a bit to much for a 318 (I think 700 ish for a hottie would be about right), but (to be honest) I want them more for the looks.
If they turn out to be a pig set up, I do have a 4 barrel manifold I can use.
Funny thing is, the 2x4 has smaller (and all the same size) holes than the edelbrocks, but the 4 barrel manifold has smaller again.
The carb that it was designed for must have been tiny
I am very close now to pulling the engine apart to see what I have, so that fun will start in here soon
|
|
| |
|
Expert 5K+
Posts: 8443
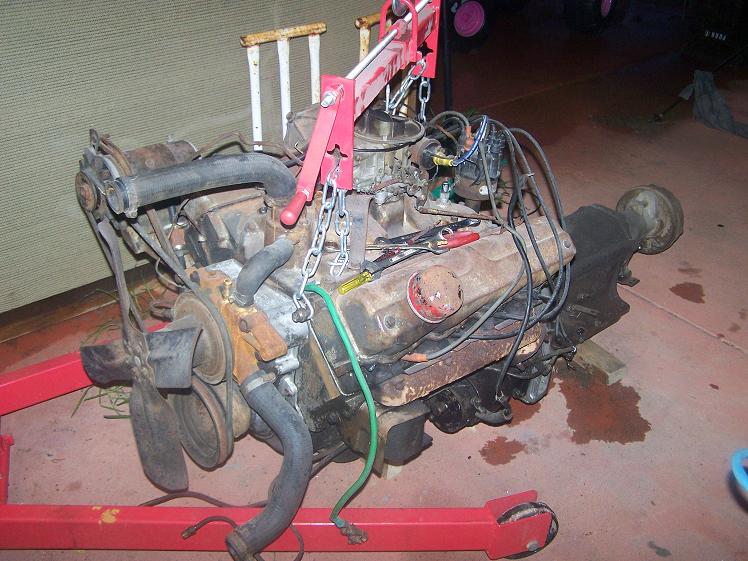
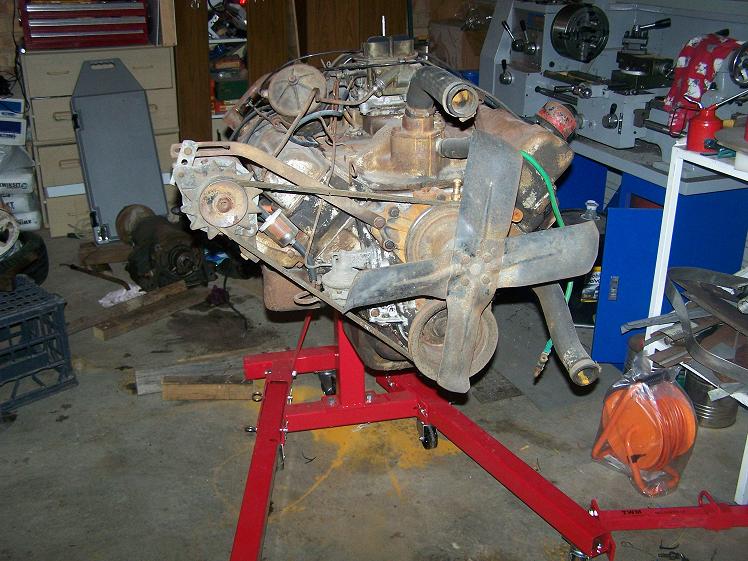
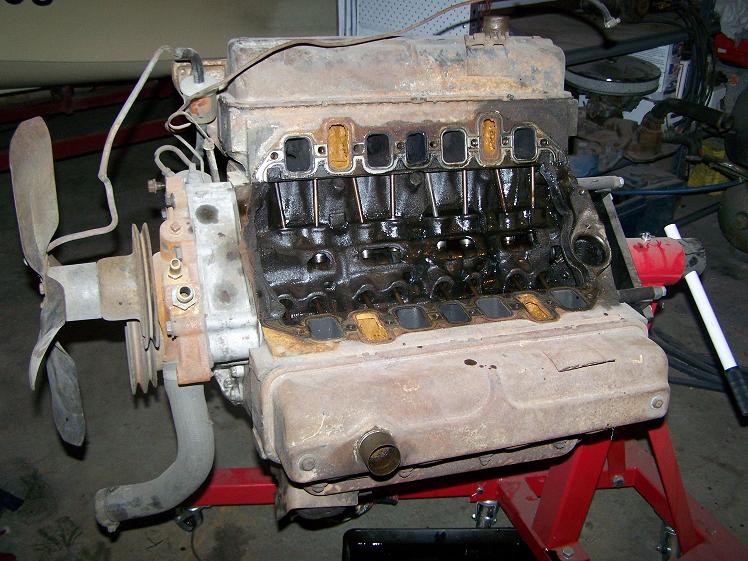
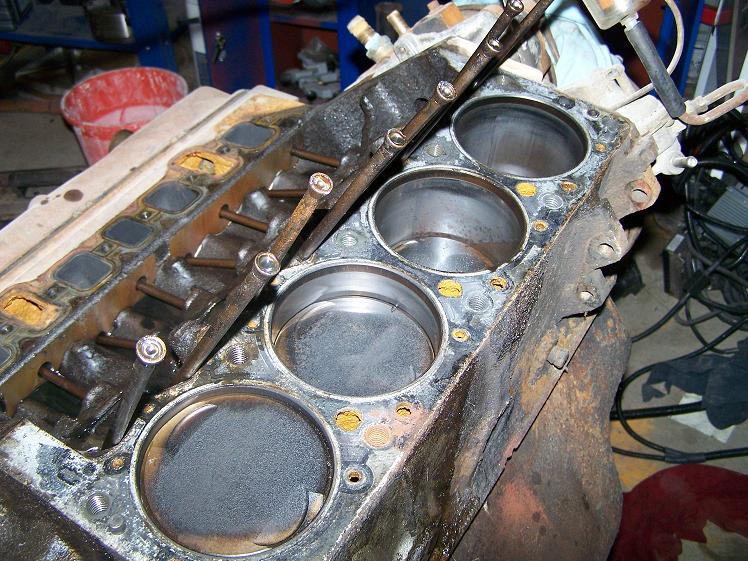
Location: Perth Australia | I have started stripping down the engine, so far I havnt seen anything dramatic at all.
It did run, but was smokey (white smoke).
I have all the top 1/2 off now and will most likely pull the sump tomorrow and get the bottom end apart.
Looking at the bores, theres only a slight lip and the pistons (apart from being black and sooty) look pretty good.
I am thinking I might get away without having to replace the pistons.
I do want to get it all profesionally checked and get the block hot tanked to get the sludge out (not that much there), so
we will see what it needs then.
I will need to get a hotter cam to let the engine breath a bit better (dual carbs), but the exhaust is a concern.
I have not heard (read) on here anyone that has headers for the 318 that will fit.
The other problem with the headers is that being r/h/d, there is a steering box in the way, leaving even less room.
Pics will come in a day or so
I will try to restrain myself a little
|
|
| |
|
Expert 5K+
Posts: 8443
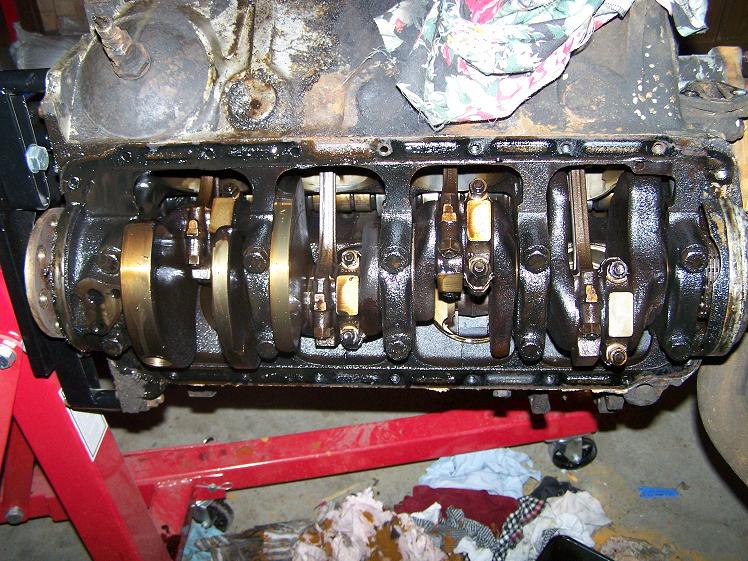
Location: Perth Australia | I found the cause of the smoke
Pistons 1 and 2 both have broken oil rings, otherwise all was pretty good.
The coolant side is another story, all the years of running straight water has done the engine no favours.
I will need to get another timing cover as the water pump area is very thin and only a matter of time before it went right through
Next is to see what the machinist thinks and I will go from there
 (dodge 318 strip 001s.JPG) (dodge 318 strip 001s.JPG)
 (dodge 318 strip 007s.JPG) (dodge 318 strip 007s.JPG)
 (dodge 318 strip 008s.JPG) (dodge 318 strip 008s.JPG)
 (dodge 318 strip 012s.JPG) (dodge 318 strip 012s.JPG)
 (dodge 318 strip 015s.JPG) (dodge 318 strip 015s.JPG)
 (dodge 318 strip 017s.JPG) (dodge 318 strip 017s.JPG)
Attachments
----------------
dodge 318 strip 001s.JPG (98KB - 315 downloads)
dodge 318 strip 007s.JPG (123KB - 334 downloads)
dodge 318 strip 008s.JPG (109KB - 348 downloads)
dodge 318 strip 012s.JPG (131KB - 315 downloads)
dodge 318 strip 015s.JPG (119KB - 328 downloads)
dodge 318 strip 017s.JPG (117KB - 341 downloads)
|
|
| |
|
Expert 5K+
Posts: 8443
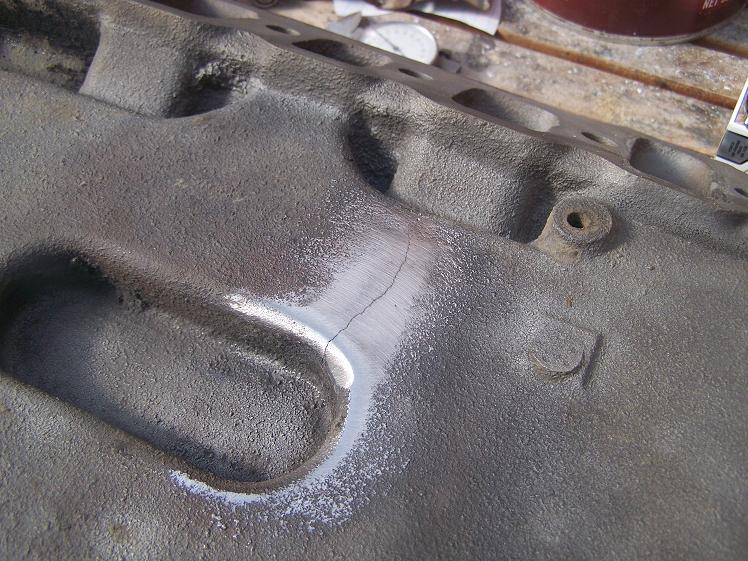
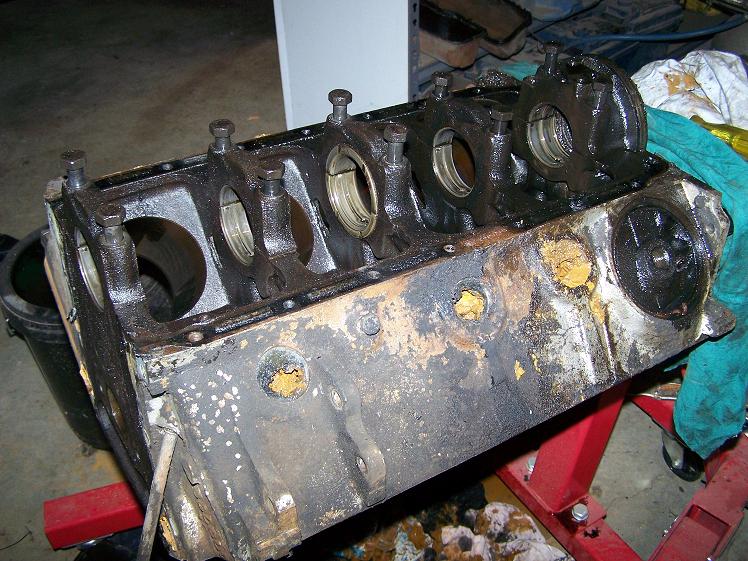
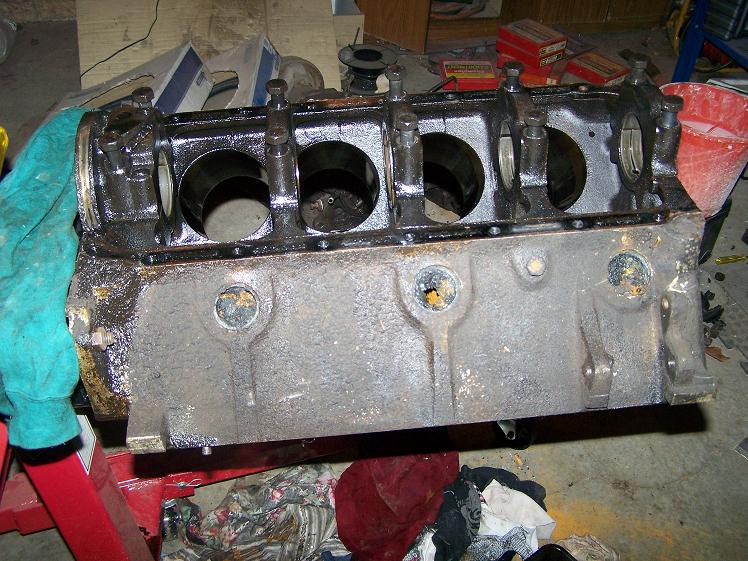
Location: Perth Australia | Just finished cleaning the block up and I have foud a crack in the water jacket
Not happy
I will have to decide wether to pinch the engine from the pymouth or get another one
Not a decission for today
|
|
| |
|
Expert
Posts: 2788
Location: USA - KY | 
Sorry to hear this, Mick!
Dang.
|
|
| |
|
Expert 5K+
Posts: 8443
Location: Perth Australia | I have got hold of another block, so I took it to the machine shop today to get their verdict.
I also took the 2x4 manifold to them as they think they can fix it (block off the exhaust ports)
So I am now waiting for the shopping list from them so I can order all the guts of the engine.
Cant wait to start screwing it together insted of screwing it up
|
|
| |
|
Expert
Posts: 2788
Location: USA - KY |
Your persistence will pay off, Mick!
Happy to see that you are pressing on! It will get there.
Best of luck!
Edited by FIN ME 2013-04-10 9:54 AM
|
|
| |
|
Expert 5K+
Posts: 8443
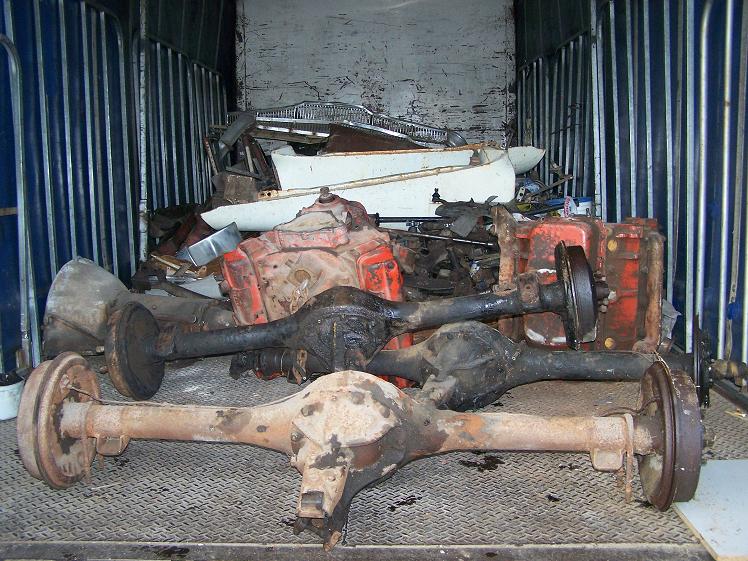
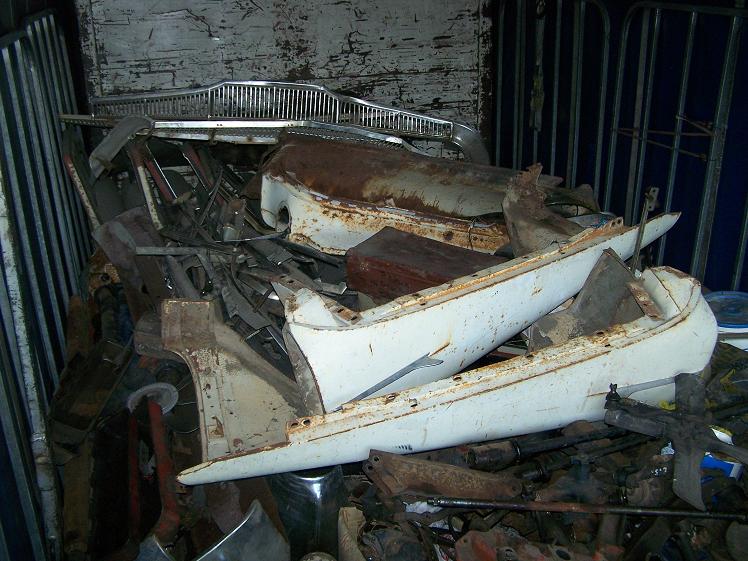
Location: Perth Australia | I havnt done to much exciting stuff to the dodge lately, just getting the suff organised for the engine and trans rebuilds and I rebuilt the truck heater(what they used here in the r/h/d vesions)
But today I picked up a few odds and ends for it
The truck rear is about the size of a 20' sea container
 (parts 001s.JPG) (parts 001s.JPG)
 (parts 002s.JPG) (parts 002s.JPG)
 (parts 003s.JPG) (parts 003s.JPG)
Attachments
----------------
parts 001s.JPG (120KB - 391 downloads)
parts 002s.JPG (96KB - 409 downloads)
parts 003s.JPG (110KB - 400 downloads)
|
|
| |
|
Expert 5K+
Posts: 8443
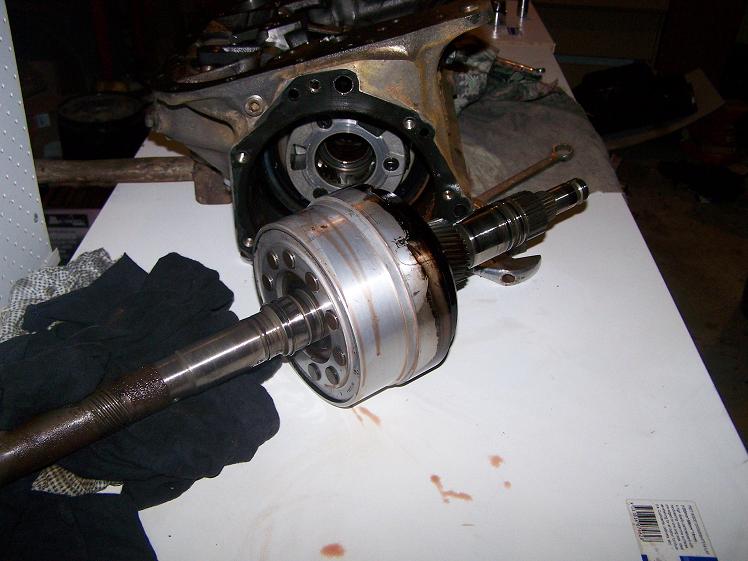
Location: Perth Australia | Well the parts for my trans have arrived from Fatsco, so I spent some time getting 50 odd years of
dirt off of it and am about to delve into the mysterious world of the automatic.
I have never done this before, so wish me luck
|
|
| |
|
Expert
Posts: 2788
Location: USA - KY |
Good luck!
You'll do fine!
|
|
| |
|
Expert 5K+
Posts: 8443
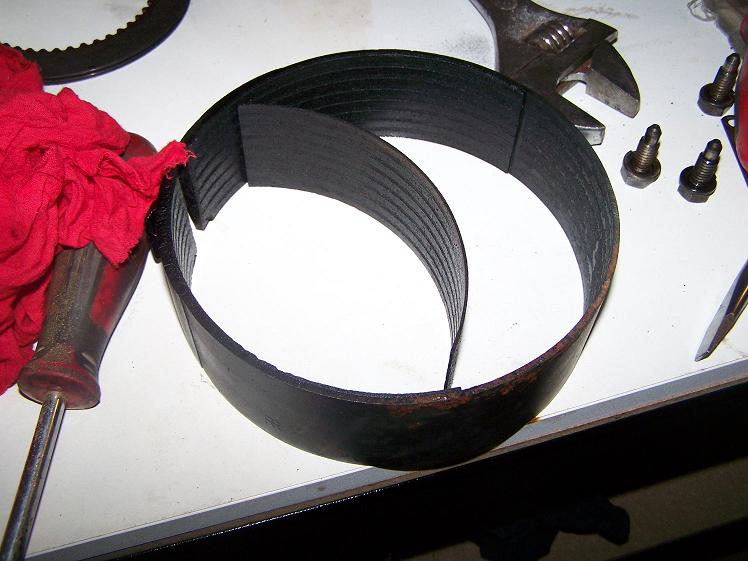
Location: Perth Australia | Hit a snag (typical for this car), the reverse/low band had section of the friction material fall off.
The kickdown band looked 100% better, but thats going to be done as well
The bands are on their way to Sydney (other side of the country for me) to be re lined
If I run out of tranny bits to clean, I might get onto makeing the fuel and brake lines to go to the rear
|
|
| |
|
Elite Veteran
Posts: 774
Location: Atlanta GA USA | Good luck. It will be interesting watching this project come together. |
|
| |
|
Expert 5K+
Posts: 8443
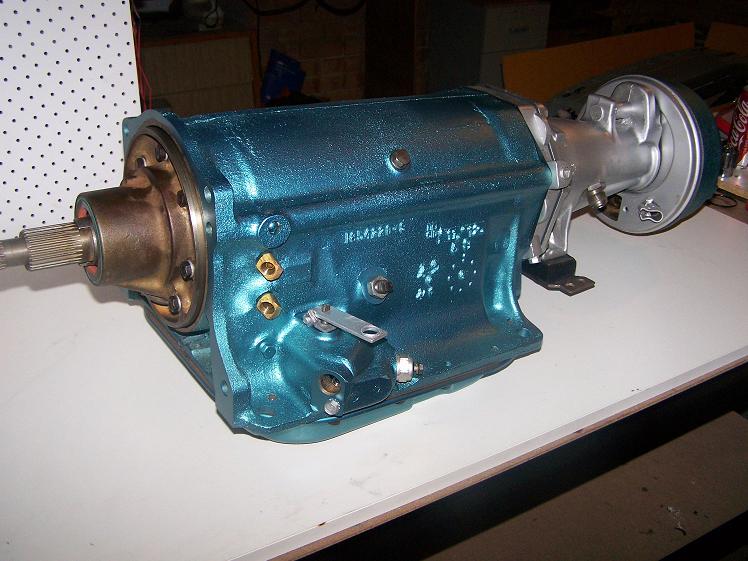
Location: Perth Australia | I got the bands back and the trans is all back together
I hope it works wont find out for a while yet
 (Transmission 010s.JPG) (Transmission 010s.JPG)
 (Transmission 014s.JPG) (Transmission 014s.JPG)
 (Transmission 019s.JPG) (Transmission 019s.JPG)
 (Transmission 020s.JPG) (Transmission 020s.JPG)
Attachments
----------------
Transmission 010s.JPG (66KB - 389 downloads)
Transmission 014s.JPG (69KB - 408 downloads)
Transmission 019s.JPG (80KB - 401 downloads)
Transmission 020s.JPG (71KB - 419 downloads)
|
|
| |
|
Elite Veteran
Posts: 1120
Location: Brisbane, Australia | you are a man of many talents, Mick!!!!!
|
|
| |
|
Expert 5K+
Posts: 8443
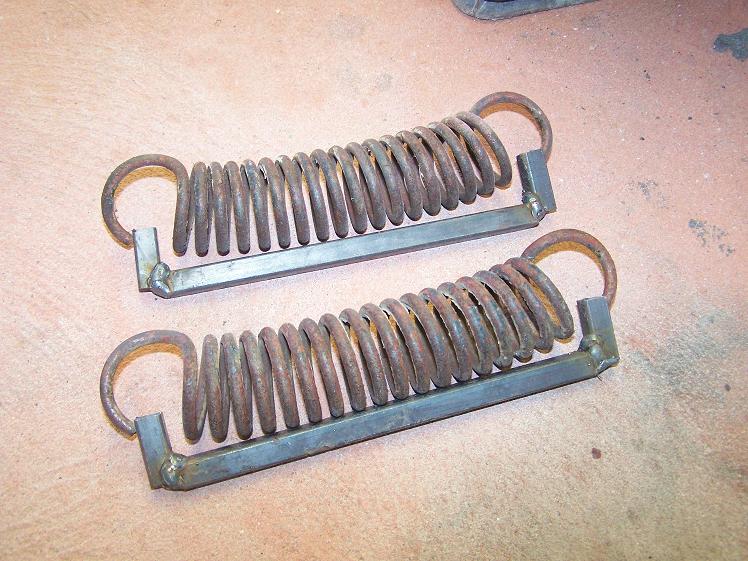
Location: Perth Australia | I am about 1/2 way through the engine now, but I have to wait for the heads and camshaft so I am doing a bit of housework.
After I got the rear springs repaired, the ride height was way up there so I took a couple of leaves out and that improved it some, but not enough, so I bit the bullet and I have taken them out again and I am going to try another set and maybe juggle leaves around a bit and see if its better.
I know I wont get it down in the weeds, but at least std ride height would be good.
I have also made and fitted a new fuel line to the tank and also made a new rear brake line, so the front to rear plumbing is done including the exhaust.
I have just put the old exhaust in for now as I want to get a new one made up, but only after its all going.
The reason for putting the old ones back in is for when I run the can in (neibhors wont appreciate the noise :)).
So basically just tinkering now untill I get the rest of my engine back
|
|
| |
|
Elite Veteran
Posts: 774
Location: Atlanta GA USA | Can you post a shot of the other side of the tranny? Like it. |
|
| |
|
Expert 5K+
Posts: 8443
Location: Perth Australia | I dont actually have that, but when the engine and trans become one (hopefully by next weekend) I'll take one then
|
|
| |
|
Location: North Australia | Looks good Mick.
Did you completely strip the box? I have never stripped and built an auto. Done a few manuals (Tojo Landcruisers).
Are you going to check the crank to bell housing run out before you mount the auto? I checked mine before I re-mounted using just a mag base dial indicator. Mine was out .007 thou, but on advice from a member I left it alone.
I made a engine stand with an extension to support the gear box and it was still tricky lining up the box and sliding it home. Patients and a good eye is the key! It must be a bear of a job doing it with the engine in the car.
Did you do anything with the converter?
Who did the relining for you?
Thanks for the answers, Steve.
|
|
| |
|
Expert 5K+
Posts: 8443
Location: Perth Australia | The trans was completely stripped, I have never done one before either
Autos were always smoke and mirror things to me, and its not a job I want to rush in to do again either, But as long
as it works, I hope to not have to for a while
As for the aligning, most likely not, not sure that I could do much about it if it was out a bit?
I havnt put much thought into the reunion of the engine and trans yet, but definately be done out of the car.
When I separated the 2, there was one bell housing bolt that went from thr torque converter side into the block that meant I
had to unbolt the trans from the bell, conveter from the crank, then bell from the block.
I am still cursing the stupid that thought that was a good idea
I am leaving the converter alone, one of the few parts I am going to see how it goes
I know its a pain to get out if its stuffed, but I am starting to run out of coin and thats one corner I can cut and live with.
As for the band relining, I got them sent to Sydney by a trans place here (wouldnt tell me the name of the place) and they are apparently the only place that will do it.
They looked great and fitted perfectly.
The place here is called Driveline and just looking at their invoice, they have offices in Adelaide and Sydney as well
The cost to do the bands was just under $230.00 including the freight. |
|
| |
|
Location: North Australia | Thanks Mick.
I think it would be good money spent to go buy some long bolts, cut the heads off, screw them into the bell to guide the box onto the bell. I did this and it helped. Make sure you align the front pump drive ears with the converter.
Probably wouldn't take much detective work to i.d. the relining company. I will have a look.
Steve. |
|
| |
|
Location: North Australia | Some of the old hands might chime in here, but, it would probably be a good idea to fill the TC with a solvent and flush that sucker out. Maybe fill it up with petrol and slosh it around a few times?
Steve. |
|
| |
|
Location: North Australia | Mick, take a look at this too.
http://search.mywebsearch.com/mywebsearch/redirect.jhtml?searchfor=...
This weekend gone I mounted one of these up along with a cooler into my Imperial. The OEM lines are 5/16, so I bought the cooler and filter in 3/8 to minimise fluid flow reduction.
Steve. |
|
| |
|
Expert 5K+
Posts: 8443
Location: Perth Australia | Thanks for the advice Steve
The guide bolts would be a good idea as is the filter
I might end up with a remote oil cooler, but not sure where I am going with the radiator yet.
To be honest, I cant remember if it was any good , I dont recall it leaking, but with the rust that was in the block and heads, its going to have to be stripped and cleaned at least.
The other option is an allo one, but I havnt looked into them yet
|
|
| |
|
Expert 5K+
Posts: 8443
Location: Perth Australia | I got hold of a set of wheels tonight, so I had to try one on
 (wheel 003s.JPG) (wheel 003s.JPG)
Attachments
----------------
wheel 003s.JPG (68KB - 388 downloads)
|
|
| |
|
Expert 5K+
Posts: 7807
Location: Williams California | Keep up the good work, Mick!! Looking great!
---John |
|
| |
|
Expert 5K+
Posts: 8443
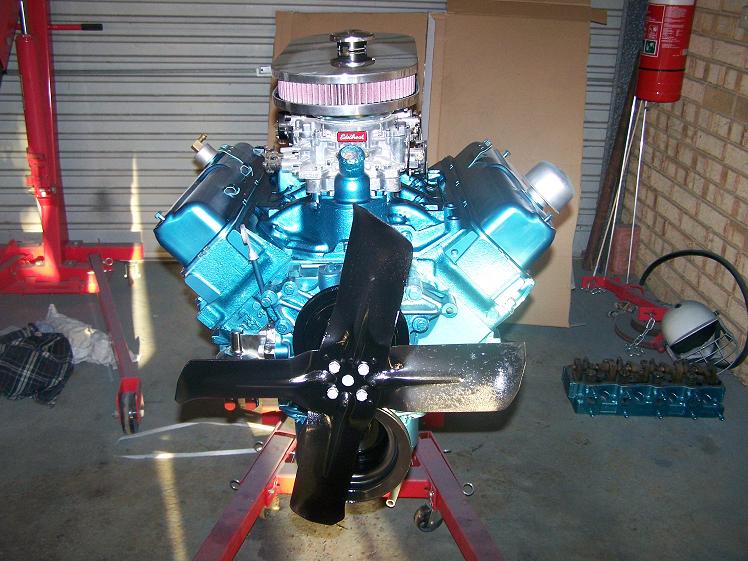
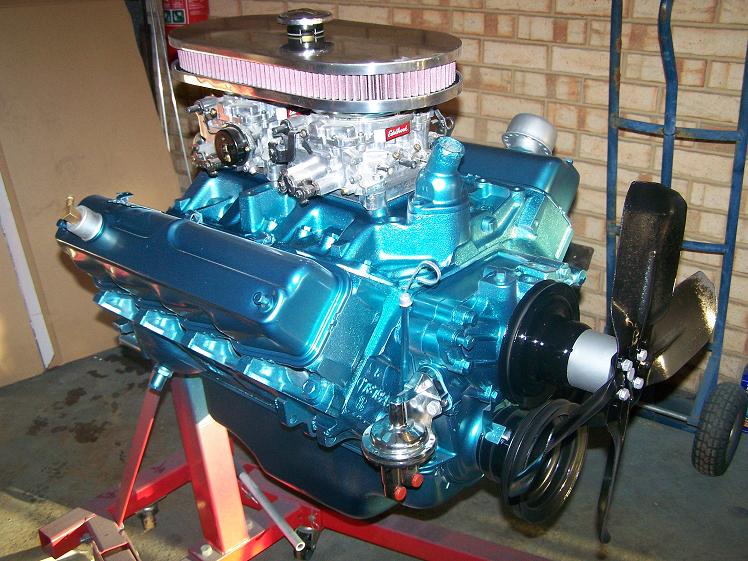
Location: Perth Australia | Engines pretty much together
Just a few small jobs and it can be re united with the transmission
 (Engine 004s.JPG) (Engine 004s.JPG)
 (Engine 007s.JPG) (Engine 007s.JPG)
 (Engine 008s.JPG) (Engine 008s.JPG)
Attachments
----------------
Engine 004s.JPG (97KB - 382 downloads)
Engine 007s.JPG (114KB - 388 downloads)
Engine 008s.JPG (107KB - 393 downloads)
|
|
| |
|
Expert
Posts: 2788
Location: USA - KY |
Looking good, Mick!
Your tenacity and impressive talents are evident!
. |
|
| |
|
Elite Veteran
Posts: 982
Location: Upper Hunter NSW Australia | .......
.......
I really like that color Mick
I guess you got that crack repaired in the quad intake ?
With the rear leaves, instead of mucking around with individual leaves could you have a set of lowering blocks made with longer U bolts to lower it ?
A lot less trouble than fiddling with the springs.
Lowering blocks are legal over here in Nuisance Wales ( NSW ) which is surprising since NSW is probably the most anti modified car rule state in OZ.
And I'm lovin' those wheels, nice sorta '60's period ones
That car's going to be a real head turner !!!
..........
Edited by VAN HELSING 2013-06-01 9:30 AM
|
|
| |
|
Expert 5K+
Posts: 8443
Location: Perth Australia | I will most likely go lowering blocks, but the licencing people over here can be painfull, so the less they question, the better
I am going to try to have it in the car by the end of the w/e
|
|
| |
|
Expert 5K+
Posts: 8443
Location: Perth Australia | Got it together and in today :)
 (Engine 2613 001s.JPG) (Engine 2613 001s.JPG)
 (Engine 2613 003s.JPG) (Engine 2613 003s.JPG)
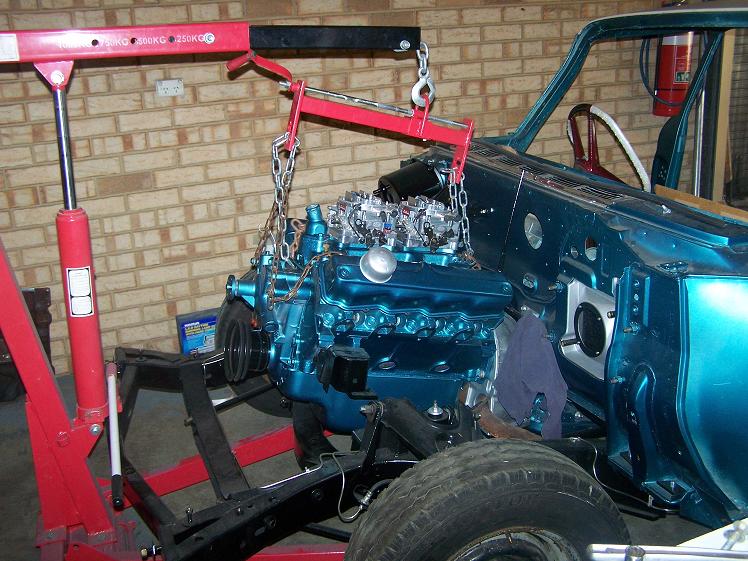 (Engine 2613 006s.JPG) (Engine 2613 006s.JPG)
 (Engine 2613 010s.JPG) (Engine 2613 010s.JPG)
Attachments
----------------
Engine 2613 001s.JPG (103KB - 398 downloads)
Engine 2613 003s.JPG (97KB - 393 downloads)
Engine 2613 006s.JPG (107KB - 413 downloads)
Engine 2613 010s.JPG (140KB - 403 downloads)
|
|
| |
|
Elite Veteran
Posts: 774
Location: Atlanta GA USA | Congrats! Looking awesome already |
|
| |
|
Expert 5K+
Posts: 8443
Location: Perth Australia | I will have to get into some more panelwork now so I dont get tempted to get it running
See how long that lasts
I have already set the throttle linkages up
|
|
| |
|
Expert 5K+
Posts: 8443
Location: Perth Australia | Didnt last long,its now running after a lot of pestering dramas, mostly with core plugs not staying in
I have yet to see if the trans is ok yet (it is turning unloaded)
I am going to fit the park brake so I can see if it stops turning with the brake on and then see if it gets a gear
Be another week befor that happens though (I think)
But, it sure sounds good (fantastic actually) except for an exhaust flange leak.
Just waiting for a new system to turn up from the US (cheaper than getting one made here)
Might make a video tommorow (maybe)
|
|
| |
|
Elite Veteran
Posts: 1120
Location: Brisbane, Australia | I look forward to the video (with you in it) |
|
| |
|
Location: North Australia | Mick, fer chrisakes, slow down! You're making the rest of us look lazy!
Actually I have been working hard on my Imp. I am close to the first start up (after re-build) too. I am on hol's now and took a few days to go fishing at my shack to get my head together, now back in the shed screwing the Imp together. I've set myself a deadline to get it roadworthy in two months.
Looking real good Mick, that power plant is going to make you grin when you get to feel it through your pants!
Steve.
|
|
| |
|
Expert 5K+
Posts: 7807
Location: Williams California | Looks great, Mick!
Keep up the progress reports, they're great!
---John |
|
| |
|
Expert 5K+
Posts: 8443
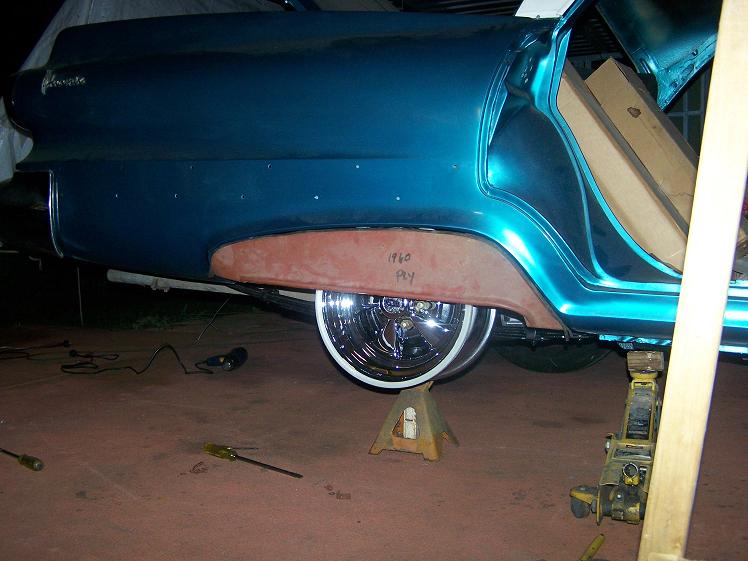
Location: Perth Australia | Put the cragars on today, well a second (second hand) set I got that has tyres already
I can now choose between 14 and 15" or a combination of both
These ones are 15x8 on the rear and 14x6 on the front
The tyres are 15x235x70 rears and the fronts are 14x205x75
I got these mostly to see how big I could go on the back and these are the limit (only just fitted under the lip)
 (962013 001s.JPG) (962013 001s.JPG)
Attachments
----------------
962013 001s.JPG (113KB - 376 downloads)
|
|
| |
|
Expert
Posts: 2788
Location: USA - KY |
I like that tire/wheel combo, Mick!
You are one busy bee!
|
|
| |
|
Expert
Posts: 1730
Location: Michigan | Did you sort out the tranny? Noticed a few posts back that you had the trans turning with no load on it. Mine did that in neutral as well. It tends to turn a little without being in gear. If I rev my engine in without the brake on it will rock the car forward. It won't actually move but there is a little bit of push from the trans even in neutral. While I was running mine on the stand, before I put it in the car, I could grab the brake drum on the trans and stop it from turning.
Keep up the great work Mick it looks very nice with that electric blue and silver color combination.
Edited by Beltran 2013-06-09 4:29 PM
|
|
| |
|
Expert 5K+
Posts: 8443
Location: Perth Australia | Thanks Fin me
The rears would be better in a 60 series, there juts a bit tall
I dont know about the tranny yet, I want to finish the brakes first before I put the tail shaft in.
Be terrible to watch it drive itself away
|
|
| |
|
Expert 5K+
Posts: 8443
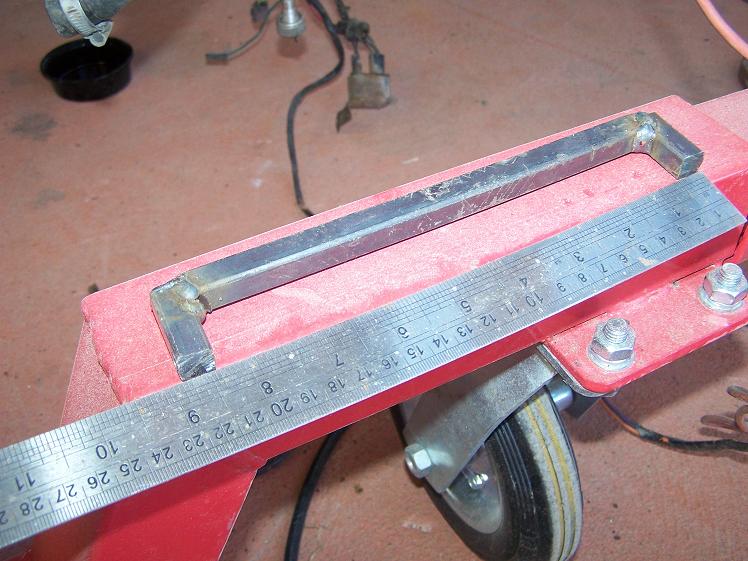
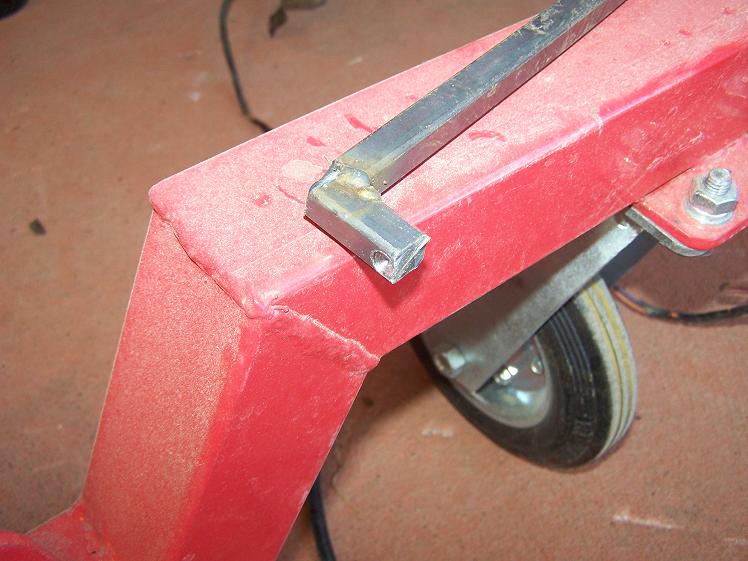
Location: Perth Australia | Just as an asside, 1960wbdart asked for pictures of my tow hitch so here they are
 (60 dodge tow bar 001s.JPG) (60 dodge tow bar 001s.JPG)
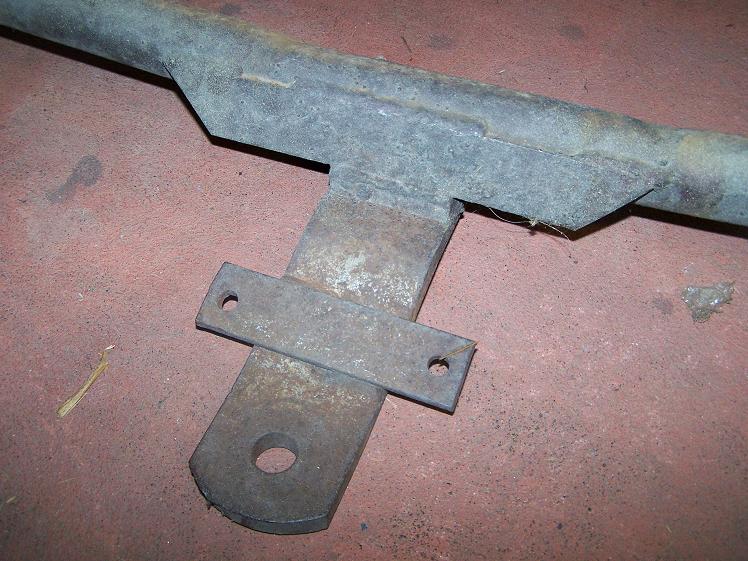 (60 dodge tow bar 002s.JPG) (60 dodge tow bar 002s.JPG)
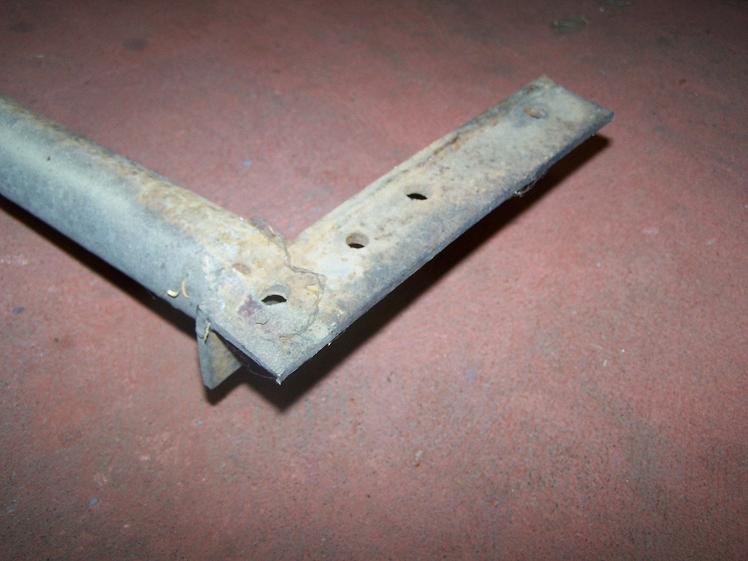 (60 dodge tow bar 003s.JPG) (60 dodge tow bar 003s.JPG)
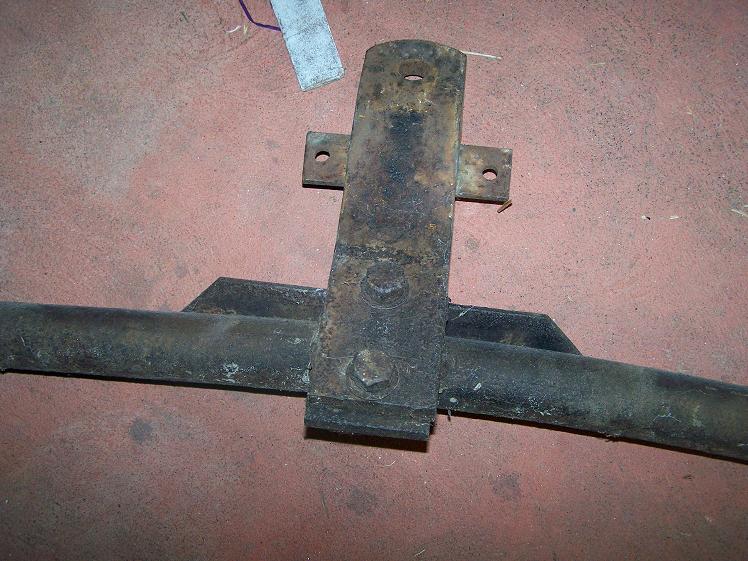 (60 dodge tow bar 004s.JPG) (60 dodge tow bar 004s.JPG)
 (60 dodge tow bar 005s.JPG) (60 dodge tow bar 005s.JPG)
 (60 dodge tow bar 006s.JPG) (60 dodge tow bar 006s.JPG)
 (60 dodge tow bar 007s.JPG) (60 dodge tow bar 007s.JPG)
Attachments
----------------
60 dodge tow bar 001s.JPG (70KB - 409 downloads)
60 dodge tow bar 002s.JPG (99KB - 400 downloads)
60 dodge tow bar 003s.JPG (56KB - 375 downloads)
60 dodge tow bar 004s.JPG (97KB - 406 downloads)
60 dodge tow bar 005s.JPG (100KB - 380 downloads)
60 dodge tow bar 006s.JPG (95KB - 389 downloads)
60 dodge tow bar 007s.JPG (88KB - 374 downloads)
|
|
| |
|
Expert 5K+
Posts: 8443
Location: Perth Australia | It was mounted with 2 plates with 3 holed drilled into them and then drilled through the trunk floor and rear rails.
It did pull the floor in a bit, so when it goes back on, I am going to make up tubes to make the area stronger for the bolts to go through.
If you are not keen on trying to make your own, you could measure the width of the rails and how thick they are and go to somewhere that
sells tow bars and see if there is something thats close to it.
I would feel happier doing that if it was me (wouldnt worry about how good my welds were)
|
|
| |
|
Location: North Australia | Mick, looks like it's almost ready for a test drive around the block? Keep those progress photos coming.
Steve.
Steve |
|
| |
|
Expert 5K+
Posts: 8443
Location: Perth Australia | Yeah, not quite Steve (love to though)
I have a seat and stuff comming from John (Big M) that will help on that score as I am to short to see over the dash without it
Oh wait a sec, thats right, no dash either
Might have to start putting some thought and effort into that one though, which means I will have to get started on the wiring as well.
Even as an auto elec, its still a big job to totally re wire a car, especially if you want a few extra things as well
|
|
| |
|
Location: North Australia | A full rewire on a car is a daunting task. Are you going to purchase a loom to kick off, or roll your own? I spent hours today (on hols!) laying out the original loom under the bonnet of my 60 and hooking up all I could. I have added electronic ignition (mopar orange box) and a 75 A alternator. I have also fitted a new loom for the headlights using a double relay and using the original wiring for the triggers. It all actually worked out OK, as the original stuff is still in good nick. Only a couple of strays left! I am still to work out the ballast wiring and the original generator regulator 'battery'' wire. I have replaced the heavy cables to the starter and earth leads. I think I need to bypass the amp meter on the dash for safety. The proof is when I hook up the battery leads I guess.
I have been referring to the Imperial website and MADElectrical for tech info. I might need your help yet Mick.
http://www.madelectrical.com/electrical-tech.shtml
Steve.
Edited by 60 Imp 2013-06-12 8:33 AM
|
|
| |
|
Expert 5K+
Posts: 8443
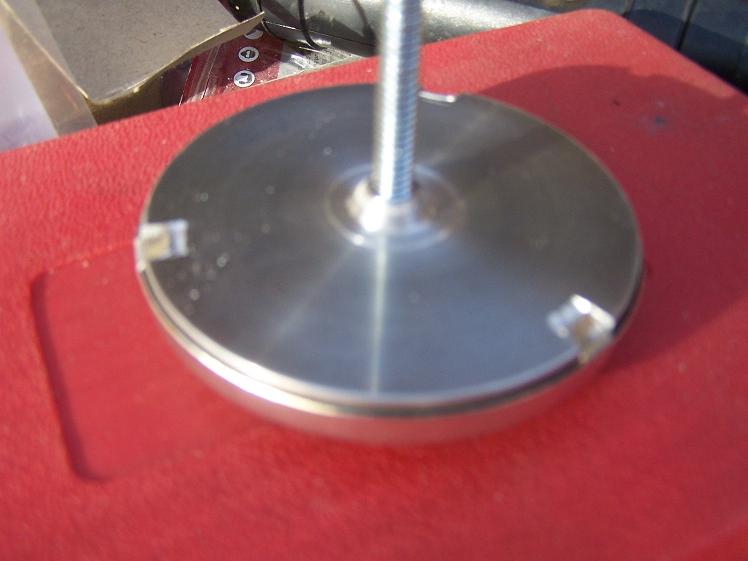
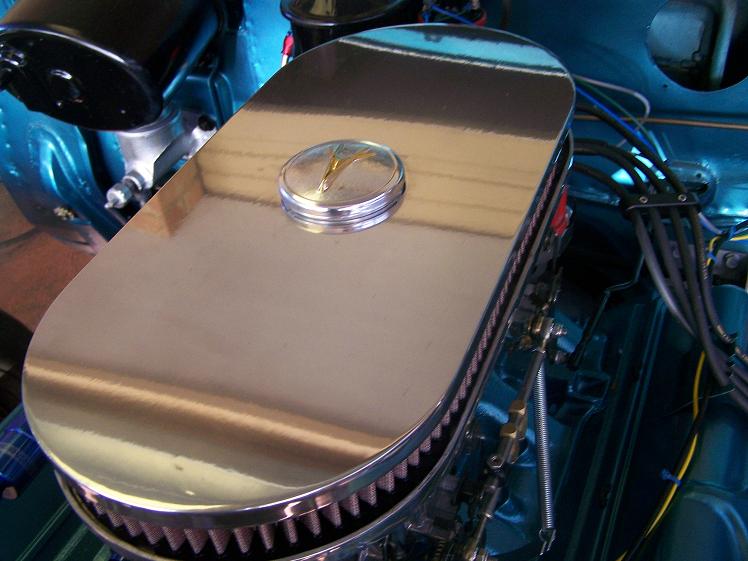
Location: Perth Australia | Had a spare couple of hours today, so I made an aircleaner nut
 (aircleaner 003s.JPG) (aircleaner 003s.JPG)
 (aircleaner 006s.JPG) (aircleaner 006s.JPG)
 (aircleaner 010s.JPG) (aircleaner 010s.JPG)
Attachments
----------------
aircleaner 003s.JPG (98KB - 374 downloads)
aircleaner 006s.JPG (45KB - 412 downloads)
aircleaner 010s.JPG (68KB - 392 downloads)
|
|
| |
|
Elite Veteran
Posts: 774
Location: Atlanta GA USA | Cool. |
|
| |
|

Elite Veteran
Posts: 1110
Location: Tulare Ca | Thats A Sweet Cleaner Nut!! |
|
| |
|
Expert 5K+
Posts: 8443
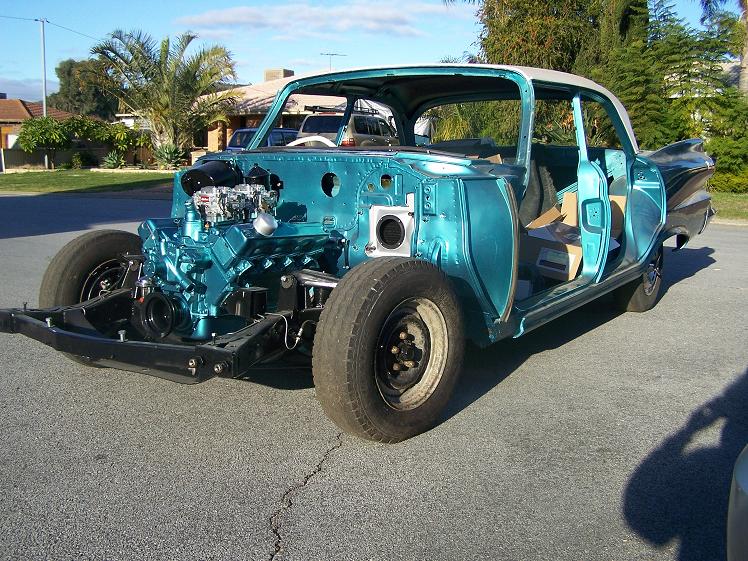
Location: Perth Australia | Car moved under its own power for the first time in ages
I drove it forward and back about an inch
Now I really am hanging for my stuff to turn up from my shipper
Theres a bench seat in there for the car
Best get stuck into the dash so the steering column gets some support
|
|
| |
|
Location: NE Ohio | Progress it seems |
|
| |
|
Expert 5K+
Posts: 8443
Location: Perth Australia | Took a while to work out how to do this, but got it on utube thing
http://www.youtube.com/watch?edit=vd&v=d3EbN5Bq7Lc
It sounds a bit funny because the l/h exhaust flange wont seal up
I have to dig out another manifold because the flange is not that flat
Edited by ttotired 2013-07-05 9:00 AM
|
|
| |
|
Elite Veteran
Posts: 716
| Pretty good vid for a first timer!
Sometimes it's real easy to tell that car is loved by the detailed nature of the work - like yours.
Good on ya......she's going to be a beauty.....almost there! |
|
| |
|
Extreme Veteran
Posts: 314
| Looks great! Sure do like those Cragars on there! |
|
| |
|
Extreme Veteran
Posts: 337
Location: UK | Amazing work there Mick. I'll have to bite the bullit and smarten mine up a little. |
|
| |
|
Expert 5K+
Posts: 8443
Location: Perth Australia | I am working on the front sheet metal and dash now, so with those parts, there seems like there is 1000 little nut, bolts ,screws ect and all of them are rusty to some degree and it has sort of one of the reasons I have been avoiding doing them, anyway I was looking at ultra sonic cleaning and stuff and remembered about electrolysis
I have set up a tub with a few bits of re bar, made a mesh basket and thrown some of the bolts and stuff in and hooked up a battery and a charger to pickle overnight
So far it seems to be working, the water and washing soda mix has turned a lovely rusty orange
I have put a door striker in there as well that has paint on it to see if the paint will also come off (thinking bigger tank and door paint removal here)
|
|
| |
|
Veteran
Posts: 107
Location: Australia | Love what your doing Mick, I am doing a similar thing to my 61 Phoenix. Could you tell me what dizzie you used and and what the calibrations are for the Edlebrock's, this stuff I know little about. Saw your video and loved it, thats what I am aiming for. |
|
| |
|
Expert 5K+
Posts: 8443
Location: Perth Australia | The dizzy is a new one from the states
Its a bosch copy thats the same sort of thing as one out of an early 80s ford or holden.
If you look for a 318 la dizzy on ebay, you should find one (and it was cheap)
I got the HEI type, so the cap has all male posts on it.
I bought the leads at the same time from the same place, I got the ones that you make yourself so I could get the leanths right.
I got them from KJM Performance (bit of a stuff around with the shipping as they dont ship international, but got there in the end)
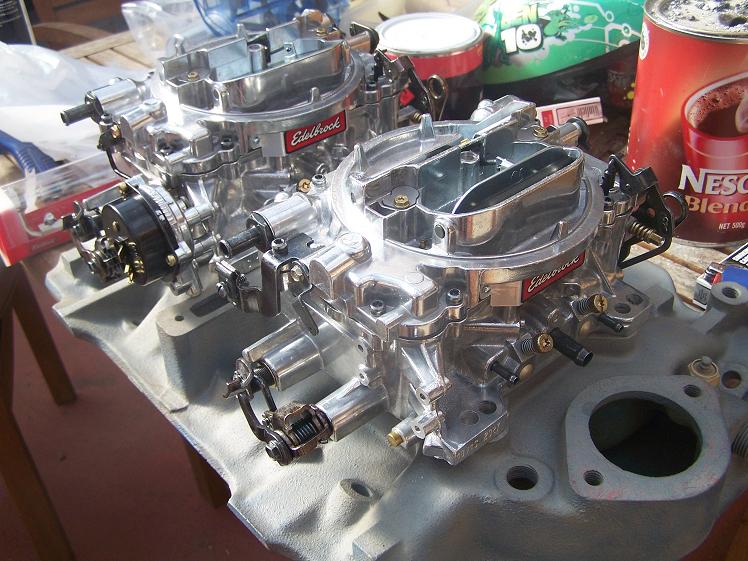
The carbs and linkages ect all came from Summit Racing, the aircleaner was a dissapointment in it didnt come close to fitting, I had to get an alloy plate cut out to bolt under the air cleaner like an adaptor (that cost more than the aircleaner).
The carbs are 500 eddies, 1 with elec choke (primary) and 1 with mech choke (secondary)
They are pretty much just strait out of the box, I have just turned the idle mixture screws right in on thr secondary carb to kill the idle circuits.
1 thing you will notice is how much heavier your throttle pedal will be, I am thinking that its to heavy, but untill I am living it, I am not sure, so I wont mess with it yet (its not the return springs, it seems to be the factory springs on the carbies)
And just a little update
Painted and installed the dash over the weekend, it almost seems crowded in there now, its been a long time since it had one
The stuff from John I am waiting for is still a month away (my shipper kinda lost it all for a bit there, got shoved in a corner and forgotten about it seems, but on the way now), cant wait to get the strips so I can install the roof lining, then the glass
|
|
| |
|
Veteran
Posts: 107
Location: Australia | Thanks for that , I have been quite concerned the 500cfm carbs would over fuel the small block 318 but yours sounds great. I should put up some picks of mine and you would see we are doing a similar thing. looking forward to seeing your build progress.
Regards, Eric |
|
| |
|
Expert 5K+
Posts: 8443
Location: Perth Australia | I wonder about the overfueling as well
1000cfm is a lot of carb, but with the staged throttle linkages, it will mostly run on the rear carb until you get your foot into it (whenever mr plod aint around most likely)
One thing I might do is to taper the intake ports on the manifold to take the ledges out betwen the manifold and the spacers to make sure fuel cant puddle there, but that will happen after it has number plates.
I have a 4 barrel manifold as well if it turns to poo, but it would have to be really bad before I do that
|
|
| |
|

Expert 5K+
Posts: 9667
Location: So. Cal | You could put 400 cfm carbs on. That would be a better match. 400 cfm afbs come from 273 commando engines in '65-'67 Barracudas and Darts. Most of the '65 and older small block afbs are also 400cfm or less. There is also the Holley 390 cfm option, but I don't like Holleys. I have found that the motor works best with fixed linkage though - i.e. not progressive. On a 6-pack motor, a progressive linkage works well because the center carb is more evenly distributed to all the cylinders. But on a dual 4bbl, it runs better with fixed linkages. |
|
| |
|
Expert 5K+
Posts: 8443
Location: Perth Australia | I wonder about the overfueling as well
1000cfm is a lot of carb, but with the staged throttle linkages, it will mostly run on the rear carb until you get your foot into it (whenever mr plod aint around most likely)
One thing I might do is to taper the intake ports on the manifold to take the ledges out betwen the manifold and the spacers to make sure fuel cant puddle there, but that will happen after it has number plates.
I have a 4 barrel manifold as well if it turns to poo, but it would have to be really bad before I do that
|
|
| |
|
Veteran
Posts: 107
Location: Australia | I had a look at the Edlebroch site for springs, jets and metering rods and noticed the ones supplied with the carbs are a little over mid range, I wonder if I put smaller rods and jets would that lower the cfm. |
|
| |
|
Expert 5K+
Posts: 8443
Location: Perth Australia | CFM is the amount the carb can flow in air, so no it wont, all the jets ect do is modify how much fuel will go through it
Done a bit more on mine, dash in and 1 front fender
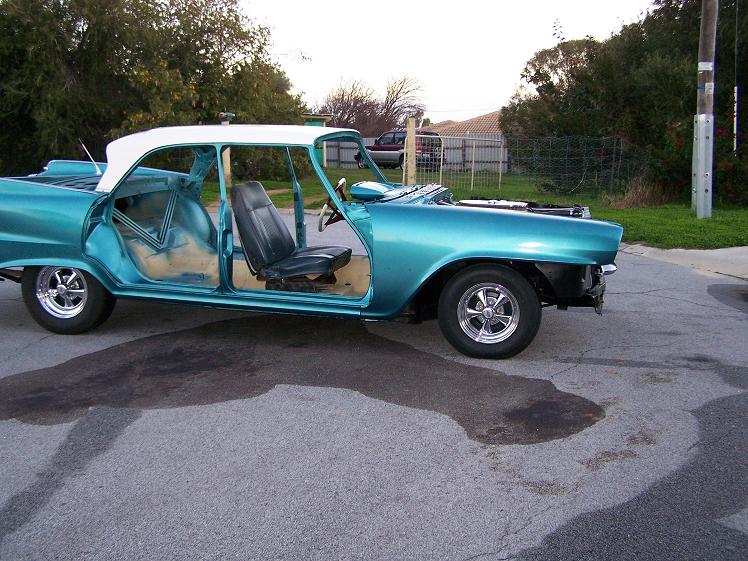 (Dodge fenderS.JPG) (Dodge fenderS.JPG)
Attachments
----------------
Dodge fenderS.JPG (107KB - 400 downloads)
|
|
| |
|
Expert
Posts: 2788
Location: USA - KY |
thanks for the update, ttotired!
|
|
| |
|
Expert 5K+
Posts: 8443
Location: Perth Australia | Just noted another Australianism to the build of my dodge
The sandblasted fender is off an Aussie Dodge, the other one arrived yesterday from John (BigM), note the brazing to hold the headlight buckets into the fender on the blasted one and the spotwelds on the US one, I also noticed that the Aussie ones do not have holes punched in them at the back of where the bulbs would go
Just a little interesting thing again
 (LF Fender 002.jpg) (LF Fender 002.jpg)
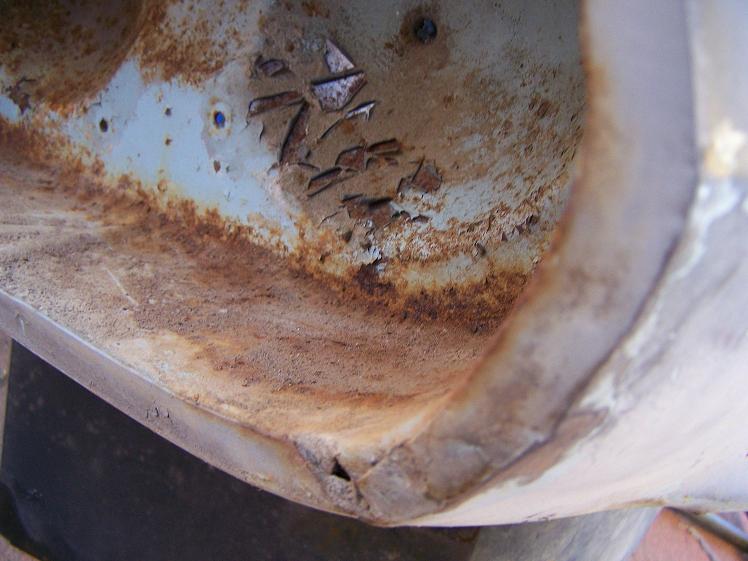 (LF Fender 005.jpg) (LF Fender 005.jpg)
Attachments
----------------
LF Fender 002.jpg (59KB - 389 downloads)
LF Fender 005.jpg (67KB - 406 downloads)
|
|
| |
|
Expert 5K+
Posts: 7207
Location: Victoria, BC, on Vancouver Island, Canada | The 1960 Dodge front fenders were possibly the worst designed Forward Look fenders for holding mud and salt spray in every nook around the headlight buckets. They should have had a baffle installed behind them to prevent the mud-flinging from the tires from builidng up there.
Edited by imopar380 2013-08-10 1:42 PM
|
|
| |
|
Expert 5K+
Posts: 8443
Location: Perth Australia | Hello again all
I am slowly getting all the front back together, but I have run into a snag
I am haveing trouble getting hold of a useable (no dents, no broken bits) grill
I have 4 of them now, but none are any good
Anyone have one or know where one could be bought PLEASE
I will put this in the wanted bit as well
|
|
| |
|
Elite Veteran
Posts: 982
Location: Upper Hunter NSW Australia | .....
...
Mick,
I'm heading down to Melbourne in two weeks time and catching up with a couple of FL fellas while I'm there so I'll ask for you. I'm also going to the Last of the Chrome Bumpers show at Warrigul and there's usually an FL or two there so I'll see how I go.
.....
... |
|
| |
|
Expert 5K+
Posts: 8443
Location: Perth Australia | Cheers Terry
Warrigul is one of my old stomping grounds
Thats where I did the bulk of my apprenticeship
Used to live in a town called Garfield
|
|
| |
|
Expert 5K+
Posts: 8443
Location: Perth Australia | A word to the wise
I have been working on the R/R door, all painted ect, went to fit it, ROTTEN THING WONT FIT (change rotten to any word you like that will be sensored).
I have messed about all day trying to get it to fit, scratched the paint all over the place, you name it it happened (except dropping it), anyway, out of frustration, I took it off and went and got the old door to try, it wont fit either.
The orriginal doors still had its hinges on, so the adjustment wasnt messed up when I took it off and I cant even get the bottom hinge all the way into the hole in the B pillar, the bottom of the door is hitting the sill panel.
That would be the %$@#EN NEW SILL PANEL.........
When I have done other cars in the past, I have always fitted everything then painted, this time I thought I would paint then fit so everything was fully painted and never rust.
I am now going to have to try to evenly press the sill panel step for the door down (at least on the right side) to make the door
opening big enough to fit a %$@#EN door.
Haveing a scotch now to calm down
I would happilly have advised anyone to fit the panel first then paint
NOT HAPPY
|
|
| |
|
Elite Veteran
Posts: 774
Location: Atlanta GA USA | ttotired - 2013-09-22 4:03 AM
A word to the wise
I have been working on the R/R door, all painted ect, went to fit...
Did the frame twist at some point? Jack up the opposite rear, or maybe same rear to untwist? |
|
| |
|
Expert 5K+
Posts: 8443
Location: Perth Australia | No, unfortunatly the replacement sill panels were a slightly different shape, I thought it wouldnt make to much difference, but it did
I hace punched the RR down a bit and its almost right, but I am goint to fit the front door now to see if I should
slice/section the sill panel to bring the whole leanth down
The sill will need to be re painted now, so what happens happens
Chalk it up to the measure twice, cut once principle
|
|
| |
|
Expert 5K+
Posts: 8443
Location: Perth Australia | The front door fitted fine and a little more "adjustment" and the rear one fits now
I hope the otherside is ok, but I have some repair/painting work to do on the right side now anyway, so alls a bit better with the world
Yesterday was just one of those bad days, back fence blew down as well
Silver lining
I get a new back fence and the garden will be less afew weeds
|
|
| |
|
Expert 5K+
Posts: 8443
Location: Perth Australia | I still have to get the L/h doors done, but they fit, so should be no problems
What I have been doing is the wiring
The car (at some time in its life) had tried to burn itself down by melting the main power feed to the headlight and ignition switch from the starter relay right through to the genny (all the heavy wiring basically)
The engine (genny) wiring had been replaced, but they left all the main wiring alone (risky, but they got away with it)
If you look closely at the first pic, you will see the bits of red sticking out, thats the burnt wire, the second pic is the wire removed.
I have done a few mods to the wiring while its out, I have put 4 extra wires in from behing the gauges to outside the firewall for future upgrades (these are 2 colour wires), I have also done a mod that most of you will not want (or need) to do, that is, as this is an Aussie built car, thay made the reverse lights into reverse and indicator lights, so they flash instead of the brake light, I prefer the brake lights to flash (as the US cars do)
Because this car will have to go through licencing, I think they would reject the car if I made the brake lights flash, so what I have done is to put a plugable cross over wiring system in, basically, I can swap 2 plugs over to convert to one way or the other (white plugs in the harness)
The other mod I have done is something everyone should/Should have done, thats fit fuseable links into the main power wire, there are 2, 1 for the power and 1 for the genny (although I will be fitting an alternator, same wire)
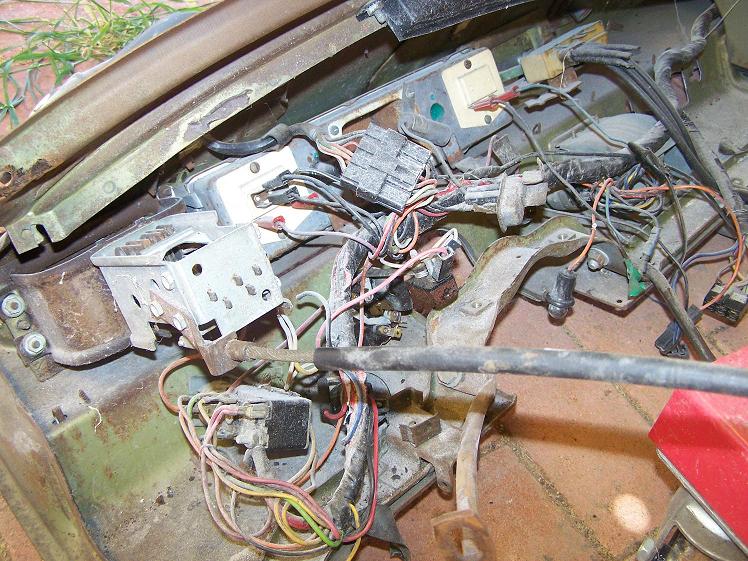 (Dash removal (48)s.JPG) (Dash removal (48)s.JPG)
 (Wiring 001s.JPG) (Wiring 001s.JPG)
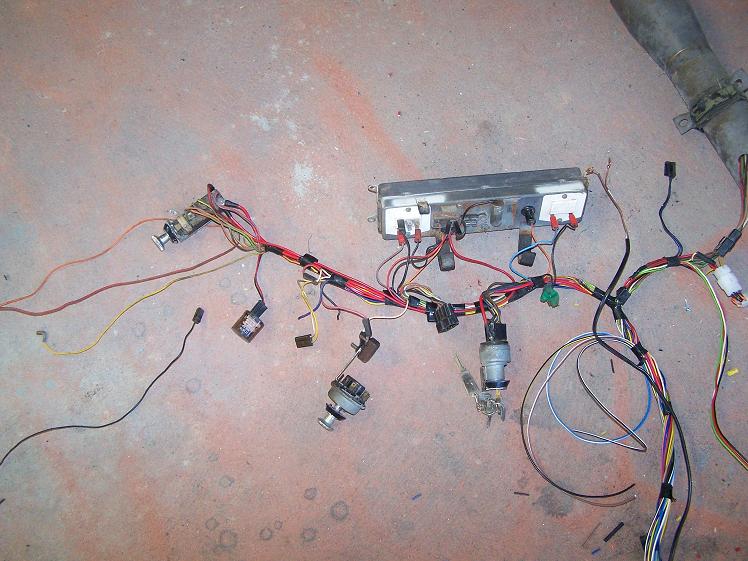 (Wiring 002s.JPG) (Wiring 002s.JPG)
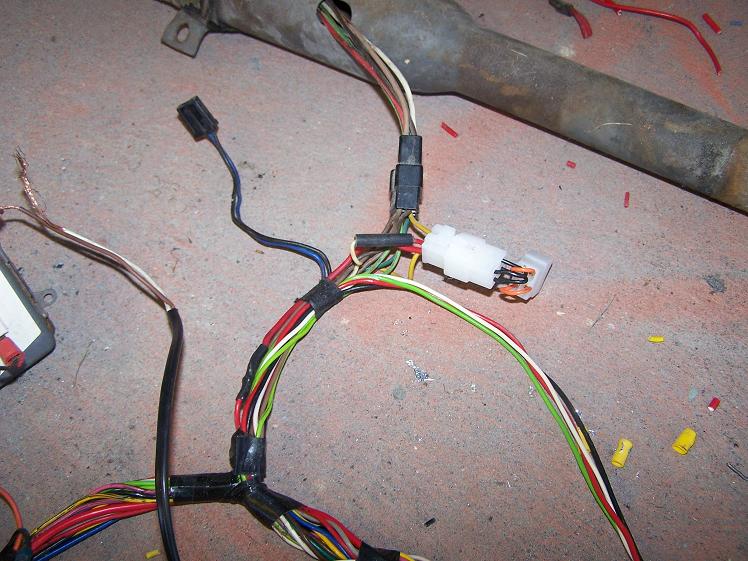 (Wiring 004s.JPG) (Wiring 004s.JPG)
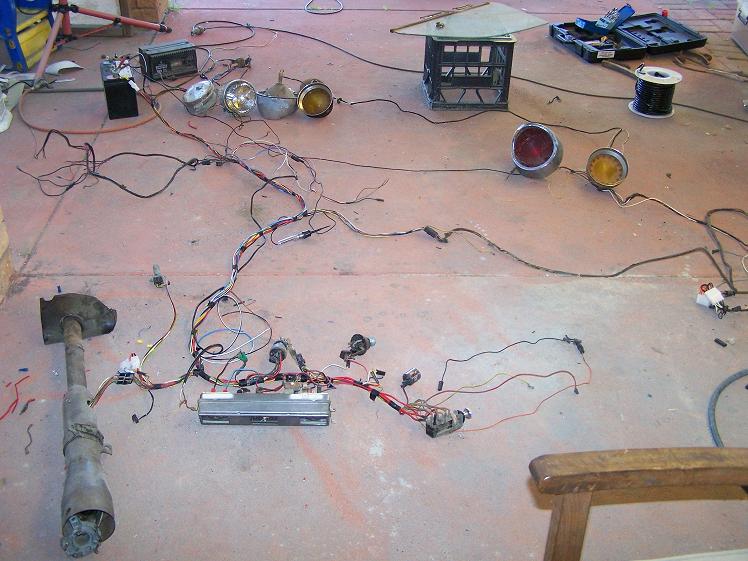 (Wiring 005s.JPG) (Wiring 005s.JPG)
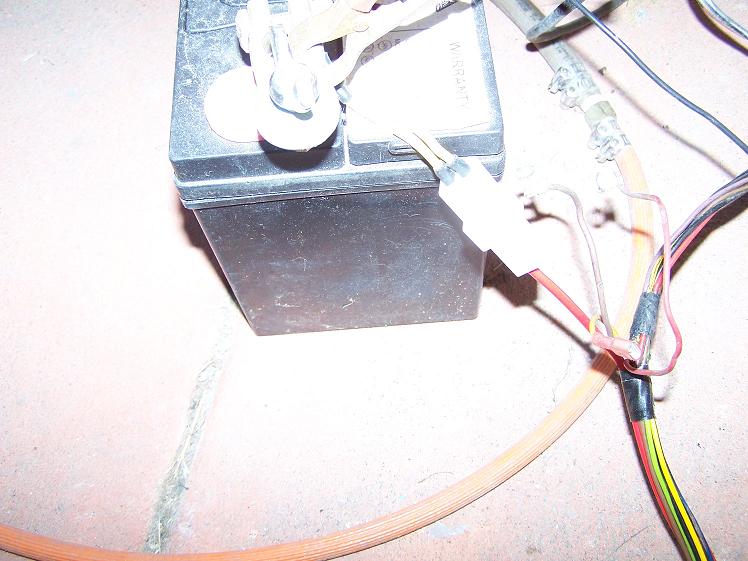 (Wiring 007s.JPG) (Wiring 007s.JPG)
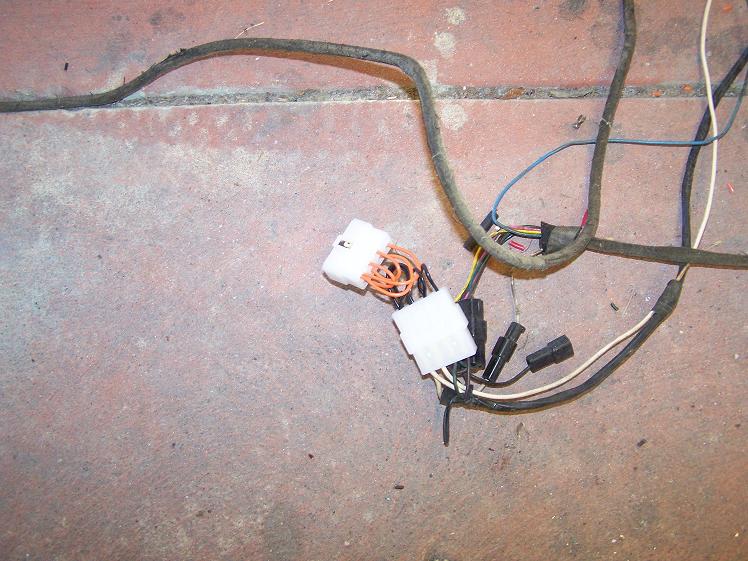 (Wiring 011s.JPG) (Wiring 011s.JPG)
Attachments
----------------
Dash removal (48)s.JPG (129KB - 370 downloads)
Wiring 001s.JPG (95KB - 399 downloads)
Wiring 002s.JPG (87KB - 381 downloads)
Wiring 004s.JPG (95KB - 397 downloads)
Wiring 005s.JPG (87KB - 375 downloads)
Wiring 007s.JPG (73KB - 380 downloads)
Wiring 011s.JPG (93KB - 377 downloads)
|
|
| |
|
Expert 5K+
Posts: 8443
Location: Perth Australia | Main harness taped up
The loose ends will be plugged up once its fitted
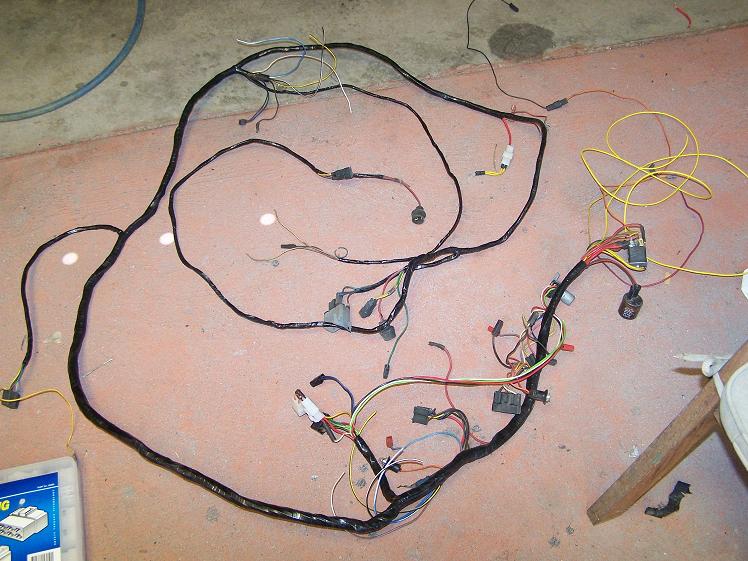 (Wiring 12s.JPG) (Wiring 12s.JPG)
Attachments
----------------
Wiring 12s.JPG (94KB - 387 downloads)
|
|
| |
|
Expert 5K+
Posts: 8443
Location: Perth Australia | Its alive !!!!!!
Starts off its own key now and has some lights
Been nearly 2 years since it was able to do that
|
|
| |
|
Extreme Veteran
Posts: 337
Location: UK | Crafty system for the indicator/brake and reverse lights youve done.. Luckily in the UK the cut off date is 1965 so I didn't need to do that although someone did do half the job before I got my car so I needed to change it back. Love the picture if it all laying wired up in the floor. Great progress Mick! |
|
| |
|
Expert 5K+
Posts: 7807
Location: Williams California | Looks good, Mick.
That electrical work is right up your alley!
---John |
|
| |
|
Expert 5K+
Posts: 8443
Location: Perth Australia | Did the Alternator conversion (mounting) this morning
Wasnt as hard as I thought it would be, only took 1.5 hours, including waiting for paint to dry
The mounting bracket was made from the original genny mount, no modification to the adjusting bracket at all, even uses the same belt
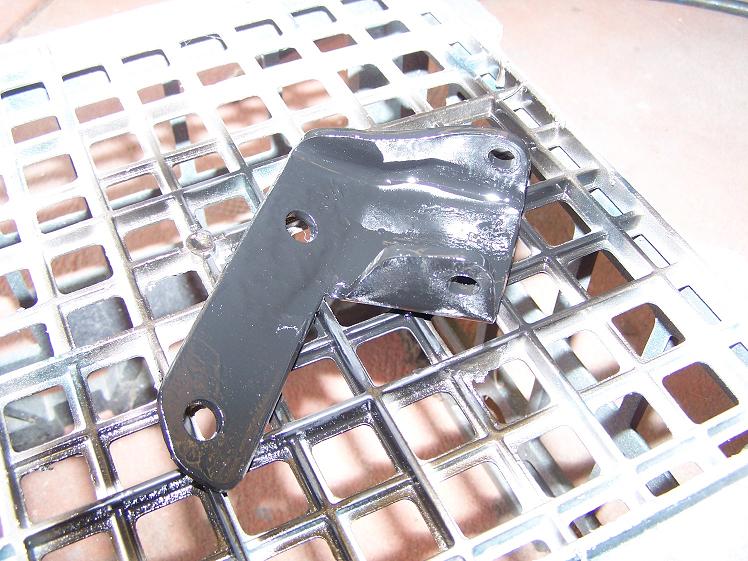 (Alternator 001s.JPG) (Alternator 001s.JPG)
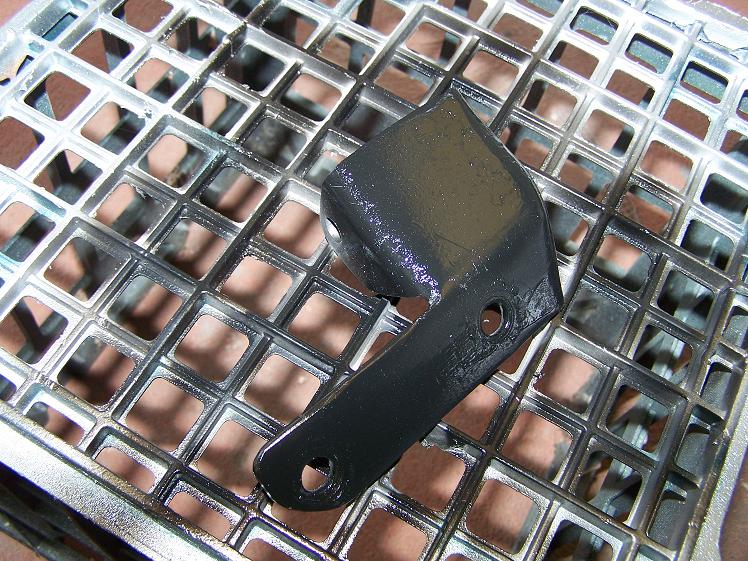 (Alternator 002s.JPG) (Alternator 002s.JPG)
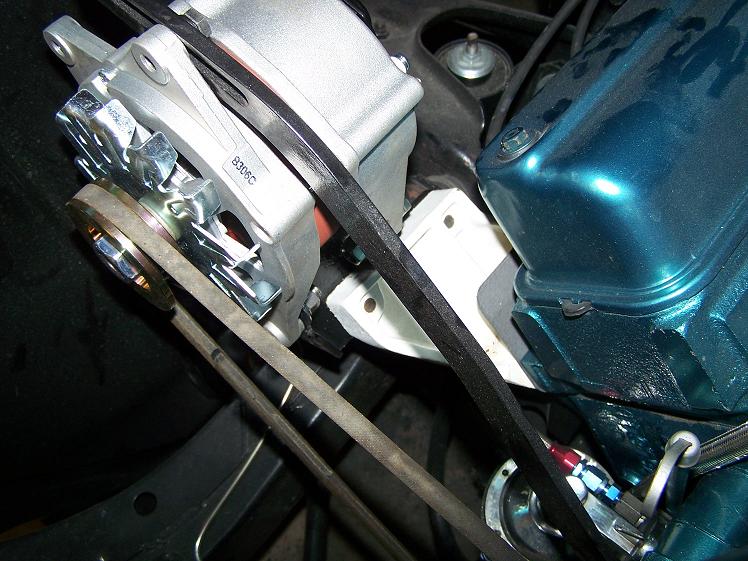 (Alternator 004s.JPG) (Alternator 004s.JPG)
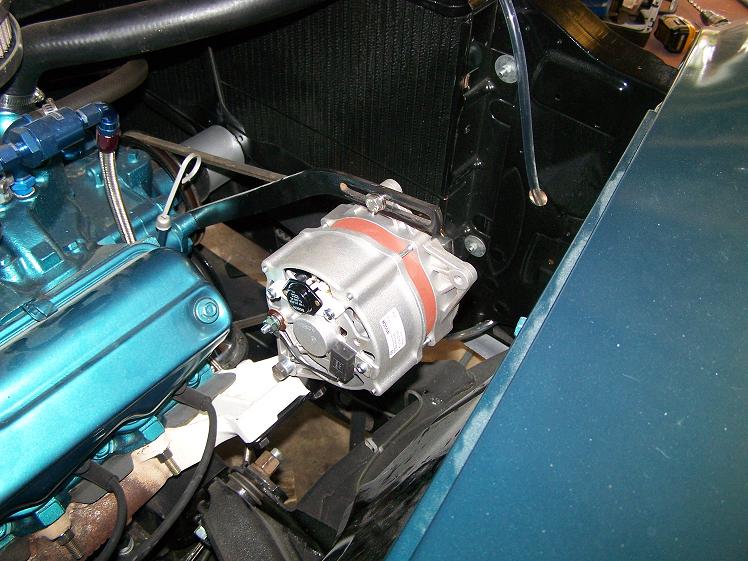 (Alternator 006s.JPG) (Alternator 006s.JPG)
Attachments
----------------
Alternator 001s.JPG (103KB - 374 downloads)
Alternator 002s.JPG (140KB - 392 downloads)
Alternator 004s.JPG (95KB - 368 downloads)
Alternator 006s.JPG (94KB - 360 downloads)
|
|
| |
|
Expert 5K+
Posts: 8443
Location: Perth Australia | Just looked at the pics better then
The engine was idling when I took them, fast shutter on the camera
You can also see how good (note the sarcasm) the VHT exhaust paint is, wasted my time doing that
|
|
| |
|
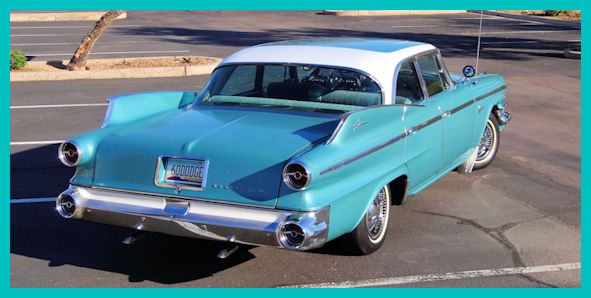
Expert
Posts: 2312
Location: Arizona | I cleaned, primed, and used the special disc brake paint on my Firebird calipers and the paint was coming off before I finished getting the car all back together. Also found the same on "high temp" paint, their idea of high temp and my manifolds idea of high temp don't seem to agree. |
|
| |
|
Expert 5K+
Posts: 8443
Location: Perth Australia | I hate buying rubbish
Anyway, engine is all wired up and the Alternator and warning lights work fine
Still not happy with the R/H back door, so I am "adjusting" the sill some more to get the door a little further down.
Its about right now (just a little more) then time to fix the paint
Edited by ttotired 2013-10-20 4:51 AM
|
|
| |
|
Expert 5K+
Posts: 8443
Location: Perth Australia | I havnt updated for a little while
I have the L/H doors on and fitting now
I have started messing with the grill and so forth, but its all sort of just sitting there at the moment
I have been trying to get something going with the interior, but I have had quotes in the $10000.00 range to do it all and thats just not going to happen.
I am looking at buying a sewing machine to have a go myself.
I have read Wizards excellent thread on how he did his interior and have taken a lot of inspiration from that (Thanks Wiz), not sure I will look like I am about to go out on the town when I'm doing it though, more like deshreveled and frustrated
The walking foot sewing macine is proving to be a bear to find (one thats under $2000 anyway)
I am going to a haberdashery (I think thats what you call it) this afternoon to talk sewing machines, apparently, you can get a walking foot attatcment for machines now?
Anyway, a few pics of it today
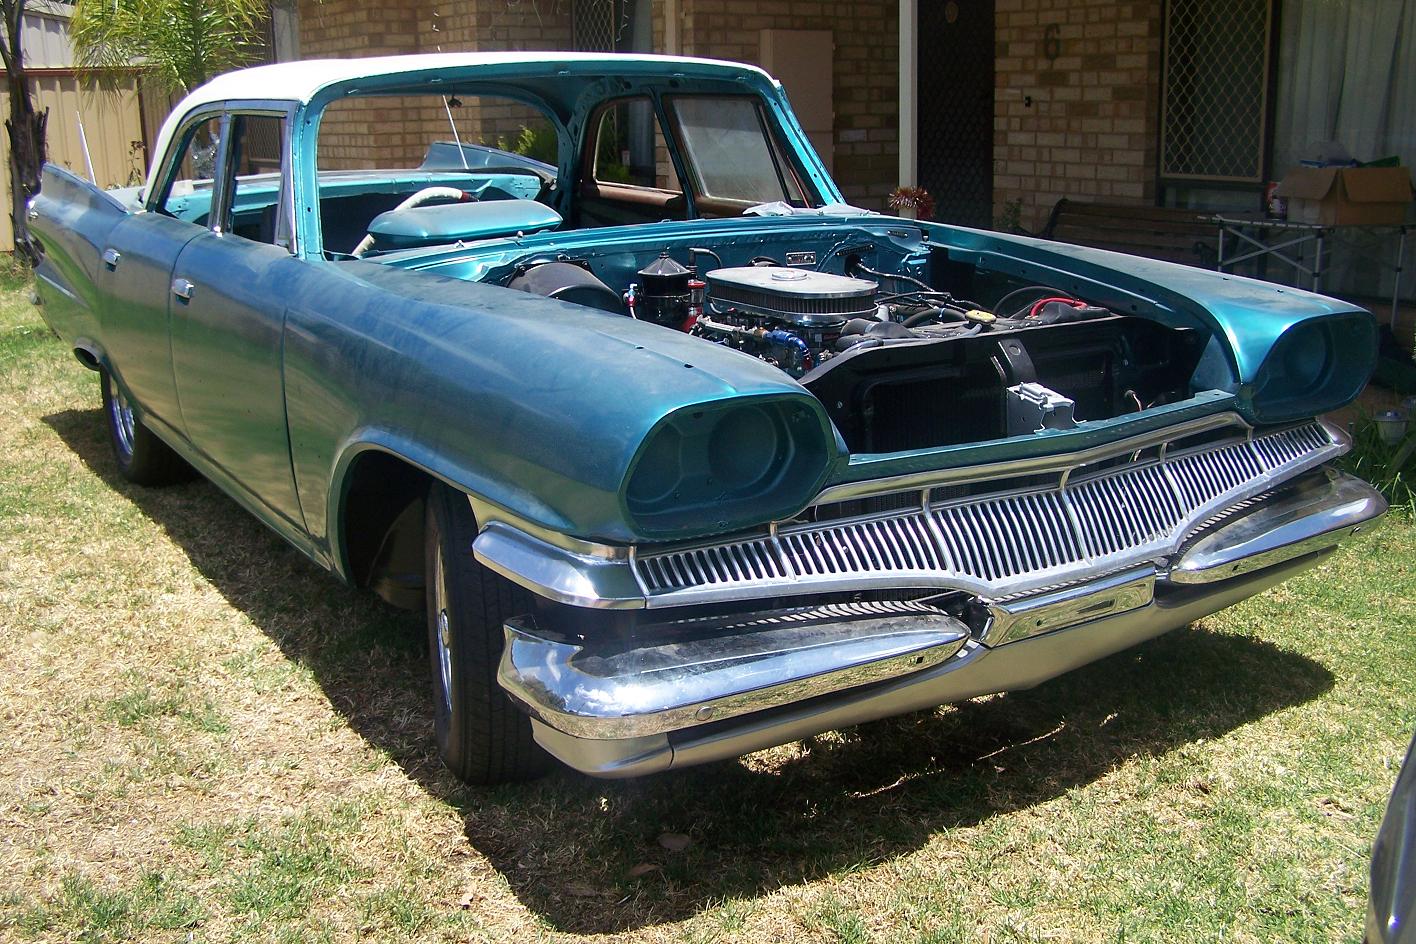 (dodge81213 003s.JPG) (dodge81213 003s.JPG)
 (dodge81213 004s.JPG) (dodge81213 004s.JPG)
 (dodge81213 005s.JPG) (dodge81213 005s.JPG)
Attachments
----------------
dodge81213 003s.JPG (337KB - 370 downloads)
dodge81213 004s.JPG (355KB - 365 downloads)
dodge81213 005s.JPG (329KB - 382 downloads)
|
|
| |
|
Elite Veteran
Posts: 982
Location: Upper Hunter NSW Australia | ....
...
Don't know why but I've missed these recent months updates pics/info on your rebuild Mick ?? .... until now anyway that is.....
Really like your recent build pics they give me inspiration for mine
The color and the period style wheels ( Cragar SS's ??? ) really do it for me .
That alt conversion to me is a good idea, looks like one of them chinese Holden/Ford Bosch copies, any feedback on them Mick ???, guess you've probably used them in some customer cars as well ???
I'm gonna be looking for a foot walkin' sewing machine for ya Mick, you and me are gonna learn how to sew by correspondence if we have to !!! .
There's gotta be some budget friendly WF machines over there on your side of the paddock .................
Meantime, I'm already talkin' with all the old granny's I know 'bout sewing stuff.
I think I know how to thread a needle now!!!
...
.. |
|
| |
|
Expert 5K+
Posts: 8443
Location: Perth Australia | Threading a needle is a fantastic start
I have heard its really hard to get things happening in the sewing scene if you dont do that, I could be wrong though (its happened before)
They are cragars, 14" fronts and 15" rears
I have just started (yesterday) on the L/R door, bit more work than I thought it was going to be (as just about everthing has been), found a couple of rust holes under the door rubbers, so I spent the bulk of yesterday making little patches and welding them in, done now just trying to get a few small dents out of the scin that were just filled before (didnt know they were there untill I got all the paint off)
I hope to have that door painted and back on by next w/e
Still not sure about the sewing stuff, went to buy a machine last week and it was to small (and wasnt a walking foot one), so I asked about another machine he had and it would have been perfect
It was a monster singer, looked a bit rough cosmetically, but otherwise really good, then he hit me with the price $3000 and wasnt willing to bend (as far as I wanted anyway, like 1/3 the price, I tried), so anyway, I rang another bloke and his machine wont do it either, but he is an upholterer and he said he will come and have a look before newyears, so I might dodge the sewing bullet yet, otherwise, Ill keep looking
|
|
| |
|
Expert
Posts: 2788
Location: USA - KY |
Looking GOOD, ttotired!
|
|
| |
|
Expert
Posts: 2312
Location: Arizona | Ttotired - years ago I did some sewing of leather and was able to rent a machine. So instead of buying one perhaps you can find one to rent, or maybe the guy you talked to about the $3000 one would be willing to rent it to you for a couple months. |
|
| |
|

Board Moderator & Exner Expert 10K+
Posts: 13049
Location: Southern Sweden - Sturkö island | Just read through your thread Mick - you put in a lot of effort and the result will be a very nice car. If you should need any advises for the eventual upholstery project, just ask and I'll try to guide you through it. |
|
| |
|
Expert
Posts: 3034
Location: N.W. Fla. | EricDownunder - 2013-07-23 4:44 AM
Thanks for that , I have been quite concerned the 500cfm carbs would over fuel the small block 318 but yours sounds great. I should put up some picks of mine and you would see we are doing a similar thing. looking forward to seeing your build progress.
Regards, Eric A carb expert on another Forum recently posted that in reality you don't just add the 2 carbs CFM together. He said that in reality inefficientcy of the linkage, tuning of each carb, getting the 2 synced to prevent bogging, and a bunch of other factors results in 2 500s only able to flow in the 700-800 CFM range, and that with all in. Still more than a 318 needs, but will probably only hurt you in the milage area. Like the Cragars also!
Edited by Mopar1 2013-12-28 2:22 PM
|
|
| |
|
Expert 5K+
Posts: 8443
Location: Perth Australia | Thanks for the coments
Wiz, it was your upholstory thread that taught me of the importance of the "walking foot" machine, I would have otherwise gone head first and bought some clapped out domestic crappy machine
I didnt ask about renting the 3 grand machine (didnt think to actually), but as he is selling it for his father (in a nursing home with dementure), I dont think he would, just in case I broke it
|
|
| |
|
Expert 5K+
Posts: 8443
Location: Perth Australia | Had a little oops just before
I backed the dodge 1/4 of the way out of the garage to move some stuf from in front of it
About 5 minuits later (for no apparant reason) a big steel pipe that I had resting against the wall for months decided to no longer be happy where it was and fell onto the fin denting the fin trim and squashing the fin down a bit.
Of coase there were some choice words spoken to the pipe (it didnt seem to care that much)
Anyway, as I am/was about to prime the door, I stopped on the door, beat the dent back out of the fin and have just finished priming both the door and the l/r 1/4 panel.
This car is really fighting me every step of the way (makes me more determined to get the darn thing on the road just to spite it)
Glad I am getting good at this panel beating stuff
|
|
| |
|
Elite Veteran
Posts: 982
Location: Upper Hunter NSW Australia | ....
..
Two days ago one of the hydraulic rams dropped out of my 2 post hoist ( must have a sloooow leak back ) and dented the roof stainless on my FB Holden parked underneath it.
I'm sure I used the same swear words you used Mick !!!
...
.. |
|
| |
|
Expert
Posts: 2788
Location: USA - KY | 
Sorry to hear about the items falling from the sky and denting your cars, guys! Poop!
You have fought tenaciously, ttotired to overcome all obstacles...it will all be sooooo worth it!
|
|
| |
|
Expert
Posts: 3034
Location: N.W. Fla. | VAN HELSING - 2013-12-29 4:30 AM
Two days ago one of the hydraulic rams dropped out of my 2 post hoist ( must have a sloooow leak back ) and dented the roof stainless on my FB Holden parked underneath it.
.. Hate to hear of damage, but @ least it was a Holden instead of a Mopar or Falcon.... |
|
| |
|
Elite Veteran
Posts: 982
Location: Upper Hunter NSW Australia | Mopar1 - 2013-12-30 6:38 AM
VAN HELSING - 2013-12-29 4:30 AM
Two days ago one of the hydraulic rams dropped out of my 2 post hoist ( must have a sloooow leak back ) and dented the roof stainless on my FB Holden parked underneath it.
.. Hate to hear of damage, but @ least it was a Holden instead of a Mopar or Falcon....
....
..
Yeah, I'm hearing ya !!
I have 19 Holdens here as drivers/rebuilders/parts cars so plenty of parts here, if not it's just a quick phone call and either new or used parts are here in days.
Ive got only one MOPAR and a US model at that. Parts are much more expensive ( double/tripple'/quadruple priced ) , exchange rate lowering , shipping expensive , lots of US sellers don't ship international etc etc etc...........
So yep, I AM happy it hit my Holden and not my MOPAR !!!
Back to Mick's rebuild................
...
.. |
|
| |
|
Expert 5K+
Posts: 8443
Location: Perth Australia | This is where its at as of today
I need to finish painting the bonnet and fit it back on and if you look closely, you will see a few paint chips here and there.
After the bonnets on, I am going to decide wether I paint it again or not (still got plenty of paint and its not to far together that it cant come apart a bit yet)
Not sure yet, one day yes the next no
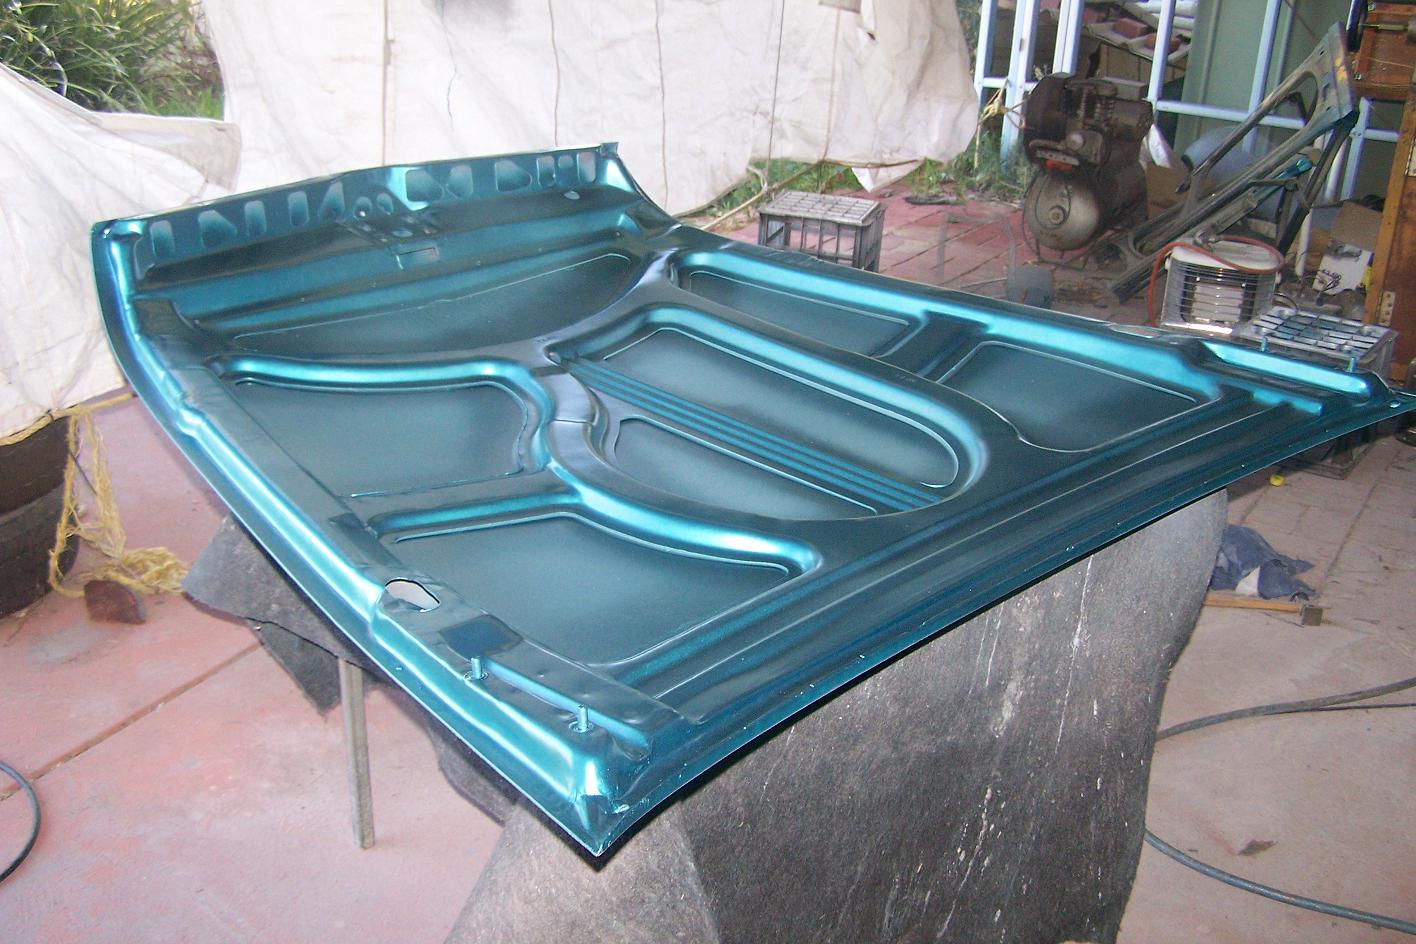 (220114 001s.JPG) (220114 001s.JPG)
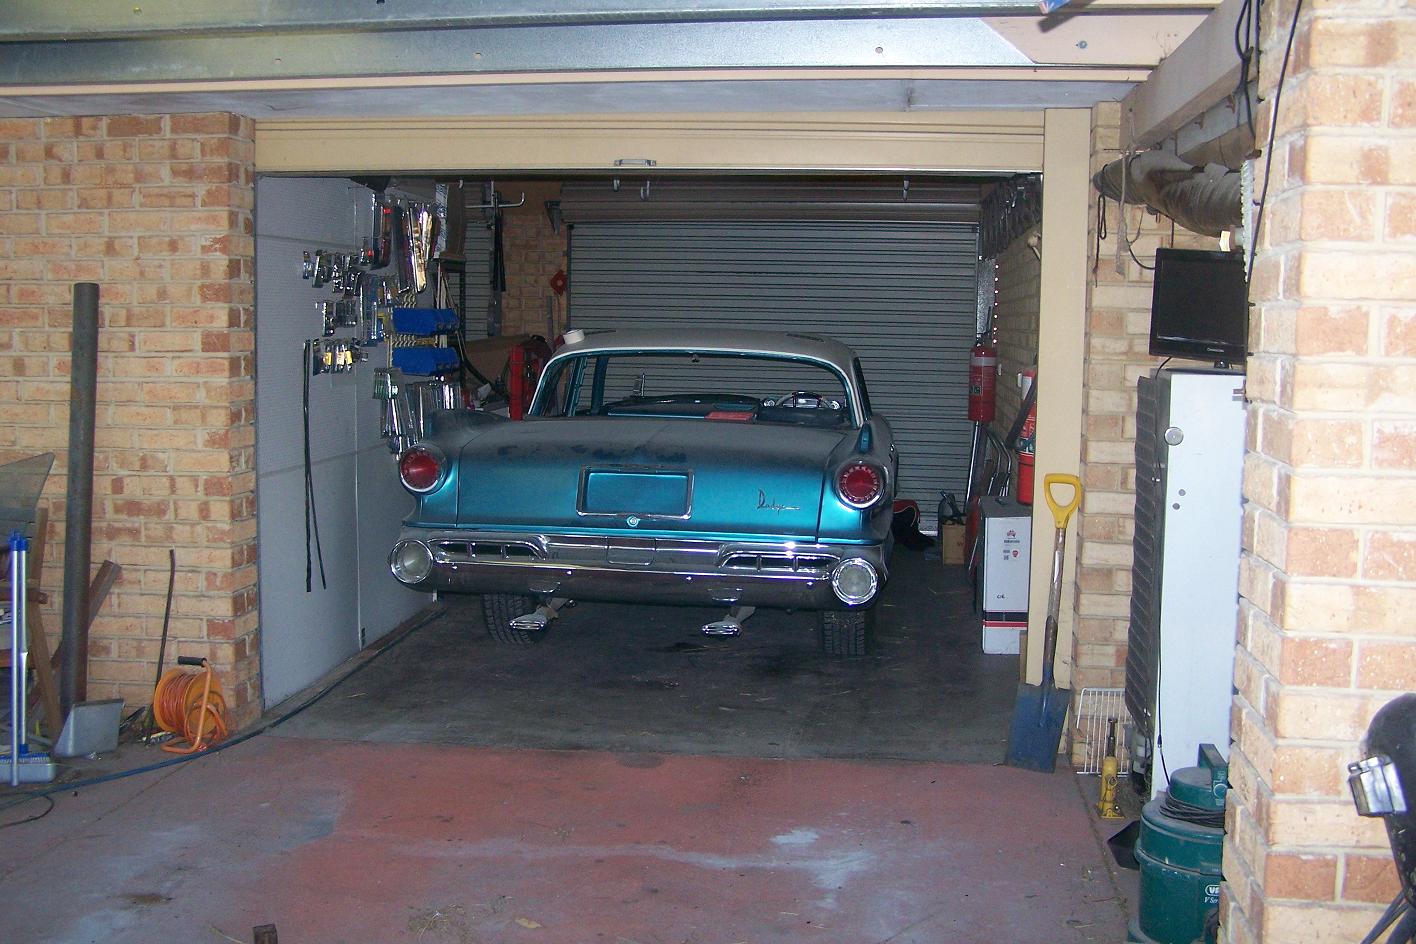 (220114 002s.JPG) (220114 002s.JPG)
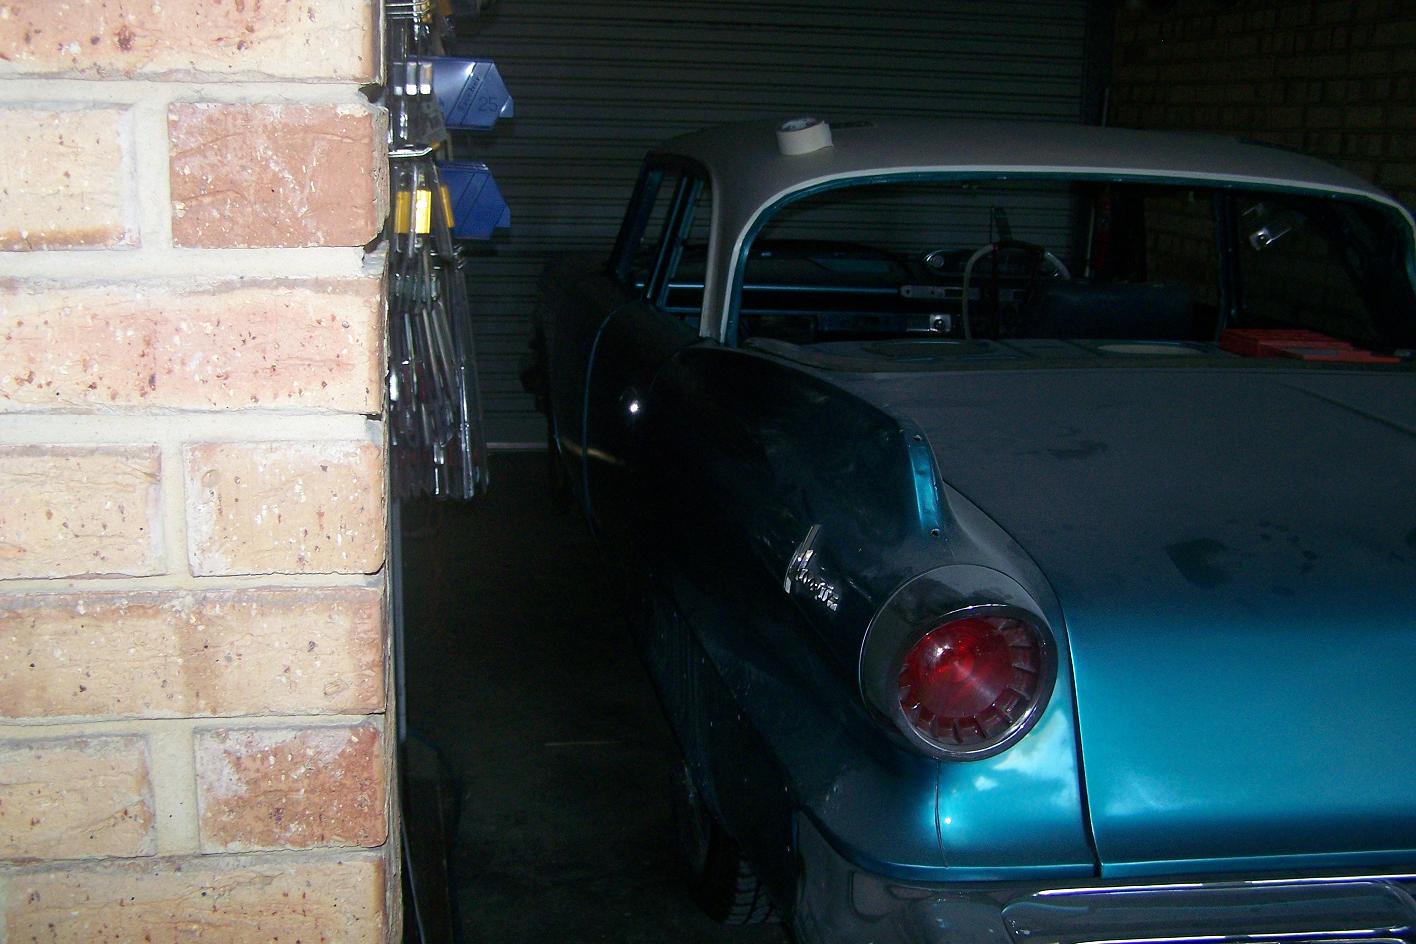 (220114 003s.JPG) (220114 003s.JPG)
 (220114 004s.JPG) (220114 004s.JPG)
Attachments
----------------
220114 001s.JPG (206KB - 365 downloads)
220114 002s.JPG (213KB - 376 downloads)
220114 003s.JPG (164KB - 366 downloads)
220114 004s.JPG (162KB - 394 downloads)
|
|
| |
|
Elite Veteran
Posts: 1120
Location: Brisbane, Australia | HAPPY NEW YEAR MICK SORRY TO HEAR ABOUT THE CHICKEN LIKEN EFFECT BUT I'M SURE YOU WILL HAVE IT RIGHTED IN NO TIME. AT LEAST IT DIDNT GET SCORCHED IN THE FIRES OVER YOUR WAY. BY THE LOOKS OF THE PIX IT IS REALLY STARTING TO TAKE SHAPE. HOPE TO SEE IT IN THE FLESH LATER THIS YEAR
BOB |
|
| |
|
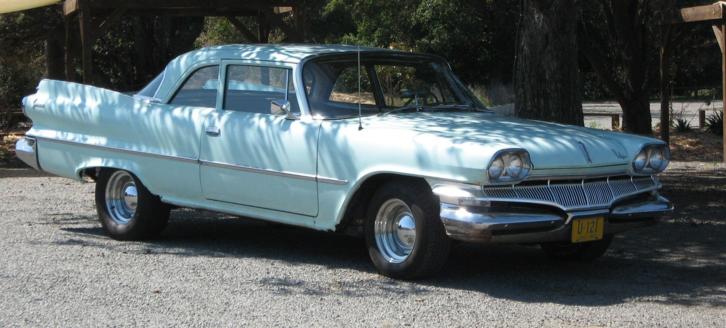
Veteran
Posts: 203
Location: Christchurch, New Zealand | Wonderful wonderful stuff just read the thread from the start, ............ Interesting thread for me as I need to do my 60 Dart pleased I dont have any roof issues although I have many of the other areas that rust to sort mainly salt damage ex Ohio car. The plodge thing is interesting over here NZ all the 60 Darts were Pioneers yet yours were all Phoenix's both with the Plymouth dash and in NZ the Plymouth steering wheel not the Dodge as the Aussie Phoenix had .............. Cheers bigears |
|
| |
|
Expert 5K+
Posts: 8443
Location: Perth Australia | Interesting about the phoenix/pioneer thing, you would have thought there wouldnt be a difference between the 2 countries
This car has been (and still is) a hell of a lot more work than I was anticipating, it really was going to just be a 6 month makeover and used as a reference for my plymouth, but I am one of those people that if you see something thats not so good, I have to fix it, or the whole thing is a waste of time.
In saying that though, a few dents showed up when the colour went on that I have left (didnt pick them earlier) and they will probably be there once its on the road.
This car will be a general run around car for me once its going (I use my work car for that at the moment), so its likely to get little knocks here and there.
The interior is my biggest stress at the moment, the prices I have been quoted to do it are stupid money (in my opinion) and it may end up going together without it being as I want and will get done later.
I have found some mylar that I think will do the trick on the door panels.
I have been looking at how they (the door panels) were constructed and they seem to be plastic welded and not stitched at all, I am thinking of getting a cheap iron and welding a 1/4" peice of steel to it to iron on (plastic weld) the mylar and vinyl pieces together like orriginal, we will see how that goes.
Thanks for the comments
|
|
| |
|

Expert
Posts: 1737
Location: Hay Lakes, Alberta, Canada | Wow!! Lookin good!!
Too bad you're not over here...my friend does upholstery. In trade, all you have to do is work on his house... |
|
| |
|
Expert 5K+
Posts: 8443
Location: Perth Australia | I am painting the top side of the bonnet this morning for a second time.
When I fitted it, the r/h/side stuck up above the endge of the gaurd by about 1".
It had me puzzled for a bit, but it turns out that it had at some stage had a stuck r/h hinge and had been forced closed, of coarse, bending it just in front of the hinge bolts.
Even with a top coat of paint, it was very hard to tell, what gave it away (apart from it not sitting down) was the edge of it was more curved than the l/h/side.
To fix it, I had to cut the webbing under the skin and push the corner up hard and weld the (now opened up) gaps in the webbing and re check it.
I was going to use another bonnet (I have 3 more to choose from), but they all have varying damage and it would have been just as much a pain in the butt to fix any of them, so I stuck with it.
I havnt re fitted it again after it was ok before, so I hope it will still be ok
Watch this space for all the astrixes if it went off again after finish welding the tacs that were holdind it right before
God I hope the plymouth doesnt give me as much of a hard time as this thing has
|
|
| |
|
Expert 5K+
Posts: 8443
Location: Perth Australia | here you go
Its grown another panel
 (16214 001s.JPG) (16214 001s.JPG)
Attachments
----------------
16214 001s.JPG (240KB - 363 downloads)
|
|
| |
|
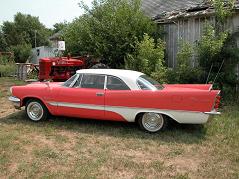
Veteran
Posts: 279
Location: Klein, TX | Excellent job. Enjoyed reading and seeing the great photos. |
|
| |
|
Expert 5K+
Posts: 8443
Location: Perth Australia | Cheers Bill
I havnt had a chance really to do much on it the last few weeks, so thats still pretty much where its at
|
|
| |
|
New User
Posts: 1
| G'Day Mick thought you and everyone else on here might like this page www.facebook.com/MirrorChristine is a page detailing the build of a US-spec RHD clone of the movie car Christine starting with a genuine red 2 door hardtop USA ... Cheers Andrew
Edited by Crashrac 2014-03-26 11:48 AM
|
|
| |
|
Expert 5K+
Posts: 8443
Location: Perth Australia | Welcome to the Mix Andrew
Meet one of my brothers everyone
|
|
| |
|
Expert 5K+
Posts: 8443
Location: Perth Australia | Got stuck into the roof lining finally
I have isulated the roof with 1/2" sticky foam stuff that has the metal stuff stuck to it (I waited a few days to make sure it didnt start comming off)
Anyway, I still have a few wrinkles to get out, but thats mostly getting it right on the sides
It was good to finally (after 2 years) getting a rear window back in
Just a note to anyone having a go at doing this, dont forget the little clips that hold the window trim in, its not fun doing the window twice
Ask me how I know that one
Anyway, by the time easter is done, I should have the windscreen in as well.
I am going to get as much totally done now while I wait and see what happens with the interior
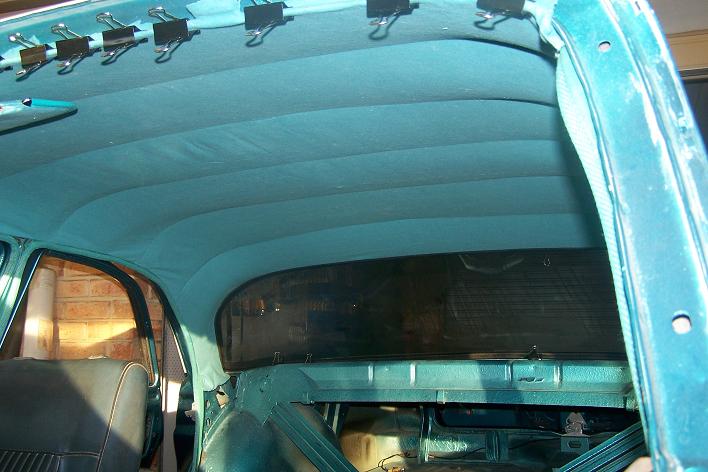 (roof lining 002s.JPG) (roof lining 002s.JPG)
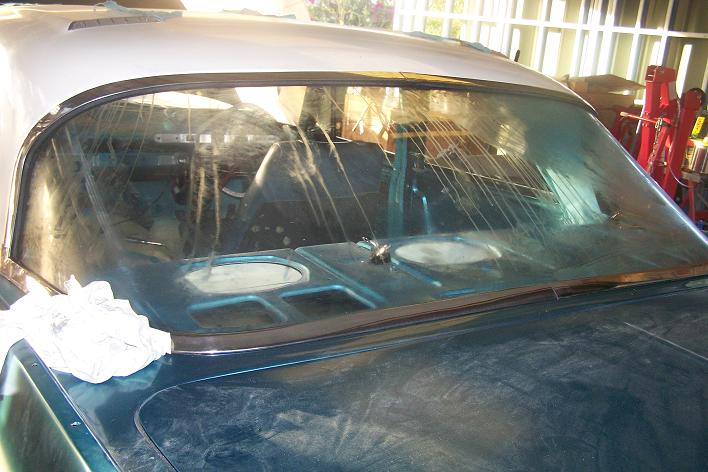 (roof lining 003s.JPG) (roof lining 003s.JPG)
Attachments
----------------
roof lining 002s.JPG (64KB - 332 downloads)
roof lining 003s.JPG (70KB - 338 downloads)
|
|
| |
|
Expert
Posts: 2788
Location: USA - KY |
Hope the day is going well, and you're winning the battle of the headliner!
|
|
| |
|
Expert 5K+
Posts: 8443
Location: Perth Australia | I got the front windscreen in this morning without breaking it, so I can breath now, it took about 3 hours of very carefull fighting with the rubber (gasket), but it went in
Phew
No more reaching through the windsreen hole to start and stop the engine, I will have to sit in it now, what a shame lol
So heres a question, since I bought the windscreen, I have had it resting on the rubber in the opening on my 60 plymouth, which is a 4drht, and it looked like it would fit, I thought there was something different with the shape of the ht ones and the sedan ones?
So what is the difference?
Thing is, at some stage, I still have to do this all again on the plymouth
|
|
| |
|
Expert 5K+
Posts: 8443
Location: Perth Australia | Now that the front and rear glass is in, I have now put the door glass all in and have cut the paint (yes I got carried away in one spot and went to far ).
Did a little bit more lining up and am starting to do the exterior chrome ect.
I am doing everything I can now while I try and get the insides sorted out.
I have to get some windscreen sealant to (leaks like a sieve), but I expected that.
|
|
| |
|
Expert 5K+
Posts: 8443
Location: Perth Australia | It got its face back today
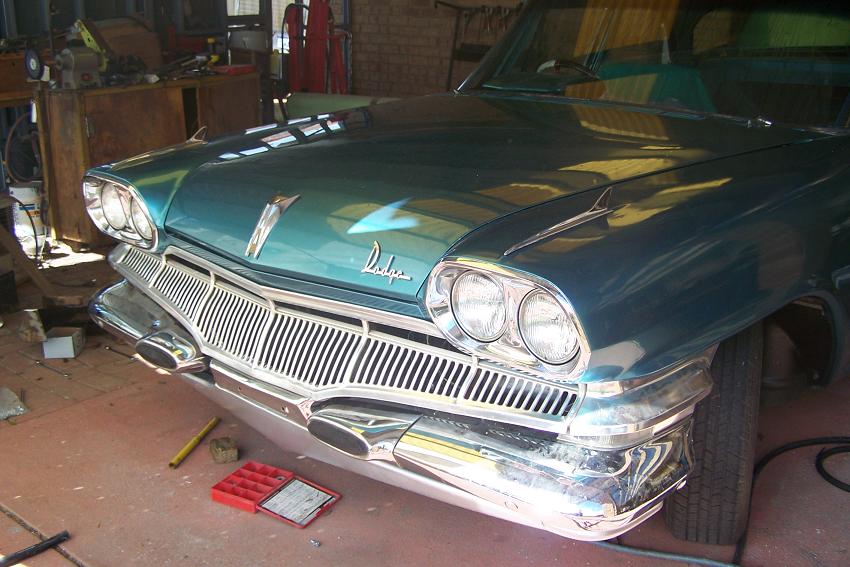 (face s.JPG) (face s.JPG)
Attachments
----------------
face s.JPG (94KB - 338 downloads)
|
|
| |
|
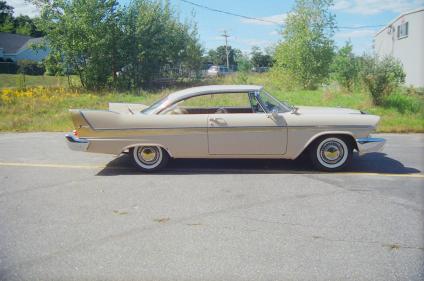
Expert
Posts: 1740
Location: Alaska | Hey!! big mistake!! You put the steering on the wrong side!! Really starting to come together.
Edited by 58coupe 2014-05-15 9:58 AM
|
|
| |
|
Expert 5K+
Posts: 8443
Location: Perth Australia | I thought something looked off?
I have been trying to resurect some stainless over the weekend, not perfect, but I can live with it
The alloy strips were just cleaned with a light acid (used by car detailers to get inground dirt out of paint)
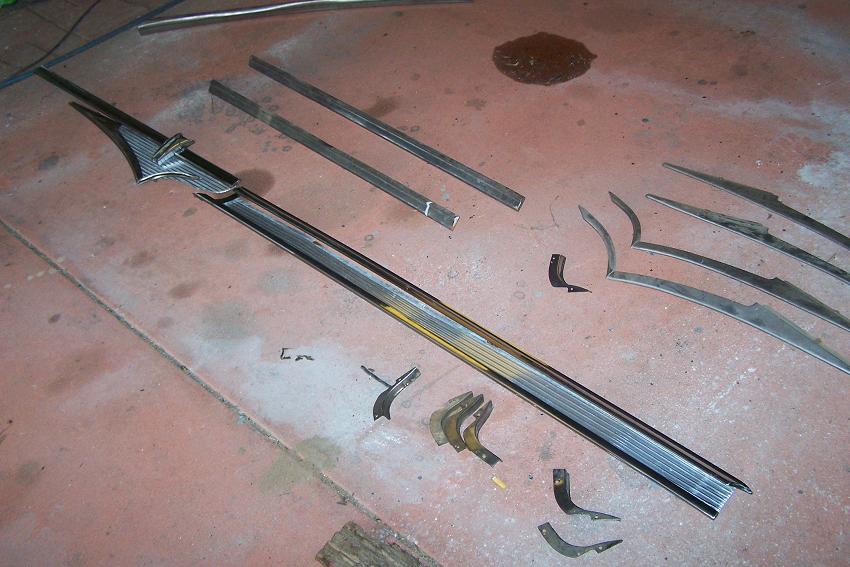 (sstrim 001.jpg) (sstrim 001.jpg)
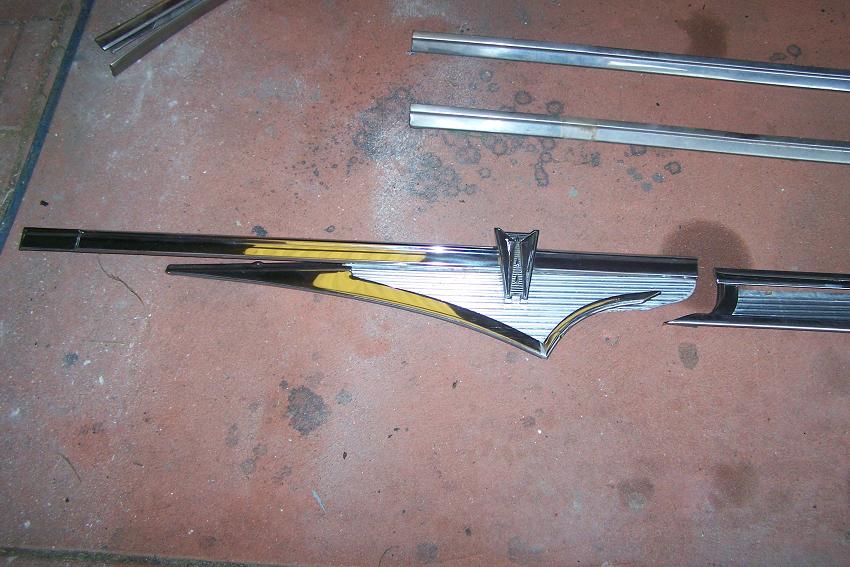 (sstrim 002.jpg) (sstrim 002.jpg)
Attachments
----------------
sstrim 001.jpg (88KB - 324 downloads)
sstrim 002.jpg (92KB - 335 downloads)
|
|
| |
|
Elite Veteran
Posts: 1120
Location: Brisbane, Australia | I'll have to start planning my trip to Perth so I can have a ride!!!!
|
|
| |
|
Expert 5K+
Posts: 8443
Location: Perth Australia | Ha ha
Dont rush Bob
We would be sitting on milk crates, I dont have an insides sorted yet, one of these days I will bite the bullet and decide wether to cut off an arm and pay someone to make it up or I will cut off an arm to buy a sewing machine and do it myself
The cutting off of an arm seems to be an un escapable part, its the have a machine so i can do both cars or save some hassle and get it done part that I am procrastinating on
|
|
| |
|
Expert
Posts: 3034
Location: N.W. Fla. | 58coupe - 2014-05-15 8:57 AM
Hey!! big mistake!! You put the steering on the wrong side!! Really starting to come together. Looks like it's on the right side to me. |
|
| |
|
Exner Expert 19,174 posts. Neil passed away 18 Sep 2015. You will be missed, Neil!
Posts: 19146
Location: bishop, ca | Wow; that car has come SO far!!!!
BTW, how many kilometres is Brisbane from Perth (and: vice versa)?
Ans: a FUR piece.
|
|
| |
|
Expert 5K+
Posts: 8443
Location: Perth Australia | 4336 Km - Distance from Brisbane to Perth
Its a bit of a drive
Try and get some more up of the car later
|
|
| |
|
Elite Veteran
Posts: 1120
Location: Brisbane, Australia | Its too far going that way!
I hadnt considered taking the Desoto but thats a good idea we come by train! |
|
| |
|
Expert 5K+
Posts: 8443
Location: Perth Australia | That would be cool Bob
Then I can drool over the wonderfull work you did on that car
|
|
| |
|
Expert 5K+
Posts: 8443
Location: Perth Australia | Just got it on a tow truck to go and get a decent exhaust on it
First time its been away from home since I got it
I messed around for ages with a system I got in a box from the US and gave up
When I bought the exhaust, I totally forgot how different it would need to be because of the steering being on the correct side ( ) and it also only had
1-3/4" tail pipes that turned down (pretty ugly really)
Anyway, hopefully I get it back today
|
|
| |
|
Elite Veteran
Posts: 1120
Location: Brisbane, Australia | MUST BE GETTING CLOSE, MICHAEL |
|
| |
|
Expert 5K+
Posts: 8443
Location: Perth Australia | Still a long way Bob
I am going over some stuff that I kind of rushed to get it together that I am not happey with, the exhaust being 1 of them
I have a leaking diff pinion seal that will be next, be kind of handy to have a hoist to do this under car stuff, but I dont have the roof height fo one, so its all done using jack stands (1/2 the reason the exhaust has been a pain)
Still no closer to an interior yet, but nearly bit the bullet today as the car was on the truck to get it taken to a trimmer, but I still have some inside bits that have to be painted ect, so I am holding back.
Just doing bits inbetween jobs and today I have nothing booked in
|
|
| |
|
Expert 5K+
Posts: 8443
Location: Perth Australia | Got it back, has a nice bark to it, so now onto the other little things
It was funny it not being there, I was tempted to get the plymouth and put it there so I had something to stare at when I went out for a smoke
|
|
| |
|
Location: North Australia | Getting closer Mick! When ya gonna post some more photos?
Steve. |
|
| |
|
Elite Veteran
Posts: 982
Location: Upper Hunter NSW Australia | .........
Coming along well there Mick,
Did the exhaust shop end up using some or all ofthe exhaust system you got from the US or did they start with a newy from scratch ?
......... |
|
| |
|

Expert
Posts: 1384
Location: Ocala, Florida | Excellent work! You will be cruising in no time. I can't see how you did all this work without retractable castors. |
|
| |
|
Expert 5K+
Posts: 8443
Location: Perth Australia | Not really been a lot to photograph Steve, just been doing little fiddly things like spending 1/2 a day trying to find a small duct hose for the demister vents that I carefully put away, gave up in the end and went on to do something else
Found it yesterday while I was looking for something else (that I didnt find)
They used the mufflers and the l/h engine pipe (most of it anyway)
They put 2 bolt flanges at the back of the gearbox mount and on the bumper side of the arch that goes over the diff housing, so if I need to take it off, it will all drop away nicely
Also means if I want to play rev head, I can unbolt the front flanges and bolt on pipes bent to about 70 deg for strait outs 
I dont have them yet
And as for the castors, it really has been quite the struggle, the amount of times I have nearly weakened and gone and bought them, the projects not done yet and it may still happen, and I still have the plymouth to do yet
Thanks for the comments guys
|
|
| |
|
Expert 5K+
Posts: 8443
Location: Perth Australia | Been doing a litle more tinkering
Finally got around to hooking up the kickdown rod and putting in braided hoses for the trans cooler
Still not getting the best out of these stupid carbies, it revs like a champ just sitting there, but when I floor it on a test drive (any police reading this, its only in my drive ) it just bogs down
I have the accelerator pum on the least active hole, I am going to try the other 2 holes and see if its leaning out
Hard to believe that would be the problem, but it pings its head off when it happens as well
Timing is at 8 degrees and I have tried moving the dizzy around as well
Stupid callibration kits will cost nearly as much as a carb
Oh, and had a trimmer come and have a look at it over the weekend, but havnt had the bad news yet
I want it on the road this summer
|
|
| |
|
Elite Veteran
Posts: 982
Location: Upper Hunter NSW Australia | ........
Strange that it's revving fine in the drive but bogging under road loading, could be many variables causing it, like all these sorts of things , I always start at the most obvious and less costly/time consuming items and work up from there.
It doesn't take any money and not much time to move the accel pump plunger settings ' eh .
I guess your vac advance is working OK on the distributor and is receiving good vacuum ?
I have a brand new multi carb sychronizer here I can send you if you want it, might help with fine tuning later on ?
On this side of OZ you are permitted to " test drive" a car for the purpose of establishing it's fitness for road worthy so if the cops pull you up then that's what you are doing OK , should be same/similar laws over there in WA I'd imagine ??
Just don't go running a blacky on the asphalt Mick , that one might stretch the claim a bit !!!
........... |
|
| |
|
Expert 5K+
Posts: 8443
Location: Perth Australia | I think you need a permit to do it here, thought that was the same over there as well , actually
A blacky would be a total accident caused by the distraction the police vehicle caused, so it would be their fault
I might get some play time today, but I have to adjust the bands and stuff before it goes on its next lap
|
|
| |
|
Elite Veteran
Posts: 982
Location: Upper Hunter NSW Australia | ..........
I think the unregistered/unlicensed " test drive " permitted for the purpose of registration here would be limited to within' a few miles of the vehicle owners residence or vehicle storage/repair address.
It think if you picked the kids up from school, went shopping for groceries and had a night out at the cinema and THEN got pulled over by the cops going home on a " test run " then I guess the limit of reason for useage would be long gone and a hefty fine would result .................
............. |
|
| |
|
Expert 5K+
Posts: 8443
Location: Perth Australia | Bought this today to help me iron out some running issues
Its been at least 20 years since I have even seen one of these, let alone used one
It has told me that I am not getting correct spark to cylinders 2 and 7, which will probably account for the intermittant back firing and bogging down under load problems I am chasing out
The right tools can sometimes make all the difference, and it also has an exhaust gas analyser, but I havnt played with that yet
I love new toys
 ($_20.jpg) ($_20.jpg)
Attachments
----------------
$_20.jpg (55KB - 326 downloads)
|
|
| |
|
Expert 5K+
Posts: 8443
Location: Perth Australia | heres a few action shots
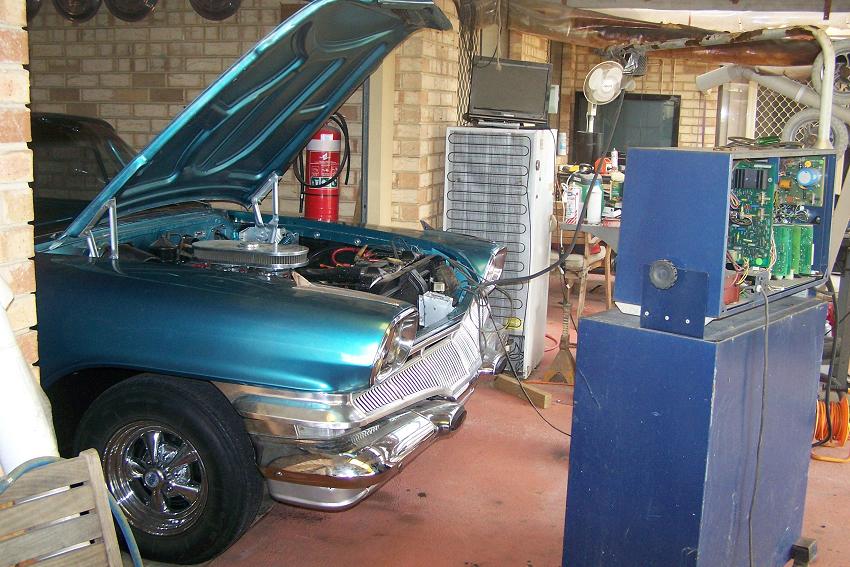 (tune up machine 006s.JPG) (tune up machine 006s.JPG)
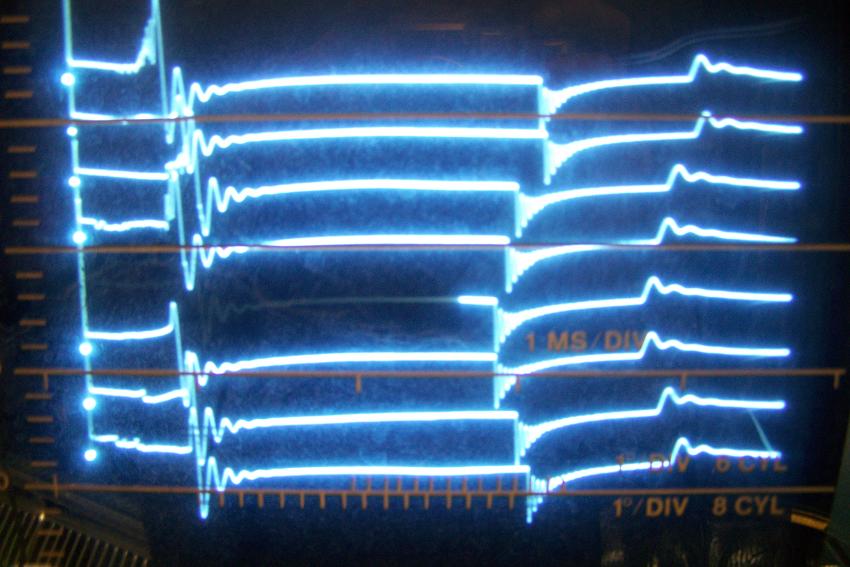 (tune up machine 011s.JPG) (tune up machine 011s.JPG)
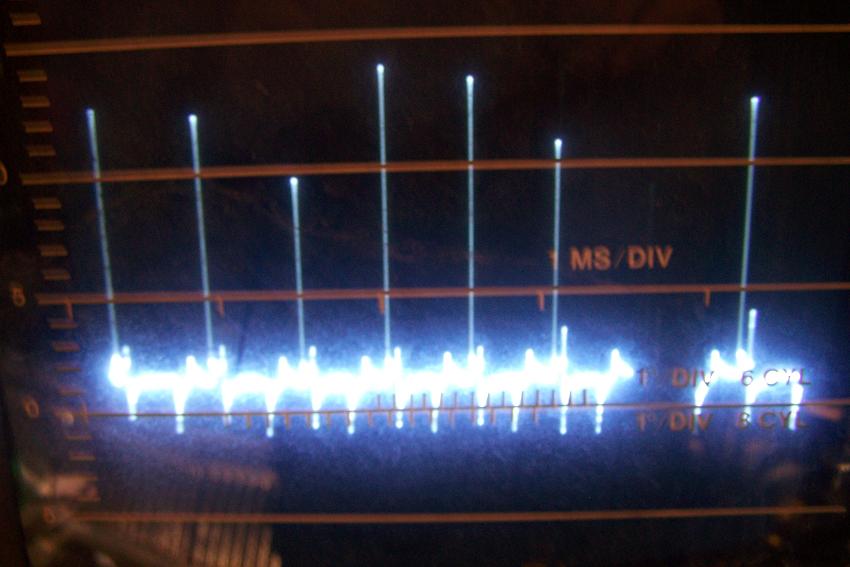 (tune up machine 017s.JPG) (tune up machine 017s.JPG)
Attachments
----------------
tune up machine 006s.JPG (116KB - 304 downloads)
tune up machine 011s.JPG (80KB - 322 downloads)
tune up machine 017s.JPG (58KB - 315 downloads)
|
|
| |
|
Expert 5K+
Posts: 8443
Location: Perth Australia | Finally got something going with the inside
Carpet arrived on Friday
I ordered it from Original Auto Interiors and specified that it was for a RHD, so the heel pad is not attached (not sure how to do that apart from sewing it on).
It is actually supposed to be for a Plymouth 2 drht but it seems to fit ok
They didnt trim the carpet either, so that helped
Not to happy with the tunnel to firewall fit though, but that might fix up with steaming?
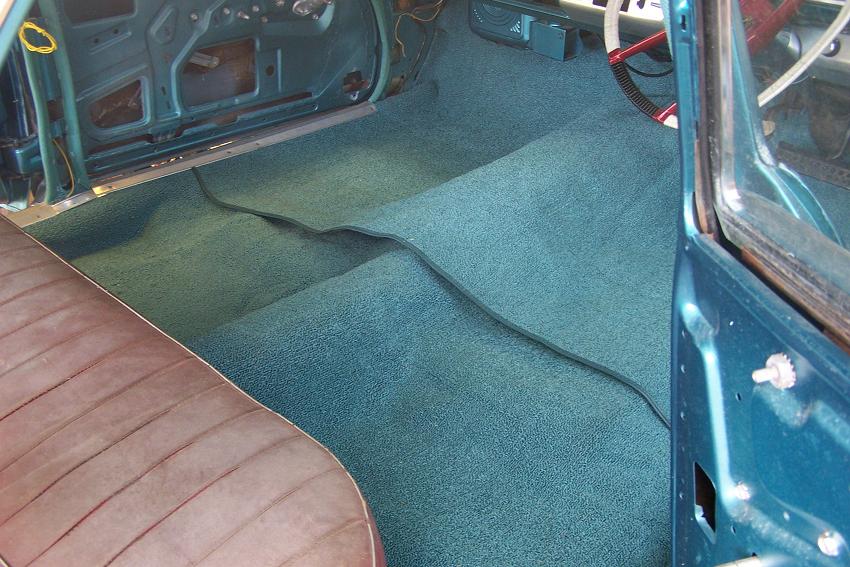 (Carpet 002.jpg) (Carpet 002.jpg)
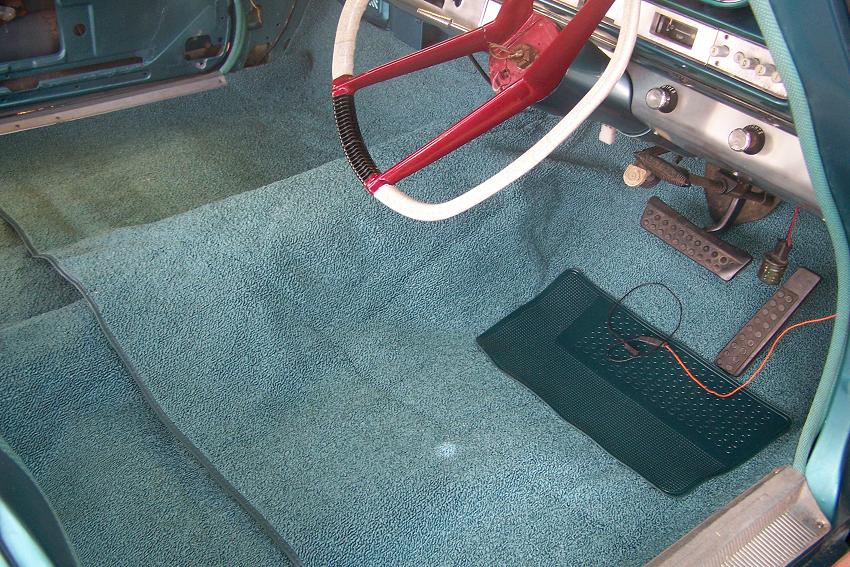 (Carpet 003.jpg) (Carpet 003.jpg)
 (Carpet 004.jpg) (Carpet 004.jpg)
 (Carpet 005.jpg) (Carpet 005.jpg)
Attachments
----------------
Carpet 002.jpg (109KB - 350 downloads)
Carpet 003.jpg (154KB - 324 downloads)
Carpet 004.jpg (81KB - 309 downloads)
Carpet 005.jpg (74KB - 332 downloads)
|
|
| |
|
Expert
Posts: 2312
Location: Arizona | I put a new heel pad on the carpet in one of my vehicles by using hot melt glue. Mine came up a little around the edges but putting more glue under the edge glued it back down and it's been holding for two years now with no problems. |
|
| |
|
Expert 5K+
Posts: 8443
Location: Perth Australia | Thanks Jim, I'll give it a try
Played with the sewing machine as well
I think SMS are safe for now, but its not bad
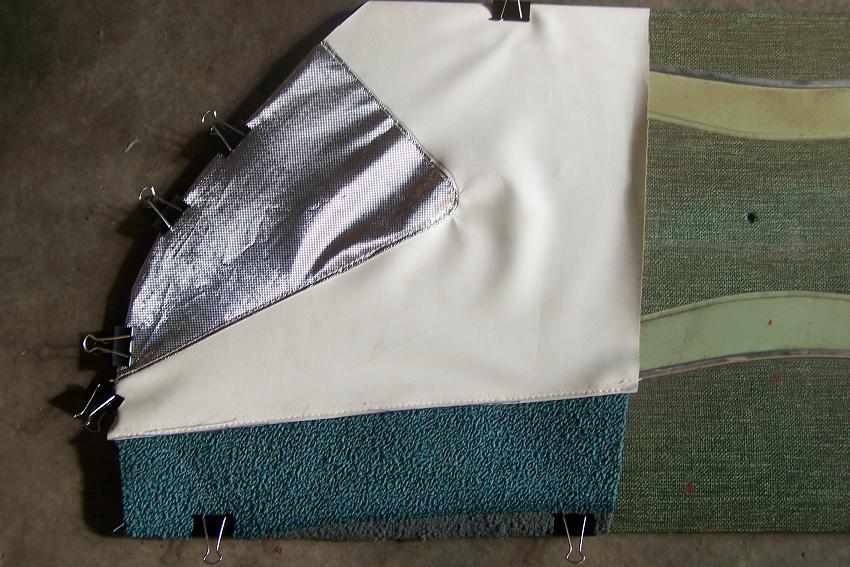 (Carpet 006.jpg) (Carpet 006.jpg)
Attachments
----------------
Carpet 006.jpg (103KB - 308 downloads)
|
|
| |
|
Expert
Posts: 2905
Location: little rock, AR | I see that steering wheel, mine is just a core but I have one. It's all coming together for you. Good job on a lengthy project. |
|
| |
|
Expert 5K+
Posts: 8443
Location: Perth Australia | Not busy today (so far), so I started stripping the front bench that I am going to use
Its a 60 plymouth savoy seat
I found 6 out of the 11 springs in the seat back broken and after scratching my head for a bit, this is how I am fixing it
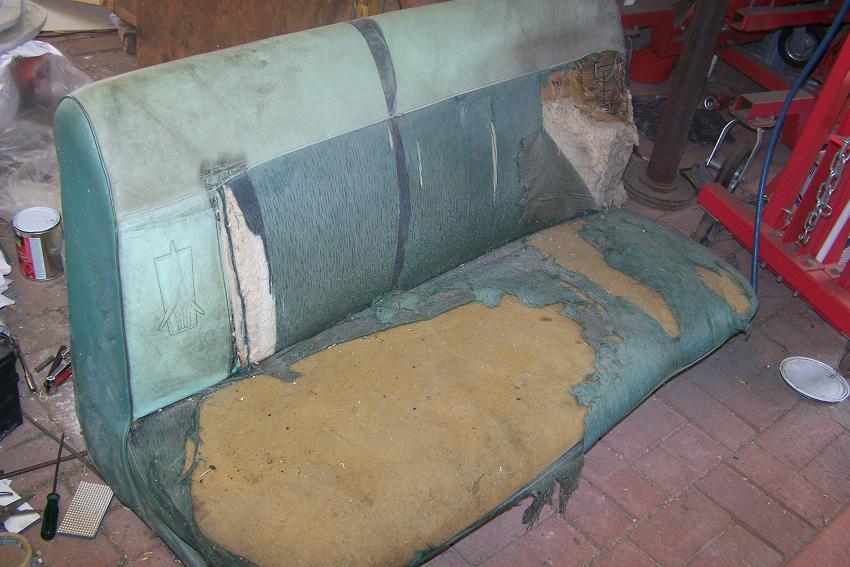 (Front bench back 002s.JPG) (Front bench back 002s.JPG)
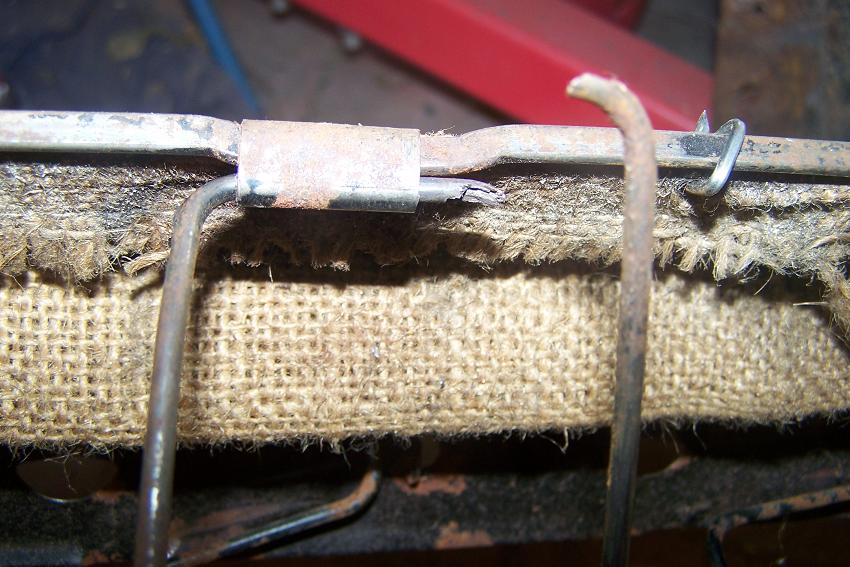 (Front bench back 017s.JPG) (Front bench back 017s.JPG)
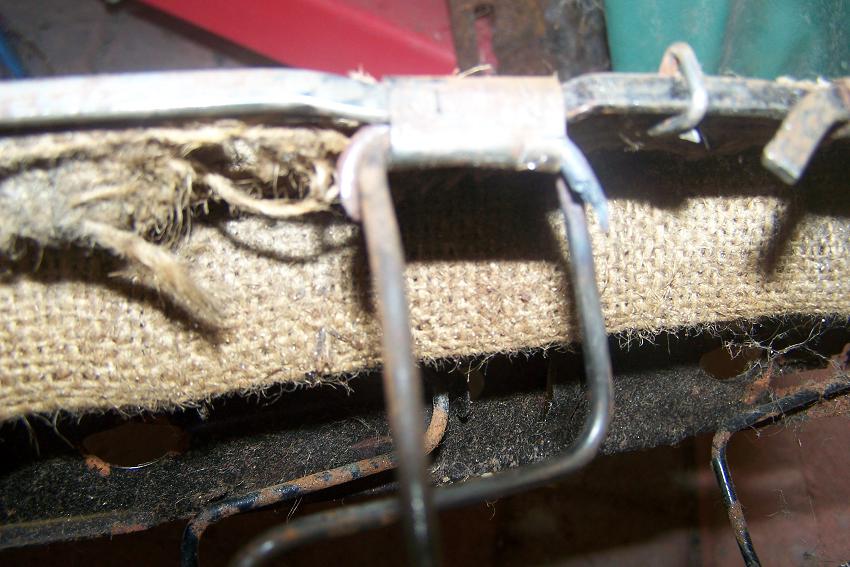 (Front bench back 018s.JPG) (Front bench back 018s.JPG)
Attachments
----------------
Front bench back 002s.JPG (89KB - 318 downloads)
Front bench back 017s.JPG (102KB - 327 downloads)
Front bench back 018s.JPG (94KB - 303 downloads)
|
|
| |
|
Expert 5K+
Posts: 8443
Location: Perth Australia | All the springs around the corner on the left edge were broken
I couldnt fix them the same way, so I welded them
I stepped on the edge a few times to see if they would break again, but they seem to be ok, not easy to weld though
I also converted the seat from l/h/d to r/h/d (put the handle to move the seat to the other end)
Edited by ttotired 2014-11-06 3:32 AM
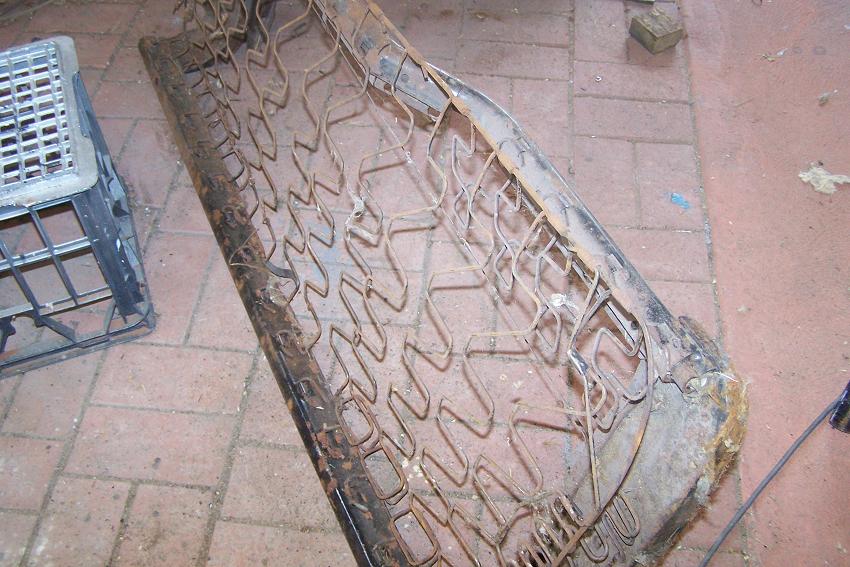 (Front bench base 013s.JPG) (Front bench base 013s.JPG)
Attachments
----------------
Front bench base 013s.JPG (107KB - 310 downloads)
|
|
| |
|
Board Moderator & Exner Expert 10K+
Posts: 13049
Location: Southern Sweden - Sturkö island | Sorry if I break your day, but those springs will not last long. They are hardened from the beginning and that is also the reason that they finally broke. In that position, the spring works pretty much as a torsion bar, so the welded area will only "give" instead of spring back again. Go see your lokal upholstery shop and ask if they have any suitable replacements. You can also search for "furniture seat springs" |
|
| |
|
Veteran
Posts: 112
Location: Brisbane Australia | Major spring manufactures sell the springs on a roll. I bought a roll, think it was 20 metres for around the $80 mark a few years back. Place here in Qld called Thomas March Springs had it in the front foyer. Cheers Terry |
|
| |
|
Expert 5K+
Posts: 8443
Location: Perth Australia | Sort of knew it wasnt good, thats why I didnt fig the Back of the seat with the welder
I am going to try to get to a trimmers supply today, if work doesnt get in the way to much
Thanks guys
|
|
| |
|
Location: North Australia | I got one of the Original auto interior carpets for my 60 Imperial. The fit over the gearbox tunnel on the firewall end looks very much like yours above Mick. I cut mine and sewed a seam to neaten it up. At the time I figured I had been sold a later model Imperial carpet (when they changed to alloy case box) and sold to me as a 1960 job.
I got the lush cut pile (with the rubber backing) carpet in black and it looks good with the red interior.
Steve. |
|
| |
|
Board Moderator & Exner Expert 10K+
Posts: 13049
Location: Southern Sweden - Sturkö island | jimntempe - 2014-11-02 8:33 AM
I put a new heel pad on the carpet in one of my vehicles by using hot melt glue. Mine came up a little around the edges but putting more glue under the edge glued it back down and it's been holding for two years now with no problems.
The OEM heel pad has false stiches molded into the "frame" - I cut small holes and sew the heel pad in the right position instead.
This is an easy operation that allows one to change the heel pad. |
|
| |
|
Expert 5K+
Posts: 8443
Location: Perth Australia | I was worried about the stitches working loose over time
The heel pad is brand new, so must be easilly available, so a permanent attatchment shouldnt be a problem
I got the molded carpet because of the funny dips and shapes in the floor that I thought would look really messy if you tried to cut and sew to make fit.
The rear floor wells in particullar (that fitted really well), so I was quite surprised at how (well, I have to say it) poorly they make the fit on the front carpet.
With the amount of loose gathering at the tunnel to firewall area, I can only guess that because of the acual size of the tunnel and depth of the floor, that there is to much carpet to sort of shrink into itself.
I have an answer for it though, its called "Under dash A/C" , that'll fix it
By the way, I would still buy another one as the service was good from them and I really dont think a cut and sewn carpet would look that much better.
|
|
| |
|
Veteran
Posts: 107
Location: Australia | Did SMS supply the silver fabric? Ive been looking for that! |
|
| |
|
Expert 5K+
Posts: 8443
Location: Perth Australia | Nope
Its from qld I think, but I found it on ebay
Its used for hydroponics
http://www.ebay.com.au/itm/ADF-DIAMOND-FOIL-1-2-X-7-5-MTR-REFLECTIV...
|
|
| |
|
Veteran
Posts: 107
Location: Australia | Thanks for that, I got some on the way. |
|
| |
|
Expert 5K+
Posts: 8443
Location: Perth Australia | It seems (seams ) to sew all right, but I think it might be better to glue a backing to it (like thin canvas or cotton?) just to give it some textile streanth
I am fixing the front seat now (I will do pictures later), but all was going well until I went to fit the last section of the vinyl to the rest of the seat cover and discovered that the seat top (where your bum would sit) is somehow to short.
After lots of swearing, I unpicked the whole lot and I need to make a new bit and re sew the lot again
Lets just call it a practice run
|
|
| |
|
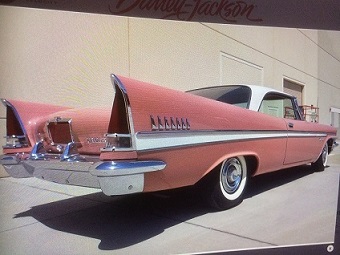
Elite Veteran,, James Passed away March 2021, He will be Missed
Posts: 1028
Location: Melbourne, Australia | Looks good Mick , your car is coming up well . The colour you have used is similar to the colour we painted our 60 Phoenix Convertible that Auto Art in Melbourne now has . It was Phoenicican Turquoise HT Holden colour . Anyway keep up the good work , looks great ! |
|
| |
|
Expert
Posts: 2788
Location: USA - KY |
Steady progress there, Mick! Your great ride is coming along well, and all of your hard work is impressive!
|
|
| |
|
Expert 5K+
Posts: 8443
Location: Perth Australia | As said by Wizard, the welds on the seat springs didnt last long, they (well one did) as I have been making the covers.
I got some spring wire from a spring manufacturer and I am making my own.
They (of coarse) said that they could make them for me, but in the quantity I needed, it wouldnt be worth while.
The "S" shaped one was the one that I thought would be hard, but it wasnt, the other ones were
I want to get the base done because I have made the cover (and all the padding stuff) for it and I want to see if its all going to work
I will post a few pics later
|
|
| |
|
Expert 5K+
Posts: 8443
Location: Perth Australia | Seat springs
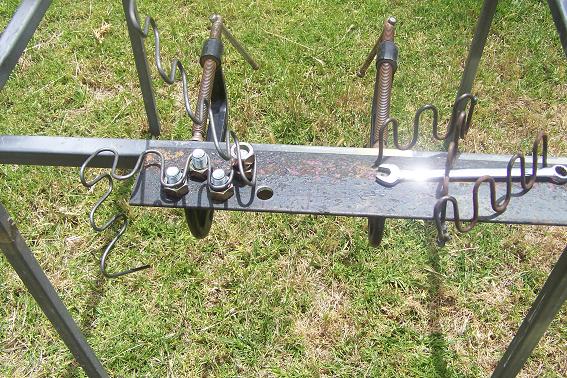 (seat 002.jpg) (seat 002.jpg)
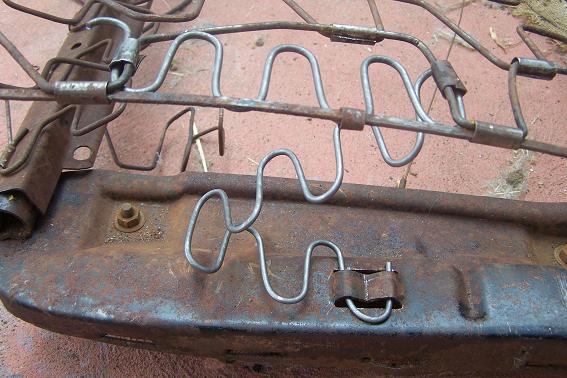 (seat 003.jpg) (seat 003.jpg)
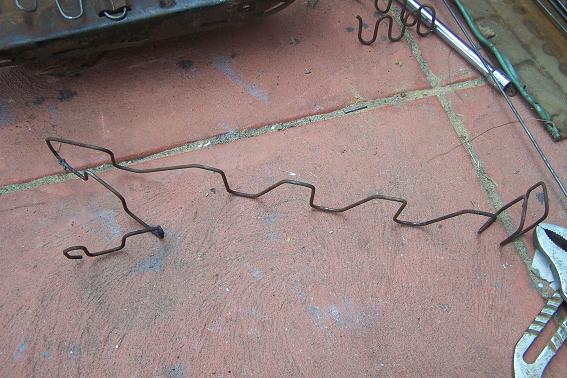 (seat 004.jpg) (seat 004.jpg)
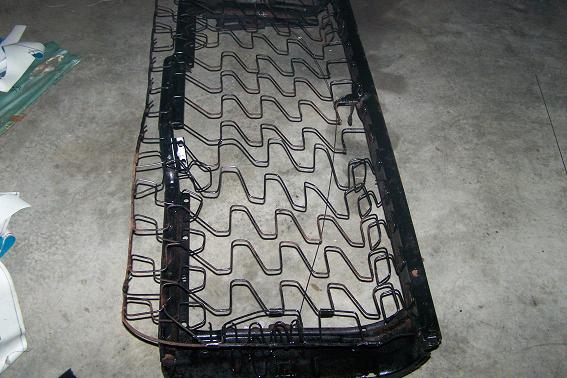 (seat 007.jpg) (seat 007.jpg)
Attachments
----------------
seat 002.jpg (104KB - 330 downloads)
seat 003.jpg (60KB - 329 downloads)
seat 004.jpg (58KB - 295 downloads)
seat 007.jpg (60KB - 322 downloads)
|
|
| |
|
Expert 5K+
Posts: 8443
Location: Perth Australia | The seat base isnt nude anymore
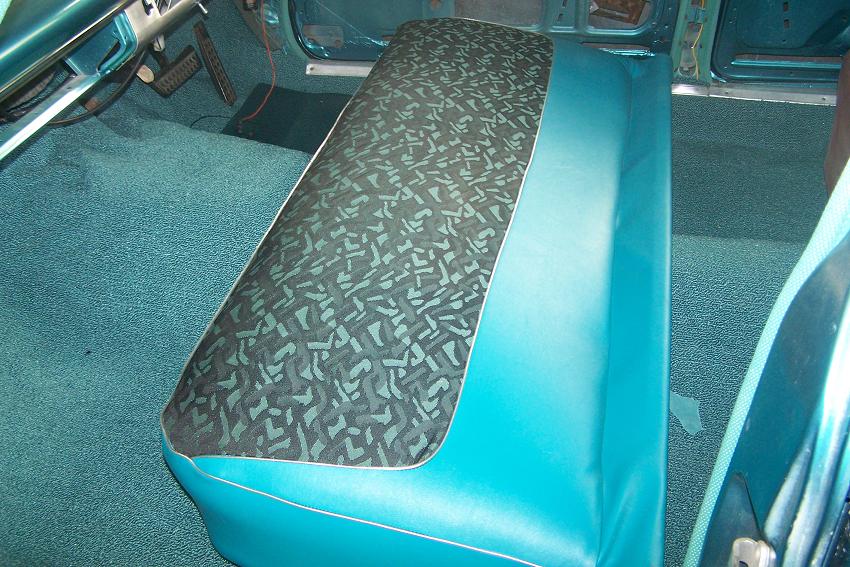 (seatbase front 001.jpg) (seatbase front 001.jpg)
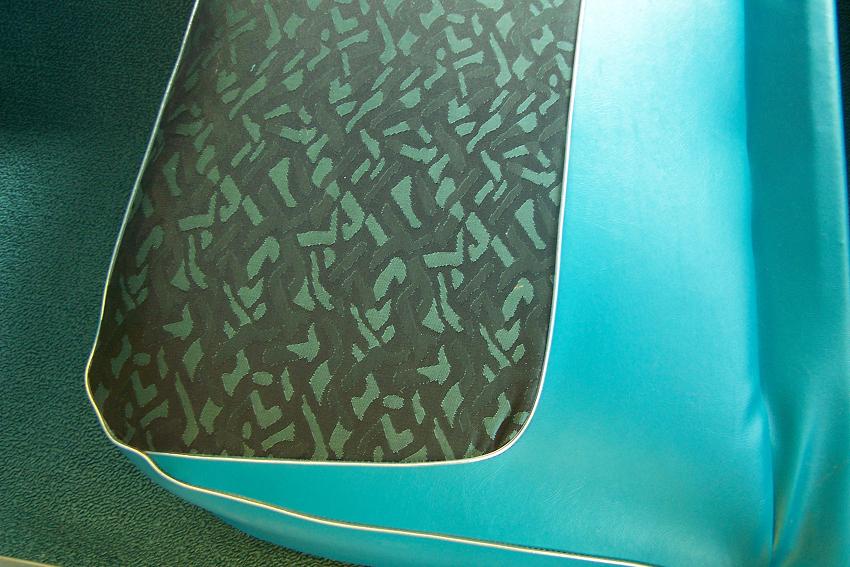 (seatbase front 002.jpg) (seatbase front 002.jpg)
Attachments
----------------
seatbase front 001.jpg (128KB - 306 downloads)
seatbase front 002.jpg (93KB - 293 downloads)
|
|
| |
|
Elite Veteran
Posts: 982
Location: Upper Hunter NSW Australia | .......
That is a darn good job there Mick for someone who is just started to learn to sew, something I've got to master myself down the track a bit.
Looks good to me
........ |
|
| |
|
Expert 5K+
Posts: 7807
Location: Williams California | Heck, I'd have to say it looks great!! You've really come a long way, and done it in style!!
---John |
|
| |
|
Expert 5K+
Posts: 8443
Location: Perth Australia | Cheers John
I am really doing this inbetween work, the last couple of weeks has been unusually quiet
With the metal working skills you have shown, I think you wouldnt have to much trouble doing the trimming either
Its really pretty much the same, measure, cut, measure again then stick it together
The hard part is that the plymouth front seat doesnt really give you a good patern to copy off, so theres a bit of guesswork involved
The seat back is the next (and hardest) bit
|
|
| |
|
Elite Veteran
Posts: 1120
Location: Brisbane, Australia | love those seats Mick! |
|
| |
|
Board Moderator & Exner Expert 10K+
Posts: 13049
Location: Southern Sweden - Sturkö island | Really great work Mick, I like the way you adressed the springs as well - you'll be proud of your work when many won't believe that you did it yourself! |
|
| |
|
Expert
Posts: 2905
Location: little rock, AR | ttotired - 2014-11-24 4:29 AM
The seat base isnt nude anymore
|
|
| |
|
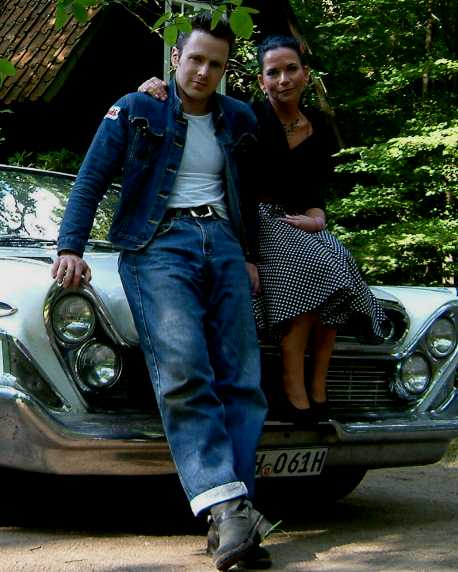
Expert 5K+
Posts: 7400
Location: northern germany | great job. just got a quote on seat covers...... i guess i have to learn to sew as well
Edited by 1960fury 2014-12-02 11:58 AM
|
|
| |
|
Expert 5K+
Posts: 8443
Location: Perth Australia | Well heres my first effort at playing motor trimmer
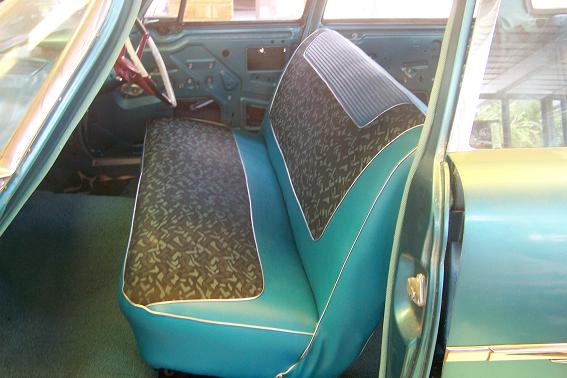 (Front seat1.JPG) (Front seat1.JPG)
Attachments
----------------
Front seat1.JPG (49KB - 365 downloads)
|
|
| |
|
Board Moderator & Exner Expert 10K+
Posts: 13049
Location: Southern Sweden - Sturkö island | It does feel great, dosn't it? Good work! |
|
| |
|
Expert 5K+
Posts: 8443
Location: Perth Australia | I am hoping the rear seat is easier, that seat really wasnt in good shape
Thanks again for the advice Wiz, your seat thread was the inspiration for having a go at it (that and the costs ect involvolved)
|
|
| |
|
Expert 5K+
Posts: 8443
Location: Perth Australia | Another little mile stone today
The ol dodge has now got all its seats
Parcel shelf, kick panels and door panels next
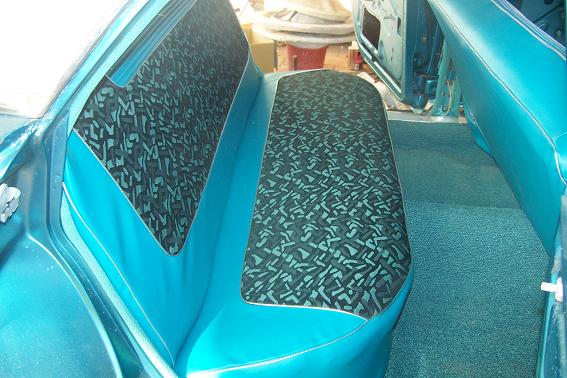 (seat back base 004.jpg) (seat back base 004.jpg)
Attachments
----------------
seat back base 004.jpg (62KB - 359 downloads)
|
|
| |
|
Expert 5K+
Posts: 8443
Location: Perth Australia | Parcel shelf is done
Just need to get some normal 6x9 speakers for the late model sterio that I havnt got yet
Not sure where that will go?
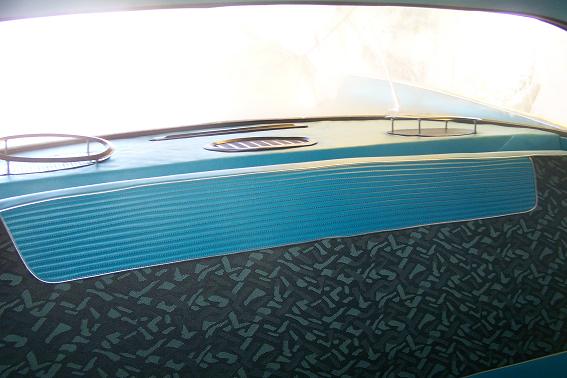 (parcel shelf 001.jpg) (parcel shelf 001.jpg)
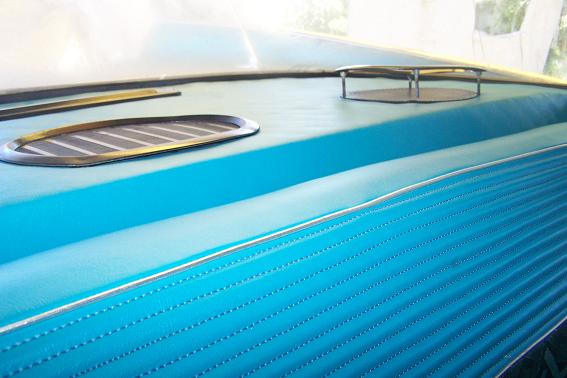 (parcel shelf 002.jpg) (parcel shelf 002.jpg)
Attachments
----------------
parcel shelf 001.jpg (44KB - 346 downloads)
parcel shelf 002.jpg (44KB - 330 downloads)
|
|
| |
|
Expert
Posts: 2905
Location: little rock, AR | I see you have a rear defroster
|
|
| |
|
Exner Expert 19,174 posts. Neil passed away 18 Sep 2015. You will be missed, Neil!
Posts: 19146
Location: bishop, ca | Rear window defrosters are FWDLK eye-candy, 4-sure, but they make a lot of noise, in operation; their functionality is somewhat limited by
the usual necessity for our ever having to drive our rides in bad weather.
But boyhowdy, do they look bitchin sittin out on the parcel shelf.
Edited by d500neil 2014-12-20 10:46 PM
|
|
| |
|
Expert 5K+
Posts: 8443
Location: Perth Australia | Its not wired yet, but I did give it a go on the floor and it wasnt that load at all
I also have to get some ducting for it because I am using the centre speaker hole for its intake instead of one of the outside ones
I might turn the outlet around to act as an a/c duct later, but I havnt decided yet, I have an under dash one to go in the front once I work out how to mount a compressor
I am thinking about putting the compressor next to the carbies like where the hemi generator goes?
I also realised after I put the rear seat in that I forgot to run the antenea lead and the speaker wires for the back as well
With all the nice new stuffing in the seats, getting the seat base in and out is a bit of a battle
I also just fitted a 5 button heater control, so I now have to work out how to make the heater stuff that was controlled by cables work on vacuum
If I get time tommorow, it will finally get an orriginal (plymouth) am radio (hope it still works
|
|
| |
|
Expert
Posts: 1384
Location: Ocala, Florida | Looks really good! You will be cruising in no time! |
|
| |
|
Board Moderator & Exner Expert 10K+
Posts: 13049
Location: Southern Sweden - Sturkö island | Hi Mick, even though made in a slighty yellow country, these speakers are really great http://www.retrosound.com/product-p/r-693.htm
I hav one mounted in the dash, connected as stereo nd the sound is really amazing AND it was a direct fit as well. |
|
| |
|
Expert 5K+
Posts: 8443
Location: Perth Australia | Not sure on what ohms those ones are Sven?
I did get a couple of these ones, 1 for the dodge, the others for the plymouth
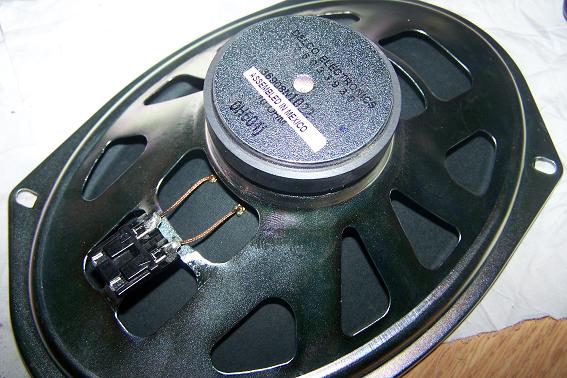 (Accessories 004.jpg) (Accessories 004.jpg)
 (Accessories 005.jpg) (Accessories 005.jpg)
Attachments
----------------
Accessories 004.jpg (62KB - 355 downloads)
Accessories 005.jpg (44KB - 370 downloads)
|
|
| |
|
Board Moderator & Exner Expert 10K+
Posts: 13049
Location: Southern Sweden - Sturkö island | The Retrosound speakers in the link are dual coil 4 ohms connected as one two channel stereo speaker and 8 ohms connected as one channel speaker Mick.
I have two normal 6x9 in the rear and one Retrosound connected as a two channel stereo speaker as a front dash speaker.
I'm totally amazed by the sound that comes out of the Retrosound one. |
|
| |
|
Expert 5K+
Posts: 8443
Location: Perth Australia | I will keep them in mind Sven, thank you
I was hopeing that when you saw my sewing machine that you might jump on a plane and show me how to do the seats, but I have seen that you are busy with a car thats a bit more local to you
|
|
| |
|
Board Moderator & Exner Expert 10K+
Posts: 13049
Location: Southern Sweden - Sturkö island | Yeah Mick - that's a good sewing machine and perhaps you could cut the investment by doing another couple of seats for someone down there. I would like to come, but I still have to figure out if I could do it upside down
Edited by wizard 2014-12-22 9:51 AM
|
|
| |
|
Expert 5K+
Posts: 8443
Location: Perth Australia | Nothing to it, I do it all the time
Its doing it in snow and Ice that I couldnt do
By the way, it was 30 degrees c here today
|
|
| |
|
Board Moderator & Exner Expert 10K+
Posts: 13049
Location: Southern Sweden - Sturkö island | Well "thanks'" for that info mate here's 100 shades of grey and a little rain on the side
Edited by wizard 2014-12-22 10:16 AM
|
|
| |
|
Expert 5K+
Posts: 8443
Location: Perth Australia | Made this up this afternoon
Its a bit lumpy looking because its clipped to an old, lumpy door trim
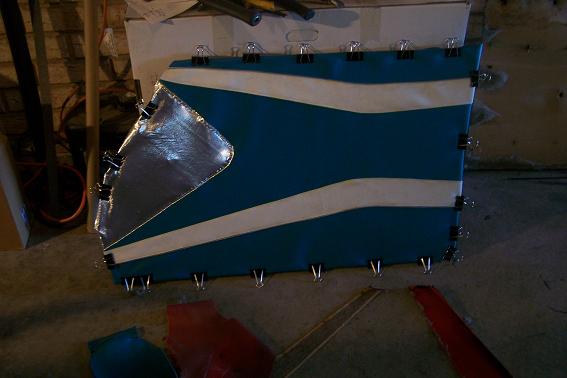 (Accessories 010.jpg) (Accessories 010.jpg)
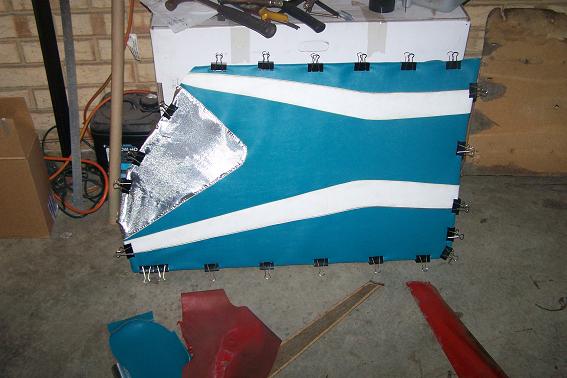 (Accessories 011.jpg) (Accessories 011.jpg)
Attachments
----------------
Accessories 010.jpg (36KB - 356 downloads)
Accessories 011.jpg (48KB - 336 downloads)
|
|
| |
|
Veteran
Posts: 129
Location: A little east of Pittsburgh Pa. | looking great
|
|
| |
|
Expert 5K+
Posts: 8947
Location: WHEELING,WV.>>>HOME OF WWVA | perth , if you leave those clips on too long , they'll leave marks . best chip bag clips in the world ---------------------------------------------------later |
|
| |
|
Expert 5K+
Posts: 8443
Location: Perth Australia | finished making these today
If you want to see how I did it, look here
http://www.forwardlook.net/forums/forums/thread-view.asp?tid=49055&...
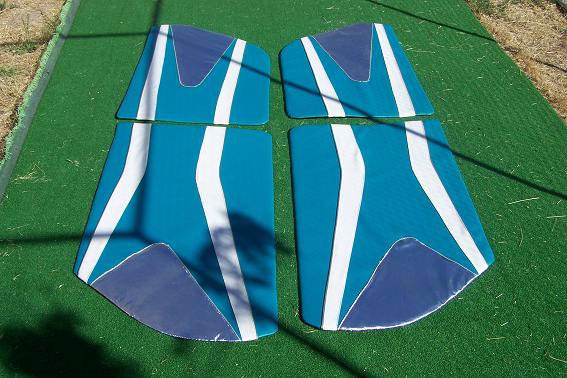 (Door trims 019.jpg) (Door trims 019.jpg)
Attachments
----------------
Door trims 019.jpg (61KB - 342 downloads)
|
|
| |
|
Expert 5K+
Posts: 8443
Location: Perth Australia | Another little milestone today
I put 30 miles on it today trying to get it inspected for licencing
I went to a tyre place to get tyres put on it (kind of obvious ) and they took their sweet time doing it and I missed my window to get it inspected, but the car went fine except 1 plug lead fell off
The temp gauge decided it wasnt going to work anymore and that was about it except my nice original (plymouth) radio doesnt work either, but listening to the car was more important anyway
I now have a lot of work backed up, so it will be another week or so before I give it another try
I am a bit pieved about the tyre guys, as I was trying to have it going this weekend for a big car show (not really into shows, but it would have been good to maybe catch up with a few of the other Perth f/l owners who would most likely rock up)
Anyway, theres always next year
|
|
| |
|
Expert
Posts: 2788
Location: USA - KY |
Nice work on the interior, ttotired!
I really like that nifty upholstery pattern - the colours go great with your car's paint.
|
|
| |
|
Expert 5K+
Posts: 8443
Location: Perth Australia | Still havnt had a chance to have a "take 2" on getting it licenced yet
I had a few little issues come up on its shake down run that I thought I best sort out first, the biggest being that my nicely restored heater started to leak (rotten thing pressure tested fine), so, I cant get it repaired because of the honey comb construction (it might be possible to remake for a stupid amount of money), sooo, I was going to put A/C in it down the road anyway, soooo I have started putting in an under dash A/C heater combination unit.
Pretty easy to do except I have to have demisters for licensing, sooooo that means I had to work out how to put demister ports into the unit
Long story short, I had a vent/front facia here from a much larger unit that was not required on that job and i adapted it to the A/C heater I bought and cut the side (a bit) out of the heater unit and put the demister ports behind the vents to the right hand side
Airflow from the vents on the extended part is not great, but it does work and I can increase the flow if I make a deflector to channel the air from the unit to the r/h vents
I will be plumbing the heater up once I get some more fittings ect
I was going to use a Vintage Air unit, but as they are designed for l/h/d vehicles, it wasnt looking like it was going to fit well anyway
|
|
| |
|
Expert 5K+
Posts: 8443
Location: Perth Australia | A/C heater ect all in
I decided the bent hood will never be any good, so I am doing another one (tried this one first), so its still not on the road
I went looking for the youtube video of when I got the engine going and couldnt find it, but I knew it was here, so when I clicked on the link, it didnt work, so heres one that did
https://www.youtube.com/watch?v=HWToKeNm6Gc
|
|
| |
|
Expert
Posts: 2905
Location: little rock, AR | Your getting close. You'll be burning up the roads with those dual quads. |
|
| |
|
Expert
Posts: 1730
Location: Michigan | Very nice! |
|
| |
|
Expert 5K+
Posts: 8443
Location: Perth Australia | Go to the first page and see how it started
This is how it is now, basically done
There will always be something to tinker with and I want to trim the boot, but its over
I think I will have a rest for a bit before I get into the plymouth (that wont last long, I am itching to get into it
My arms are killing me, I spent most of the day washing and polishing the outside (thats why the engine bay is still a bit of a mess)
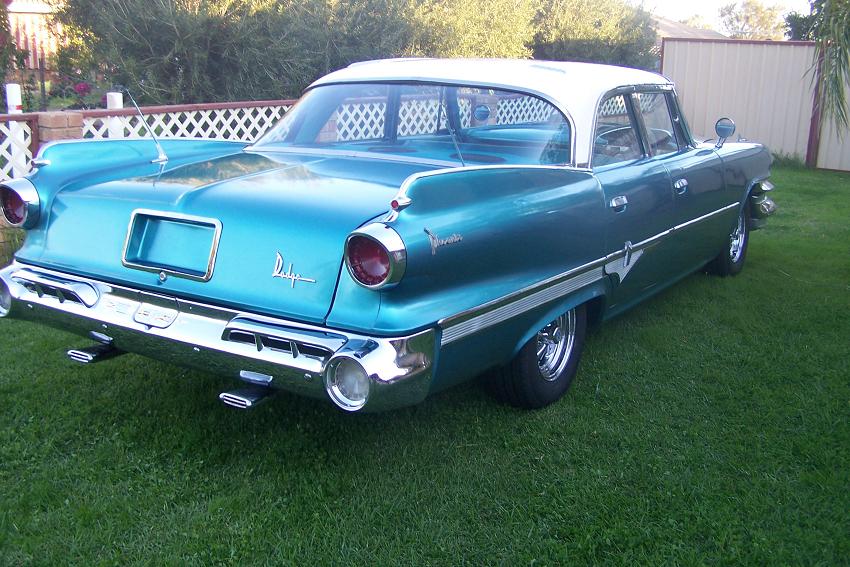 (dodge now 001.jpg) (dodge now 001.jpg)
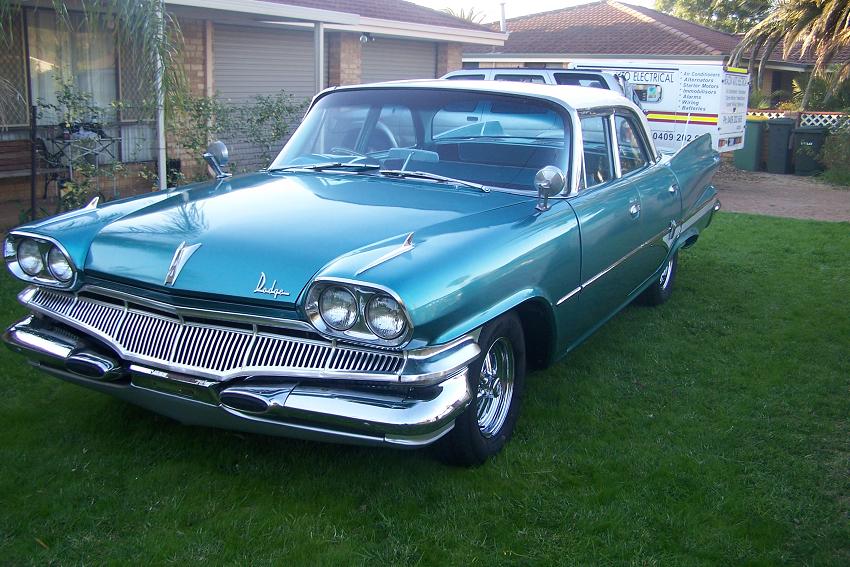 (dodge now 002.jpg) (dodge now 002.jpg)
 (dodge now 003.jpg) (dodge now 003.jpg)
 (dodge now 004.jpg) (dodge now 004.jpg)
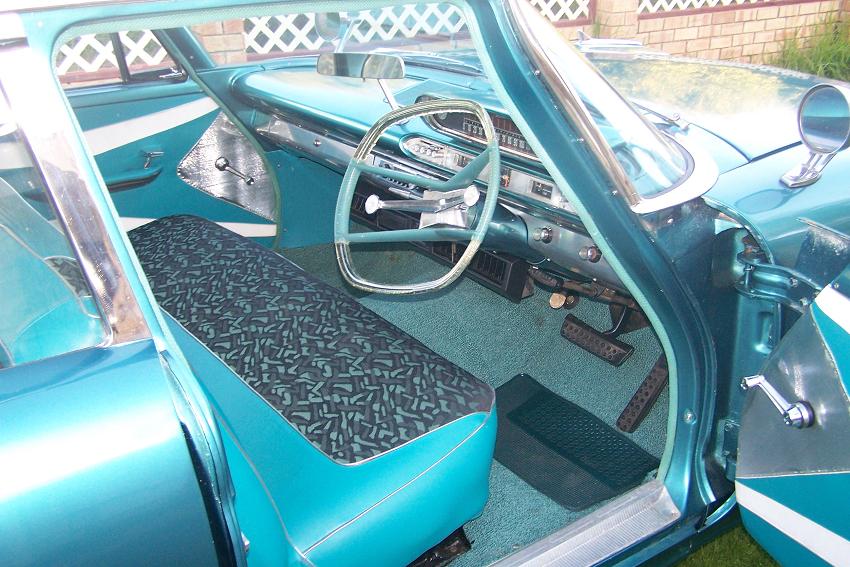 (dodge now 005.jpg) (dodge now 005.jpg)
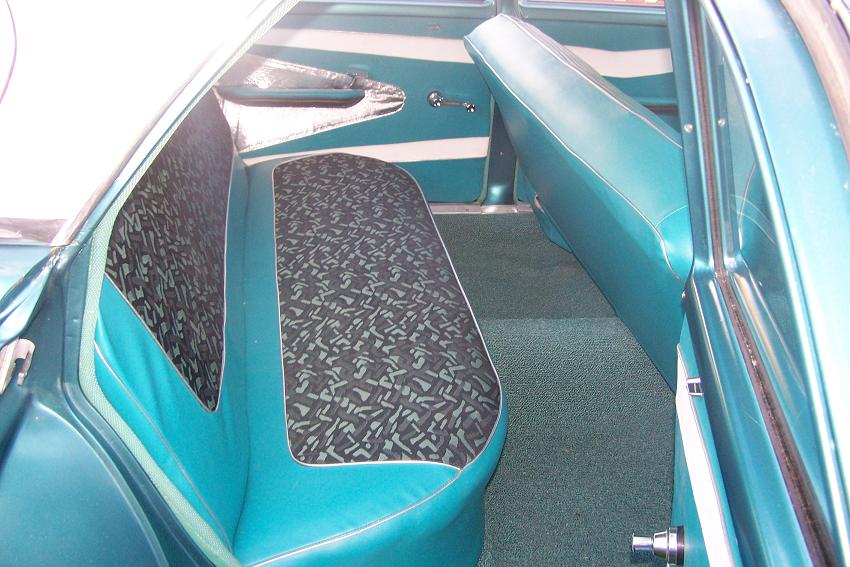 (dodge now 006.jpg) (dodge now 006.jpg)
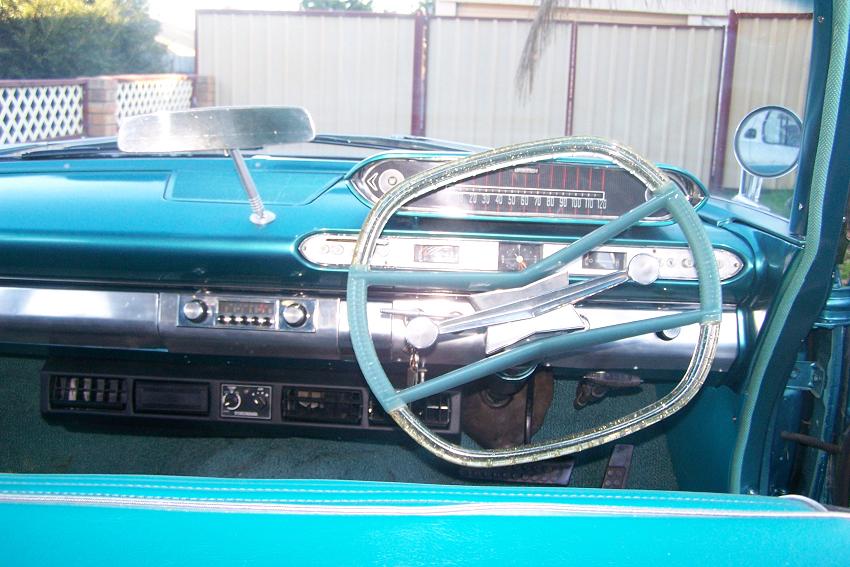 (dodge now 007.jpg) (dodge now 007.jpg)
Attachments
----------------
dodge now 001.jpg (118KB - 298 downloads)
dodge now 002.jpg (116KB - 333 downloads)
dodge now 003.jpg (106KB - 317 downloads)
dodge now 004.jpg (119KB - 310 downloads)
dodge now 005.jpg (114KB - 331 downloads)
dodge now 006.jpg (99KB - 345 downloads)
dodge now 007.jpg (95KB - 329 downloads)
|
|
| |
|
Expert 5K+
Posts: 8947
Location: WHEELING,WV.>>>HOME OF WWVA | real nice perth , really nice ---------------------------------------------later |
|
| |
|

Expert
Posts: 2119
Location: atlanta | Great job Mick! she sure looks sweet, and ya know every nut and bolt on her, personally. Great color also. |
|
| |
|
Expert
Posts: 2312
Location: Arizona | Looks nice. What's the open round duct on the engine side of the firewall? |
|
| |
|
Expert 5K+
Posts: 8443
Location: Perth Australia | Thanks for the comments
That vent is one of the tinker jobs I have to do
The original heater in the r/h/d cars is the mopar truck heater and mine failed, so it got a heater/ac unit instead, but the truck heater had a big air hose that went from that hole to the heater inlet (where the heater and ac hoses are now going through) for fresh air
It still has the fresh air flap inside the car, but that was used for heated fresh air
I will be making a round plate to remove that hole and block it off when I work out a nicer way to run all the cables ect so the firewall doesnt look so messy
I like the colour it has in photographs as well, but in real life, its green
The picture with the bonnet up, the underside of the bonnet colour is more like it
I wonder if its the clear coat that makes it look blue in pictures ( I didnt clear under there) ? |
|
| |
|
Expert 5K+
Posts: 8443
Location: Perth Australia | Its licensed
After a little stress
I took it in on Monday afternoon for its inspection, but because it hadnt been licensed since before 1979, there was no record of the VIN# (it had been cancelled), the guy that was doing the inspection was saying that there was no way to prove it was an Aussie built car and that the steering might have to be checked by an automotive engineer and he sent me off to get the car weighed (1760 KG), so, when I got home, I rang the previous owner to ask if they had any record of what the last license plate was or any other details that might help, but they didnt know what its last plate was either, so that was the end of it for Monday
Tuesday morning, I rang the New South Wales (Australian state) licensing department again (This was the last place it was licensed. I had tried to confirm the VIN a few times before) and got onto a helpful guy there who spent some time with me on the phone trying to find the car in their records without any luck, but what he did find was a page on their site called a "descriptor" that you can put in your vehicle make and model and it comes up with an example of the VIN and some other detail (I found it interesting), anyway, while I was on the phone to the guy in NSW, I had another phone call come that was the vehicle inspector telling me that its all been approved so I could come and get the paperwork and go get it licensed
Here is where you would think I would be saying that I rushed off to do just that, but unfortunately work got in the way and I didnt get a chance to until the afternoon
All done now, I am still waiting for personalized plates to come, so its got standard ones on for now that after fitting, required a couple of hours test driving
It drove well, did seem to get a bit warm and I think I need to get phenolic plates to go under the carbies to stop the fuel disappearing out of them when it sits there hot
|
|
| |
|
Expert
Posts: 2788
Location: USA - KY | 
Looks GREAT, Mick!
Really nice job. I think I need a trip to Australia to check it out in person.
Enjoy your wonderful FL car, and drive it with pride. You deserve it.
. |
|
| |
|

Expert
Posts: 4589
Location: Northern New Jersey | Very Cool!
You do Great Work.
|
|
| |
|
Expert 5K+
Posts: 8443
Location: Perth Australia | Thanks, I still havnt got its correct number plate yet, but I have started the de bug process
New thermostat and radiator cap is going on now
|
|
| |
|
Expert 5K+
Posts: 8443
Location: Perth Australia | Got my new number plate today
I wanted 60DODGE, but I wasnt allowed, but they allowed this one
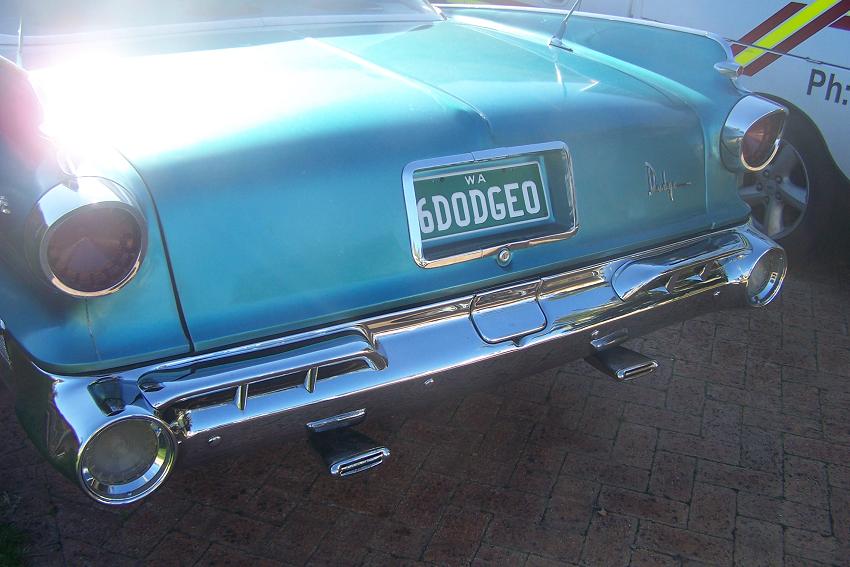 (Number Plate.jpg) (Number Plate.jpg)
Attachments
----------------
Number Plate.jpg (80KB - 335 downloads)
|
|
| |
|
Expert 5K+
Posts: 8443
Location: Perth Australia | It does get out and about
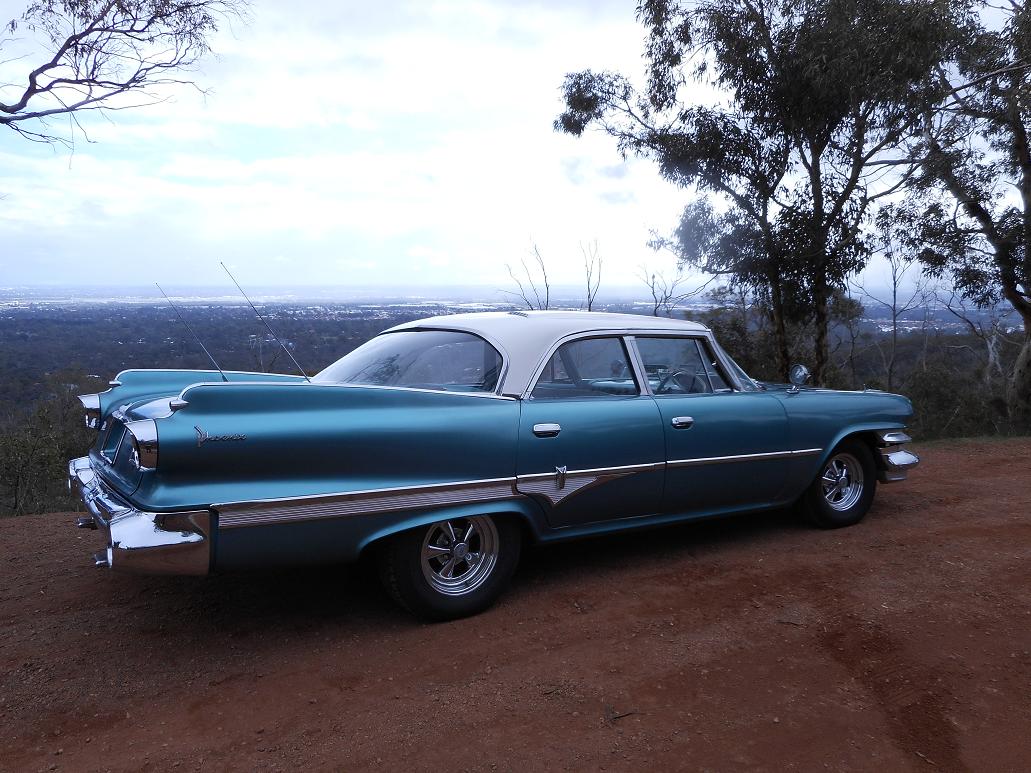 (zigzag 06062016 001.jpg) (zigzag 06062016 001.jpg)
Attachments
----------------
zigzag 06062016 001.jpg (202KB - 362 downloads)
|
|
| |
|
Expert 5K+
Posts: 8443
Location: Perth Australia | Another at a car show
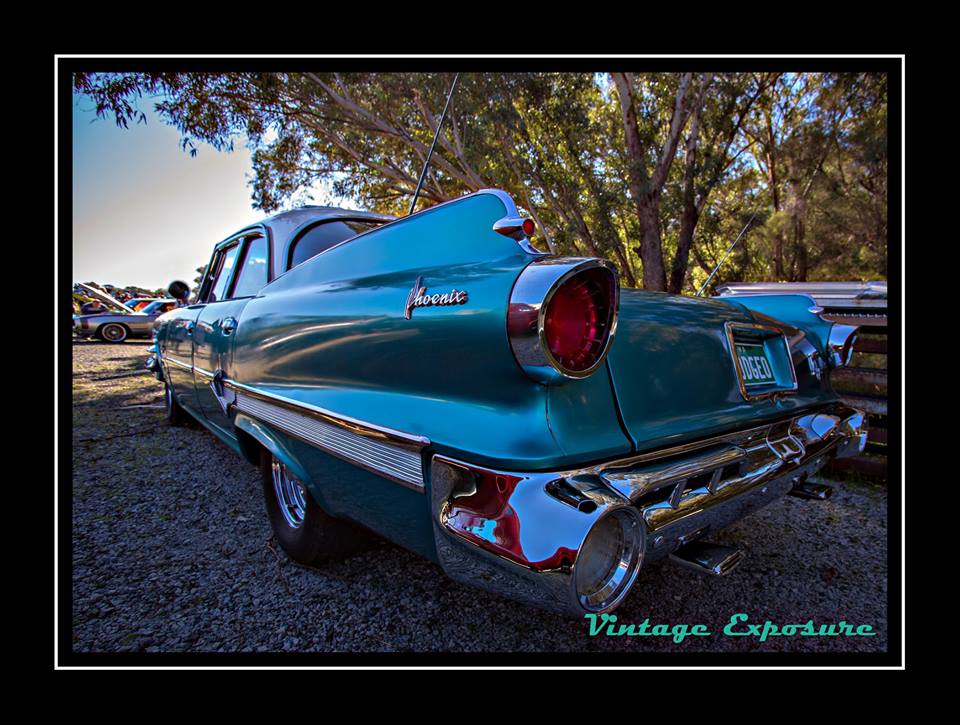 (dodge rear.jpg) (dodge rear.jpg)
Attachments
----------------
dodge rear.jpg (115KB - 292 downloads)
|
|
| |
|
Extreme Veteran
Posts: 337
Location: UK | Fantastic work Mick. I like it! |
|
| |
|
Expert 5K+
Posts: 8443
Location: Perth Australia | Cheers Carl
|
|
| |
|
Extreme Veteran
Posts: 360
| great job with that dodge!!! I am happy to see you got it finished. Awesome! |
|
| |
|
Expert 5K+
Posts: 8443
Location: Perth Australia | Nice old car, no idea why you posted it in this thread though?
|
|
| |
|

Elite Veteran
Posts: 628
Location: Lubbock, TX | Its a spam account, been dropping this crap all over the forms for the past week... |
|
| |
|
Board Moderator & Exner Expert 10K+
Posts: 13049
Location: Southern Sweden - Sturkö island | I've removed that post - Clive and I am aware of this guy but we haven't really understood the background of all these postings yet. |
|
| |
|
Expert 5K+
Posts: 8443
Location: Perth Australia | Sort of guessed it was, but I couldn't see the "maliciousness" of it and the poster had only 1 post, the one that was on here
|
|
| |
|
Board Moderator & Exner Expert 10K+
Posts: 13049
Location: Southern Sweden - Sturkö island | This guy has created several accounts here (against the rules), that's why we are following up what hes' doing. |
|
| |
|
Expert 5K+
Posts: 8443
Location: Perth Australia | As a final footnote to this cars time with me, I sold it yesterday.
|
|
| |
|
Extreme Veteran
Posts: 337
Location: UK | What?!?!?!!? |
|
| |
|
Expert 5K+
Posts: 8443
Location: Perth Australia | Sad to see it go, but other things had to take priority
|
|
| |