|
|
Veteran
Posts: 279
 
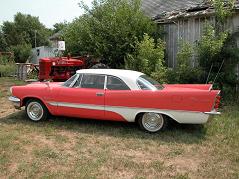
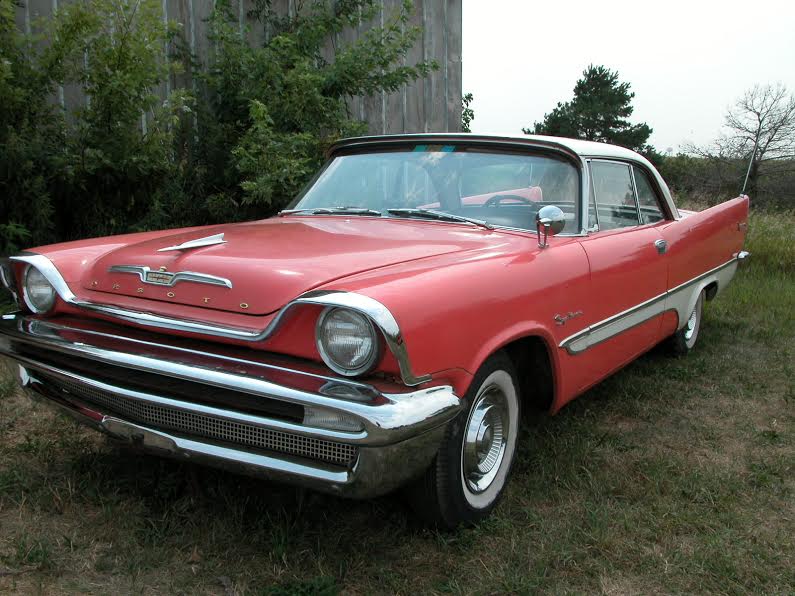
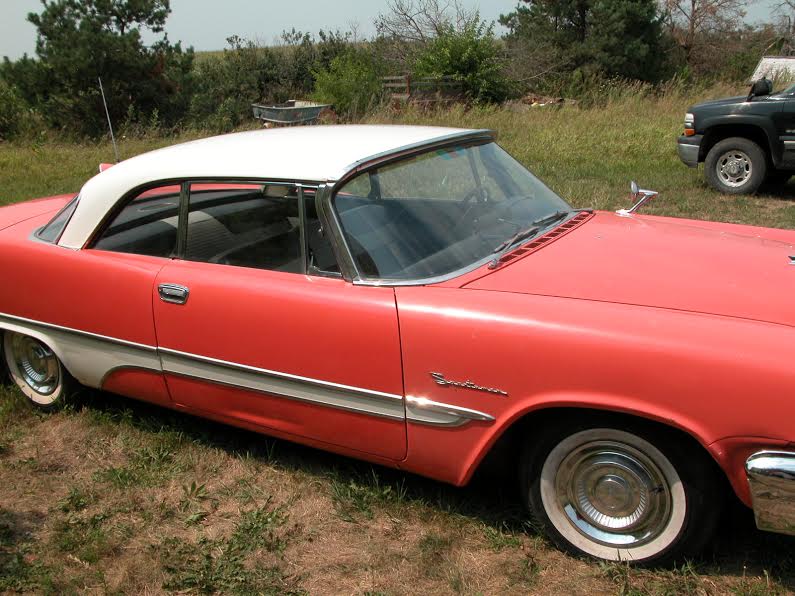
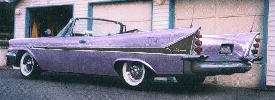
Location: Klein, TX | I have been spending some time reading through various threads here on FL. Lots of great info for sure. I had a '57 Desoto Firesweep Sportsman back in high school in '62. I traded it off for a '56 Chevrolet and had traders remorse for the past 50 plus years. I found another '57 Desoto Firesweep Sportsman on ebay and was able to win the auction. The car is in pretty good shape, but lots of work to do. I have restored a number of cars over the years, but this one is really special. Not counting the dealer that sold it on ebay, I am the second owner of this 38000 mile car. I researched the previous owner and she bought the car new and drove it sparingly. She passed away at 92 and the car stayed in storage for many years. The car runs, but the brakes need work as well as some body work and replacement floor pans in the front. Once I figure out how to post pictures on this thread, I will do so. Thanks for the great site and I look forward to making my Desoto a roadworthy car once again.
 (3 57 LF FT VIEW.jpg) (3 57 LF FT VIEW.jpg)
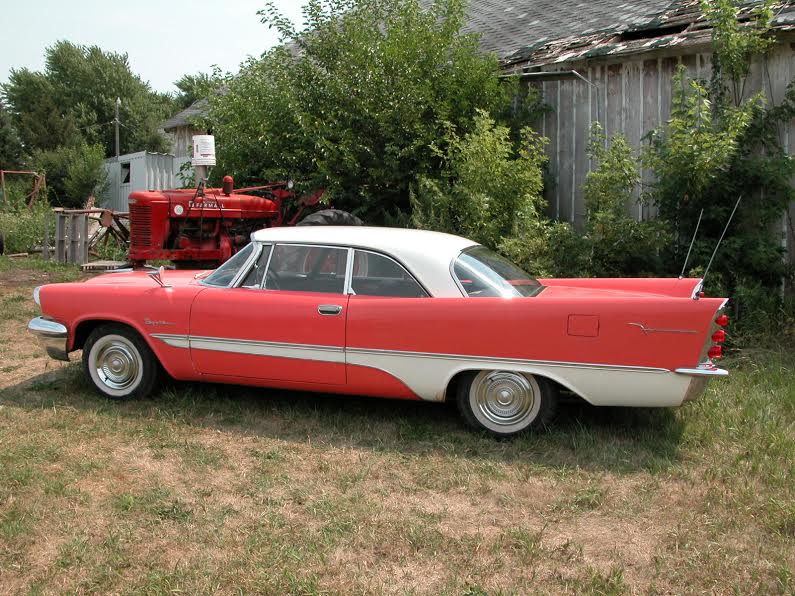 (1 57 LFT SIDE VIEW.jpg) (1 57 LFT SIDE VIEW.jpg)
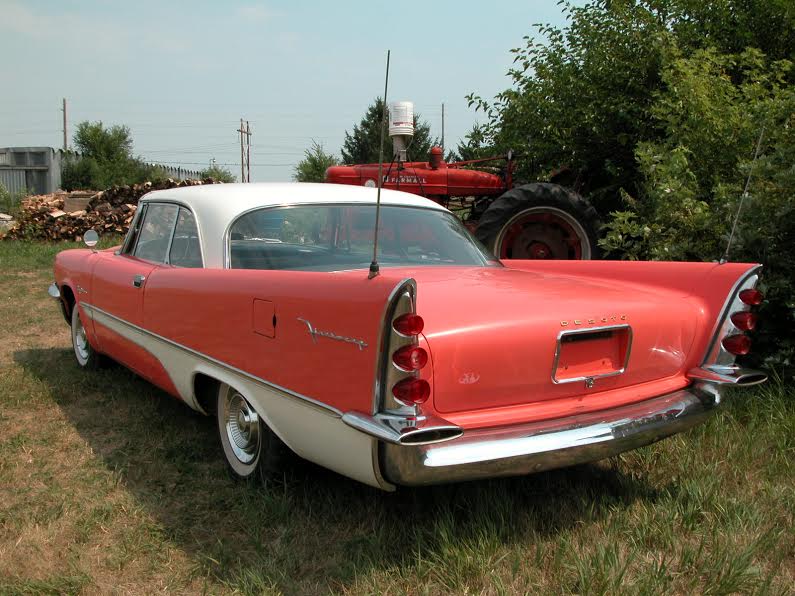 (4 57 LF RR QTR VIEW.jpg) (4 57 LF RR QTR VIEW.jpg)
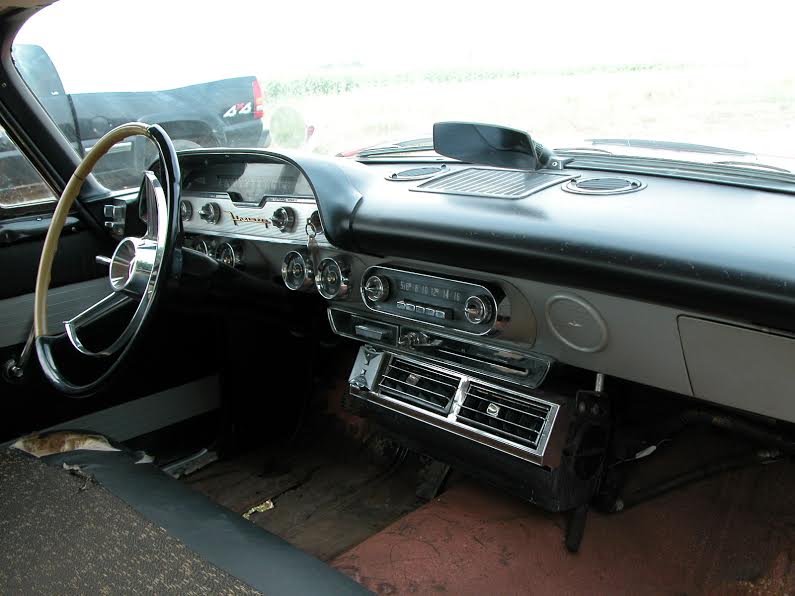 (9 57 DASH FM RT.jpg) (9 57 DASH FM RT.jpg)
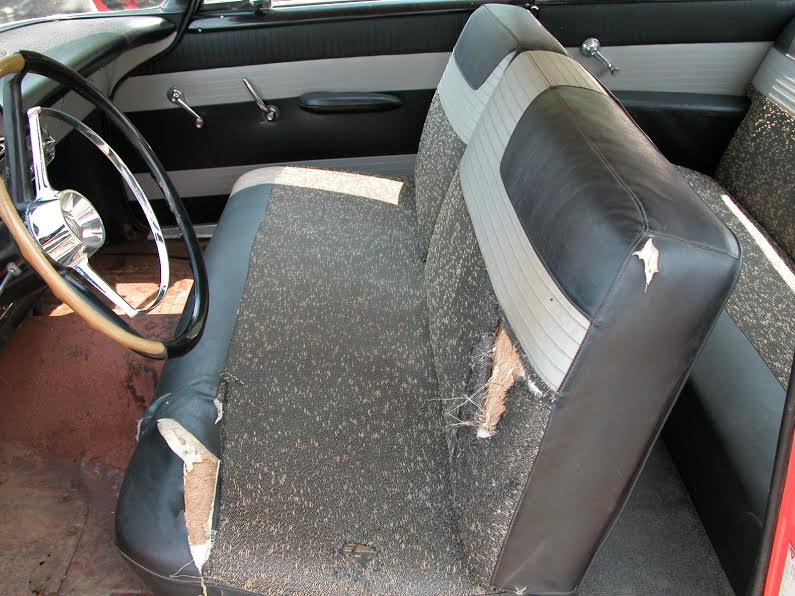 (12 57 FRONT SEAT.jpg) (12 57 FRONT SEAT.jpg)
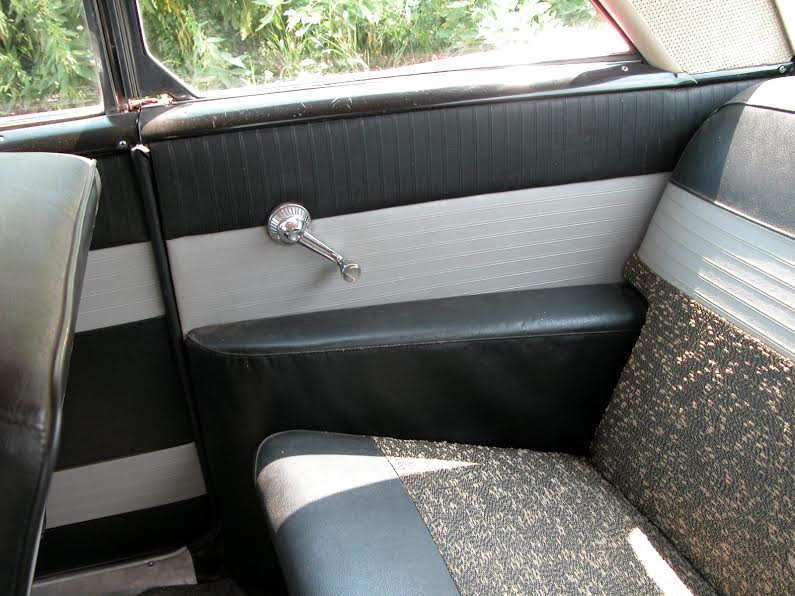 (18 57 RR INT.jpg) (18 57 RR INT.jpg)
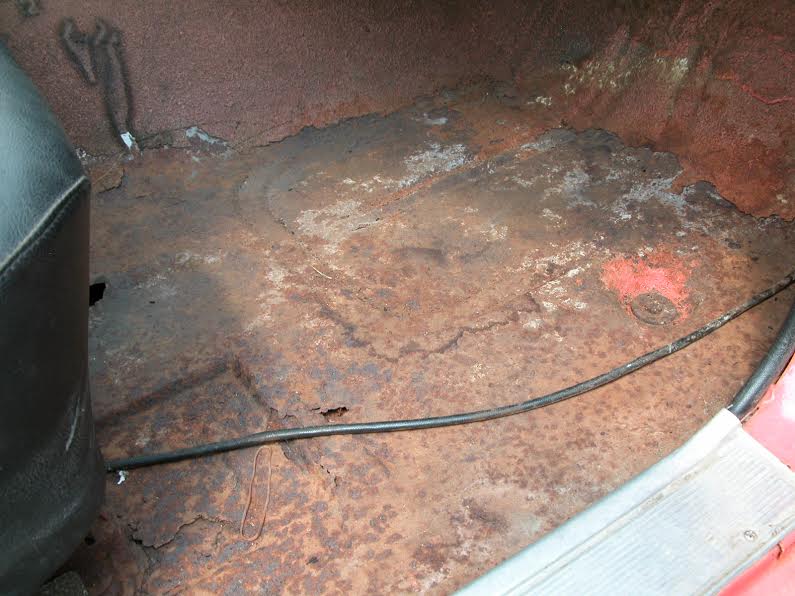
 (38 57 LF FLOOR.jpg) (38 57 LF FLOOR.jpg)
 (40 57 RT FT FLOOR.jpg) (40 57 RT FT FLOOR.jpg)
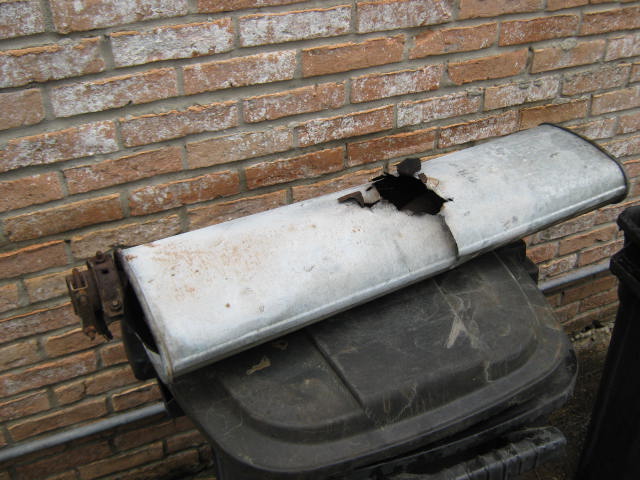
 (43 57 RT DOOR DAMAGE.jpg) (43 57 RT DOOR DAMAGE.jpg)
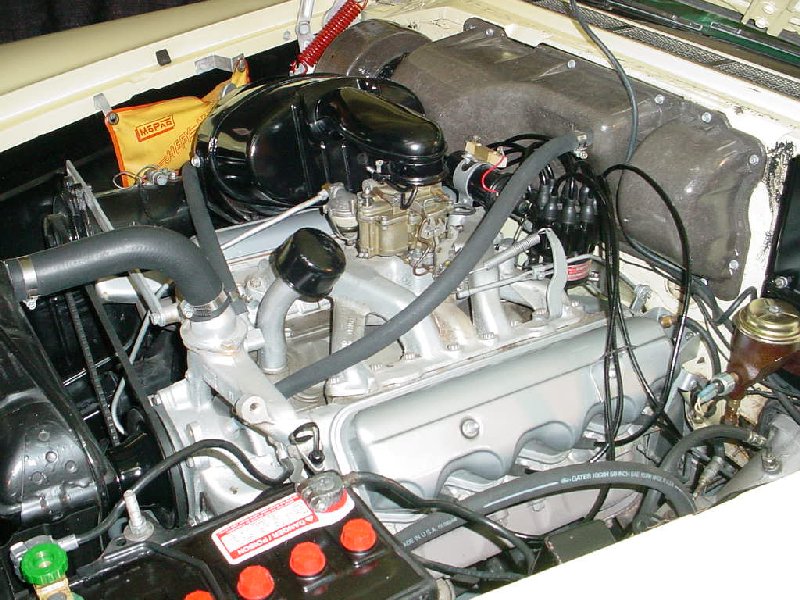
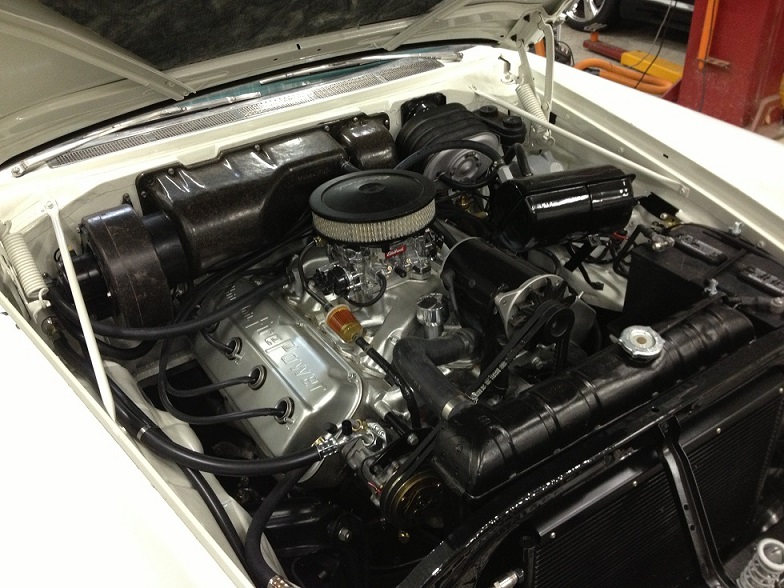
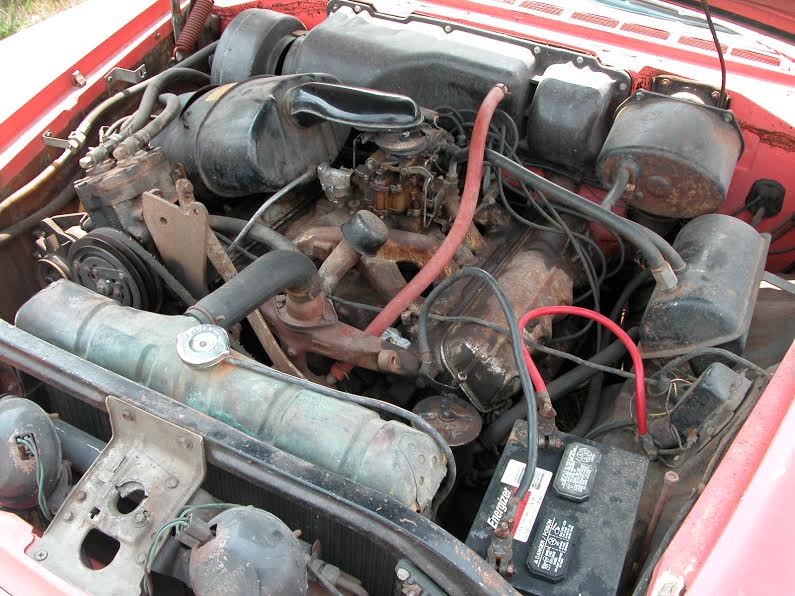 (49 57 ENG BAY.jpg) (49 57 ENG BAY.jpg)
Attachments
----------------
 3 57 LF FT VIEW.jpg (72KB - 152 downloads) 3 57 LF FT VIEW.jpg (72KB - 152 downloads)
1 57 LFT SIDE VIEW.jpg (101KB - 142 downloads)
4 57 LF RR QTR VIEW.jpg (76KB - 146 downloads)
9 57 DASH FM RT.jpg (50KB - 142 downloads)
12 57 FRONT SEAT.jpg (77KB - 144 downloads)
18 57 RR INT.jpg (72KB - 150 downloads)
38 57 LF FLOOR.jpg (67KB - 149 downloads)
40 57 RT FT FLOOR.jpg (57KB - 153 downloads)
43 57 RT DOOR DAMAGE.jpg (76KB - 134 downloads)
49 57 ENG BAY.jpg (80KB - 160 downloads)
|
|
| |
|
Veteran
Posts: 279
Location: Klein, TX | Bill, Spring, TX |
|
| |
|
Expert
Posts: 4044

Location: Connecticut | Beautiful car !  Rather than using aftermarket floor pans, I would recommend having Big M cut some originals from a 57-8 Dodge or Desoto Firesweep. Working with original metal will save you a lot of grief. I noticed that the car is missing its generator. Do you have that ? Ron |
|
| |
|
 
Location: NE Ohio | Welcome & Nice Score...... |
|
| |
|
Veteran
Posts: 279
Location: Klein, TX | The generator is to the left of the A/C compressor. I received the floor pans today. I will check with Big M if I need more. Thanks for the info. Bill, Spring, TX |
|
| |
|
Expert
Posts: 4044
Location: Connecticut | OK. I see it now. I guess it got relocated when the a/c was added. Ron |
|
| |
|
Veteran
Posts: 279
Location: Klein, TX | Ron, Do you have a pix of where it was originally located? Bill, Spring, TX |
|
| |
|
Extreme Veteran
Posts: 440
Location: Vermont | Next to the 61, the 57 is my favorite Desoto. Very nice car. |
|
| |
|
Veteran
Posts: 209
Location: The Republic of Texas | Congrats on the car. I saw it when it was for sale, but it was well out of my price range. |
|
| |
|
Expert
Posts: 4044
Location: Connecticut | baker53 - 2014-01-31 3:22 PM Ron, Do you have a pix of where it was originally located? Bill, Spring, TX I believe that when a car had a/c the generator was relocated to an area above the intake on the driver's side via a special bracket. I'm not a 57 Desoto expert, so maybe Ed Petrus will chime in here. Ron |
|
| |
|
Expert
Posts: 1488
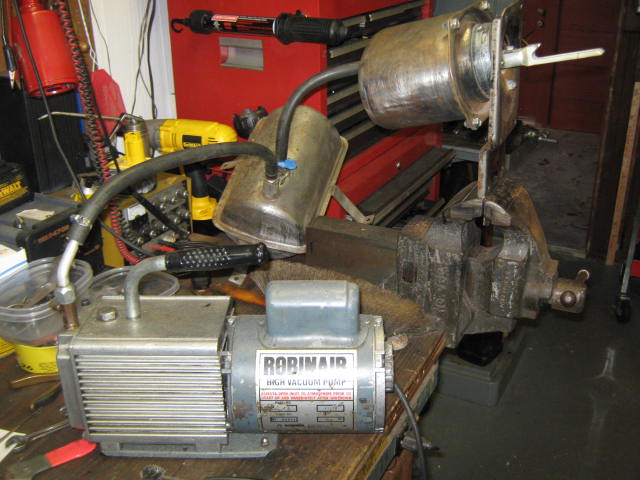
Location: New Castle PA | I may have to punt on this one, Ron. I have thousands of photos of 1957 DeSotos and parts of them, but none that I KNOW to have FACTORY-INSTALLED AC in a Firesweep. I'll attach 2 photos. One shows a non-AC car, with the generator in the same place as Bill's car's. That is the correct and normal location for the generator on a non-AC Firesweep. The other has an AC unit, but you'll note that the generator remained in the same place as Bill's, but the AC unit is on a different side from Bill's. I can't prove the generator should be moved when AC was added, but you COULD be correct on a factory install. There's definitely a bracket there capable of mounting either the gen or the AC. I'll defer to someone else's knowledge on this one.
Edited by 57desoto 2014-01-31 6:48 PM
 (S27engine.jpg) (S27engine.jpg)
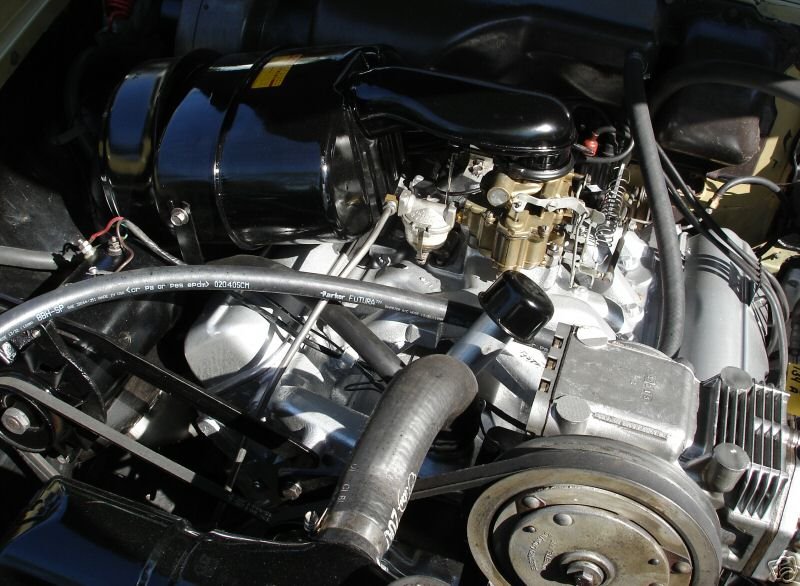 (S27eng5.jpg) (S27eng5.jpg)
Attachments
----------------
S27engine.jpg (142KB - 130 downloads)
S27eng5.jpg (102KB - 144 downloads)
|
|
| |
|

Expert
Posts: 1819
Location: Vancouver, BC | ronbo97 - 2014-01-31 1:51 PM
Beautiful car ! Rather than using aftermarket floor pans, I would recommend having Big M cut some originals from a 57-8 Dodge or Desoto Firesweep. Working with original metal will save you a lot of grief. I noticed that the car is missing its generator. Do you have that ? Ron
Could also use Firedome, Fireflite or Chrysler floors. They are all the same. And the Firesweep body is the same as used on the Firedome and Fireflite, although the Fireflite had a bigger back window.
|
|
| |
|

Expert
Posts: 1493
Location: Jamaica Plain, MA | I've got her sister. Been through it, so happy to share any info. |
|
| |
|

Expert
Posts: 2788
Location: USA - KY | 
baker53 - considering having your original generator rebuilt as an alternator? No one will be able to tell that it's been done by just looking at the engine. 
I'm having that done as we speak, and it's not going to be that pricey.
My car's rear lights were altered to have four brake lights instead of just the original two, and that was enough to cause the headlights to dim slightly whenever I applied the brakes (among other reasons ). I'm adding modern AC to my Firesweep, and if the headlights are any indication of what's to come, I think that switching to an alternator might help...maybe.
Of course, finding the proper pulleys and brackets to accommodate a modern AC system will be my real challenge. Currently, we're playing with original AC brackets from donor cars to see what fits, or what can be made to fit. The fabricator might have to break out his talents if everything else fails. You're lucky in that you already have everything in place; it's really interesting to see your car's "original" aftermarket AC system. I sent photos of your car's engine to my shop as inspiration.
Your car has a great history! It's going to be fun seeing how the work on your great new old car progresses!
Congratulations again!
Edited by FIN ME 2014-02-01 8:59 AM
|
|
| |
|
Expert
Posts: 2788
Location: USA - KY |
Oh...here's a clock:
http://www.ebay.com/itm/1957-Desoto-Dash-Clock-57-57-Firesweep-Fire... |
|
| |
|
Veteran
Posts: 279
Location: Klein, TX | FIN ME: I saw the clock on ebay, but too pricey. I tried making an offer, but it was not accepted. Fortunately, I do have the cover plate for the clock area on the dash. Maybe, I will come across a clock in the future. Very interested on the alt in a gen case. If you have a source to do that, I would like to check it out. On the AC, I will probably do the same as you.
Thanks to all who commented on the car and provided great advice.
Bill, Spring, TX |
|
| |
|
Expert
Posts: 1488
Location: New Castle PA | Bill, here is one source for the alternator-in-a-generator case: http://www.gener-nator.com/
|
|
| |
|

Location: Parts Unknown | Why put a clock in it ? This car has a great history. Part of that history is a 92-year-old original
owner, and part of her history is putting A/C in the car and NOT putting a clock in it ! Who doesn't
wear a wrist watch these days ? Those block-off plates are cool. I'd leave the character of the car
and just look at my watch.
BTW - great colors !
|
|
| |
|
Elite Veteran
Posts: 982
Location: Upper Hunter NSW Australia | ......
VERY nice car there Bill and great to see you re-living those good old days back in '62. Love the color too, welcome aboard to the FL forum.
Terry.
..... |
|
| |
|
Expert
Posts: 2905
Location: little rock, AR | Drive and work on it as you can. Its easier to tear them apart but takes more to put them back together. Great color combo. |
|
| |
|
Expert
Posts: 2524
Location: Houston | PowerGen alternator
 (3544 low res.jpg) (3544 low res.jpg)
Attachments
----------------
3544 low res.jpg (181KB - 229 downloads)
|
|
| |
|
Veteran
Posts: 279
Location: Klein, TX | GregCon: Thanks for the picture of the power-gen alternator. |
|
| |
|
Veteran
Posts: 279
Location: Klein, TX | Is there a document that has the decoding information for the body plate that is supposed to be located on the firewall next to the right side hood hinge? |
|
| |
|
Veteran
Posts: 209
Location: The Republic of Texas | baker53 - 2014-02-02 2:56 PM
Is there a document that has the decoding information for the body plate that is supposed to be located on the firewall next to the right side hood hinge?
I've been all over under the hood of my '58 Windsor and I can't find the plate or holes or anything. The only info. I can find on mine is the VIN and the engine number. I can't actually see the engine number, but I know it's there. |
|
| |
|

Expert
Posts: 1384
Location: Ocala, Florida | Grand car love the coral! Welcome! |
|
| |
|
Expert
Posts: 1488
Location: New Castle PA | For the other models, I have most everything decoded. Not so much for the Firesweeps, though. Go to my web site to see what I DO know, though. http://www.angelfire.com/de/petrus/index.html
|
|
| |
|
Exner Expert 19,174 posts. Neil passed away 18 Sep 2015. You will be missed, Neil!
Posts: 19146
Location: bishop, ca | I can probably decode a few (or many) of the Firesweep P/T plate options.
|
|
| |
|
Expert
Posts: 2788
Location: USA - KY |
PM sent.
|
|
| |
|
Veteran
Posts: 279
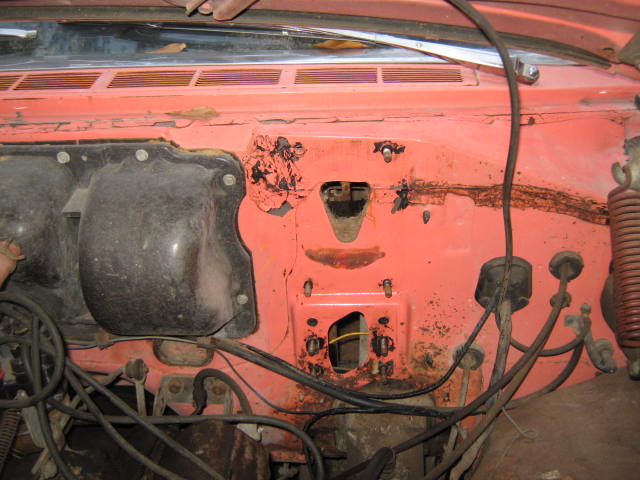
Location: Klein, TX | The '57 Firesweep arrived yesterday in an enclosed three car hauler. The battery was dead so jump started it and it barely made it up the driveway to the garage. It was running rough as a cob. Realized later that the battery was only putting out 2 volts and that the belt for the generator was missing. Also found that number number 8 and number 4 wires were crossed at the distributor. After charging the battery, it was running much better, but I still need to pull the plugs and do some ignition maintenance.
All in all the car is better than expected. The only things that are not working are the brakes, BTW, the emergency brake works fantastic. It has a leaking water pump and a pin hole leak in the radiator. I had already ordered a replacement water pump so that will go on this week. I pulled the radiator and it will go the radiator shop tomorrow morning. All the electrical items work including the radio. I also checked to see if there was any freon in the A/C and was surprised that it still had pressure. The power steering works very well also.
Lots of body and interior work to do, but very pleased so far. The undercoating on the frame did a pretty darn good job of protecting the metal. The exhaust system is shot so that will get replaced after the radiator and brake work. The power brake booster is holding vacuum. The brake pedal goes to the floor, so I'll be tracking down that problem soon. A cursory look at the backing plates and drums did not reveal any brake fluid leaks. I was also surprised to find the windshield washer bag is in great condition. It was covered with dirt and grime, but it cleaned up nicely and no leaks. More to follow. |
|
| |
|
Veteran
Posts: 209
Location: The Republic of Texas | Good luck with it and I know it feels good having it home. |
|
| |
|
Location: North Australia | Great news on the car! Not often they are better than expected. What is also great is you are on here showing your journey with this Desoto.
Keep the comments/photo's coming.
Regards Steve.
|
|
| |
|
Expert
Posts: 2637
Location: Minor Hill, TN | Very nice good luck with the restoration |
|
| |
|
Expert
Posts: 2788
Location: USA - KY |
Congratulations regarding the arrival of your new baby!
It sounds as though you've been very busy already! It's great to hear that the car was in over all good shape!
Best of luck with the resto, and please keep us posted with your progress!
|
|
| |
|
Location: Parts Unknown | Swapping a few wires on the distributor really makes a great running car into a dog fast.
A great prank to pull on your friends and enemies ! 
|
|
| |
|
Veteran
Posts: 279
Location: Klein, TX | Got busy on the brakes this afternoon. I pulled the master cylinder and found that the piston was stuck at the bottom of the bore. I ordered a new master cylinder and it should be here later this week. After all was said and done, it is possible to remove the booster and leave the black mounting plate attached to the master cylinder flange, but you have to remove four nuts from the underside of the dash and they are a bit of a pain to get to. I pulled the whole system off and will clean and repaint the booster, backing plate, and master cylinder before re-installation. Hopefully, after a system flush and bleeding of the brakes, I'll be stopping the car with the brake pedal rather that the emergency brake. More to follow. |
|
| |
|
Location: North Australia | Go Bill Go.
So, you plan to get this Old Girl up and running ASAP? How are you going to deal with the floor rust?
Steve. |
|
| |
|
Expert
Posts: 1488
Location: New Castle PA | For a "new" guy, you're certainly making fast progress! You must have already known about the L and R threads on the lug nuts, and about the special puller needed to remove the rear drums. Those are the stumbling blocks of many a new Mopar (of this vintage) owner. |
|
| |
|
Location: Parts Unknown | Sounds to me like Bill is a Marine.
|
|
| |
|
Veteran
Posts: 279
Location: Klein, TX | 60 Imp: I purchased replacement front floor pans and hopefully, will get started on cutting out the old ones with the plasma cutter and fitting and TIG welding in the new ones in a week or two. From looking underneath the car and under the carpets the tunnel plus the area under the front seat and the rear floor area is all solid. The trunk is also solid. No idea on why the front area were so rusted, but it wont be that way for much longer.
57 Desoto: Yes indeed, knew about the left and right hand wheels studs. I have one of those pullers you are referring to. I hope the drums come off fairly easy. I had a Firesweep back in '62 and this car sure brings back some good memories.
Doctor Desoto: Not a marine, was in the Navy after college and spent the majority of my time at NAS Kingsville, TX. Knew a lot of good Marines while there who were learning how the land on an aircraft carrier.
I picked up some temporary wheels and tires today and put them on the car. Found them on Craig's list for $250. The tires were almost new and the rims were the right bolt pattern, 5 x 4-1/2". They have narrow white walls, but will be good until all the resto work is done. Then I'll bite the bullet and buy the wide white-walls and install them on my Desoto rims after they have been stripped and repainted. The tires that were were on the car were so far gone, I am surprised they even held air. Now at least. I'll be able to drive the car around a bit.
|
|
| |
|
Expert
Posts: 2788
Location: USA - KY |
This guy doesn't fool around!
You're makin' us all look bad, Bill.
Keep up the great work - enjoying reading about the progress!
|
|
| |
|
Veteran
Posts: 279
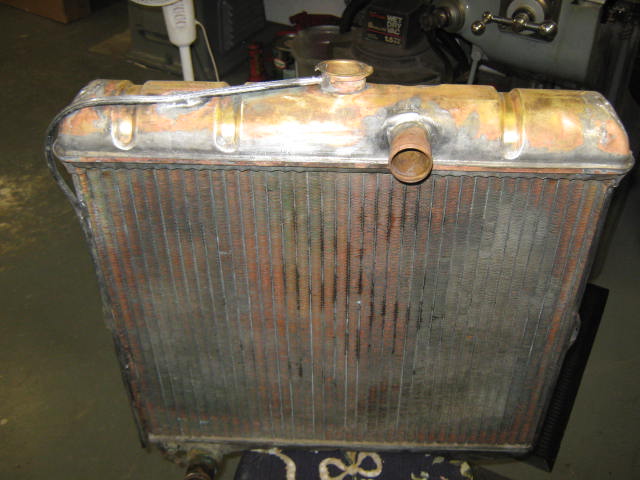
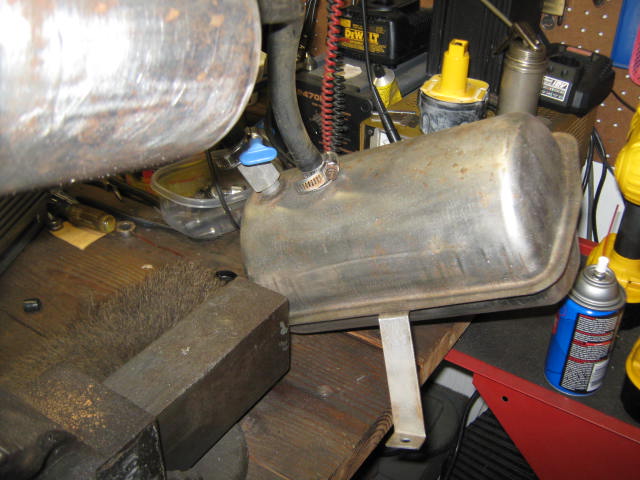
Location: Klein, TX | Picked up the repaired radiator this morning. They repaired a leak along the upper tank seam and rodded the core out. Originally was quoted $75, but the shop owner likes old cars and ended up charging $50. I am still waiting on some parts for the brakes, so I think I will clean up the booster, vacuum tank along with all the bolts and nuts removed so far and paint them along with the radiator.
BTW, any suggestions for the best silver paint to use on the Desoto engine? I need to pressure was the engine bay and put some color on the engine. If I have to pull the engine later, I'll do a proper painting of the 325 engine. More to follow. |
|
| |
|

Expert 5K+
Posts: 7809
Location: Williams California | baker53 - 2014-02-18 10:43 AM
60 Imp: I purchased replacement front floor pans and hopefully, will get started on cutting out the old ones with the plasma cutter and fitting and TIG welding in the new ones in a week or two. From looking underneath the car and under the carpets the tunnel plus the area under the front seat and the rear floor area is all solid. The trunk is also solid. No idea on why the front area were so rusted, but it wont be that way for much longer.
57 Desoto: Yes indeed, knew about the left and right hand wheels studs. I have one of those pullers you are referring to. I hope the drums come off fairly easy. I had a Firesweep back in '62 and this car sure brings back some good memories.
Doctor Desoto: Not a marine, was in the Navy after college and spent the majority of my time at NAS Kingsville, TX. Knew a lot of good Marines while there who were learning how the land on an aircraft carrier.
I picked up some temporary wheels and tires today and put them on the car. Found them on Craig's list for $250. The tires were almost new and the rims were the right bolt pattern, 5 x 4-1/2". They have narrow white walls, but will be good until all the resto work is done. Then I'll bite the bullet and buy the wide white-walls and install them on my Desoto rims after they have been stripped and repainted. The tires that were were on the car were so far gone, I am surprised they even held air. Now at least. I'll be able to drive the car around a bit.
Nice score on the Desoto, Bill!
If just the front floors were rusted out, I would suspect a leak at either the windshield or the lower windshield trim molding bolts. The factory used a pliable putty on the molding bolts, so when the nuts were snugged up, it would seal the holes, as there are four of these right in the cowl drain area. It'd be a good idea to check for leaks so the rust doesn't reoccur.
---John |
|
| |
|
Expert
Posts: 2788
Location: USA - KY |
Hi, Bill:
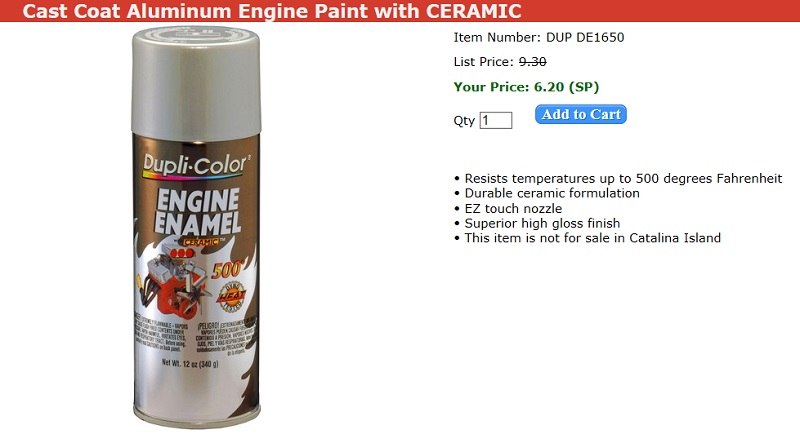
I recently painted my car's engine in "Dupli-Color - DUP DE1650 Cast Coat Aluminum Engine Paint with Ceramic" - really nice silver colour which is neither too "blue", nor too "tin foil silver".
I painted the exhaust manifolds in "Eastwood - cast iron color" for a nice, dark gray "cast iron" look. I think that the manifolds were painted silver in the factory back in the day, but that paint likely burned off pretty quickly, so I went for a bare, cast iron look instead.
Edited by FIN ME 2014-02-19 12:16 PM
 (enginepaint.jpg) (enginepaint.jpg)
 (manifoldpaint.jpg) (manifoldpaint.jpg)
Attachments
----------------
enginepaint.jpg (67KB - 147 downloads)
manifoldpaint.jpg (89KB - 150 downloads)
|
|
| |
|
Veteran
Posts: 279
Location: Klein, TX | Big M: Thanks for the info, I'll check that out as you suggest.
|
|
| |
|
Veteran
Posts: 279
Location: Klein, TX | FIN ME: Great on the paint suggestion. I will follow your lead and make it the new Desoto engine color specification.
|
|
| |
|
Veteran
Posts: 279
Location: Klein, TX | I just placed an order with Rock Auto for some more parts. Upper and lower radiator hoses, spark plugs, points, cap and rotor, 6 wheel cylinder kits, p/s belt, plus a few other odds and ends. Nice to find that they do list parts for the '57 Desoto and the prices are not bad. Off to the garage for more cleaning of parts. |
|
| |
|
Expert
Posts: 1488
Location: New Castle PA | A lot of times when you order parts, they "fit" but might not look correct. Good examples are segmented fan belts (instead of smooth ones) and flex radiator hoses instead of formed ones. I hope Rock Auto gets you the right ones if looks are important to you. |
|
| |
|
Veteran
Posts: 279
Location: Klein, TX | From the pictures on the Rock Auto order page and the descriptions, they are formed hoses. The flex ones were also listed, but I ordered the formed ones.
I cleaned up the radiator as well as the brake booster and vacuum tank. I made up a bench tester for the booster with my vacuum pump and checked that the system was working well. Not sure if the pictures I attached will come through or not. BTW, I mentioned earlier that I though the booster could be removed without removing the master cylinder. After looking at the hole in the firewall, I don't think that is possible. There are four nuts on the booster assembly and I thought they would be accessible from under the dash, but it looks to me that access to one or two of the four is blocked by the small triangular hole in the firewall.
I'll be painting the booster, tank, and radiator plus a bunch of other parts tomorrow.
 (57 desoto work 001.jpg) (57 desoto work 001.jpg)
 (57 desoto work 003.jpg) (57 desoto work 003.jpg)
 (57 desoto work 004.jpg) (57 desoto work 004.jpg)
 (57 desoto work 005.jpg) (57 desoto work 005.jpg)
 (57 desoto work 006.jpg) (57 desoto work 006.jpg)
Attachments
----------------
57 desoto work 001.jpg (56KB - 143 downloads)
57 desoto work 003.jpg (53KB - 155 downloads)
57 desoto work 004.jpg (64KB - 143 downloads)
57 desoto work 005.jpg (69KB - 140 downloads)
57 desoto work 006.jpg (71KB - 144 downloads)
|
|
| |
|
Expert
Posts: 2788
Location: USA - KY |
Busy Bee!
Bill, if you happen to find any new engine mounts that will fit your car, please let me know. They seem to be lost somewhere in the Holy Grail Section of the Unobtanium Catalogue for old car owners.
Apparently the design for the Firesweep engine mounts changed mid-year, and I'm unlucky in that my car was built in the first half of the year (May 1/57), so finding new engine mounts for my car is proving to be a real challenge. Ed figured out that according to my car's numbers, my car was most likely built 42 cars away from having the latter-year mounts. Darnitall.
Impressed with your progress!
|
|
| |
|
Veteran
Posts: 279
Location: Klein, TX | The company I was ordering the brake hoses came back with a 2 week delay on them. Any FL folks know of any part numbers (Dorman, Bendix, Raybestos, etc.) for the the two front hoses and the one rear hose? |
|
| |
|
Veteran
Posts: 188
| Great car, lucky man. I was just looking at this car on Ebay wondering whether I will be lucky to have something like this some day. |
|
| |
|
Veteran
Posts: 279
Location: Klein, TX | Thanks. I had a Firesweep back in '62 and was glad to find another. Lots of work to do on this one, but I am enjoying the various tasks involved in getting it road-worthy once again. |
|
| |
|
Veteran
Posts: 279
Location: Klein, TX | Found the Car Production Broadcast sheet above the glove box. I listed what was on it, in case it would be useful to the FL members that decode these. I did not find any other documentation under the rear seat as was mentioned in another post.
HAND WRITTEN AT TOP OF SHEET: DESOTO 103
HAND WRITTEN IN THE SPECIAL INSTRUCT. SECTION: BLACK
CAR PRODUCTION BROADCAST
DODGE DIVISION
PROD. ITEM NO. 0164
LINE N
SHIPPING ORDER NO. 0221 07725
BODY MODEL 3146
STYLE 4
PAINT LNL
TRIM 516
SPECIAL ORDER NO. BLANK
TIRES D7
BATT BLANK
AXEL D
NCS BLANK
TRANS 32 3
AIR COND 351 BLANK
REAR DEFR 367 BLANK
HEATER 374 4
LIGHT-H/B 377 BLANK
POWER SEAT 384 BLANK
POWER W/L 2 385 BLANK
POWER W/L 4 386 BLANK
POWER W/L TG 387 BLANK
SOLEX GLASS EXC CONV 394 BLANK
SOLEX TINT 395 BLANK
VISOR 396 BLANK
SOLEX TINT CONV 397 BLANK
UNDERCOAT 401 BLANK
ROOF PKG 48 BLANK
CONV, TOP 31 BLANK
POWER BRAKES 339 BLANK
BUMP. MLDG 53 BLANK
ROUTE 67 5
ACC GROUP 1 331 BLANK
ACC GROUP 2 332 BLANK
ACC GROUP 3 333 BLANK
ACC GROUP 4 334 BLANK
ACC GROUP 5 335 BLANK
ACC GROUP 6 336 BLANK
ACC GROUP 7 337 BLANK
POW STEER 338 8
POW BRAKE 339 9
AERIALS 34 34 1
AIRFOAM-FRT 361 BLANK
AIRFOAM-RR 362 BLANK
BUMP VERT 363 BLANK
CARPET 364 BLANK
CLOCK-ELEC 365 BLANK
CRASH PAD 366 BLANK
DUAL EXH 368 BLANK
DUAL EXH WAGONS ONLY 369 BLANK
EXH DEFL 371 BLANK
D-500 ENG 372 BLANK
ENG POW PKG 373 BLANK
B.U. LIGHTS 375 BLANK
LIGHTS GB 376 BLANK
378 BLANK
MIRROR-GP 379 BLANK
MIR. OUT L. 381 BLANK
MIR. OUT R. 382 BLANK
MIR. VANITY 383 BLANK
RADIO SEARCH TUNNER 388 BLANK
PUSHBUTTON RADIO 389 9
RADIO MANUAL 391 BLANK
REAR SPEAKER 392 BLANK
HI FI 393 BLANK
PLASTIC STEERING WHL. 398 8
STONE SHIELD 399 BLANK
WHL COV 402 2
DEL WHL COV 403 BLANK
W/S WAASHER 404 4
W/S WIPER 405 BLANK
GEN-40 AMP 406 BLANK
GEN-50 AMP 407 BLANK
BUMPER EQPT 408 BLANK
409 BLANK
41 BLANK
42 BLANK
43 BLANK
44 BLANK
GAS HEATER & H.C.C RAD 45 BLANK
LIGHT-DESOTO ASHTRAY & DOME 46 BLANK
LIGHT-DESOTO TRUNK-COURTESY 47 BLANK
DESOTO MLDG PKG. 48 BLANK
49 BLANK
50 BLANK
BUMP. MLDG. 53 BLANK
FEATURE GRP 56 BLANK
LOW COMP. 57 BLANK
GAS CAP & HEADLAMPS 58 BLANK
RAD. CORE & SW. CONV. 59 BLANK
TOOL KIT & TIRE KIT 60 BLANK
H/D SPRINGS 61 BLANK
H/D SHOCKS 62 BLANK
63 BLANK
64 BLANK
65 BLANK
|
|
| |
|
Veteran
Posts: 279
Location: Klein, TX | Here is a picture of the CAR PRODUCTION BROADCAST.
 (57 desoto PRODUCTION BROADCAST.jpg) (57 desoto PRODUCTION BROADCAST.jpg)
Attachments
----------------
57 desoto PRODUCTION BROADCAST.jpg (49KB - 135 downloads)
|
|
| |
|
Elite Veteran
Posts: 982
Location: Upper Hunter NSW Australia | baker53 - 2014-02-23 11:26 AM
Here is a picture of the CAR PRODUCTION BROADCAST.
..........
.....
Same guys handwriting on your broadcast sheet in seemingly the same blue pen as is written on my '59 Dodge Coronet's broadcast sheet , seems he worked there at least from 1957 to 1959 ......................
..........
..... |
|
| |
|
Exner Expert 19,174 posts. Neil passed away 18 Sep 2015. You will be missed, Neil!
Posts: 19146
Location: bishop, ca | So, your car's dashboard is (completely) black.
That "N" guy appears never to have slept; he autographed (signed-off on) a lot of 57 Dodge/Firesweep dashes.
Your tires are coded "07", and that means that they were five (including a spare wheel/tire!) Rayon ("Power Cushion") Goodyear
8.00x 14" white-walls.
The blank 'NCS' (New Car Service) means that it was not prepared in the factory for immediate customer drive-away, once it
was delivered to the dealership.
Your car was built on or around 2/21/57.
It was delivered to the dealership by Common Carrier (Truck).
Unfortunately, your car didn't get the 325 Hemi engine installed in it, but, neither did it receive the 4-bbl carb/dual-exhaust "Power
Package" in it, either.
It was not undercoated, either, which makes it a rare(er) survivor; all that it had between the OEM steel and the Rusty World
was some thin gray/blue colored sealer/primer.
I can't see your Axle code; there's a smudge over it; but, it should be a "B", not a "D"; B is the 3.36:1 ratio.
If it is a 'D', let me know...also, if you can get under the diffie, there is a small 'flat' area on its passenger's side which
will have the ratio very lightly, but clearly stamped onto it.
Edited by d500neil 2014-02-22 9:28 PM
|
|
| |
|
Veteran
Posts: 279
Location: Klein, TX | The top part of the dash is black and the lower portion is gray. The code letter above the axle block is definitely D. It is not a B. I will check out the differential ratio and let you. I did some pressure washing on the engine and the front cross-member and no rust on the cross-member. I will attach some pictures of the cleaned engine as well as what it looks like under the valve covers. Thanks for the info you provided. All of it was obvious, except for the date of manufacture which I sure do appreciate. |
|
| |
|
Veteran
Posts: 279
Location: Klein, TX | Some pictures of work in process.
 (PAINTED RADIATOR.jpg) (PAINTED RADIATOR.jpg)
 (PAINTED BOOSTER.jpg) (PAINTED BOOSTER.jpg)
 (PAINTED VACUUM TANK.jpg) (PAINTED VACUUM TANK.jpg)
 (PAINTED BACKING PLATE.jpg) (PAINTED BACKING PLATE.jpg)
 (BLOCK 1 AFTER PRESSURE WASH.jpg) (BLOCK 1 AFTER PRESSURE WASH.jpg)
 (BLOCK 3 AFTER [RESSURE WASH.jpg) (BLOCK 3 AFTER [RESSURE WASH.jpg)
 (LEFT BANK CYLINDER HEAD.jpg) (LEFT BANK CYLINDER HEAD.jpg)
 (RT BANK CYLINDER HEAD.jpg) (RT BANK CYLINDER HEAD.jpg)
Attachments
----------------
PAINTED RADIATOR.jpg (44KB - 128 downloads)
PAINTED BOOSTER.jpg (57KB - 120 downloads)
PAINTED VACUUM TANK.jpg (41KB - 135 downloads)
PAINTED BACKING PLATE.jpg (47KB - 133 downloads)
BLOCK 1 AFTER PRESSURE WASH.jpg (85KB - 130 downloads)
BLOCK 3 AFTER [RESSURE WASH.jpg (76KB - 132 downloads)
LEFT BANK CYLINDER HEAD.jpg (90KB - 131 downloads)
RT BANK CYLINDER HEAD.jpg (82KB - 135 downloads)
|
|
| |
|
Expert
Posts: 2788
Location: USA - KY |
.
d500neil - I'm assuming that any item followed by "BLANK", means that the car does not have this item/feature?
The car seems to have Solex glass, but "BLANK" follows the Solex items listed on the broadcast sheet...I think?
So, I must be mistaken in some way?
Sure wish I had the broadcast sheet for my car!
Edited by FIN ME 2014-02-24 9:03 AM
|
|
| |
|
Veteran
Posts: 279
Location: Klein, TX | Built a remote fill cap for the master cylinder. Hopefully, it will make brake bleeding a lot easier.
 (remote fill 1.jpg) (remote fill 1.jpg)
 (remote fill 2.jpg) (remote fill 2.jpg)
 (remote fill 3.jpg) (remote fill 3.jpg)
 (remote fill 4.jpg) (remote fill 4.jpg)
 (remote fill 5.jpg) (remote fill 5.jpg)
Attachments
----------------
remote fill 1.jpg (35KB - 133 downloads)
remote fill 2.jpg (42KB - 126 downloads)
remote fill 3.jpg (36KB - 126 downloads)
remote fill 4.jpg (31KB - 125 downloads)
remote fill 5.jpg (57KB - 120 downloads)
|
|
| |
|
Veteran
Posts: 279
Location: Klein, TX | Finished sand-blasting the five wheels for the Desoto. They all had some surface rust. They are now ready for primer and paint. Then save up some $$$ to purchase the new whitewalls from Diamondback.
 (WHEELS.jpg) (WHEELS.jpg)
Attachments
----------------
WHEELS.jpg (54KB - 124 downloads)
|
|
| |
|
Veteran
Posts: 279
Location: Klein, TX | Rebuilt the single point distributor for the Desoto and dialed it in on the Sun Distributor machine. That sure makes quick work to verify proper operation and check for point bounce as well as setting up the mechanical advance and verifying vacuum advance and any other issues with the distributor.
 (DIST 1.jpg) (DIST 1.jpg)
 (DIST 2.jpg) (DIST 2.jpg)
 (DIST 3.jpg) (DIST 3.jpg)
 (DIST 4.jpg) (DIST 4.jpg)
Attachments
----------------
DIST 1.jpg (86KB - 127 downloads)
DIST 2.jpg (75KB - 139 downloads)
DIST 3.jpg (61KB - 131 downloads)
DIST 4.jpg (55KB - 129 downloads)
|
|
| |
|
Expert
Posts: 4044
Location: Connecticut | baker53 - 2014-02-25 2:04 PM Built a remote fill cap for the master cylinder. Hopefully, it will make brake bleeding a lot easier. The issues I see with this setup are: 1. it is not original and will be quite visible in an otherwise correctly restored car. 2. How will you know when the master is full ? As you are filling it, when the master is full, brake fluid will start backing up into the line. When you remove the connection, it will spill over onto your firewall. The solution for filling stock p/b master cylinders is pretty simple. Auto parts stores sell plastic funnels with flexible extensions that you can easily snake around the booster and into the master cyl. That's what I used for my 58 Ply with a bellows (Kelsey Hayes) booster. The bellows actually offers less clearance than the canister (Bendix), yet I am able to fill the m/c with no problems. Ron |
|
| |
|
Veteran
Posts: 279
Location: Klein, TX | Hi Ron, The Delrin filler cap is only for servicing. The standard cap will be installed after servicing. The funnel is a great way I am sure, but I had some time plus the material and the machine shop here at home so I made a filler cap. |
|
| |
|
Veteran
Posts: 279
Location: Klein, TX | Ron, I forgot to mention that I have a pressure bleed system that connects to the right angle tubing connector that is screwed into the Delrin filler cap. |
|
| |
|
Veteran
Posts: 279
Location: Klein, TX | Rebuilt the generator and the 2 BBL carburetor today. I was pleasantly surprised how reasonable the kit for the carburetor was.
 (Rebuilt generator.jpg) (Rebuilt generator.jpg)
 (Rebuilt carb 1.jpg) (Rebuilt carb 1.jpg)
 (Rebuilt carb 2.jpg) (Rebuilt carb 2.jpg)
Attachments
----------------
Rebuilt generator.jpg (40KB - 126 downloads)
Rebuilt carb 1.jpg (72KB - 130 downloads)
Rebuilt carb 2.jpg (68KB - 122 downloads)
|
|
| |
|
Inactive by user's request
Location: Las Vegas, Nevada | baker53 - 2014-02-25 11:04 AM
Built a remote fill cap for the master cylinder. Hopefully, it will make brake bleeding a lot easier.
Now this is great engineering. I may steal your idea for my '57. Though my goal is to keep the car virtually stock, it will be a driver rather than a trailer queen and this is a brilliant idea. Thanks for sharing.
Though as I think about it, this is something you'd replace with the stock cap after bleeding is done.
K.
Edited by Kenny J. 2014-03-03 10:00 PM
|
|
| |
|
Expert
Posts: 2788
Location: USA - KY |
Great progress, baker53!
You work fast!
Please keep the updates coming.
|
|
| |
|
Veteran
Posts: 279
Location: Klein, TX | Thanks Rosy. This cold weather we are getting down here has slowed me down a bit. Just a few more days of this cold weather and we will be back to the 70's and I'll get busy on the inner fender panels. I have the engine just about ready for the silver paint. The fender wells have surface rust, but clean-up has been going pretty well so-far. |
|
| |
|
Veteran
Posts: 279
Location: Klein, TX | Weather was great down here today, so I did a little painting on the wheels, inner fender panels, plus some of the other parts that were ready for paint. Hopefully, we will have nice weather tomorrow as well and I can get busy on the engine paint.
 (painted wheels 2.jpg) (painted wheels 2.jpg)
 (painted wheel well 4.jpg) (painted wheel well 4.jpg)
 (painted parts 5.jpg) (painted parts 5.jpg)
 (painted wheel well 1.jpg) (painted wheel well 1.jpg)
 (painted parts 1.jpg) (painted parts 1.jpg)
 (painted parts 2.jpg) (painted parts 2.jpg)
 (painted parts 3.jpg) (painted parts 3.jpg)
 (painted parts 4.jpg) (painted parts 4.jpg)
Attachments
----------------
painted wheels 2.jpg (60KB - 127 downloads)
painted wheel well 4.jpg (61KB - 132 downloads)
painted parts 5.jpg (47KB - 129 downloads)
painted wheel well 1.jpg (34KB - 135 downloads)
painted parts 1.jpg (50KB - 141 downloads)
painted parts 2.jpg (49KB - 133 downloads)
painted parts 3.jpg (48KB - 130 downloads)
painted parts 4.jpg (53KB - 122 downloads)
|
|
| |
|
Veteran
Posts: 279
Location: Klein, TX | Put some paint on the engine today.
 (painted engine 1.jpg) (painted engine 1.jpg)
 (painted engine 2.jpg) (painted engine 2.jpg)
Attachments
----------------
painted engine 1.jpg (61KB - 116 downloads)
painted engine 2.jpg (62KB - 127 downloads)
|
|
| |
|
Elite Veteran
Posts: 982
Location: Upper Hunter NSW Australia | .....
....
Wow, thats made one hell of a difference compared to the bare bones original paint " patina " engine before hand. !!!
.....
.... |
|
| |
|
Veteran
Posts: 279
Location: Klein, TX | VAN HELSING: Thanks, lots of de-greasing, scrubbing, pressure washing, and wire brushing. I am getting onto the brakes now and after they are in good order, I will reassemble the accessories on the engine. |
|
| |
|
Exner Expert 19,174 posts. Neil passed away 18 Sep 2015. You will be missed, Neil!
Posts: 19146
Location: bishop, ca | Bill, any luck in finding the axle ratio?
Also, what advance specifications do you have dialed into your distributor, and what
advancement does the vacuum advance have?
Its advancement will be twice the number that is stamed onto its lever arm?
A 2-bbl carb can have a lot of advance dialed into it, compared to that for a 4-bbl carb car.
Rosy, if a Broadcast Sheet or IBM card has no option numbers appearing on a particular item,
then, either that item is standard-equipped on that car, or, that car does not happen to have that optional
item in it.
Bill's car is not coded as having Solex glass in it (just like my car, coincidentally), so it would have
only the standard non-tinted clear-windshield and side/back glass in it.
Edited by d500neil 2014-03-07 9:39 PM
 (PICT0014.JPG) (PICT0014.JPG)
 (PICT4244.JPG) (PICT4244.JPG)
Attachments
----------------
PICT0014.JPG (108KB - 128 downloads)
PICT4244.JPG (108KB - 136 downloads)
|
|
| |
|
Expert
Posts: 1488
Location: New Castle PA | Yes, Bill, GREAT job on everything!!! |
|
| |
|
Veteran
Posts: 279
Location: Klein, TX | d500neil: Here is the info you requested on the advance. ALL INFO IS IN CRANKSHAFT DEGREES.
MECHANICAL ADVANCE
ENGINE RPM CRANKSHAFT DEGREES
1000 RPM 1.5 DEGREES
1200 RPM 3 DEGREES
1600 RPM 8 DEGREES
2000 RPM 10 DEGREES
2400 RPM 12 DEGREES
2800 RPM 14 DEGREES
3200 RPM 17 DEGREES
3600 RPM 18 DEGREES
4000 RPM 18 DEGREES
VACUUM ADVANCE
VAC. CRANKSHAFT DEGREES
8" 4 DEGREES
10" 10 DEGREES
12" 14 DEGREES
14" 18 DEGREES
16" 20 DEGREES
18" 22 DEGREES
20" 24 DEGREES
22" 24 DEGREES
24" 24 DEGREES
|
|
| |
|
Veteran
Posts: 279
Location: Klein, TX | d500neil: The third member is marked 3 54 |
|
| |
|
Veteran
Posts: 279
Location: Klein, TX | 57desoto: Thanks Ed, I just got the car up on four jack stands and will start on the brakes today. From a cursory look, all of the steel brake lines look solid and rust free. I don't see any brake fluid leakage around the various wheel cylinders. I will try and bleed them and see how that goes. I have new wheel cylinder kits, but have not bought any shoes. I am hoping the existing ones will be OK. Only way to tell is give them a look see. |
|
| |
|
Expert
Posts: 2788
Location: USA - KY | d500neil - 2014-03-07 9:29 PM
Rosy, if a Broadcast Sheet or IBM card has no option numbers appearing on a particular item,
then, either that item is standard-equipped on that car, or, that car does not happen to have that optional
item in it.
Bill's car is not coded as having Solex glass in it (just like my car, coincidentally), so it would have
only the standard non-tinted clear-windshield and side/back glass in it.
Thanks, Neil!
I guess my eyes were deceiving me, 'cause I thought that baker53's car had Solex glass from the looks of the photos. Must have just been some shadowing.
 |
|
| |
|
Veteran
Posts: 279
Location: Klein, TX | I bled the brakes and had great pedal, but found I was engaging only one shoe on the right front. I pulled all four drums and found that 5 of the 6 wheel cylinders were stuck. Also, the shoes looked pretty thin. Rather than install kits in the cylinders, I ordered new ones along with new shoes and new steel brake lines. Hopefully, all that stuff will get here this week. I also took the drums to get them turned and they should be ready soon. I have new bearings sets for the front, so I'll put them in as well. Maybe within a week or two I will have brakes on the Firesweep.
57desoto: Ed you asked earlier about the flexible lines for the brakes. For the short one from the master cylinder to the steel line I used Raybestos BH27048, for the two front flexible lines, I will use Dorman H24717, for the rear flexible hose I will use NAPA 24058.
Also, in case anyone needs some wheel cylinder kits, I have 6 Dorman 19382 kits for sale.
|
|
| |
|
Expert
Posts: 1488
Location: New Castle PA | All sounds good, Bill! Thanks. Hopefully you ordered linings of 3/16" thickness, and not 1/4". The latter may prevent you from getting the drums over the shoes. |
|
| |
|
Veteran
Posts: 279
Location: Klein, TX | Hi Ed, I did not know about the 3/16" and the 1/4" linings for the shoes. I will have to check with the supplier tomorrow. Thanks for the heads up. |
|
| |
|

Expert
Posts: 3967
Location: DFW, TX | Bill, you're doing a fantastic job. Any chance you'll take the Desoto to the Lonestar Roundup next month? |
|
| |
|
Veteran
Posts: 279
Location: Klein, TX | 57burb: I am not sure if it will be ready or not. If it is, I'll take it there. I got word that the parts I ordered for the brakes are being shipped today. I removed the brake assembly from the right front and cleaned up the back plate and the other parts of the assembly. I've been removing dirt and gunk from the suspension parts at the right front. It is slow going with 57 years of stuff caked on the parts. I have jury duty tomorrow, so that will put a damper of the other three brake assemblies. Hopefully, if I am selected as a juror, it won't be a long one. |
|
| |
|
Veteran
Posts: 279
Location: Klein, TX | The brakes are coming together. I finished the front and rear assemblies and now awaiting the new steel brake lines which should be here next Monday. Hopefully, the brakes will be working great early next week.
 (FRONT BRAKE ASSEMBLIES.jpg) (FRONT BRAKE ASSEMBLIES.jpg)
 (REAR BRAKE ASSEMBLIES (1).jpg) (REAR BRAKE ASSEMBLIES (1).jpg)
Attachments
----------------
FRONT BRAKE ASSEMBLIES.jpg (59KB - 122 downloads)
REAR BRAKE ASSEMBLIES (1).jpg (83KB - 131 downloads)
|
|
| |
|
Expert
Posts: 1488
Location: New Castle PA | Bill, I think your return springs are attached incorrectly. On the FRONTS, the shoe side of the spring goes into the HOLE in the middle of the shoe, NOT into the loop at the outer edge. On the REAR, it DOES attach to the outer loop. This is shown in the service manual, but they don't make a big enough point about it. I've helped a lot of folks over the years who complain about brakes not working properly with just that one change. |
|
| |
|
Expert
Posts: 4044
Location: Connecticut | Ed is correct about the loop vs. hole location. Hole for front; loop for rear. Also, I would recommend replacing the springs with fresh ones. Over time, they loose their tension and can result in shoes not returning properly. One of the causes of pulling to the left or right that folks sometimes complain about. I believe Andy Bernbaum has the correct springs. Smart move to replace wheel cylinders, rather than rebuilding them. Pitting in the cylinder bore can result in leaks, which are never fun. I highly recommend buying the shop manual for your car. While I haven't seen the 57 Desoto shop manual, I know the 57 Chrysler manual is very well written and detailed. 95% of mechanicals are the same between the two cars. Ron |
|
| |
|
Expert
Posts: 2788
Location: USA - KY |
Great progress and a very impressive pace, baker53!
I see '57 DeSoto manuals for sale every now and then on Ebay, and on vintage auto literature sites:
http://www.ebay.com/itm/1957-Desoto-Firedome-Firelite-Firesweep-Sho...
Some tranny manuals too if anyone is interested:
http://www.ebay.com/itm/1956-1957-Desoto-Torque-Flite-Transmission-...
|
|
| |
|
Veteran
Posts: 279
Location: Klein, TX | Thanks Rosy, I don't have the transmission manual, but I did get the Service manual. I think it was the first thing I purchased for the car. |
|
| |
|
Veteran
Posts: 279
Location: Klein, TX | Thanks Ed for the info on the return springs. I will get that corrected. |
|
| |
|
Veteran
Posts: 279
Location: Klein, TX | ronbo97: Thanks for the info, I'll check into that. I do have the Service manual, so I have no excuse for the incorrect installation of the return springs. |
|
| |
|
Expert
Posts: 2788
Location: USA - KY |
Maybe it's 'cause you can work at the speed of light! LOL Honest mistake.
If there is any chance at all, please try to bring your DeSoto to the National DeSoto Convention in Indiana in mid July! We'd love to see your car and all of the progress that you've made...oh...and we'd love to meet you too.
|
|
| |
|
Expert
Posts: 4044
Location: Connecticut | Smart move getting the shop manual. I would caution against these 'manuals on CD' that have been appearing on ebay. I purchased one for a 55 Desoto and the reproduction quality was poor. I had to send it back because the images, which are a critical part of the manual, were illegible. I managed to find an original shop manual in excellent condition and the images/illustrations were sharp and clear. Just FYI. Ron |
|
| |
|
Veteran
Posts: 279
Location: Klein, TX | FIN ME: It would be great to attend that event, but I don't think I will be ready. Perhaps the next one will be in the cards.
ronbo97: OK on that CD, glad you found a good hard copy manual. I have an original manual that is in great condition. I just need to check the pictures more frequently.
I am in the process of removing the old brake lines. I have all of them off except for the long line to the rear. The others came off very easily and will make good patterns to bend the new steel lines from.
|
|
| |
|
Veteran
Posts: 279
Location: Klein, TX | Spent yesterday and today putting the engine bay back together. Still more to do before start-up, but making some progress. I added an idler pulley for the belt that drives the water pump, A/C compressor and generator. The original system did not seem to provide enough belt contact with the water pump and compressor. My new steel brake lines are due in tomorrow, so I'll either do brake completion or engine bay completion.
 (57 desoto work 001.jpg) (57 desoto work 001.jpg)
 (57 desoto work 002.jpg) (57 desoto work 002.jpg)
 (57 desoto work 003.jpg) (57 desoto work 003.jpg)
 (57 desoto work 004.jpg) (57 desoto work 004.jpg)
 (57 desoto work 005.jpg) (57 desoto work 005.jpg)
 (57 desoto work 006.jpg) (57 desoto work 006.jpg)
Attachments
----------------
57 desoto work 001.jpg (59KB - 119 downloads)
57 desoto work 002.jpg (53KB - 117 downloads)
57 desoto work 003.jpg (47KB - 116 downloads)
57 desoto work 004.jpg (63KB - 112 downloads)
57 desoto work 005.jpg (55KB - 117 downloads)
57 desoto work 006.jpg (60KB - 131 downloads)
|
|
| |
|
Veteran
Posts: 209
Location: The Republic of Texas | Everything looks really good. |
|
| |
|
Expert
Posts: 2312
Location: Arizona | Nice job on the pulley. There was a reason the factory setup used two belts..... |
|
| |
|
Veteran
Posts: 279
Location: Klein, TX | I guess it worked OK as it was originally with the single belt, but I agree with you two belts are better. Unfortunately, the water pump pulley has a single groove and if I tried to use a an extra long belt to drive the power steering pump and the A/C compressor, the belt would rub against the area in front of the single groove an the water pump pulley. I figured the idler pulley was the best option for my setup. |
|
| |
|
Veteran
Posts: 279
Location: Klein, TX | Red letter day for me. Finished assembly of the engine bay and started up the '57 Desoto Firesweep. Engine sounds great, no tappet noise or other bumps in the night plus oil pressure is excellent. Temperature gauge works as well as the ammeter. The fuel gauge is not working, so I'll have to investigate that issue. BTW, I am really impressed how quickly the engine started. I spun the engine for about 5 seconds to fill up the float bowl in the carb and it started right up. I pressure tested the cooling system with my tester and no leak down, so it looks like all is well so-far. The new steel brake lines should arrive today so forming and installing them will be tomorrows project.
|
|
| |
|
Expert
Posts: 2788
Location: USA - KY |
Great news, baker53!
You've done speedy and impressive work on your new, old car!
BTW...we are all convinced that you never sleep! LOL
Congratulations on obtaining this wonderful car, and getting it back in shape so quickly!
|
|
| |
|
Expert
Posts: 2905
Location: little rock, AR | If you don't watch out your going to have one of those things called, Trailer Queens. Looking Great. |
|
| |
|
Veteran
Posts: 279
Location: Klein, TX | FIN ME: Thanks. I am just so glad to get the Firesweep after these many years, that I want to get out and drive it. The progress will surely slow down very soon. Lots of minor body work to do and that is not my forte. I am still trying to decide if I should farm out the body work. I don't have a great place to paint within, but it will do in a pinch. My wife, Cathy says to send it out for the paint and upholstery and that will be what I end up doing.
I did find the problem with the gas gauge and have ordered a replacement fuel sender for the car. BIG M also helped me out big time. He had a dash clock and a knob that goes on the heater lever that I was missing.
Edited by baker53 2014-03-18 12:45 PM
|
|
| |
|
Veteran
Posts: 279
Location: Klein, TX | oldwood: Thanks for the comment on the car. This will not be a trailer queen, that is for sure. I enjoy working on the old cars, but I am not of the caliber of the great restorers that I have seen over the years. Here is a link to a web page of mine that shows some of the cars I built over the years. There is a bunch of radio stuff at the beginning, then some pictures of my shop, (which needs to be updated), followed by the old cars.
https://sites.google.com/site/w5sgbill/
|
|
| |
|
Expert
Posts: 2312
Location: Arizona | Cool stuff. Wish I had such a nice shop setup. |
|
| |
|
Veteran
Posts: 279
Location: Klein, TX | Thanks Jim. It all gets used regularly either on a project for me or one of the guys around here.
Edited by baker53 2014-03-18 9:05 PM
|
|
| |
|
Veteran
Posts: 279
Location: Klein, TX | The brake lines came in a day late so I got busy bending them using the old ones as patterns. The brake assemblies and drums are all mounted and pre-adjusted. Tomorrow I'll install the new brake lines and bleed the system. Also, FEDEX delivered a NOS '57 Desoto muffler which will be going on in the not too distant future.
 (RF Brake and Line.jpg) (RF Brake and Line.jpg)
 (RR Brake and Line.jpg) (RR Brake and Line.jpg)
 (NOS Muffler.jpg) (NOS Muffler.jpg)
Attachments
----------------
RF Brake and Line.jpg (52KB - 133 downloads)
RR Brake and Line.jpg (44KB - 143 downloads)
NOS Muffler.jpg (55KB - 139 downloads)
|
|
| |
|

Expert
Posts: 1737
Location: Hay Lakes, Alberta, Canada | So, Bill...when can I ship you my '57 Chrysler...? |
|
| |
|
Veteran
Posts: 279
Location: Klein, TX | Hi Brad, Those '57 Chrysler's are great. I have a friend near here that has a '57 New Yorker 2-door hardtop. He built it about ten years ago and sold it to a guy in CA. He was out in CA a year or so ago and called the new owner. He ended up buying it back and is enjoying it here in TX once again.
Edited by baker53 2014-03-18 11:24 PM
|
|
| |
|
Expert
Posts: 2788
Location: USA - KY |
Thank you, baker53 for the link! Great shop you have. I'm jealous!
Wow, you've restored a lot of very nifty cars in your day! We could sure use your talents here, closer to home.
AND! Best of all...I am about 90% sure that the black and white photo of the '57 Firesweep that you have on your site, is a photo of my car!
It looks so much like an old photo that I've seen before, of the car sitting in the previous owner's driveway. Ed would likely know for sure.
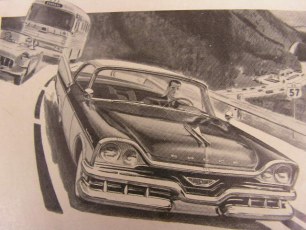
 (1957_DeSoto_Firesweep-large.jpg) (1957_DeSoto_Firesweep-large.jpg)
Attachments
----------------
1957_DeSoto_Firesweep-large.jpg (38KB - 137 downloads)
|
|
| |
|
Veteran
Posts: 279
Location: Klein, TX | FIN ME: It very well could be. We lost a number of pictures and albums during a flood in 1994 and many of the older car pictures were lost. I have managed to contact a few friends from the past that had some pictures. I went on line and looked for pictures of the cars I was missing as well as some of the early radio station pictures. BTW, we were flooded again in 1998 and Cathy said we are getting out of here. We sold the house as is and moved to this place in 1998. My request to Cathy who was searching for a new place was to to look for a 12 car garage with a house attached. That didn't happen, but at least I have more shop space than at the old place.
|
|
| |
|
Veteran
Posts: 279
Location: Klein, TX | Finished installing the new brake lines and bleeding the brakes today. The car is still up on jack stands but the brakes work great. After I finish a few more under the car chores, I'll take it for a test drive. |
|
| |
|
Expert
Posts: 2788
Location: USA - KY | baker53 - 2014-03-19 4:28 PM
...My request to Cathy who was searching for a new place was to to look for a 12 car garage with a house attached...
Sounds reasonable to me!
Leon, the gentleman who used to own my car, confirmed that is a photo of his old car...my "new" Firesweep.
That's a very cool coincidence!
|
|
| |
|
Expert
Posts: 1488
Location: New Castle PA | Gee, I didn't even get the chance to confirm that the picture is of Leon's car (now Rosy's), but it certainly is. Bill, you're doing an amazing job. Keep it up! |
|
| |
|
Exner Expert 19,174 posts. Neil passed away 18 Sep 2015. You will be missed, Neil!
Posts: 19146
Location: bishop, ca | Bill, I didn't notice your distributor's Sun analyzer's results, on Page-2, until now.
Right now, your stock dissie has X(Engine) + 18 (built-in Mechanical Advancement) + 24 (Vacuum Advance[ment]) = UNK Total
Advancement.
Because a 2-bbl carb can not fill a combustion chamber to the extent that a 4-bbl carb does, a 2-bbl system can withstand
more total advancement (something above 50-degrees) than a 4-bbl system (which can withstand up to about 50 degrees
of total advancement, without the engine detonating--'pinging'--not good)
If you do nothing else, you should install (very-) light weight return springs in your dissie, because it only reaches its (wimpy-)
18 degrees of M.A. until 3,600 RPM which is (at) pretty fast speed.
The lighter return springs will allow the 18 degrees of M.A. to be reached at slower RPM; maybe at around 2,800 rpm, which
will give you better economy and performance.
If the dissie is not re-curved (to increase its M.A. to about 22-24 degrees, from its current 18), you could dial-in about
8 degrees of Engine Initial Advance + 18 M.A. + 24 V.A. = 50 degrees.
The 8 degrees of I.A. should keep your engine from 'pinging' with Regular grade gasoline, at start-up acceleration.
8+18 = 26 degrees of Total Mechanical Advancement, which means that your WOT acceleration will not be as high
as it would be, if you could get the dissie re-curved, so that 8+ 22/24 = 30 or 32, which is still less than the optimum
35-36 degrees, but, considerably better than what you've got now.
Again, because you've got a 2-bbl carb, you can keep your 24 degree V.A......because 8+22+24 =54 or, even 8+24+24=
56 (which is still marginally OK; you might need to use Mid-Level gas, but, the amount of Engine I.A. can be lowered, to
keep you running on Regular gas.
Edited by d500neil 2014-03-19 8:31 PM
|
|
| |
|
Veteran
Posts: 279
Location: Klein, TX | Thanks Ed, I'll keep plugging along. Hopefully, the replacement fuel sending unit will be here soon and I can install it. I wire brushed all the crud away from around the sending unit and sprayed some penetrating fluid on it. Hopefully, the retaining ring will come off easily. I also have on order a NOS cross-over pipe that I would like to install while the car is still up on the jack stands. The old cross-over pipe still looks good, but I found one and thought I would install it before taking the car and the NOS muffler to the muffler shop. The old exhaust system including the muffler is full of rust holes.
|
|
| |
|
Veteran
Posts: 279
Location: Klein, TX | d500neil: Thanks for your distributor input. No problem on re-curving the distributor. I have a bunch of springs and the Sun 504 distributor machine here in my shop. I'll make sure to keep your info at hand for the next iteration.
 (DIST 1.jpg) (DIST 1.jpg)
Attachments
----------------
DIST 1.jpg (86KB - 147 downloads)
|
|
| |
|
Exner Expert 19,174 posts. Neil passed away 18 Sep 2015. You will be missed, Neil!
Posts: 19146
Location: bishop, ca | That's GOOD news.
If you can score a Vacuum Advance that provides something less than the 24 degrees that your OEM guy has, you will
be able to dial in some serious M.A. into the dissie.
The V.A.'s have their distributor advancement stamped onto their lever arms; our Crankshaft (or 'engine'-) advancement is
twice that number, so, you're looking for a V.A. with 8-11 stamped onto it....the lower, the better, for your car's accleration
rate.
Edited by d500neil 2014-03-19 8:27 PM
|
|
| |
|
Veteran
Posts: 279
Location: Klein, TX | Had a set back today. My new fuel sending unit arrived and I decided to check it out before pulling the old one out. The new unit has a broken wire on it that can be fixed but the resistance value for FULL was off. It should be 200 ohms and it reads 130. So I have to send it back and get a replacement. I was hoping to get that issue fixed, but that is the way it goes some days. |
|
| |
|
Veteran
Posts: 279
Location: Klein, TX | Put the wheels back on and took a test drive. Engine and transmission seem to be working well. I need to do some more work on the brakes though. Seems like the shoes are not centered in the drums and the brakes pulsate a bit. It got better after driving a bit, but still needs work.. |
|
| |
|
Expert
Posts: 4044
Location: Connecticut | Bill - Is your original sending unit rebuildable ? If so, you may want to go that route. Another thought is to look on ebay for a NOS unit. They show up from time to time. In either case, be sure that there is a filter installed on the end of the pickup tube. Ron |
|
| |
|
Extreme Veteran
Posts: 537
Location: Upstate NY | Who rebuilds old sending units? I have a half dozen or more that are so varnished up they don't read. I tried all kinds of solvents but if it worked on the wiper, it killed the winding. I would love to send one off to get fixed. I've read so many problems with the new ones not reading right.
Thanks |
|
| |
|
Veteran
Posts: 279
Location: Klein, TX | I think I found the issue with the brakes on the Desoto. The alignment holes on the drums were distorted. The run-out on the right rear was .070" and the left rear was .150". I setup the right rear drum on the mill and indexed the five holes and re-bore them and the run-out on the right rear is now .007" I'll do the left rear drum in the morning and then try things out again. I could see chattering marks on the rear shoes and that is what I think I was feeling. BTW, the run-out on the front drums was around .007" |
|
| |
|
Veteran
Posts: 279
Location: Klein, TX | ronbo97: Hi Ron, I have not pulled it out of the tank yet. When I measured the resistance it was around 39 K Ohm. It may be just corrosion around the wiper. I may pull it out and check it. |
|
| |
|
Expert
Posts: 1488
Location: New Castle PA | bbrasse1, John Wolfe and Co. rebuilt my sending unit. http://johnwolfco.com/
|
|
| |
|
Extreme Veteran
Posts: 537
Location: Upstate NY | Thanks Ed! |
|
| |
|
Expert
Posts: 2788
Location: USA - KY |
Bill, I'm happy to hear that the test drive went well! Won't be long now before you're driving around in style.
BTW - sent you a PM.
Please keep the photos and updates coming - great thread!
|
|
| |
|
Veteran
Posts: 279
Location: Klein, TX | Thanks Rosy. I received the PM and sent an e-mail back to you. I have been lazy yesterday and today. I'll get back on the project tomorrow. We are being deluged by yellow pollen dust. Everything is covered with the stuff. We need a good rain to wash some of it away. |
|
| |
|
Veteran
Posts: 279
Location: Klein, TX | Started pulling out the old exhaust system. The cross-over pipe and the intermediate pipe going to the muffler looked to be in great condition. I have a NOS cross-over pipe, but I may not put it in due to the great condition of the one already on the car. The muffler and tailpipe are another story. Really rusted up. I have a NOS muffler that will go on the car and I think the old tail pipe will be useable as a model for the tubing bender at the muffler shop.
 (exhaust 001.jpg) (exhaust 001.jpg)
 (exhaust 002.jpg) (exhaust 002.jpg)
Attachments
----------------
exhaust 001.jpg (84KB - 137 downloads)
exhaust 002.jpg (70KB - 138 downloads)
|
|
| |
|
Veteran
Posts: 279
Location: Klein, TX | Any one know what mounted in the hole to the left of the parking brake handle? I am thinking it was a lamp to indicate that the parking brake was engaged.
 (dash hole.jpg) (dash hole.jpg)
Attachments
----------------
dash hole.jpg (41KB - 131 downloads)
|
|
| |
|
Expert
Posts: 2788
Location: USA - KY |
You'd be right!
Here's a pic from a '57 Firedome; you can just see the yellow light that comes on when the hand brake is operational.
Edited by FIN ME 2014-03-24 11:49 AM
 (desoto_dash.jpg) (desoto_dash.jpg)
Attachments
----------------
desoto_dash.jpg (39KB - 130 downloads)
|
|
| |
|
Expert
Posts: 2788
Location: USA - KY |
A '58 Firesweep dash - not a great photo, but at least it's a close up. Shows the missing ashtray drawer from the optional passenger side ashtray, attached to the right hand side of the heater control surround.
Other than the paint colour, the configuration of the vents on top of the dash, and the placement of the rear view mirror, the dash is the same as the '57's - well, I can't tell from this photo if the design in the pressed metal is exactly the same in the '58's as it is in the 57's, but you get the idea. Also, with the '57 Firesweeps, the bases of the two instrument "pods" on either side of the steering wheel are usually painted the same colour as the the dash behind them. I don't know for certain if this was the case originally, or if they just ended up being painted during subsequent restorations. Ed would know for sure. It's one of the very few questions that I haven't asked him yet.
Edited by FIN ME 2014-03-24 12:25 PM
 (58-DeSoto-Firesweep-DV-09_GC_i07.jpg) (58-DeSoto-Firesweep-DV-09_GC_i07.jpg)
Attachments
----------------
58-DeSoto-Firesweep-DV-09_GC_i07.jpg (213KB - 129 downloads)
|
|
| |
|
Expert
Posts: 2788
Location: USA - KY |
Here's a 1957 Firesweep that's a pretty good "reference" car for the most part:
http://www.schmitt.com/viewimage.asp?ID=4561
Its dash:
Edited by FIN ME 2014-03-24 12:19 PM
 (405237-34.jpg) (405237-34.jpg)
 (405237-38.jpg) (405237-38.jpg)
Attachments
----------------
405237-34.jpg (56KB - 132 downloads)
405237-38.jpg (63KB - 132 downloads)
|
|
| |
|
Veteran
Posts: 279
Location: Klein, TX | Thanks for the pictures Rosy. |
|
| |
|
Veteran
Posts: 279
Location: Klein, TX | I received the replacement fuel sender and like the first one it has an incorrect range. It should be 10-200 ohms and is 10-124 ohms. I am going to send both of them back and hopefully, get a refund.
I did pull the original sender from the tank and was able to clean it up and re-install it. It works and I now can see how much gas is in the tank. |
|
| |
|
Expert
Posts: 4044
Location: Connecticut | Best to stick with original rather than questionable aftermarket units. Was the filter still attached to the pick up tube on the sending unit ? Ron |
|
| |
|
Veteran
Posts: 279
Location: Klein, TX | ronbo97: Yes, it was still attached and looked very clean. I looked into the tank as best as I could and the tank bottom looked clean and I did not see any rust. The shaft that the wiper arm attaches to was stuck in the empty position. I sprayed it with some lubricant and slowly worked it back and forth till it moved smoothly. I also checked the cork floats in water and was able to move the wiper arm up and down. I noticed that the unit used a conical non-linear resistor which was pretty neat. Presumably that was done to account for the tanks shape. |
|
| |
|
Expert
Posts: 1488
Location: New Castle PA | Body of gauges should be argent silver, Rosy... |
|
| |
|
Veteran
Posts: 279
Location: Klein, TX | Talk about a big mess. I forgot how fast the oil came out of the drain plug on the 325 engine. It overflowed my plastic oil collector and I spent a while cleaning up the mess. That oil filter canister is no joy to work with either, but all is well now and the Firesweep has 7 quarts of fresh oil and a new filter. |
|
| |
|
Expert
Posts: 4044
Location: Connecticut | baker53 - 2014-03-25 3:57 PM Talk about a big mess. I forgot how fast the oil came out of the drain plug on the 325 engine. It overflowed my plastic oil collector and I spent a while cleaning up the mess. That oil filter canister is no joy to work with either, but all is well now and the Firesweep has 7 quarts of fresh oil and a new filter. Woah Bill. Seven quarts ??? I'm thinking it should be six, including the filter. Please verify before starting the engine. Also, many of us have replaced the PITA canister with an adapter that allows a modern, screw on filter to be used. Ron |
|
| |
|
Veteran
Posts: 279
Location: Klein, TX | Ronbo: Just checked the service manual and it says 6 quarts with filter. I must have an incorrect dip stick it that 7 quarts brought it up to the Full mark on the dip stick. Before changing the oil, I checked the dip stick and it was right at the full mark, so it had been running at that level for I don't know how long. |
|
| |
|
Veteran
Posts: 279
Location: Klein, TX | ronbo97: If you have any info on that adapter, I would be most grateful to get it and order one. |
|
| |
|
Expert
Posts: 4044
Location: Connecticut | baker53 - 2014-03-25 5:17 PM Ronbo: Just checked the service manual and it says 6 quarts with filter. I must have an incorrect dip stick it that 7 quarts brought it up to the Full mark on the dip stick. Before changing the oil, I checked the dip stick and it was right at the full mark, so it had been running at that level for I don't know how long. Overfilling the engine with oil is never a good thing. You need to drain a quart from that guy. For the oil filter adapter, try these guys: Hot Hemi Heads Their adapter may fit your 325. Ron |
|
| |
|
Veteran
Posts: 279
Location: Klein, TX | ronbo97: If you have a 325 poly engine, please measure the dip stick from the Full mark to the top of the cap. The dip stick I have measures 21 inches from the Full mark to the top of the cap. |
|
| |
|
Expert
Posts: 2788
Location: USA - KY | 57desoto - 2014-03-25 6:48 AM
Body of gauges should be argent silver, Rosy...
Thanks, Ed!
|
|
| |
|
Expert
Posts: 4044
Location: Connecticut | Sorry, no 325. Maybe Neil can jump in here. Ron |
|
| |
|
Veteran
Posts: 279
Location: Klein, TX | Time to tackle the floors on the Firesweep. For the most part, floors are not too bad, but still lots of patching to be done. I have after-market floor panels for the front and will cut portions of them to be be welded in.
 (floor 001.jpg) (floor 001.jpg)
 (floor 002.jpg) (floor 002.jpg)
 (floor 003.jpg) (floor 003.jpg)
 (floor 004.jpg) (floor 004.jpg)
 (floor 005.jpg) (floor 005.jpg)
 (floor 006.jpg) (floor 006.jpg)
Attachments
----------------
floor 001.jpg (62KB - 139 downloads)
floor 002.jpg (69KB - 132 downloads)
floor 003.jpg (69KB - 136 downloads)
floor 004.jpg (70KB - 136 downloads)
floor 005.jpg (63KB - 133 downloads)
floor 006.jpg (68KB - 139 downloads)
|
|
| |
|
Expert
Posts: 1493
Location: Jamaica Plain, MA | Hi-- on my 325 poly engine, the dip stick measures ~20 3/4" inches from the Full mark to the cap. |
|
| |
|
Veteran
Posts: 279
Location: Klein, TX | JT Vincent: Only a 1/4" difference. I checked to see if the tube was not fully seated into the block. It looked to be correct. Did Desoto offer a optional large capacity oil pan by some chance? |
|
| |
|
Expert
Posts: 1488
Location: New Castle PA | Nope. |
|
| |
|
Expert
Posts: 2788
Location: USA - KY |
BTW, baker53 - the photos and info regarding your Desoto's vintage-after-market AC system have really come in handy, providing important clues as to how to install a similar, modern AC system into my Firesweep's engine compartment!
Thank you!
|
|
| |
|
Veteran
Posts: 279
Location: Klein, TX | That's great Rosy. I hope you will cruisin' in cool A/C soon. |
|
| |
|
Expert
Posts: 1493
Location: Jamaica Plain, MA | The cap in the dipstick can come loose and slide around. If your lipstick measuring length is actually longer, it's going to read fuller. I'll take a pic of a stock one with a measuring tape. |
|
| |
|
Veteran
Posts: 279
Location: Klein, TX | JT Vincent: I attached a picture of mine measured from the FULL mark to the cap. The cap is in the correct position up against the nibs. When I checked the oil level just now it was about a 3/16" above the FULL mark.
 (dip stick.jpg) (dip stick.jpg)
Attachments
----------------
dip stick.jpg (58KB - 130 downloads)
|
|
| |
|
Expert
Posts: 1493
Location: Jamaica Plain, MA | I concur, Bill. My KDS motor's dip is exactly the same. And you can call me Jon. |
|
| |
|
Veteran
Posts: 279
Location: Klein, TX | Thanks Jon, I know we had several chats before about the D500 engine. Sorry I could not remember you name. I'll blame it on getting older. |
|
| |
|
Expert
Posts: 1493
Location: Jamaica Plain, MA | We all are. You aren't acting old in your approach to your car! |
|
| |
|
Veteran
Posts: 279
Location: Klein, TX | I've been working on the floors for the past week or so. All the interior is stripped to bare metal. I still have to strip the trunk and then get busy on the patch panels. I plan to seal the patch panels with poly-urethane sealer and follow that with black Rustoleum paint. I'm not sure if I will do anything more to the floors and just let the upholstery shop apply the stuff that they normally use below the carpet. The heat gun and the scraper has been getting a workout removing all the coating material the factory sprayed on the floors. Fortunately, I won't have to fabricate many patch panels. The biggest problem was on the removable panel that allows access to the steering column for removal. I will be able to use the old panel as a model to fabricate the new one. I had purchased left and right front patch panels before I received the car and will not be using them. If anyone has a need for them, please let me know. |
|
| |
|
Veteran
Posts: 279
Location: Klein, TX | Gave the metal shear and the box brake a workout today. Finished cutting the various pieces for the interior floor. Hopefully, I will get the trunk done in the morning and put Rustoleum on the underside of the panels as well as the metal that is part of the original floor. If that dries by Saturday, I'll start welding the various parts of the jigsaw puzzle together.
 (floor panels 001.jpg) (floor panels 001.jpg)
 (floor panels 002.jpg) (floor panels 002.jpg)
 (floor panels 003.jpg) (floor panels 003.jpg)
 (floor panels 004.jpg) (floor panels 004.jpg)
 (floor panels 005.jpg) (floor panels 005.jpg)
 (floor panels 006.jpg) (floor panels 006.jpg)
 (floor panels 007.jpg) (floor panels 007.jpg)
Attachments
----------------
floor panels 001.jpg (53KB - 144 downloads)
floor panels 002.jpg (65KB - 129 downloads)
floor panels 003.jpg (64KB - 130 downloads)
floor panels 004.jpg (62KB - 129 downloads)
floor panels 005.jpg (63KB - 127 downloads)
floor panels 006.jpg (70KB - 130 downloads)
floor panels 007.jpg (70KB - 125 downloads)
|
|
| |
|
Expert
Posts: 2788
Location: USA - KY |
Whew...that's a lot of work!
Progress is looking great, Bill!
|
|
| |
|
Expert
Posts: 4044
Location: Connecticut | Bill - Do you have access to a bead roller ? IMHO, it's important to add the correct depressions to the metal patches to give them structural rigidity, rather than just using flat sheet metal. Ron |
|
| |
|
Veteran
Posts: 279
Location: Klein, TX | Hi Ron, In lieu of bead rolling I weld "L" or "V" brackets to the bottom sides of panels to keep them from tin canning. I've been doing it this way for about 50 years and so-far it has worked well and it makes a nicer surface for the upholsterer to work with. Thanks for your thoughts, but I'll stay with my method. I have access to a bead roller, but rarely use it.
|
|
| |
|
Veteran
Posts: 279
Location: Klein, TX | The interior floors are just about completed except for final paint which I will do tomorrow. I ended up cutting and fitting about 23 pieces for the floors. The shear, brake, MIG, and me got a workout over the past week or so. I applied seam sealer this evening and that should be cured by tomorrow and I'll hit the floors with gray Rustoleum paint. BTW, I installed "V" brackets on the back side of the larger panels to prevent "tin-canning".
 (floor panels 008.jpg) (floor panels 008.jpg)
 (floor panels 009.jpg) (floor panels 009.jpg)
 (floor panels 010.jpg) (floor panels 010.jpg)
Attachments
----------------
floor panels 008.jpg (55KB - 139 downloads)
floor panels 009.jpg (61KB - 128 downloads)
floor panels 010.jpg (48KB - 135 downloads)
|
|
| |
|
Veteran
Posts: 279
Location: Klein, TX | Finally, the floor repairs and re-paint are done. After I put the front & rear seats back in, I'll take the car to the muffler shop and get the exhaust done. Then I guess I'll have to start thinking about body work...
 (floor panels 011.jpg) (floor panels 011.jpg)
 (floor panels 012.jpg) (floor panels 012.jpg)
 (floor panels 013.jpg) (floor panels 013.jpg)
 (floor panels 014.jpg) (floor panels 014.jpg)
 (floor panels 015.jpg) (floor panels 015.jpg)
Attachments
----------------
floor panels 011.jpg (44KB - 130 downloads)
floor panels 012.jpg (31KB - 122 downloads)
floor panels 013.jpg (43KB - 120 downloads)
floor panels 014.jpg (38KB - 117 downloads)
floor panels 015.jpg (33KB - 127 downloads)
|
|
| |
|
Expert
Posts: 2312
Location: Arizona | Why the removable panel under the brake pedal? |
|
| |
|
Veteran
Posts: 279
Location: Klein, TX | It is there in-case you need to remove the steering column and gear box. |
|
| |
|
Veteran
Posts: 279
Location: Klein, TX | Decided to go with dual exhaust rather than the stock single exhaust. The muffler shop got me done in about 3 hours and they built both sides from the exhaust manifold to the down-swept tailpipe for $350 using the two mufflers that I supplied. Ended up going with 2-1/4" pipe the whole way. In case anyone is interested, I have for sale (1) NOS Muffler with the following markings on it PLY V8 56-57, DODGE V8 56-57, DESOTO 56-57 DUAL, TRIPLE WRAP. I also have a NOS cross-over pipe for the 325 engine. I know it fits a 57 Desoto Firesweep and probably others. The part number on it is 17 ? 6 3 3 50. I can't read the third number if there is one and I think the fourth number is 6.
 (exhaust parts 001.jpg) (exhaust parts 001.jpg)
 (exhaust parts 002.jpg) (exhaust parts 002.jpg)
 (exhaust parts 003.jpg) (exhaust parts 003.jpg)
 (exhaust parts 004.jpg) (exhaust parts 004.jpg)
 (exhaust parts 005.jpg) (exhaust parts 005.jpg)
 (exhaust parts 006.jpg) (exhaust parts 006.jpg)
Attachments
----------------
exhaust parts 001.jpg (46KB - 134 downloads)
exhaust parts 002.jpg (50KB - 124 downloads)
exhaust parts 003.jpg (45KB - 132 downloads)
exhaust parts 004.jpg (43KB - 118 downloads)
exhaust parts 005.jpg (46KB - 119 downloads)
exhaust parts 006.jpg (36KB - 126 downloads)
|
|
| |
|
Expert
Posts: 1488
Location: New Castle PA | Very nice job on the floors, Bill! |
|
| |
|
Veteran
Posts: 279
Location: Klein, TX | Thanks Ed, I'm glad to have them done finally. |
|
| |
|
Veteran
Posts: 279
Location: Klein, TX | On the way to and from the muffler shop, I was hearing a clunking sound whenever I pressed on the brake pedal. I thought perhaps there was a problem with a spring or a shoe, but after pulling the front drums all looked good there. I then checked the various suspension parts and all were good except for the rubber bushings at the front of the strut rods. Found a new pair at the parts store and now all is well. Took the car for a test drive and it received its first rain bath. Glad to have working wipers. I attached a few pictures of the old and new rubber bushings.
 (strut 001.jpg) (strut 001.jpg)
 (strut 002.jpg) (strut 002.jpg)
Attachments
----------------
strut 001.jpg (68KB - 118 downloads)
strut 002.jpg (63KB - 113 downloads)
|
|
| |
|
Veteran
Posts: 279
Location: Klein, TX | I was going to take the Desoto Firesweep to the upholstery shop and the chrome plating shop this morning to get some quotes, but had a problem with the car on the freeway. As I increased speed to around 60 mph, the car would bog down. I got off the freeway and headed home. After checking a number of things, I finally found the culprit to be the fuel filter at the inlet of the carb. For now, I removed the ceramic filter from the glass bowl and put in a in-line filter. I don't know if the ceramic filters are made any more or not, but all is OK now. I guess I'll go on my quote trip tomorrow. |
|
| |
|
Expert
Posts: 2788
Location: USA - KY |
Glad you made it back home safe and sound, Bill! I'm sure you'll get those kinks worked out really quickly.
I know that you've got a lot of experience with these sorts of things, but all I can say regarding upholstery and chrome plating quotes for our beloved behemoths is...brace yerself! 
She's going to look and run great by the time you're all done!
|
|
| |
|
Exner Expert 19,174 posts. Neil passed away 18 Sep 2015. You will be missed, Neil!
Posts: 19146
Location: bishop, ca | Bill, those front strut rod bushings are called "crush sleeve" for a very good reason.
Just Suspension makes heavy duty strut bushings which are not of the wimpy crush-sleeve persuasion.
I should have a pic of them, but they are easy to install and will improve your car's handling.
Not a great photo of them....
Edited by d500neil 2014-04-16 6:30 PM
 (PICT0008.JPG) (PICT0008.JPG)
Attachments
----------------
PICT0008.JPG (107KB - 128 downloads)
|
|
| |
|
Veteran
Posts: 279
Location: Klein, TX | FIN ME - 2014-04-16 4:29 PM
Glad you made it back home safe and sound, Bill! I'm sure you'll get those kinks worked out really quickly.
I know that you've got a lot of experience with these sorts of things, but all I can say regarding upholstery and chrome plating quotes for our beloved behemoths is...brace yerself!
She's going to look and run great by the time you're all done!
: )
Hi Rosy, I know from past cars the big bucks to be spent on stainless polishing and chroming. I feel like I've paid for the shop owners kids college expenses about ten times now....
The upholstery guy has been real fair with his work in the past. I've decided not to go with the original style of interior or the black and gray colors. Cathy and the upholsterer will make the final decision as they have on previous cars.
The replacement fuel filter sure made a big difference. I ran the car up to about 80 mph or so and no bogging down anymore. |
|
| |
|
Veteran
Posts: 279
Location: Klein, TX | d500neil - 2014-04-16 5:23 PM
Bill, those front strut rod bushings are called "crush sleeve" for a very good reason.
Just Suspension makes heavy duty strut bushings which are not of the wimpy crush-sleeve persuasion.
I should have a pic of them, but they are easy to install and will improve your car's handling.
Not a great photo of them....
Hi Neil, Thanks for the suggestion on the strut rod bushings. I put in the stock rubber ones and hopefully, they will stand up for a while. I feel that in the not to distant future, I will be doing some front suspension work and will then look into the "heavy duty strut bushings" you mentioned.
|
|
| |
|
Expert
Posts: 1384
Location: Ocala, Florida | Good work! Looks so nice in the first photo who knew what was laying under it.. |
|
| |
|
Veteran
Posts: 279
Location: Klein, TX | The Chrysler Kid - 2014-04-16 7:38 PM
Good work! Looks so nice in the first photo who knew what was laying under it..
So far, it has been a very good project to work on. I am about to take on some body work and the only rusted area is at the left side rear wheel area and that looks like it will be a fairly easy part to cut out and replace with new sheet metal. There are a number of dents and scrapes but they should rework very well. As far as the under carriage is concerned not rusted through areas at all other that the muffler and tail pipe which is all replaced now. The only suspension issue I found so far has been the strut rod bushings, so all in all it has been going fairly well with no big gotcha's so far. |
|
| |
|
Expert
Posts: 2788
Location: USA - KY | baker53 - 2014-04-16 7:14 PM
Hi Rosy, I know from past cars the big bucks to be spent on stainless polishing and chroming. I feel like I've paid for the shop owners kids college expenses about ten times now....
LOL
I hear ya!
Did I tell you about the kidney that I sold on Ebay so I could pay my plater?
You'll likely get a kick out of this:
All of the chrome from my car was laid out on on the shop floor in the same pattern that it came off the car - about twenty feet of it, and likely half a ton of weight in all. Right beside all of this, laid out in the very same manner, was ALL of the chrome from a vintage MG. Needless to say, there was no comparison! I said to the painter, "You call THAT chrome?!". LOL I did envy the MG owner's relatively minor plating bill though, I must admit.
Can't wait to see Cathy's choice in interior! Smart man..."happy wife, happy life", plus I'm sure she's got great taste!
Happy to hear that your car is riding well now!
|
|
| |
|
Veteran
Posts: 279
Location: Klein, TX | I went to the chrome plater, upholstery shop, and the body/paint shop today and got the approximate costs and time frames to do the Firesweep. Big bucks to put it mildly and won't be able to start on it for at least a month. Guess I better line up some more consulting work to pay these craftsmen. I have lots of smaller stuff to do in the interim and hopefully, by July I will have the car done. |
|
| |
|
Veteran
Posts: 279
Location: Klein, TX | I have been trying to fix a brake pulsation problem on the Firesweep for a week now and been checking all sorts of things. I had been concentrating on the front brakes and could not find any issues. A couple folks mentioned that it sounded like hard spots on one or more of the drums. I checked the hardness on the front drums and they seems to be OK. I then checked the rear drums and found that both have hard areas and that the left rear was turned to a diameter of 11-1/16" which is just over the .060" maximum diameter. The right rear drum was turned to a diameter of 11-1/8" which is over the max diameter by .065". I am now looking for a pair of rear drums for a '57 Desoto Firesweep. Any leads would be most appreciated. I hope I am getting to the root of the problem. |
|
| |
|
Exner Expert 19,174 posts. Neil passed away 18 Sep 2015. You will be missed, Neil!
Posts: 19146
Location: bishop, ca | If you search the Evilpay, for 12" Chrysler brakes, you should see/find fine new (Chinese) brake drums, which, of nothing else, should be round/true.
Put a couple of their 11x3" drums on my ride, and they've been working great.
|
|
| |
|
Veteran
Posts: 279
Location: Klein, TX | d500neil - 2014-04-19 9:26 PM
If you search the Evilpay, for 12" Chrysler brakes, you should see/find fine new (Chinese) brake drums, which, of nothing else, should be round/true.
Put a couple of their 11x3" drums on my ride, and they've been working great.
Did not find them. Do you have a better link to them? My drums are 11 x 2-1/2 |
|
| |
|
Veteran
Posts: 279
Location: Klein, TX | I contacted John at BigM and he was able to hook me up with a pair of 11 x 2-1/2 drums with hubs. Hopefully, they will arrive this week and I can get them installed. Thanks to all who suggested various placed to obtain the parts. |
|
| |
|
Veteran
Posts: 279
Location: Klein, TX | My plan for today was to replace the bushing in the idler arm and replace the canister oil filter with a spin on filter adapter. Getting the tapered joint out of the idler that is part of the drag link turned out to be a bigger chore than expected. I finally got it out and found that the ball assembly in the tapered fitting was shot so I had to order a new drag link which hopefully will be here in a week or so. Removing the old bushing from the idler was no fun either, but got it out and installed the new bushing. I will finish the install on the the spin on oil filter adapter tomorrow.
 (filter and bushing 001.jpg) (filter and bushing 001.jpg)
 (filter and bushing 002.jpg) (filter and bushing 002.jpg)
 (filter and bushing 003.jpg) (filter and bushing 003.jpg)
 (filter and bushing 004.jpg) (filter and bushing 004.jpg)
 (filter and bushing 005.jpg) (filter and bushing 005.jpg)
 (filter and bushing 006.jpg) (filter and bushing 006.jpg)
 (filter and bushing 007.jpg) (filter and bushing 007.jpg)
Attachments
----------------
filter and bushing 001.jpg (64KB - 122 downloads)
filter and bushing 002.jpg (64KB - 112 downloads)
filter and bushing 003.jpg (51KB - 119 downloads)
filter and bushing 004.jpg (46KB - 121 downloads)
filter and bushing 005.jpg (41KB - 112 downloads)
filter and bushing 006.jpg (51KB - 126 downloads)
filter and bushing 007.jpg (46KB - 122 downloads)
|
|
| |
|
Veteran
Posts: 279
Location: Klein, TX | Thanks to Tim, TNLOWRIDER, I now have a warning light for the parking brake as well as a courtesy light just above the glove box door. I made a new lens for the courtesy light and replaced the old wiring. I really needed the parking brake warning light. At least two times, I've driven off with the parking brake engaged.
 (dash lights 001.jpg) (dash lights 001.jpg)
 (dash lights 002.jpg) (dash lights 002.jpg)
 (dash lights 005.jpg) (dash lights 005.jpg)
 (dash lights 006.jpg) (dash lights 006.jpg)
 (dash lights 007.jpg) (dash lights 007.jpg)
 (dash lights 008.jpg) (dash lights 008.jpg)
Attachments
----------------
dash lights 001.jpg (57KB - 121 downloads)
dash lights 002.jpg (54KB - 122 downloads)
dash lights 005.jpg (34KB - 130 downloads)
dash lights 006.jpg (47KB - 123 downloads)
dash lights 007.jpg (40KB - 118 downloads)
dash lights 008.jpg (59KB - 107 downloads)
|
|
| |
|
Veteran
Posts: 279
Location: Klein, TX | Made a couple tools today to help in removing the clips used to fasten the "DESOTO" letters onto the hood and trunk plus a tool to remove the clips that fasten the chrome trim piece that surrounds the license to the trunk lid. The "DESOTO" tool is just a brake spoon with a notch that is wide enough to capture the pin on the letter. The other tool is made from 1/2" bar stock with a hole at one end that is chamfered a bit.
 (trim clips 006.jpg) (trim clips 006.jpg)
 (trim clips 005.jpg) (trim clips 005.jpg)
Attachments
----------------
trim clips 006.jpg (45KB - 122 downloads)
trim clips 005.jpg (48KB - 116 downloads)
|
|
| |
|
Veteran
Posts: 279
Location: Klein, TX | Started removing the various trim pieces today. All went well, and so-far no surprises under the various pieces of trim. No rust areas and the clips came out fairly easy.
 (trim removal 001.jpg) (trim removal 001.jpg)
 (trim removal 002.jpg) (trim removal 002.jpg)
 (trim removal 003.jpg) (trim removal 003.jpg)
 (trim removal 004.jpg) (trim removal 004.jpg)
 (trim removal 005.jpg) (trim removal 005.jpg)
 (trim removal 006.jpg) (trim removal 006.jpg)
 (trim removal 007.jpg) (trim removal 007.jpg)
 (trim removal 008.jpg) (trim removal 008.jpg)
 (trim removal 009.jpg) (trim removal 009.jpg)
 (trim removal 010.jpg) (trim removal 010.jpg)
 (trim removal 011.jpg) (trim removal 011.jpg)
 (trim removal 012.jpg) (trim removal 012.jpg)
Attachments
----------------
trim removal 001.jpg (63KB - 113 downloads)
trim removal 002.jpg (50KB - 119 downloads)
trim removal 003.jpg (42KB - 119 downloads)
trim removal 004.jpg (35KB - 120 downloads)
trim removal 005.jpg (35KB - 115 downloads)
trim removal 006.jpg (40KB - 119 downloads)
trim removal 007.jpg (32KB - 117 downloads)
trim removal 008.jpg (38KB - 123 downloads)
trim removal 009.jpg (44KB - 124 downloads)
trim removal 010.jpg (56KB - 116 downloads)
trim removal 011.jpg (62KB - 108 downloads)
trim removal 012.jpg (73KB - 118 downloads)
|
|
| |
|
Expert
Posts: 4044
Location: Connecticut | Looking at picture 009, it appears that your car was a different color at some point. Have you confirmed that the pink color was the original color ?
Ron |
|
| |
|
Veteran
Posts: 279
Location: Klein, TX | ronbo97 - 2014-04-29 8:47 PM
Looking at picture 009, it appears that your car was a different color at some point. Have you confirmed that the pink color was the original color ?
Ron
That is a replacement fender. The original color combo is dusty orange (coral) and white. Some time back, Harriet, original owner, must have had and accident and the fender was replaced. From piecing together various tidbits of information, Harriet stopped driving the car in 1975 and it was stored in her garage and occasionally started up. Paint code is 4LNL which decodes to White, Dusty Orange, White |
|
| |
|
Exner Expert 19,174 posts. Neil passed away 18 Sep 2015. You will be missed, Neil!
Posts: 19146
Location: bishop, ca | You are really fortunate not to have discovered some nasty news when you exposed that deep molding trough around the bottom
of the back window.
Those wide trim tab mounting holes area real source of trunk leakages, and they should be well sealed when you replace that window
molding.
Can you give us a demonstration how that license plate surround clip-removal tool works?
|
|
| |
|
Expert
Posts: 1488
Location: New Castle PA | Bill, when you repaint, make the front fenders all the body color. There should NOT be a color sweep section painted on them between the moldings. Instead, there is a piece of sheet metal that is painted, and is slipped under the moldings, to give that color insert. I have a pattern to cut it out if you need to make one from scratch, since it appears your car lost its originals long ago. |
|
| |
|
Expert
Posts: 2788
Location: USA - KY |
Baker53, did your Sportsman scripts each come off in two pieces, split at the r? The two on my car did, as have those of many other Sportsman owners. Beginning to think they were made that way back in the day?
Ed - would you mind sending me that pattern aw well?
|
|
| |
|
Location: Parts Unknown | Your car sure is in good shape. I am envious of your lack of crunchy-munchy sheetmetal.
|
|
| |
|
Veteran
Posts: 279
Location: Klein, TX | d500neil - 2014-04-30 2:03 AM
You are really fortunate not to have discovered some nasty news when you exposed that deep molding trough around the bottom
of the back window.
Those wide trim tab mounting holes area real source of trunk leakages, and they should be well sealed when you replace that window
molding.
Can you give us a demonstration how that license plate surround clip-removal tool works?
Yes, I was most pleased to see rust free metal under all the moldings. Ed Petrus had mentioned to me to make sure that the holes for the clips were sealed well when it all goes back together.
Regarding the use of the tool on the license frame fasteners. The 1/2" bar stock fits between the tangs on the fastener. The chamfered hole is oversize for the pin on the frame. The chamfer is there to allow the tool to seat better on the clip. The clips came right off with counter clockwise rotation of the tool. I hope that helps. |
|
| |
|
Veteran
Posts: 279
Location: Klein, TX | 57desoto - 2014-04-30 5:54 AM
Bill, when you repaint, make the front fenders all the body color. There should NOT be a color sweep section painted on them between the moldings. Instead, there is a piece of sheet metal that is painted, and is slipped under the moldings, to give that color insert. I have a pattern to cut it out if you need to make one from scratch, since it appears your car lost its originals long ago.
Thanks Ed, I did not notice a panel as you mentioned. If possible, please forward that pattern and I'll do as you suggest. |
|
| |
|
Veteran
Posts: 279
Location: Klein, TX | FIN ME - 2014-04-30 7:32 AM
Baker53, did your Sportsman scripts each come off in two pieces, split at the r? The two on my car did, as have those of many other Sportsman owners. Beginning to think they were made that way back in the day?
Ed - would you mind sending me that pattern aw well?
: )
Hi Rosy, One of the "Sportsman" scripts came off in two pieces. The other one was all one piece. I attached a picture of the break area, and it looks like a break rather than manufactured that way. I guess there is a stress point in that area.
 (sportsman.jpg) (sportsman.jpg)
Attachments
----------------
sportsman.jpg (46KB - 119 downloads)
|
|
| |
|
Veteran
Posts: 279
Location: Klein, TX | Doctor DeSoto - 2014-04-30 10:48 AM
Your car sure is in good shape. I am envious of your lack of crunchy-munchy sheetmetal.
Needless to say, I am so glad to find it in as good of shape as it is. I have had my share of rust issues on other cars I have done. |
|
| |
|
Veteran
Posts: 279
Location: Klein, TX | Car is now at the body shop and all the trim parts are removed for polishing or chrome plating. Next step is to strip the car to bare metal and fix the rusted area at the leading edge of the left side rear wheel well. The rest of the car is rust free, but lots of small dings to take care of
 (body shop 003.jpg) (body shop 003.jpg)
 (body shop 004.jpg) (body shop 004.jpg)
 (body shop 005.jpg) (body shop 005.jpg)
 (body shop 006.jpg) (body shop 006.jpg)
 (body shop 007.jpg) (body shop 007.jpg)
 (body shop 008.jpg) (body shop 008.jpg)
Attachments
----------------
body shop 003.jpg (47KB - 111 downloads)
body shop 004.jpg (34KB - 114 downloads)
body shop 005.jpg (50KB - 108 downloads)
body shop 006.jpg (43KB - 103 downloads)
body shop 007.jpg (53KB - 104 downloads)
body shop 008.jpg (50KB - 110 downloads)
|
|
| |
|
Expert
Posts: 2788
Location: USA - KY |
What shape were your car's door handles in, baker53?
One from my car needed considerable repair, the other not as much.
Great thread; it's nice to see the progress.
|
|
| |
|
Veteran
Posts: 279
Location: Klein, TX | FIN ME - 2014-05-03 9:32 PM
What shape were your car's door handles in, baker53?
One from my car needed considerable repair, the other not as much.
Great thread; it's nice to see the progress.
:cool:
Hi Rosy, The door handles are in great shape. No pitting at all. I have two small pieces of stainless that have dings in them, but they are minor. One piece of pot metal was broken and BigM told me he has a replacement. The rest of the stainless was in great condition. I am also waiting to hear from Jon on a anti-sway bar. My Firesweep did not come with one. Hope you guys had a great time at the Derby. |
|
| |
|
Expert
Posts: 2788
Location: USA - KY |
I did have a great time at Derby, and posted some photos in the "Family in Fins" forum.
Let me know if you find an extra anti-sway bar - been wanting one for a while.
Glad to hear your door handles and stainless was in great shape! That will save you some resto-funds!
|
|
| |
|
Veteran
Posts: 279
Location: Klein, TX | The stripping process has begun. Top of hood stripped; now moving to front fenders.
 (body shop work 001.jpg) (body shop work 001.jpg)
 (body shop work 002.jpg) (body shop work 002.jpg)
 (body shop work 004.jpg) (body shop work 004.jpg)
Attachments
----------------
body shop work 001.jpg (65KB - 121 downloads)
body shop work 002.jpg (57KB - 121 downloads)
body shop work 004.jpg (35KB - 117 downloads)
|
|
| |
|
Expert
Posts: 1493
Location: Jamaica Plain, MA | You are kicking ass and taking no prisoners, Bill. Interesting-- my car had the same weak spots, and the same strong spots in terms of rust. |
|
| |
|
Extreme Veteran
Posts: 500
Location: Upper East Tennessee | Looks Great Bill! |
|
| |
|
Extreme Veteran
Posts: 440
Location: Vermont | Can't wait to see it all done. |
|
| |
|
Veteran
Posts: 279
Location: Klein, TX | lownslow - 2014-05-08 8:28 AM
Can't wait to see it all done.
Me too. I need to get busy selling my '53 Ford mild custom so that I can pay the paint guy, chrome guy and the upholstery guy. Hopefully, the paint will be done in a month and then off to upholstery. I have the parts that needed re-chroming at the shop now and I am hoping they will be ready when it is time to re-install them. I am guessing two months till semi-completion. |
|
| |
|
Expert
Posts: 2788
Location: USA - KY |
Just sell a kidney on Ebay like I did...made major bank.
|
|
| |
|
Veteran
Posts: 279
Location: Klein, TX | Car is pretty much stripped. Now hood, trunk lid and doors come off to get to the old paint on underside of them. Only have two places where bondo was applied in the past and they should be fairly quick to get back to flat metal. No rust on the body other than the left side rear wheel opening leading edge. So very pleased with the condition of the body.
 (body shop work 008.jpg) (body shop work 008.jpg)
 (body shop work 009.jpg) (body shop work 009.jpg)
 (body shop work 010.jpg) (body shop work 010.jpg)
 (body shop work 011.jpg) (body shop work 011.jpg)
 (body shop work 012.jpg) (body shop work 012.jpg)
 (body shop work 014.jpg) (body shop work 014.jpg)
 (body shop work 016.jpg) (body shop work 016.jpg)
 (body shop work 017.jpg) (body shop work 017.jpg)
 (body shop work 018.jpg) (body shop work 018.jpg)
 (body shop work 031.jpg) (body shop work 031.jpg)
 (body shop work 035.jpg) (body shop work 035.jpg)
Attachments
----------------
body shop work 008.jpg (56KB - 128 downloads)
body shop work 009.jpg (54KB - 132 downloads)
body shop work 010.jpg (46KB - 118 downloads)
body shop work 011.jpg (45KB - 127 downloads)
body shop work 012.jpg (48KB - 122 downloads)
body shop work 014.jpg (52KB - 117 downloads)
body shop work 016.jpg (50KB - 118 downloads)
body shop work 017.jpg (44KB - 117 downloads)
body shop work 018.jpg (44KB - 123 downloads)
body shop work 031.jpg (58KB - 123 downloads)
body shop work 035.jpg (44KB - 132 downloads)
|
|
| |
|
Exner Expert 19,174 posts. Neil passed away 18 Sep 2015. You will be missed, Neil!
Posts: 19146
Location: bishop, ca | Bill, haven't seen the underside of your car's trunk, but its asphaltic deadener panel should not be painted-over.
If your car was built in Detroit, the trunk underside reinforcements would be painted in main-body color; if it was built in L.A.
it would have that darkish gray/blue 'primer' color on it.
If it hasn't been stripped yet, can you PM me, or post a pic or two showing the extent to which the factory applied the
body paint to the under-parcel shelf area?
Thanks!
Edited by d500neil 2014-05-10 3:02 PM
|
|
| |
|
Veteran
Posts: 279
Location: Klein, TX | d500neil - 2014-05-10 1:57 PM
Bill, haven't seen the underside of your car's trunk, but its asphaltic deadener panel should not be painted-over.
If your car was built in Detroit, the trunk underside reinforcements would be painted in main-body color; if it was built in L.A.
it would have that darkish gray/blue 'primer' color on it.
If it hasn't been stripped yet, can you PM me, or post a pic or two showing the extent to which the factory applied the
body paint to the under-parcel shelf area?
Thanks!
Hi Neil, The car was built in Detroit. The next time I am over at the body shop I will try to get the pictures you requested and post them. The deadener on the underside of the trunk lid was not painted. It will be masked off when the new paint is applied to the underside of the trunk lid. |
|
| |
|
Veteran
Posts: 279
Location: Klein, TX | Any idea on how the grill in front of the windshield is attached. Not sure if it has fasteners that are accessed from under the dash or if it snaps into place. |
|
| |
|
Exner Expert 19,174 posts. Neil passed away 18 Sep 2015. You will be missed, Neil!
Posts: 19146
Location: bishop, ca | That's great news, Bill.
Masking off the deadener panel is a beotch, because it has to be done so carefully, underlying the reinforcements.
Originally, the trunk was fully adjusted to the body, before it was painted-while-elevated-and-installed to the body..
The hood was painted off of the body.
Your trunk area shows a classic-example of how only the middle area of the filler tube received paint (over-spray)
from the painter getting at the trunk hinge support.
The under-side of the parcel shelf got some over-spray from the painting of the trunk support torsion bars.
Edited by d500neil 2014-05-10 4:34 PM
|
|
| |
|
Expert
Posts: 4044
Location: Connecticut | baker53 - 2014-05-10 4:25 PM Any idea on how the grill in front of the windshield is attached. Not sure if it has fasteners that are accessed from under the dash or if it snaps into place. It's held in with a bunch of spring clips. To remove it, stick a small tipped screw driver under the lip and pry upward. Work your way clockwise around the vent and you won't bend it as it slowly releases. Ron |
|
| |
|
Veteran
Posts: 279
Location: Klein, TX | ronbo97 - 2014-05-10 4:59 PM
baker53 - 2014-05-10 4:25 PM Any idea on how the grill in front of the windshield is attached. Not sure if it has fasteners that are accessed from under the dash or if it snaps into place. It's held in with a bunch of spring clips. To remove it, stick a small tipped screw driver under the lip and pry upward. Work your way clockwise around the vent and you won't bend it as it slowly releases. Ron
Thanks Ron. I will do as you suggest. |
|
| |
|
Veteran
Posts: 279
Location: Klein, TX | I posted this in the parts wanted section as well. Looking for a package tray speaker grill and a pair of front parking light lens's for a '57 Desoto Firesweep. |
|
| |
|
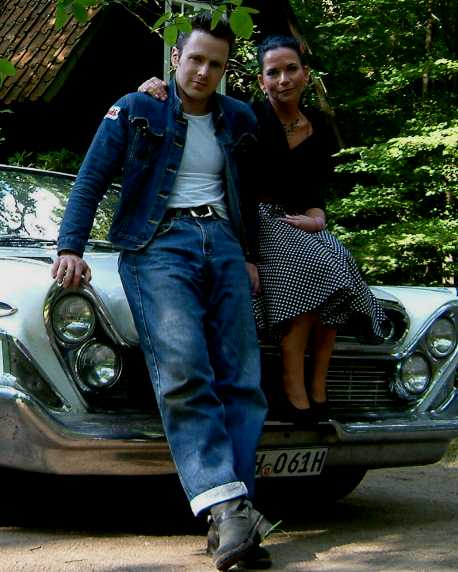
Expert 5K+
Posts: 7417
Location: northern germany | hopefully that original factory primer was already gone before, because whatever you do you will not get the same quality of the factory baked on primer again. |
|
| |
|
Expert
Posts: 2788
Location: USA - KY |
Atlas Obsolete might still sell the reproduction parking light lenses.
|
|
| |
|
Veteran
Posts: 279
Location: Klein, TX | 1960fury - 2014-05-12 4:17 PM
hopefully that original factory primer was already gone before, because whatever you do you will not get the same quality of the factory baked on primer again.
You of course are entitled to your opinion, but I totally disagree with you. It was porus and is not anywhere close to today's catylized primers and paints. I have done about 30 cars over the past 50 years or so and can only speak from my own experience. Once again I say, you are entitled to your opinion, but I don't agree. |
|
| |
|
Veteran
Posts: 279
Location: Klein, TX | FIN ME - 2014-05-12 4:43 PM
Atlas Obsolete might still sell the reproduction parking light lenses.
(O )
Thanks Rosy, I will check that out. |
|
| |
|
Expert
Posts: 2788
Location: USA - KY |
And...I just might have an extra rear shelf speaker. I will check the next time I am at the shop. I couldn't find any for the longest time, and then I found three all at once...I think. I will check and let you know!
|
|
| |
|
Expert 5K+
Posts: 7417
Location: northern germany | baker53 - 2014-05-12 5:57 PM
1960fury - 2014-05-12 4:17 PM
hopefully that original factory primer was already gone before, because whatever you do you will not get the same quality of the factory baked on primer again.
You of course are entitled to your opinion, but I totally disagree with you. It was porus and is not anywhere close to today's catylized primers and paints. I have done about 30 cars over the past 50 years or so and can only speak from my own experience. Once again I say, you are entitled to your opinion, but I don't agree.
okay i can only speak for 60/61 mopars and 26 years experience restoring these cars. nothing is better than the factory primer. its baked on in special ovens, its like galvanized. once one of my cars got t boned badly. lots of sharp wrinkles in the sheet metal but the primer was still on and even were it stretched most hard to remove. nothing you can duplicate in a paint booth. imo stripping the factory primer is one of the most common mistakes during a restoration. |
|
| |
|
Expert
Posts: 3967
Location: DFW, TX | Hey Bill,
Car is looking great. I thought it looked like a good car before, but the work you are putting into it has taken it to the next level. You do nice work - and fast.
FIN ME - 2014-05-12 4:43 PM
Atlas Obsolete might still sell the reproduction parking light lenses. (O )
I didn't see reproduction lenses, but they do offer NOS. A bit pricey though.
http://www.moparmall.com/servlet/the-1643/advnturer-firesweep-fired...
If anyone locates some, I am looking for a pair of repro turn signal lenses. |
|
| |
|
Veteran
Posts: 279
Location: Klein, TX | FIN ME - 2014-05-12 5:09 PM
And...I just might have an extra rear shelf speaker. I will check the next time I am at the shop. I couldn't find any for the longest time, and then I found three all at once...I think. I will check and let you know!
:cool:
Thanks Rosy, I hope you find an extra one. |
|
| |
|
Veteran
Posts: 279
Location: Klein, TX | 57burb - 2014-05-12 5:19 PM
Hey Bill,
Car is looking great. I thought it looked like a good car before, but the work you are putting into it has taken it to the next level. You do nice work - and fast.
FIN ME - 2014-05-12 4:43 PM
Atlas Obsolete might still sell the reproduction parking light lenses. (O )
I didn't see reproduction lenses, but they do offer NOS. A bit pricey though.
http://www.moparmall.com/servlet/the-1643/advnturer-firesweep-fired...
If anyone locates some, I am looking for a pair of repro turn signal lenses.
Wow, they sure are proud of them. Hopefully, I'll find a pair of used ones. Thanks for the comment on the car. I am hoping (with fingers, eyes, and toes crossed), that the body and paint work will be done by July 1st. The guy that I use for upholstery moves them through his shop pretty fast. So maybe some cruising time this summer.
|
|
| |
|
Veteran
Posts: 279
Location: Klein, TX | 1960fury - 2014-05-12 5:14 PM
baker53 - 2014-05-12 5:57 PM
1960fury - 2014-05-12 4:17 PM
hopefully that original factory primer was already gone before, because whatever you do you will not get the same quality of the factory baked on primer again.
You of course are entitled to your opinion, but I totally disagree with you. It was porus and is not anywhere close to today's catylized primers and paints. I have done about 30 cars over the past 50 years or so and can only speak from my own experience. Once again I say, you are entitled to your opinion, but I don't agree.
okay i can only speak for 60/61 mopars and 26 years experience restoring these cars. nothing is better than the factory primer. its baked on in special ovens, its like galvanized. once one of my cars got t boned badly. lots of sharp wrinkles in the sheet metal but the primer was still on and even were it stretched most hard to remove. nothing you can duplicate in a paint booth. imo stripping the factory primer is one of the most common mistakes during a restoration.
That is great, glad to hear you have had such great success keeping the old primer intact.
|
|
| |
|
Expert
Posts: 2788
Location: USA - KY |
What colours/style/materials did you and Cathy decide on for the interior of your car? Can't wait to see it all done and back on the road...in record time, might I add!
|
|
| |
|
Expert
Posts: 1906
Location: Ontario, Canada | Rosy, are you still looking for a sway bar? I might have one.
Greg |
|
| |
|
Veteran
Posts: 279
Location: Klein, TX | d500neil - 2014-05-10 1:57 PM
Bill, haven't seen the underside of your car's trunk, but its asphaltic deadener panel should not be painted-over.
If your car was built in Detroit, the trunk underside reinforcements would be painted in main-body color; if it was built in L.A.
it would have that darkish gray/blue 'primer' color on it.
If it hasn't been stripped yet, can you PM me, or post a pic or two showing the extent to which the factory applied the
body paint to the under-parcel shelf area?
Thanks!
Hi Neil, I attached some pictures of the underside parcel shelf area.
 (body shop work 039.jpg) (body shop work 039.jpg)
 (body shop work 040.jpg) (body shop work 040.jpg)
 (body shop work 041.jpg) (body shop work 041.jpg)
Attachments
----------------
body shop work 039.jpg (42KB - 110 downloads)
body shop work 040.jpg (43KB - 99 downloads)
body shop work 041.jpg (54KB - 111 downloads)
|
|
| |
|
Veteran
Posts: 279
Location: Klein, TX | The doors, hood, and trunk lid are off and body work done and metal etching primer applied. Anyone know of a source for nickel bead and "U" channel. The vent window assemblies are out and I need to replace the "U" channels as well as the inner and outer nickel bead on the doors and moldings. Also, what is the proper distance from the edge of the fender to the first mirror mounting hole? Presently, mine is about 11-3/4" and I am not sure if that is correct.
 (body shop work 049.jpg) (body shop work 049.jpg)
 (body shop work 047.jpg) (body shop work 047.jpg)
 (body shop work 053.jpg) (body shop work 053.jpg)
Attachments
----------------
body shop work 049.jpg (37KB - 105 downloads)
body shop work 047.jpg (28KB - 112 downloads)
body shop work 053.jpg (36KB - 110 downloads)
|
|
| |
|
Expert
Posts: 1493
Location: Jamaica Plain, MA | Lookin' good, Bill. I'm hoping to take some days off in the upcoming weeks to get my Firesweep ready for the paint shop. I've been casting odds and ends. When I take the parking lights out, I'll assess if I can cast them in clear for you. Should be doable.
Edited by JT Vincent 2014-05-13 1:54 PM
|
|
| |
|
Veteran
Posts: 279
Location: Klein, TX | JT Vincent - 2014-05-13 12:53 PM
Lookin' good, Bill. I'm hoping to take some days off in the upcoming weeks to get my Firesweep ready for the paint shop. I've been casting odds and ends. When I take the parking lights out, I'll assess if I can cast them in clear for you. Should be doable.
That sounds great. I have never tried and casting, but seems like a great thing to know how to do. |
|
| |
|
Expert
Posts: 2788
Location: USA - KY | LD3 Greg - 2014-05-13 11:47 AM
Rosy, are you still looking for a sway bar? I might have one.
Greg
I still need one Greg. I very recently asked John Fowlie, but no answer as of yet.
The way I drive, I need a sway bar.
|
|
| |
|
Expert
Posts: 1906
Location: Ontario, Canada | I'll see what I have. Need any of the brackets as well?
Greg |
|
| |
|
Expert
Posts: 2788
Location: USA - KY |
Thank you, Greg! But it seems that I should have checked my e-mail first! Big John Fowlie came through and had already found an anti-sway bar with my name on it. But thanks for the thoughtful offer!
|
|
| |
|
Veteran
Posts: 279
Location: Klein, TX | FIN ME - 2014-05-14 12:02 PM
Thank you, Greg! But it seems that I should have checked my e-mail first! Big John Fowlie came through and had already found an anti-sway bar with my name on it. But thanks for the thoughtful offer!
:cool:
Good deal Rosy, we will now have to figure out how to put them on... |
|
| |
|
Expert
Posts: 1906
Location: Ontario, Canada | Glad you got one Rosy. Yes, they install with considerable difficulty. I soaked the bushings with windex as I kept pounding on things with a rubber mallet.
Greg |
|
| |
|
Expert
Posts: 2788
Location: USA - KY |
Good news...I'm in the mood to hit something!
I am warming up my rubber mallet as I type!
|
|
| |
|
Veteran
Posts: 279
Location: Klein, TX | Today's tasks included polishing tail light lenses and repairing the aluminum door sill plates. I used some 3M polishing compound and the tail lights cleaned up very well. My drivers side sill plate was really corroded on the forward vertical part. I tried to find some replacements, but $$$. I ended up taking a piece of .038" aluminum and making overlays for the old door sills and put a small bend on the lower 3/8" like the original. I haven't decided if I will use rivets or adhesive to attach the overlays, but I leaning towards the adhesive.
 (body shop work 054.jpg) (body shop work 054.jpg)
 (body shop work 055.jpg) (body shop work 055.jpg)
 (body shop work 058.jpg) (body shop work 058.jpg)
 (body shop work 059.jpg) (body shop work 059.jpg)
 (body shop work 057.jpg) (body shop work 057.jpg)
Attachments
----------------
body shop work 054.jpg (60KB - 107 downloads)
body shop work 055.jpg (64KB - 109 downloads)
body shop work 058.jpg (61KB - 106 downloads)
body shop work 059.jpg (52KB - 101 downloads)
body shop work 057.jpg (58KB - 111 downloads)
|
|
| |
|
Veteran
Posts: 279
Location: Klein, TX | Some pictures of the body work going on at present.
 (body shop work 071.jpg) (body shop work 071.jpg)
 (body shop work 072.jpg) (body shop work 072.jpg)
 (body shop work 073.jpg) (body shop work 073.jpg)
 (body shop work 076.jpg) (body shop work 076.jpg)
 (body shop work 077.jpg) (body shop work 077.jpg)
 (body shop work 078.jpg) (body shop work 078.jpg)
 (body shop work 079.jpg) (body shop work 079.jpg)
 (body shop work 080.jpg) (body shop work 080.jpg)
 (body shop work 081.jpg) (body shop work 081.jpg)
 (body shop work 082.jpg) (body shop work 082.jpg)
 (body shop work 083.jpg) (body shop work 083.jpg)
 (body shop work 084.jpg) (body shop work 084.jpg)
 (body shop work 085.jpg) (body shop work 085.jpg)
 (body shop work 086.jpg) (body shop work 086.jpg)
 (body shop work 087.jpg) (body shop work 087.jpg)
 (body shop work 088.jpg) (body shop work 088.jpg)
 (body shop work 089.jpg) (body shop work 089.jpg)
Attachments
----------------
body shop work 071.jpg (49KB - 110 downloads)
body shop work 072.jpg (49KB - 102 downloads)
body shop work 073.jpg (46KB - 107 downloads)
body shop work 076.jpg (42KB - 107 downloads)
body shop work 077.jpg (46KB - 111 downloads)
body shop work 078.jpg (58KB - 111 downloads)
body shop work 079.jpg (46KB - 98 downloads)
body shop work 080.jpg (32KB - 107 downloads)
body shop work 081.jpg (54KB - 105 downloads)
body shop work 082.jpg (42KB - 109 downloads)
body shop work 083.jpg (44KB - 110 downloads)
body shop work 084.jpg (50KB - 105 downloads)
body shop work 085.jpg (54KB - 93 downloads)
body shop work 086.jpg (58KB - 105 downloads)
body shop work 087.jpg (61KB - 108 downloads)
body shop work 088.jpg (42KB - 102 downloads)
body shop work 089.jpg (39KB - 104 downloads)
|
|
| |
|
Exner Expert 19,174 posts. Neil passed away 18 Sep 2015. You will be missed, Neil!
Posts: 19146
Location: bishop, ca | THANKS for those pics, Bill!
Is it too late to see the painting on/around the passenger's side hinge and/or on the X-brace at the end of the trunk?
Note how the painter spayed the trunk from directly behind it, and aimed the nozzle at the leading edge of the parcel shelf, where he 'got' to
the torsion bars.
It also looks like his instructions were to paint the X-brace, but not to worry about getting the parcel shelf (or the hinges; note the spray-
shadows on them)...fully painted.
|
|
| |
|
Exner Expert 19,174 posts. Neil passed away 18 Sep 2015. You will be missed, Neil!
Posts: 19146
Location: bishop, ca |
Also, note that a 'major' source-location for trunk leakages are at the joint-seam, seen in the middle of this
photo, where water would leak through of the large base-of-back-glass molding-trim mounting holes...and, then,
drip/run down along the wheel wells, invisibly, behind the cardboard trunk liners.
 (body.jpg) (body.jpg)
 (body.jpg) (body.jpg)
Attachments
----------------
body.jpg (54KB - 97 downloads)
body.jpg (46KB - 91 downloads)
|
|
| |
|
Veteran
Posts: 245
| you can buy new doorsillplares from michael burk in michigan his phone is 517-605-5345 or mail c300f@hotmail.com they are $385 pair he dont have many left and i dont have plans to make any new ones rigth now
Thanks JAN |
|
| |
|
Veteran
Posts: 279
Location: Klein, TX | d500dodge59 - 2014-05-24 7:42 AM
you can buy new doorsillplares from michael burk in michigan his phone is 517-605-5345 or mail c300f@hotmail.com they are $385 pair he dont have many left and i dont have plans to make any new ones rigth now
Thanks JAN
Thanks for the info Jan. |
|
| |
|
Veteran
Posts: 279
Location: Klein, TX | Worked on hood hinge assemblies and the vent window assemblies this weekend. Fortunately the rubber seals around the vent windows were in great condition. Still very pliable and made a good seal around the glass and the frame. Installed new division bar window channel and they are now ready for re-install after the car is painted. The hood hinges were in very good condition as well, so just a clean-up and they are ready for re-install as well.
 (body shop work 091.jpg) (body shop work 091.jpg)
 (body shop work 090.jpg) (body shop work 090.jpg)
Attachments
----------------
body shop work 091.jpg (62KB - 98 downloads)
body shop work 090.jpg (56KB - 110 downloads)
|
|
| |
|
Veteran
Posts: 279
Location: Klein, TX | Just received a call from the chrome plating shop. The parts are all done and ready for pick-up. As Fin Me says, now it's time to sell a kidney to pay the bill. |
|
| |
|
Expert
Posts: 2788
Location: USA - KY |
Dang, that was fast!
Can't wait to see all of that new chrome on top of that new paint!
|
|
| |
|
Veteran
Posts: 279
Location: Klein, TX | FIN ME - 2014-05-26 8:25 AM
Dang, that was fast!
Can't wait to see all of that new chrome on top of that new paint!
:cool:
Me too.... |
|
| |
|
Location: Parts Unknown | What exactly is taking so long here ????
|
|
| |
|
Veteran
Posts: 279
Location: Klein, TX |
Don't know, perhaps just laziness on my part.  |
|
| |
|
Veteran
Posts: 279
Location: Klein, TX | Rainy day down here so I decided to make a spring for the door opening handle. The old had broken and the handle would rattle. Seems like about 20 years ago a pal gave me a spring winding setup so I put it to use. All is good now, plus we got a really good soaking rain which we really needed.
 (body shop work 095.jpg) (body shop work 095.jpg)
 (body shop work 092.jpg) (body shop work 092.jpg)
 (body shop work 093.jpg) (body shop work 093.jpg)
 (body shop work 094.jpg) (body shop work 094.jpg)
Attachments
----------------
body shop work 095.jpg (23KB - 101 downloads)
body shop work 092.jpg (32KB - 115 downloads)
body shop work 093.jpg (25KB - 103 downloads)
body shop work 094.jpg (42KB - 95 downloads)
|
|
| |
|
Expert
Posts: 1493
Location: Jamaica Plain, MA | It's probably rude to ask, but I'm wondering what the cost for the front air-intake bumper (not the lower one) and the rear bumper and jet-pods was. I'm trying to figure out if I should try to do this for this season. |
|
| |
|
Veteran
Posts: 279
Location: Klein, TX | JT Vincent - 2014-05-27 11:45 AM
It's probably rude to ask, but I'm wondering what the cost for the front air-intake bumper (not the lower one) and the rear bumper and jet-pods was. I'm trying to figure out if I should try to do this for this season.
Hi JT, I don't know the individual prices on the parts. He looked it all over and came back with a price and after he splashed some water on me to revive me, I said OK. I will post some pix of the parts I picked up today. |
|
| |
|
Veteran
Posts: 279
Location: Klein, TX | Made the trip to the plating shop this morning and brought back some pieces. All the parts look great.
 (chrome work 001.jpg) (chrome work 001.jpg)
 (chrome work 002.jpg) (chrome work 002.jpg)
 (chrome work 003.jpg) (chrome work 003.jpg)
 (chrome work 004.jpg) (chrome work 004.jpg)
 (chrome work 005.jpg) (chrome work 005.jpg)
 (chrome work 006.jpg) (chrome work 006.jpg)
 (chrome work 007.jpg) (chrome work 007.jpg)
 (chrome work 008.jpg) (chrome work 008.jpg)
Attachments
----------------
chrome work 001.jpg (67KB - 123 downloads)
chrome work 002.jpg (67KB - 108 downloads)
chrome work 003.jpg (65KB - 105 downloads)
chrome work 004.jpg (71KB - 107 downloads)
chrome work 005.jpg (65KB - 116 downloads)
chrome work 006.jpg (65KB - 109 downloads)
chrome work 007.jpg (78KB - 108 downloads)
chrome work 008.jpg (66KB - 113 downloads)
|
|
| |
|
Veteran
Posts: 279
Location: Klein, TX | I had an e-mail about the spring winder I used to make the replacement door handle spring, so I thought I would post a few pictures of it. It is called a Porter Spring Winder, model P-2 and came with mandrels for making springs 1/8" to 1-1/4" diameter in 1/16" increments. You can make either right hand or left hand wound springs, either compression type or torsion type.
 (chrome work 010.jpg) (chrome work 010.jpg)
 (chrome work 011.jpg) (chrome work 011.jpg)
 (chrome work 012.jpg) (chrome work 012.jpg)
Attachments
----------------
chrome work 010.jpg (73KB - 117 downloads)
chrome work 011.jpg (71KB - 115 downloads)
chrome work 012.jpg (61KB - 103 downloads)
|
|
| |
|
Expert
Posts: 2788
Location: USA - KY |
It's bling BLISS!
It all looks really good, baker53!
|
|
| |
|
Veteran
Posts: 279
Location: Klein, TX | FIN ME - 2014-05-27 4:03 PM
It's bling BLISS!
It all looks really good, baker53!
: )
Thanks Rosy, just 20 pieces of stainless trim to go. I will take them over to the shop in the morning. I had polished them myself, but they look like crap when compared to the ones the chrome shop did. So.... it's only $$$ right |
|
| |
|
Expert
Posts: 1488
Location: New Castle PA | I don't know what YOUR polishing job looks like, Bill, but your chrome shop did such a nice job that I actually thought you had chromed the stainless. Nice work with EVERYTHING you're doing! |
|
| |
|
Exner Expert 19,174 posts. Neil passed away 18 Sep 2015. You will be missed, Neil!
Posts: 19146
Location: bishop, ca | So, who is the chromer-polishing company?
Any chance to get a pic or two of the passenger's side trunk hinge/parcel shelf area?
|
|
| |
|
Veteran
Posts: 279
Location: Klein, TX | d500neil - 2014-05-27 6:10 PM
So, who is the chromer-polishing company?
Any chance to get a pic or two of the passenger's side trunk hinge/parcel shelf area?
Hi Neil, I am hoping to get over to the body shop tomorrow and take some pictures. The company doing the plating is CUSTOM POLISH CHROME, 424 Hill Rd. Houston, TX 77037. e-mail custompolishchrome@gmail.com phone: 832 770-4925 |
|
| |
|
Veteran
Posts: 279
Location: Klein, TX | 57desoto - 2014-05-27 5:44 PM
I don't know what YOUR polishing job looks like, Bill, but your chrome shop did such a nice job that I actually thought you had chromed the stainless. Nice work with EVERYTHING you're doing!
Thanks Ed, It is amazing what they can do with a piece of stainless. Lots of care and dedication to the process sure makes a difference. The stuff I did looks great from 5 or 10 feet, but up close it can't hold a candle to what they do. They do a lot of exotic cars for clients around the world. Some of stuff they have brought in looks like swiss cheese and goes out looking far better than new. |
|
| |
|
Veteran
Posts: 279
Location: Klein, TX | d500neil - 2014-05-27 6:10 PM
So, who is the chromer-polishing company?
Any chance to get a pic or two of the passenger's side trunk hinge/parcel shelf area?
Hi Neil, I tried to get some pictures of the area you requested. I hope they are what you need. There is some primer over-spray. Probably will not be able to get any additional pictures. I will be going over on Friday, but I think that area will be unavailable for more pictures.
 (DESOTO WORK 002.jpg) (DESOTO WORK 002.jpg)
 (DESOTO WORK 003.jpg) (DESOTO WORK 003.jpg)
 (DESOTO WORK 004.jpg) (DESOTO WORK 004.jpg)
 (DESOTO WORK 005.jpg) (DESOTO WORK 005.jpg)
 (DESOTO WORK 006.jpg) (DESOTO WORK 006.jpg)
 (DESOTO WORK 007.jpg) (DESOTO WORK 007.jpg)
 (DESOTO WORK 008.jpg) (DESOTO WORK 008.jpg)
 (DESOTO WORK 009.jpg) (DESOTO WORK 009.jpg)
Attachments
----------------
DESOTO WORK 002.jpg (60KB - 111 downloads)
DESOTO WORK 003.jpg (51KB - 113 downloads)
DESOTO WORK 004.jpg (48KB - 108 downloads)
DESOTO WORK 005.jpg (52KB - 107 downloads)
DESOTO WORK 006.jpg (39KB - 105 downloads)
DESOTO WORK 007.jpg (55KB - 103 downloads)
DESOTO WORK 008.jpg (33KB - 105 downloads)
DESOTO WORK 009.jpg (38KB - 103 downloads)
|
|
| |
|
Veteran
Posts: 279
Location: Klein, TX | Dropped off the remaining 20 pieces of stainless trim at the chrome shop today. Owner says it should be ready in 10 days.
 (chrome work 009.jpg) (chrome work 009.jpg)
Attachments
----------------
chrome work 009.jpg (59KB - 102 downloads)
|
|
| |
|
Veteran
Posts: 279
Location: Klein, TX | Stopped by the body shop this morning. The body is in primer with a guide coat and ready for long board work. Hopefully, painting will start next week.
 (DESOTO WORK 011.jpg) (DESOTO WORK 011.jpg)
 (DESOTO WORK 012.jpg) (DESOTO WORK 012.jpg)
 (DESOTO WORK 013.jpg) (DESOTO WORK 013.jpg)
 (DESOTO WORK 015.jpg) (DESOTO WORK 015.jpg)
 (DESOTO WORK 018.jpg) (DESOTO WORK 018.jpg)
Attachments
----------------
DESOTO WORK 011.jpg (46KB - 103 downloads)
DESOTO WORK 012.jpg (55KB - 113 downloads)
DESOTO WORK 013.jpg (41KB - 97 downloads)
DESOTO WORK 015.jpg (42KB - 96 downloads)
DESOTO WORK 018.jpg (40KB - 92 downloads)
|
|
| |
|
Veteran
Posts: 279
Location: Klein, TX | Work is also underway on the interior side of the doors.
 (DESOTO WORK 020.jpg) (DESOTO WORK 020.jpg)
 (DESOTO WORK 021.jpg) (DESOTO WORK 021.jpg)
 (DESOTO WORK 024.jpg) (DESOTO WORK 024.jpg)
 (DESOTO WORK 025.jpg) (DESOTO WORK 025.jpg)
 (DESOTO WORK 026.jpg) (DESOTO WORK 026.jpg)
Attachments
----------------
DESOTO WORK 020.jpg (70KB - 106 downloads)
DESOTO WORK 021.jpg (67KB - 93 downloads)
DESOTO WORK 024.jpg (60KB - 101 downloads)
DESOTO WORK 025.jpg (64KB - 102 downloads)
DESOTO WORK 026.jpg (69KB - 101 downloads)
|
|
| |
|
Expert
Posts: 1493
Location: Jamaica Plain, MA | I put a stainless cowl vent on my Firesweep. Inexpensive and cool looking. |
|
| |
|
Veteran
Posts: 279
Location: Klein, TX | JT Vincent - 2014-05-28 1:00 PM
I put a stainless cowl vent on my Firesweep. Inexpensive and cool looking.
I did not know they were available. Got any info on them?
|
|
| |
|
Veteran
Posts: 279
Location: Klein, TX | Reassembled the front and rear bumpers today. All ready for install on the car after paint is completed.
 (DESOTO WORK 027.jpg) (DESOTO WORK 027.jpg)
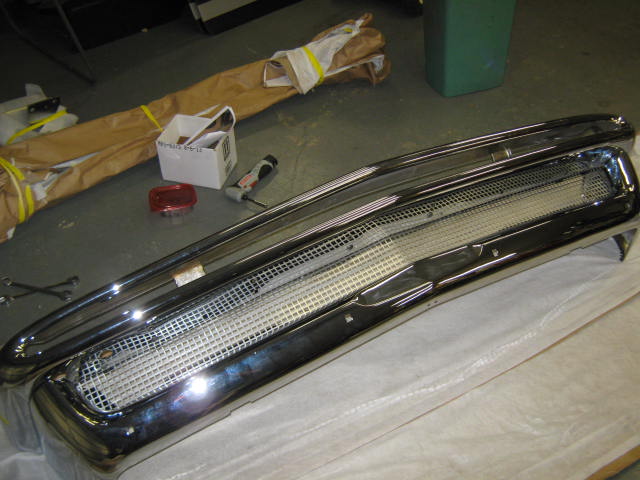 (DESOTO WORK 028.jpg) (DESOTO WORK 028.jpg)
 (DESOTO WORK 029.jpg) (DESOTO WORK 029.jpg)
 (DESOTO WORK 030.jpg) (DESOTO WORK 030.jpg)
 (DESOTO WORK 031.jpg) (DESOTO WORK 031.jpg)
 (DESOTO WORK 032.jpg) (DESOTO WORK 032.jpg)
 (DESOTO WORK 033.jpg) (DESOTO WORK 033.jpg)
 (DESOTO WORK 034.jpg) (DESOTO WORK 034.jpg)
Attachments
----------------
DESOTO WORK 027.jpg (54KB - 98 downloads)
DESOTO WORK 028.jpg (61KB - 106 downloads)
DESOTO WORK 029.jpg (50KB - 104 downloads)
DESOTO WORK 030.jpg (52KB - 99 downloads)
DESOTO WORK 031.jpg (45KB - 97 downloads)
DESOTO WORK 032.jpg (47KB - 108 downloads)
DESOTO WORK 033.jpg (47KB - 105 downloads)
DESOTO WORK 034.jpg (47KB - 110 downloads)
|
|
| |
|
Expert 5K+
Posts: 7809
Location: Williams California | Your plater did an excellent job, Bill!!
Looking forward to seeing this Desoto back on the road!
---John |
|
| |
|
Exner Expert 19,174 posts. Neil passed away 18 Sep 2015. You will be missed, Neil!
Posts: 19146
Location: bishop, ca | THANKS for those additional pics, Bill!
I'm going to archive them.
With such a casual pass-around, I'm impressed that the painters got the torsion bars well covered, along with
the hinge supports, and the hinge levers.
Note how this hinge was elevated (along with the trunk) when it was painted, and the paint could not reach its
upper/inner area.
The (upper-) cross-brace was painted almost as an after thought, along with parts of the parcel shelf.
Also, note where the trunk leaked, along the joint seams, 'thanks' to the large trim mounting holes at the base of the
rear glass ("back light" in Corp-Speak).
The leakage created some enclosed humidity, too, which surface corroded the parcel shelf area.
Edited by d500neil 2014-05-29 6:22 PM
 (DESOTO.jpg) (DESOTO.jpg)
 (DESOTO.jpg) (DESOTO.jpg)
 (DESOTO.jpg) (DESOTO.jpg)
Attachments
----------------
DESOTO.jpg (48KB - 107 downloads)
DESOTO.jpg (39KB - 102 downloads)
DESOTO.jpg (55KB - 104 downloads)
|
|
| |
|
Veteran
Posts: 279
Location: Klein, TX | Tail light assemblies ready for install after paint is done.
 (DESOTO WORK.jpg) (DESOTO WORK.jpg)
Attachments
----------------
DESOTO WORK.jpg (84KB - 96 downloads)
|
|
| |
|
Veteran
Posts: 279
Location: Klein, TX | Good day today. Received a bunch of parts from Gary Goers and a anti-sway bar assembly from John of BigM. In addition to that the painter put on some base coat on the doors, trunk lid, hood and a few other parts. So things are moving along.
 (DESOTO WORK 045.jpg) (DESOTO WORK 045.jpg)
 (DESOTO WORK 035.jpg) (DESOTO WORK 035.jpg)
 (DESOTO WORK 037.jpg) (DESOTO WORK 037.jpg)
 (DESOTO WORK 038.jpg) (DESOTO WORK 038.jpg)
 (DESOTO WORK 039.jpg) (DESOTO WORK 039.jpg)
 (DESOTO WORK 043.jpg) (DESOTO WORK 043.jpg)
Attachments
----------------
DESOTO WORK 045.jpg (53KB - 104 downloads)
DESOTO WORK 035.jpg (37KB - 100 downloads)
DESOTO WORK 037.jpg (36KB - 101 downloads)
DESOTO WORK 038.jpg (30KB - 114 downloads)
DESOTO WORK 039.jpg (28KB - 115 downloads)
DESOTO WORK 043.jpg (31KB - 97 downloads)
|
|
| |
|
Veteran
Posts: 279
Location: Klein, TX | Picked up the last of the stainless trim from the polisher this morning. Hopefully, the painter will be finished with the painting this week or next, then installation will start on all the chrome and stainless parts.
 (DESOTO WORK 046.jpg) (DESOTO WORK 046.jpg)
 (DESOTO WORK 047.jpg) (DESOTO WORK 047.jpg)
 (DESOTO WORK 048.jpg) (DESOTO WORK 048.jpg)
 (DESOTO WORK 049.jpg) (DESOTO WORK 049.jpg)
 (DESOTO WORK 050.jpg) (DESOTO WORK 050.jpg)
Attachments
----------------
DESOTO WORK 046.jpg (53KB - 106 downloads)
DESOTO WORK 047.jpg (50KB - 96 downloads)
DESOTO WORK 048.jpg (54KB - 93 downloads)
DESOTO WORK 049.jpg (46KB - 101 downloads)
DESOTO WORK 050.jpg (50KB - 104 downloads)
|
|
| |
|
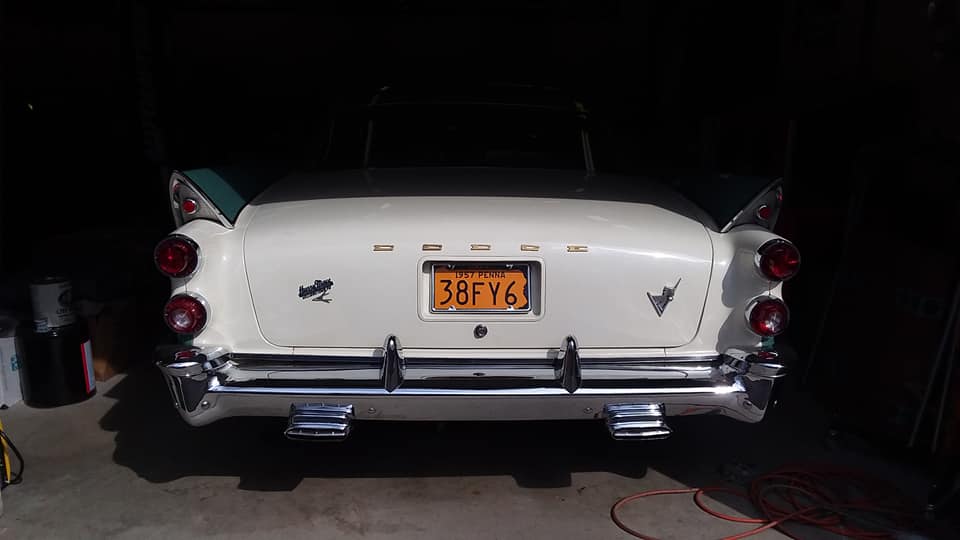
Expert
Posts: 1728
Location: Fleetwood, Pa | FYI....You forgot to paint the recessed area black between the tail light bezel and the surrounding trim, if you're trying to keep it stock, that is....... |
|
| |
|
Veteran
Posts: 279
Location: Klein, TX | sidesho_bob1961 - 2014-06-03 1:52 PM
FYI....You forgot to paint the recessed area black between the tail light bezel and the surrounding trim, if you're trying to keep it stock, that is.......
I'll check that out. When I took the parts off the car, I did not see the black painted area you are referencing. |
|
| |
|
Veteran
Posts: 279
Location: Klein, TX | sidesho_bob1961 - 2014-06-03 1:52 PM
FYI....You forgot to paint the recessed area black between the tail light bezel and the surrounding trim, if you're trying to keep it stock, that is.......
Hi, I checked out your comment with another Desoto guy who knows more about these Firesweep's than I will ever know and he said no paint in that area. You must be thinking of another car.
|
|
| |
|
Expert
Posts: 1493
Location: Jamaica Plain, MA | Hey Bill! You're doing amazing work there. I'm getting there on my car, but you're lapping me I'm afraid. The stainless cowl vents were available from 57-59 for all MoPars except Imperial, I believe. It might have been unusual to see one on a Firesweep. They were standard trim for high line cars. They simply clip in the way your stock one does. You can change back at anytime. I think they go for $50-$100 or so. Pretty common. I don't have a lot of dress-up on my car, in fact it's de-trimmed to a degree, but I have one of these on it...
http://www.ebay.com/itm/MOPAR-1960-CHRYSLER-IMPERIAL-COWL-SCREEN-AN...
Edited by JT Vincent 2014-06-03 4:46 PM
 (cowel vent.JPG) (cowel vent.JPG)
Attachments
----------------
cowel vent.JPG (362KB - 94 downloads)
|
|
| |
|
Veteran
Posts: 279
Location: Klein, TX | Thanks for the info and the picture Jon. For now, I think I will keep the painted cowl. That is good to know stainless ones are available for it. |
|
| |
|
Expert
Posts: 2788
Location: USA - KY | baker53 - 2014-06-03 3:50 PM
sidesho_bob1961 - 2014-06-03 1:52 PM
FYI....You forgot to paint the recessed area black between the tail light bezel and the surrounding trim, if you're trying to keep it stock, that is.......
Hi, I checked out your comment with another Desoto guy who knows more about these Firesweep's than I will ever know and he said no paint in that area. You must be thinking of another car.
I agree; there's just a shadow that is often cast in the valley between the two areas of higher chrome. Is that the area that is being referred to?
I didn't see any area on, or around the rear light chrome towers of my DeSoto that could have been easily painted with a black "stripe" as the assembly-line spray paint was a-flying, back in the day. Maybe another FL model?
Edited by FIN ME 2014-06-03 6:45 PM
 (z.png) (z.png)
Attachments
----------------
z.png (438KB - 109 downloads)
|
|
| |
|
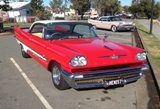
Elite Veteran
Posts: 1120
Location: Brisbane, Australia | Love those '57 Desoto Coupes and yours is going to be stunning Bill!
And that Chrome looks better than new! |
|
| |
|
Veteran
Posts: 279
Location: Klein, TX | Hi Bob, Thanks for the thoughts on the car. I noticed you list a '51 Wraith in your signature block. I spent a lot of years restoring a '58 Cloud I. I could not afford the price of parts from RR so I had to send letters to parts sellers in Hemmings trying to get them to come down in price for a part I was wanting. Many did and I finally got it restored. I had it it in storage for many years and finally a physician in Houston approached me about selling it to him for his car collection. |
|
| |
|
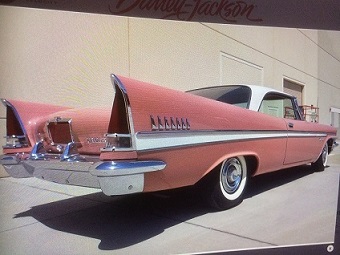
Elite Veteran,, James Passed away March 2021, He will be Missed
Posts: 1028
Location: Melbourne, Australia | Doing a great Job Bill, love the colour of your car , and for how hard it is to get a good chrome plater these days you should be over the moon with their work !
I hope my 58 desoto comes together as quick as yours ! |
|
| |
|
Veteran
Posts: 279
Location: Klein, TX | The Adventurer - 2014-06-03 7:41 PM
Doing a great Job Bill, love the colour of your car , and for how hard it is to get a good chrome plater these days you should be over the moon with their work !
I hope my 58 desoto comes together as quick as yours !
Thanks James, it has been a great time working on it. I was very fortunate to find one is such great condition. I had a Firesweep in '62 and this has been a real joy getting it back road-worthy again. You are so right about finding a good plater. I have heard numerous stories about lost parts and pot metal parts that were really pitiful when the owner got them back. This plater is very good at his craft and I'm glad he is close by. |
|
| |
|
Expert
Posts: 1728
Location: Fleetwood, Pa | All I know is that when I removed the tail lites from an unrestored 57 Firesweep the outer trims had back paint on them on that recessed surface........I have since sold the trims so I can't post a photo...although I may still have them on my computer from when I was selling them....I'll search for them....It appears as though this one is painted although most of the restored cars I found on line are not:
Edited by sidesho_bob1961 2014-06-04 7:08 AM
 (57ds2.jpg) (57ds2.jpg)
Attachments
----------------
57ds2.jpg (112KB - 99 downloads)
|
|
| |
|
Expert
Posts: 1488
Location: New Castle PA | Hmmm. Interesting, Sideshow. I have NEVER seen that area painted. I have lots of those chrome surrounds (original, but in very sad shape) and none are painted. Are you sure the Sweep you pictured is "unrestored"? It's missing the pinchweld molding at the back edge of the quarterpanel, so it must have been removed for some reason. |
|
| |
|
Elite Veteran,, James Passed away March 2021, He will be Missed
Posts: 1028
Location: Melbourne, Australia | I am with you Ed , I noticed that straight away . I think people see things once and think its gospel . |
|
| |
|
Expert
Posts: 1728
Location: Fleetwood, Pa | No, I'm not aware the car pictured above is original. I never said it was.......read my sentence again ("It appears as though this one is painted although most of the restored cars I found on line are not"). What I stated was; The trims I removed and sold were off an "unrestored" car....
All I'm saying is: the chrome surrounds I had were pretty darn nice, so maybe that's why the black paint was still visible (which is also why they sold pretty darn fast)???? The black painted area was not entirely perfect (it was worn off at spots), but visible..... I'm sure if the surrounds are all pitted and/or corroded the black paint would be long gone too....
If you were to buy a 50 year old car and the paint is worn off the hood but not the roof, does that mean the hood was never painted??? Your logic is flawed....
Either way, he's doing a very nice job with the restoration....
Edited by sidesho_bob1961 2014-06-04 9:59 AM
|
|
| |
|
Expert
Posts: 1728
Location: Fleetwood, Pa | Here's a 58 Detailed the same way??? And no, I didn't restore both of these cars... And yes, black paint wears off chrome surfaces rather easily....
Edited by sidesho_bob1961 2014-06-04 10:09 AM
 (Spoiler-133-Small.jpg) (Spoiler-133-Small.jpg)
Attachments
----------------
Spoiler-133-Small.jpg (91KB - 103 downloads)
|
|
| |
|
Expert
Posts: 1488
Location: New Castle PA | No need to take an aggressive attitude, Sideshow, we are all in this to learn. If this area WAS painted black at the factory, someone will have to absolutely prove it to me with more than a couple of photos. I have seen hundreds of 1957 DeSotos, and never saw one painted that way. I'll attach a few pics of absolutely unrestored rear fins with zero sign of black paint, and a pic of unrestored tower trim. This is exactly how all of my extra trim pieces look -- not a stitch of primer or paint on them. You're right about paint not sticking well to chrome -- that's another reason why Mopar would not have done it, in my opinion.
I'll see if I can find more original pictures of taillights, perhaps in some of the factory literature. In any case, thank you for bringing this up. As I said, it's VERY interesting to me. I do disagree with you saying my logic is flawed, however. As the attorneys say, "there is a preponderance of evidence to the contrary". Sometimes the evidence is wrong, but until that's proven, I absolutely will not recommend anyone paint that area black.
Having said that, however, I will admit that it also makes no sense to me that some of the hood "wings" to the sides of the insignia may have been factory painted black on their back face (while others are painted argent). SO, I will leave the door open to your possibility of some cars being painted that way.
 (tail1.jpg) (tail1.jpg)
 (tail2.jpg) (tail2.jpg)
 (tail3.jpg) (tail3.jpg)
 (tail4.jpg) (tail4.jpg)
 (tail5.jpg) (tail5.jpg)
 (tail6.jpg) (tail6.jpg)
 (chrome_no_paint.jpg) (chrome_no_paint.jpg)
Attachments
----------------
tail1.jpg (90KB - 95 downloads)
tail2.jpg (35KB - 102 downloads)
tail3.jpg (56KB - 101 downloads)
tail4.jpg (10KB - 99 downloads)
tail5.jpg (13KB - 94 downloads)
tail6.jpg (39KB - 99 downloads)
chrome_no_paint.jpg (106KB - 100 downloads)
|
|
| |
|
Expert
Posts: 1728
Location: Fleetwood, Pa | Hopefully I still have the photos on my at home computer. I'm wondering if it may have been a difference in suppliers of the trims?? Or maybe assembly plant variances?? I have seen photos such as the one below, which may have also been a pre-production photo??? All I know is contrary to popular belief, I've seen this on more than "one" 57/58 Desoto.....Sorry Ed, my sarcasam wasn't really directed towards you....
Edited by sidesho_bob1961 2014-06-04 3:34 PM
 (1958%20DeSoto%20Ad-06.jpg) (1958%20DeSoto%20Ad-06.jpg)
Attachments
----------------
1958%20DeSoto%20Ad-06.jpg (54KB - 106 downloads)
|
|
| |
|

Extreme Veteran
Posts: 558
Location: Grenoble - France | Ads from the era. If that helps...
 (1957-1.JPG) (1957-1.JPG)
 (1957-2.JPG) (1957-2.JPG)
Attachments
----------------
1957-1.JPG (113KB - 104 downloads)
1957-2.JPG (200KB - 102 downloads)
|
|
| |
|
Exner Expert 19,174 posts. Neil passed away 18 Sep 2015. You will be missed, Neil!
Posts: 19146
Location: bishop, ca | Short answer is: factory (prototype) photos, and air-brushed advertising illustrations, are virtually completely
unreliable as reference material.
The examples are "endless".....
[ BTW, this vert, which is seen in a lot of advertising, has a 1957 dashboard (rear-view mirror) in it]
Edited by d500neil 2014-06-04 4:30 PM
 (PICT0427.JPG) (PICT0427.JPG)
 (PICT0428.JPG) (PICT0428.JPG)
Attachments
----------------
PICT0427.JPG (111KB - 98 downloads)
PICT0428.JPG (116KB - 97 downloads)
|
|
| |
|
Expert 5K+
Posts: 8445
Location: Perth Australia | I think this discussion should be moved to a new thread and not continue in Bakers build thread
|
|
| |
|
Veteran
Posts: 279
Location: Klein, TX | Car has been primered and long block sanded. Presently applying seam sealer in the drip rails and other areas on the body. The doors, hood, trunk lid, plus a number of smaller pieces have been painted and clear coated. The main body will be painted with the color coat and clear coats next week and then wet sanded and buffed along with the other parts that have already been painted.
 (desoto work 052.jpg) (desoto work 052.jpg)
 (desoto work 053.jpg) (desoto work 053.jpg)
 (desoto work 055.jpg) (desoto work 055.jpg)
 (desoto work 057.jpg) (desoto work 057.jpg)
 (desoto work 060.jpg) (desoto work 060.jpg)
 (desoto work 062.jpg) (desoto work 062.jpg)
 (desoto work 063.jpg) (desoto work 063.jpg)
 (desoto work 066.jpg) (desoto work 066.jpg)
Attachments
----------------
desoto work 052.jpg (42KB - 100 downloads)
desoto work 053.jpg (45KB - 105 downloads)
desoto work 055.jpg (43KB - 91 downloads)
desoto work 057.jpg (51KB - 105 downloads)
desoto work 060.jpg (41KB - 96 downloads)
desoto work 062.jpg (40KB - 102 downloads)
desoto work 063.jpg (41KB - 105 downloads)
desoto work 066.jpg (46KB - 104 downloads)
|
|
| |
|
Expert
Posts: 2788
Location: USA - KY |
Jeepers, Bill...can ya hurry things up a little?
Amazing progress, as always! Things are looking great!
You are definitely going to get your car back on the road before I do, and I've been working on things for over a year now!
Impressive!
|
|
| |
|
Veteran
Posts: 279
Location: Klein, TX | Thanks Rosy, I thought I would not need to replate the front end pot metal pieces, but after looking at them up against the newly plated and polished parts I had to bite the bullet. I took those parts plus the molding that surrounds the interior of the windshield to the plating shop this morning. So the bleeding has not stopped. BTW, if anyone happens to have a great condition plastic insert for the front hood molding, please let me know. Mine is OK, but has some cracks in it.
 (desoto work 073.jpg) (desoto work 073.jpg)
 (desoto work 071.jpg) (desoto work 071.jpg)
 (desoto work 072.jpg) (desoto work 072.jpg)
Attachments
----------------
desoto work 073.jpg (44KB - 101 downloads)
desoto work 071.jpg (59KB - 103 downloads)
desoto work 072.jpg (49KB - 95 downloads)
|
|
| |
|
Expert
Posts: 4044
Location: Connecticut | Just curious how long your paint guy waited between applying the final primer coat and when he layed down the base color coat. When I had my Plymouth painted, my painter insisted on two weeks between the two coats, just to ensure that all the solvents had evaporated. Ron |
|
| |
|
Veteran
Posts: 279
Location: Klein, TX | ronbo97 - 2014-06-07 6:04 PM
Just curious how long your paint guy waited between applying the final primer coat and when he layed down the base color coat. When I had my Plymouth painted, my painter insisted on two weeks between the two coats, just to ensure that all the solvents had evaporated. Ron
I would guess about a week to ten days. He cooks the primer and paint out in the hot Texas sun. He is the painter and I DO NOT tell him anything. I have painted a number of cars, but he knows more about the process than I ever will and his completed jobs are proof of that. I have no issues whatsoever on how he does his work. He is the professional and I am at best a novice which I would guess most of us on this FL are. |
|
| |
|
Expert
Posts: 4044
Location: Connecticut | baker53 - 2014-06-07 7:13 PM I would guess about a week to ten days. He cooks the primer and paint out in the hot Texas sun. He is the painter and I DO NOT tell him anything. I have painted a number of cars, but he knows more about the process than I ever will and his completed jobs are proof of that. I have no issues whatsoever on how he does his work. He is the professional and I am at best a novice which I would guess most of us on this FL are. That's probably plenty in that hot, dry weather. Looking forward to seeing it back together. You're going to have a beautiful car. Ron |
|
| |
|
Expert
Posts: 2788
Location: USA - KY | baker53 - 2014-06-07 2:07 PM
...BTW, if anyone happens to have a great condition plastic insert for the front hood molding, please let me know.
The bad news is that those plastic inserts are IMPOSSIBLE to find in better condition than the one that you already have. 
The good news is that I just happen to have an extra, new, reproduction, plastic insert that was sold to me as a "second", but it looks darn good-enough to me.
It is not perfect, but it appears that it was well made.
That plastic insert from your car is one of the best original, Firesweep inserts that I have ever seen! (BTW, you might already know this, but they are smaller than the inserts for the other '57 Desoto models.)
Edited by FIN ME 2014-06-08 8:42 AM
|
|
| |
|
Veteran
Posts: 279
Location: Klein, TX | FIN ME - 2014-06-08 7:40 AM
baker53 - 2014-06-07 2:07 PM
...BTW, if anyone happens to have a great condition plastic insert for the front hood molding, please let me know.
The bad news is that those plastic inserts are IMPOSSIBLE to find in better condition than the one that you already have.
The good news is that I just happen to have an extra, new, reproduction, plastic insert that was sold to me as a "second", but it looks darn good-enough to me.
It is not perfect, but it appears that it was well made.
That plastic insert from your car is one of the best original, Firesweep inserts that I have ever seen! (BTW, you might already know this, but they are smaller than the inserts for the other '57 Desoto models. )
:cool:
Hi Rosy, I did not know that tidbit about the '57 Firesweep plastic inserts. I will send you an e-mail in a bit about the spare insert you have.
|
|
| |
|
Exner Expert 19,174 posts. Neil passed away 18 Sep 2015. You will be missed, Neil!
Posts: 19146
Location: bishop, ca | Ok; he's a pro-painter, but has he ever tried to re-install painted FWDLK body panels, that do not WANT to align themselves perfectly (or;
is he merely the 'painter')?
Our cars' body panels go together like a Rubik's Cube....that's missing some 'cubes' on it.
He would be well advised to have the hood, trunk and doors all be perfectly (as good-as-possible!) installed and aligned before he paints
the body and fenders....just like the factory did the job (poorly...) before the paint was applied.
Edited by d500neil 2014-06-08 3:33 PM
|
|
| |
|
Veteran
Posts: 279
Location: Klein, TX | I know that all the expert folks on this reflector are very quick to point out the poor work that has or will be done by the folks working on my car, but I have complete faith in their abilities and I feel fairly sure that they have done a number of jobs that were beyond what I or any of the other "experts" on this board are capable of. As they say, the proof is in the pudding and I've seen there work on quite a few cars and it is great. Enough said. |
|
| |
|
Exner Expert 19,174 posts. Neil passed away 18 Sep 2015. You will be missed, Neil!
Posts: 19146
Location: bishop, ca | Well, Bill, it's more like live and learn, than taking any pot shots at anyone.
|
|
| |
|
Veteran
Posts: 279
Location: Klein, TX | I appreciate all of the help that this site has provided and hopefully will have the chance to meet you at some event in the future. For now, I think I will close any further updates on the car. Thanks once again to all within the FL group. |
|
| |
|
Expert 5K+
Posts: 8445
Location: Perth Australia | I must have missed something?
Are you not wanting any advice on your car?
What poor work?
You are correct that some tend to nit pick a bit, but thats how you learn and if what theyre saying isnt something your worried about, just say so
Be a shame not to see it come together
Its a 2 way street some learn off you, you learn off some
|
|
| |
|
Exner Expert 19,174 posts. Neil passed away 18 Sep 2015. You will be missed, Neil!
Posts: 19146
Location: bishop, ca | And...this warrants its own GEN DISc thread.....but most (-if not all) and (virtually-) all independent mechanics are Prima Donas about
their 'lording' their importance, as if they are doing you a favor, about working on your humble, insignificant project.
I've had Mopar experiences since 1980, and have experienced and heard about painters & mechanics who are MORE than willing
to tell 'us' about how important they are, and how, since your car is not a Chubbie, it doesn't warrant (much of) their important attention
or RESPECT.
Try asking 'your' shop some suggestion or procedural-request about the job, or its protocols, and watch their response.
A MoPar oriented shop can be arrogant, for sure, but, at least they have experience with protocols, like ensuring that the car's body
panels all align properly, before the body is painted.
|
|
| |
|
Expert 5K+
Posts: 8445
Location: Perth Australia | To dig myself into a hole here
Neil, have you read my dodge build?
I repaire and painted everything off the car and for my level of skill, it was a mistake
Now I am an indipendant car (well trucks mostly) repairer as well, but I dont think I am any sort of "prima dona" and I do not go around "lording my importance"
When I do my plymouth, it will be panels on when it comes to painting, But you have no idea wether the panels were trial fitted and aligned prior to final paint prep or not (something I didnt do)
With enough protection around door openings ect, it would not be that hard to fit the panels without scratching them.
Just so you know, the dodge was the first car I ever did like that, all others, I normally did "panels on", but this car was that bad that I thought it better to do it panels off to try and give the metalwork some protection under places like door hinges ect
If I hadnt, I would have had the nagging thought in the back of my mind that the unsprayed metal was being eaten up
|
|
| |
|

Elite Veteran
Posts: 769
Location: Oley, PA | Bill, I hope you will continue to update this thread. I've very much enjoyed watching your amazing progress on this project. It's inspired me to move forward on mine. |
|
| |
|
Expert 5K+
Posts: 7809
Location: Williams California | I agree.
I have been enjoying watching this car come together, and it has provided me with more enthusiasm on my own project.
---John |
|
| |
|
Expert
Posts: 2788
Location: USA - KY |
It has been a very inspirational thread and project indeed!
|
|
| |