|
|

Regular
Posts: 94

Location: New Zealand | I've just purchased a rear screen defroster for my 57 Plymouth, the type that sucks air through what looks like a speaker surround and then blows out of a long thin vent. My question being does it get wired up to the same switch as the heater or does it get wired to a separate switch so it can be run by itself. |
|
| |
|

Board Moderator & Exner Expert 10K+
Posts: 13053
  
Location: Southern Sweden - Sturkö island | I can't answer for the '57 models, but for the '60-'61, the rear defogger has it's own circuit with a separate switch. It's a very convenient option and you'll be pleased with the function on a damp rainy day. |
|
| |
|
Regular
Posts: 94
Location: New Zealand | Thanks Wizard My thinking was that it probably should have it's own circuit but I cant find any info in the service manuals, which will bring me to my next question, what does the switch look like?
I know in my old 57 savoy I didn't have a defroster in the back and the screen would fog up at the drop of a hat so I'm looking forward to installing it into my Belvedere |
|
| |
|
Board Moderator & Exner Expert 10K+
Posts: 13053
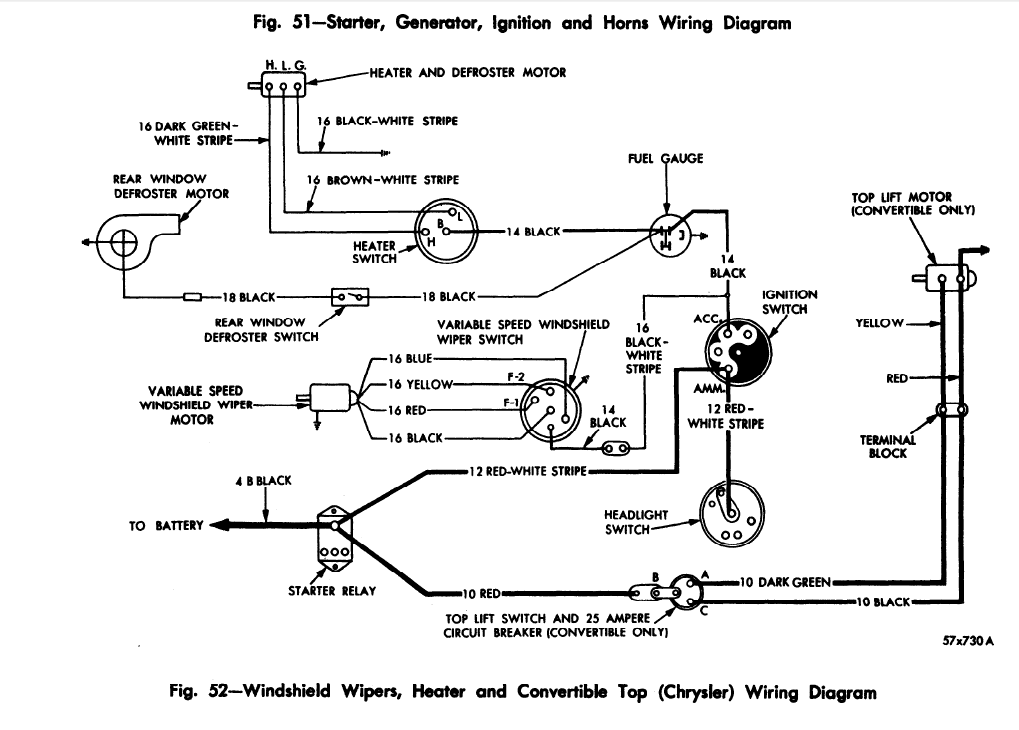
Location: Southern Sweden - Sturkö island | From '57 Chrysler shop manual;
31. REAR WINDOW DEFROSTER
The rear window defroster (optional on all
Models) is located on and under the rear shelf
panel of the car, and consists of a blower, flexible
hose and nozzle. A switch, located on the
instrument panel, controls the blower for defrosting
the rear window. There is no connection
w i t h the heater in the car, w i t h the rear
window defroster, so that when air is drawn
through the blower from inside the car, i t is
recirculated on the rear window glass.
See also the electrical schema from '58 below
Edited by wizard 2014-04-14 5:43 AM
 ('58 wiring.png) ('58 wiring.png)
Attachments
----------------
 '58 wiring.png (82KB - 186 downloads) '58 wiring.png (82KB - 186 downloads)
|
|
| |
|
Regular
Posts: 94
Location: New Zealand | That's fantastic Wizard Thank you, it all looks pretty simple and straight forward. I guess the switch would then be just some generic switch discreetly placed. |
|
| |
|
Board Moderator & Exner Expert 10K+
Posts: 13053
Location: Southern Sweden - Sturkö island | I remember that I saw a picture of a 59 Chrysler dash with the switch mounted under the dashboard - I think it might be the same switch for 57. If no one kicks in, I'll see if I can find the picture |
|
| |
|
Expert
Posts: 1906
 
Location: Ontario, Canada | The switch is just an ordinary toggle switch with a chrome or nickel handle. Power to the fuel gauge is not fused I would suggest installing a in-line fuse in the wire to the defogger motor.
Greg |
|
| |
|

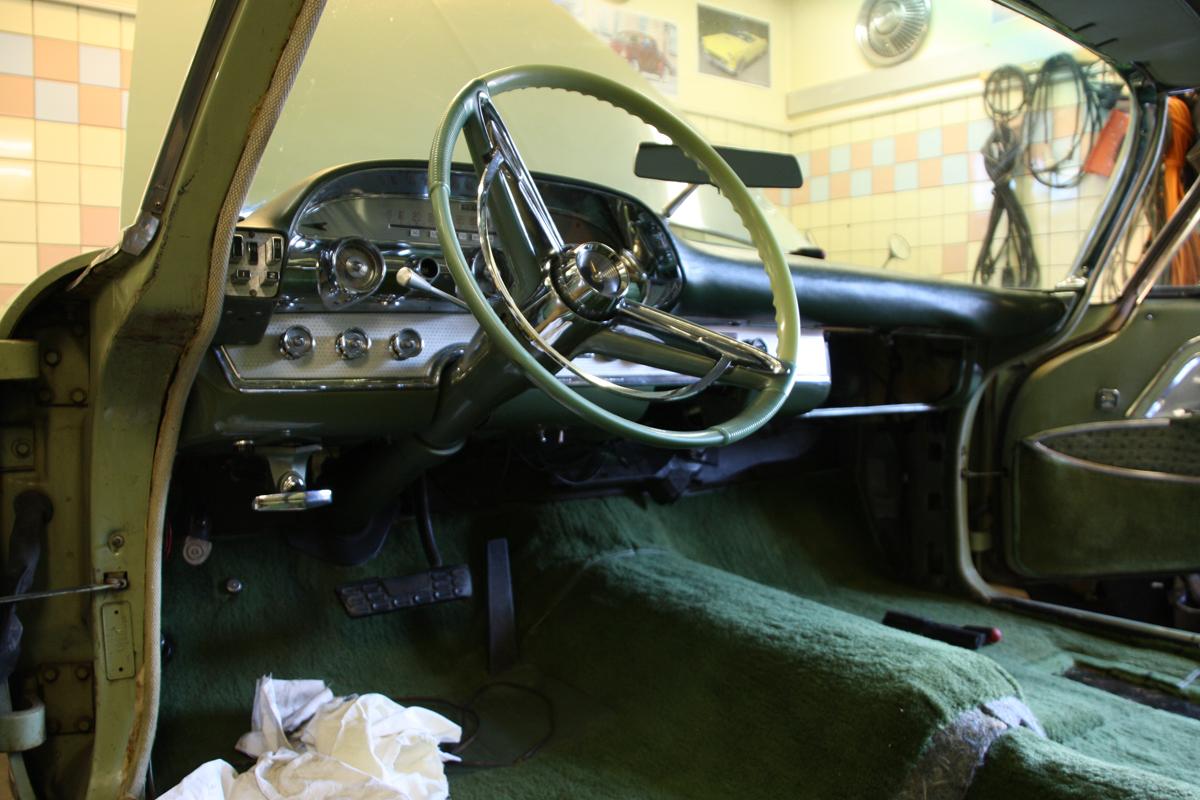
Veteran
Posts: 117
Location: Kättilstorp Sweden | This is what the switch lookes like in my car. There are two switches to the right of the wheel, rear defroster and doome light.
Hope it helps.
Magnus
Edited by T-34 2014-04-14 1:45 PM
 (Desoto 2012 010.jpg) (Desoto 2012 010.jpg)
Attachments
----------------
Desoto 2012 010.jpg (108KB - 203 downloads)
|
|
| |
|
Regular
Posts: 94
Location: New Zealand | Thanks guys I was hoping it was just a simple switch as I didn't fancy my chances of finding a factory made switch specific for the purpose |
|
| |
|

Expert 5K+
Posts: 7403
Location: northern germany | ply57nz - 2014-04-14 3:13 PM
Thanks guys I was hoping it was just a simple switch as I didn't fancy my chances of finding a factory made switch specific for the purpose
just use a relay and connect to the defroster button. |
|
| |
|
Regular
Posts: 53
| This is a post from a while back but has some good pictures and info.
http://forwardlook.net/forums/forums/thread-view.asp?tid=19242&post... defroster&highlightmode=1#M122446
|
|
| |
|
Expert 5K+
Posts: 7403
Location: northern germany | 1960fury - 2014-04-14 3:29 PM
ply57nz - 2014-04-14 3:13 PM
Thanks guys I was hoping it was just a simple switch as I didn't fancy my chances of finding a factory made switch specific for the purpose
just use a relay and connect to the defroster button.
of course no the button, connect to defroster terminal. |
|
| |
|
Expert 5K+
Posts: 8443
Location: Perth Australia | Might have a learning experience her
Are the 2 spare terminal on the heater control for the defroster?
I also have a defroster to go into my dodge
|
|
| |
|
Exner Expert 19,174 posts. Neil passed away 18 Sep 2015. You will be missed, Neil!
Posts: 19146
Location: bishop, ca | Mick, many years ago I stalled Horie's defroster system.
Back then, wasn't aware that a simple toggle switch could be used to operate the blower motor.
Wired the blower to the dashboard's Blower switch.
Anyway, discovered that the defroster motor was LOUD; at least as loud as the Heater blower is, at full-blast.
Decided that since my need to USE that rear window defroster was nil, out West, and virtually everywhere else, where
our cars would not be used as truly (winter-nasty) daily-drivers....I disconnected the blower wire and the rear window
'defroster' has been nothing more than a parcel shelf ornament since then.
|
|
| |
|
Expert 5K+
Posts: 8443
Location: Perth Australia | I have actually been toying with the idea to put an a/c evaporator between the motor and the outlet to make a rear a/c
All pie in the sky at the moment, but either way, I have it, so it will find its way into the car as it goes together
|
|
| |
|

Expert
Posts: 2312
Location: Arizona | It's really not enough blower to effectively use the capacity of the A/C evap. For all the work you'd do to get the A/C back there you'd be way ahead to use a decent blower. |
|
| |
|
Expert 5K+
Posts: 8443
Location: Perth Australia | I have a better blower motor as well
I actually havnt even tested the defroster yet, strange for me, I normally like to play with my new toys when I get them 
|
|
| |
|
Expert
Posts: 1906
Location: Ontario, Canada | Didn't the rear A/C units use 2 blowers? Anyway, Mick, if you can make it work it is a perfect setup. I, personally, have driven with a chap who used a 56?? Or so rear evaporator and dual blower assembly as his only A/C system. It was comfortable in 95 and horribly humid conditions.
Greg |
|
| |
|
Regular
Posts: 94
Location: New Zealand | Thanks for the link fin junkie, I have saved all the pics so I can look back on them when the time comes to install. |
|
| |