|
|

Expert 5K+
Posts: 9654
    
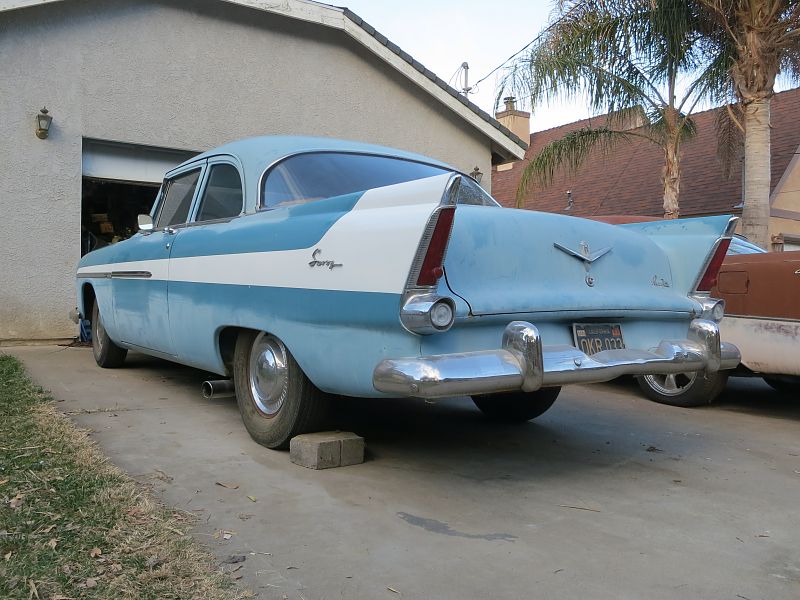
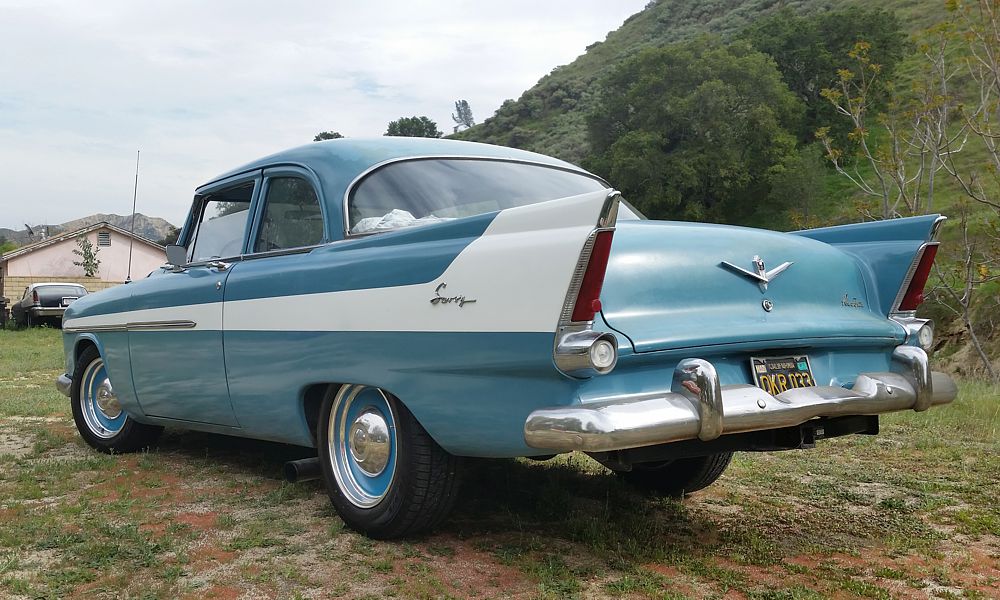
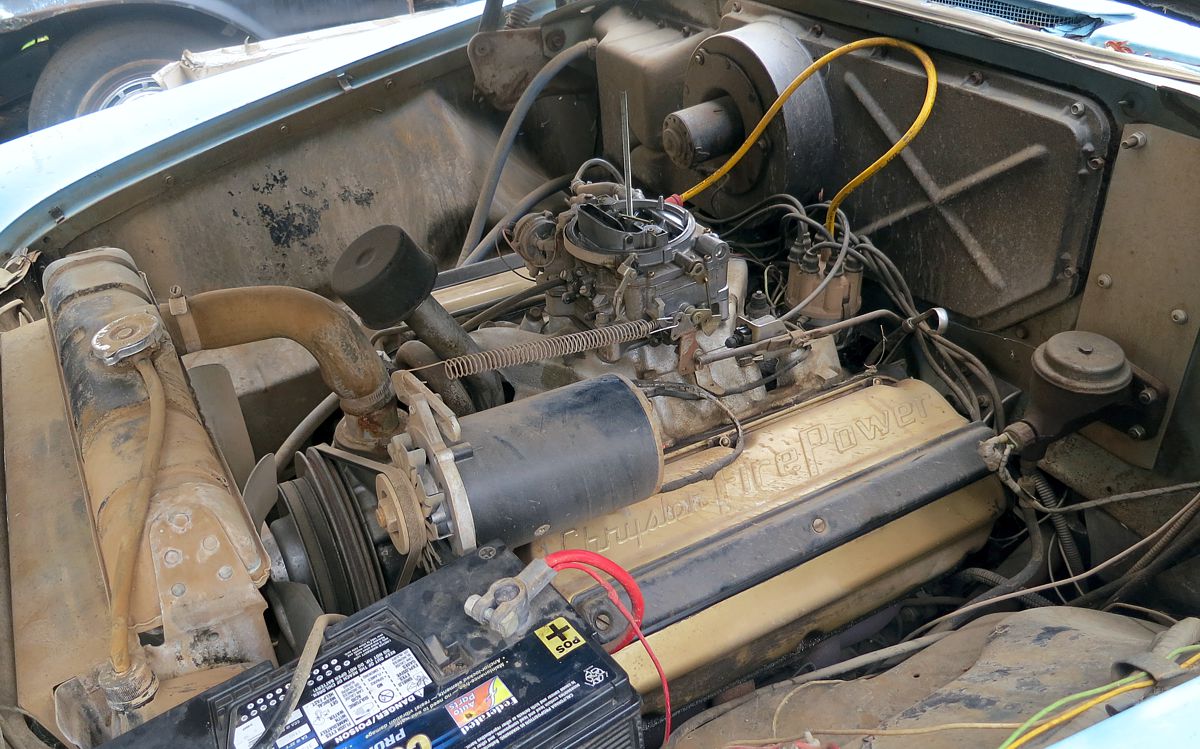
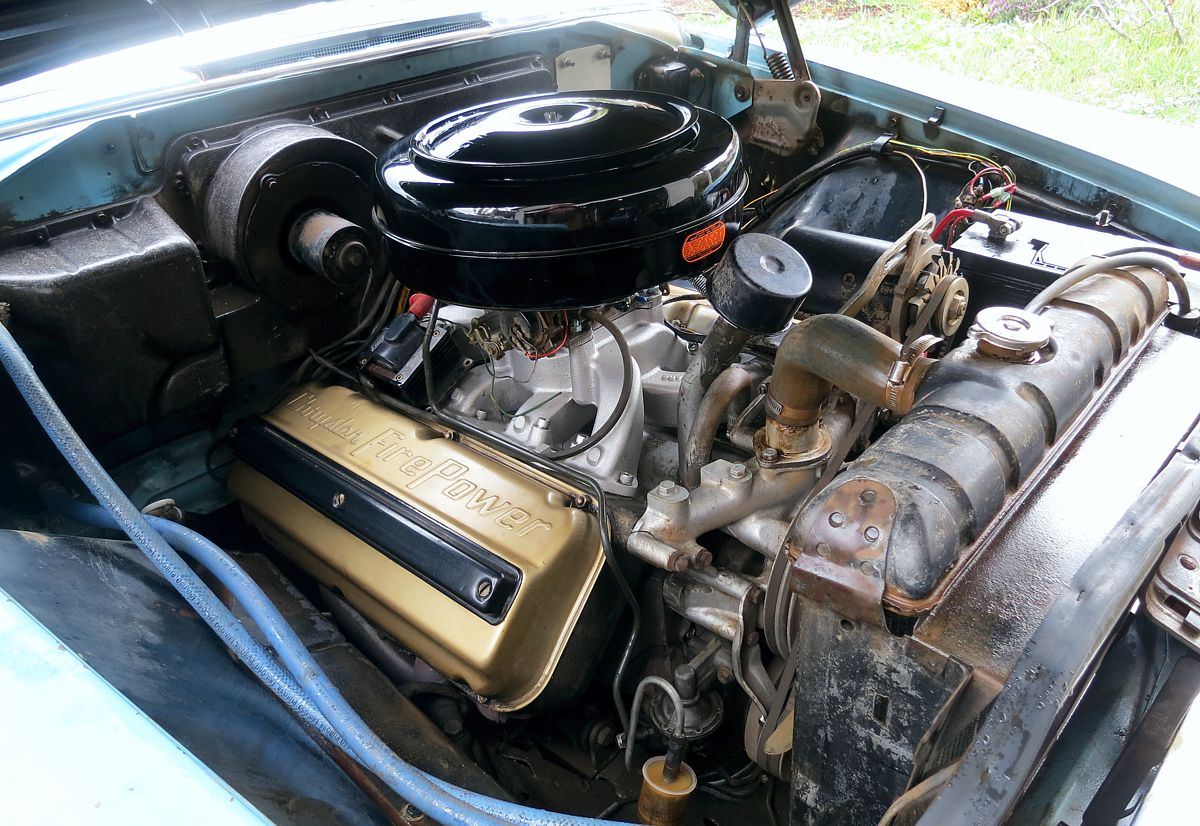
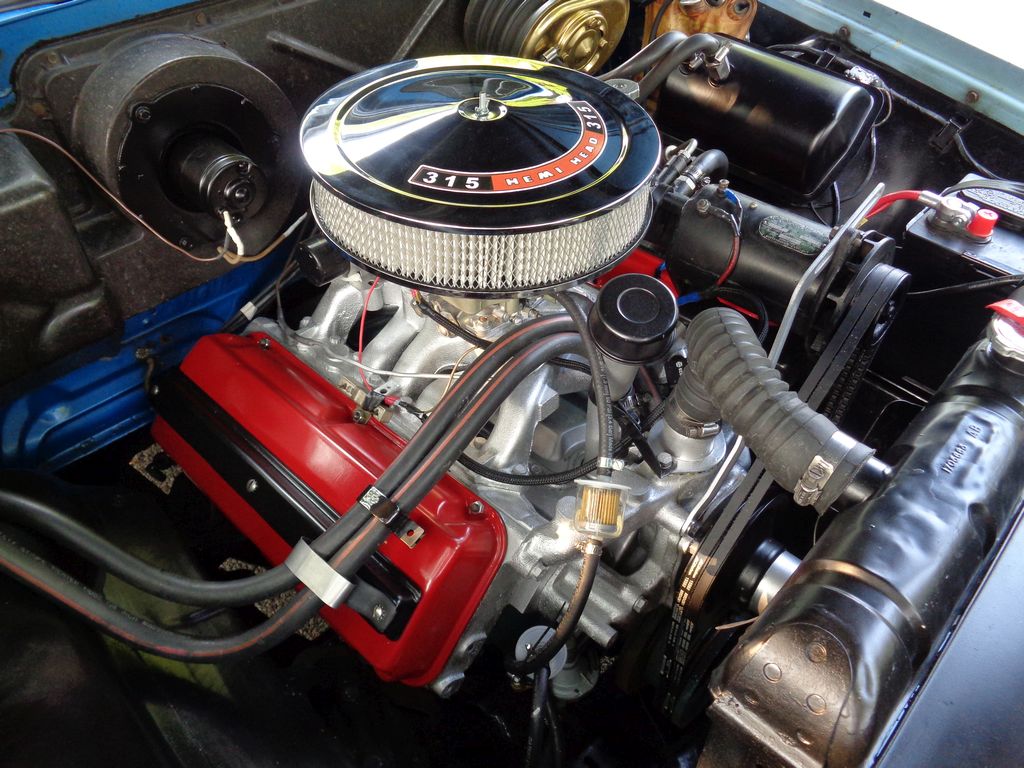
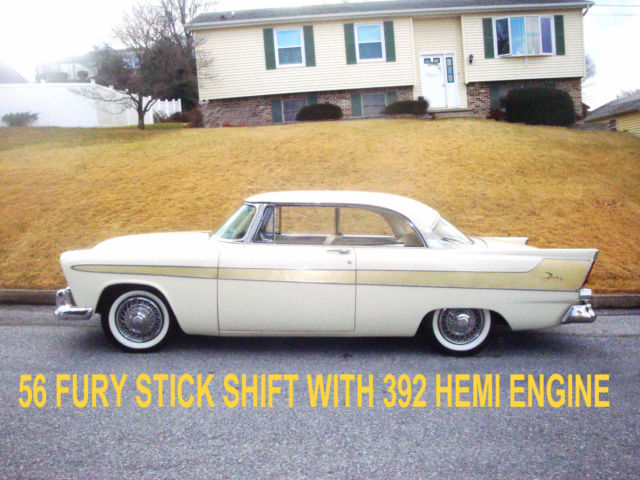
Location: So. Cal | I decided to start a thread on my '56 Plymouth so that I have a central spot to show what I am doing with it. I bought the car in 2003 from "Picture Cars" in Burbank, which is a company that rents cars out to movie studios. This car brought me to the forwardlook email group at that time. I believe that one year later in 2004, the list moved to the Forum format. The car had it's original 277 poly V8 and powerflite transmission and I was just barely able to drive it home after some tweaking of the carb & timing. An electronic ignition upgrade and other fixes turned the car into reliable running car that got 17 mpg at 50mph. My quest for a cheap & better electronic ignition setup for this car drove me to create & sell the GM HEI conversion that I continue to sell today.
Edited by Powerflite 2015-06-04 7:36 PM
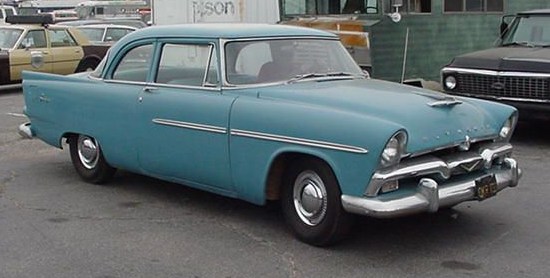 (RtFront.jpg) (RtFront.jpg)
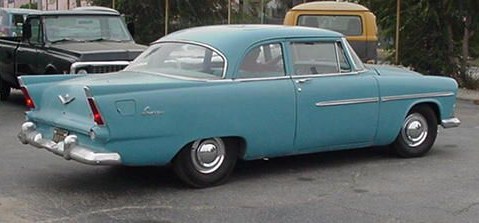 (RtRear.jpg) (RtRear.jpg)
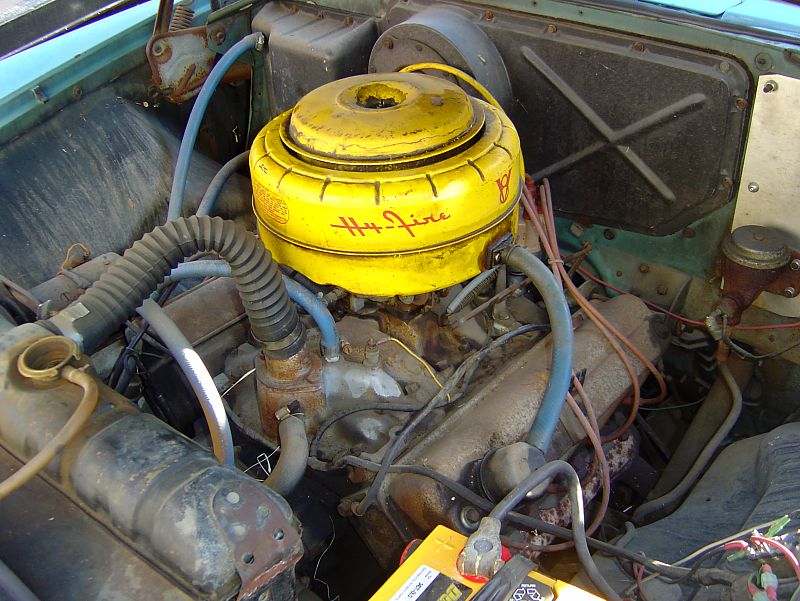 (My 277 Motor.jpg) (My 277 Motor.jpg)
Attachments
----------------
 RtFront.jpg (38KB - 706 downloads) RtFront.jpg (38KB - 706 downloads)
RtRear.jpg (27KB - 696 downloads)
My 277 Motor.jpg (110KB - 729 downloads)
|
|
| |
|
Expert 5K+
Posts: 9654
Location: So. Cal | The 277 motor ran pretty well for as old as it was, but it began to leak quite a bit of oil from the rear main seal so I decided it was time to swap to a hemi motor. I had originally purchased the car with the intent to get a car that I wanted to put the 392 hemi into that I had installed into a '68 Barracuda as a 16 yr old kid. I didn't like the way it fit in the Cuda so I wanted a car that it would fit into better, but still be able to hotrod around in.
Edited by Powerflite 2015-06-04 6:21 PM
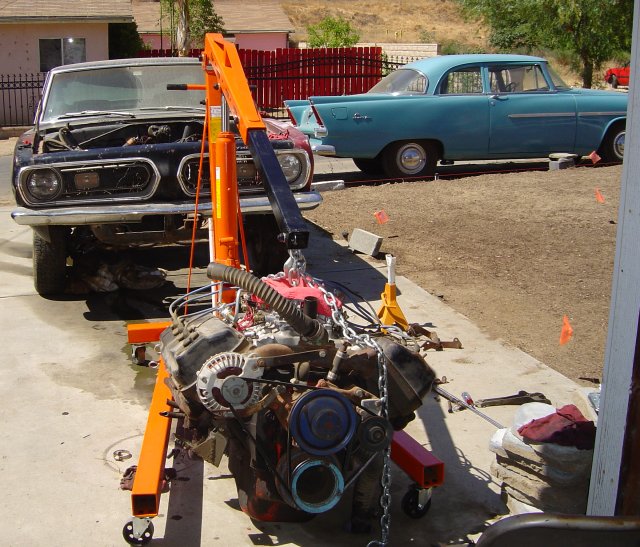 (392HemiOutof68Cuda.jpg) (392HemiOutof68Cuda.jpg)
Attachments
----------------
392HemiOutof68Cuda.jpg (101KB - 722 downloads)
|
|
| |
|
Expert 5K+
Posts: 9654
Location: So. Cal | I don't know why I tore it apart because the 392 motor ran pretty well, but I tore it down and purchased a running 331 hemi from a '55 Imperial, straight from Memory Lane wrecking yard, and threw that into the Savoy. To get it to fit, I had to:
1. Make my own lower motor mounts ( the original V8 mounts would have worked, but they interfered with the exhaust I ended up using). The upper portion I purchased from PAW, now R.I.P.
2. Move the motor & trans over to the left 1 inch
3. Install a '57 392 center sump oil pan & pickup
4. Swap the header pipes around on the Chinese shorty headers.
Then it fit like a glove with only 1/4" extra height on the motor mounts just to clear the header pipes a little better. Custom headers would be ideal, and those are still in the plans.
You can see the old thread on it here:
http://www.forwardlook.net/forums/forums/thread-view.asp?tid=13584&...
Edited by Powerflite 2015-06-04 8:47 PM
 (Left.jpg) (Left.jpg)
 (Exhaust.jpg) (Exhaust.jpg)
 (Hemi.jpg) (Hemi.jpg)
Attachments
----------------
Left.jpg (56KB - 695 downloads)
Exhaust.jpg (90KB - 725 downloads)
Hemi.jpg (75KB - 741 downloads)
|
|
| |
|
Expert 5K+
Posts: 9654
Location: So. Cal | The hemi had a lot of rust built up inside its passages so I filled the motor with a dissolved solution of Cascade automatic dish soap and ran the motor around (plugged hose to hose) without a fan or radiator until it was hot. Then I let it sit overnight, got it hot again, and dumped it. Amazing how well that worked. The water was thick with brown rust. After a couple of good flushings, it was good to go.
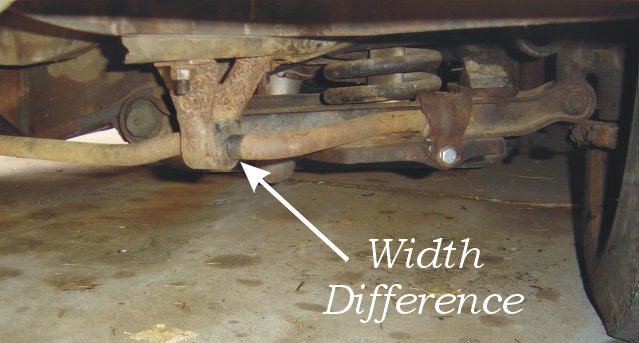
The motor added some weight to the car so it didn't handle as well as it used to so I decided to install a sway bar from a '56 Chrysler that was 7/8" instead of the 3/4" Plymouth bar. It was a little wider than the Plymouth, but it worked and made the car handle similar to the way it did before.
Edited by Powerflite 2015-06-04 7:25 PM
 (ChryslerSwayBar.jpg) (ChryslerSwayBar.jpg)
Attachments
----------------
ChryslerSwayBar.jpg (42KB - 692 downloads)
|
|
| |
|
Expert 5K+
Posts: 9654
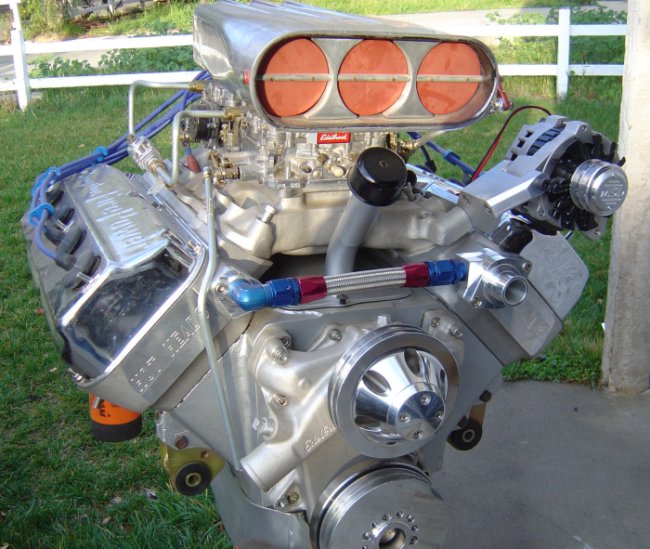
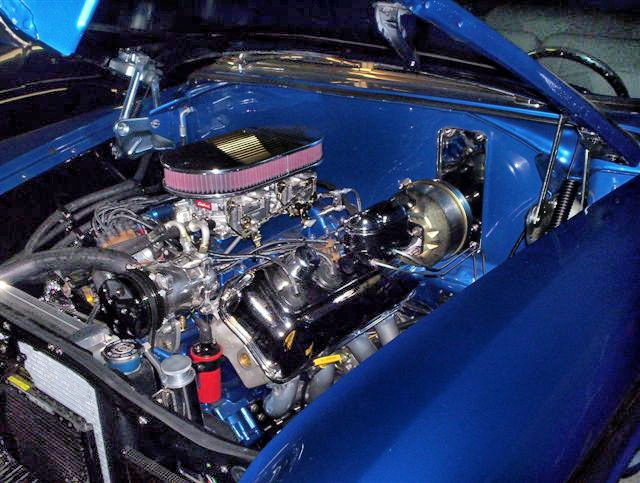
Location: So. Cal | Time passed and I drove the car for 2-3 years, often commuting with it 90 miles roundtrip, but it eventually started to smoke - really bad. It became so bad that just moving it across the street would hinder the visibility for a 1/2 mile or so just getting it out of my driveway. Not good. I wish I had thought to take a movie or picture of it. It was spectacular. I quickly determined that the problem had nothing to do with the valve seals. Great, so the rings are bad. So it sat while I gussied up the 392 I wanted to put into it. I purchased aluminum heads for it, and bumped up the compression to 11:1, put in a nice cam and upgraded to a GM alternator.
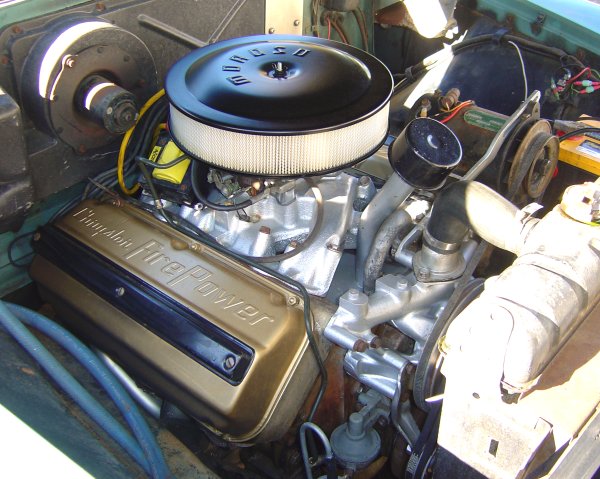
But now I wish I had tried to make it look more stock. This motor is going to really ruin the nostalgic factor of my Plymouth. Too much bling on it, but I do like how light it is. I need to find a good compromise.
Edited by Powerflite 2015-06-04 7:06 PM
 (Hemi Alt Mounted.JPG) (Hemi Alt Mounted.JPG)
Attachments
----------------
Hemi Alt Mounted.JPG (88KB - 703 downloads)
|
|
| |
|
Expert 5K+
Posts: 9654
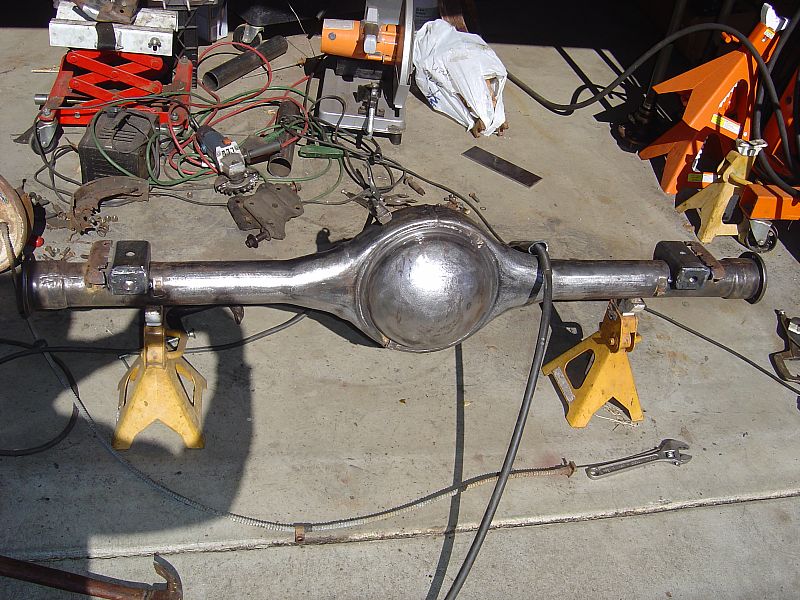
Location: So. Cal | I decided to replace the rear axle & transmission while I was at it so I welded up spring mounts at 41" apart on a '68-'70 B-body axle with the shock mount placed in the back end of the spring mounts like the originals. I used the remains of the old B-body mounts to ensure that the new mounts would be welded on at the same pinion angle.
But looking back, I should have used the '65-'67 B-body axle I had laying around instead because there is a little too much offset required with this axle. Also, I should have used the original spring mounts from the '56 rear because they need to be very narrow in order to fit well on the splayed springs. But, it worked out in the end.
Edited by Powerflite 2015-06-04 7:02 PM
 (56PlymRear.jpg) (56PlymRear.jpg)
Attachments
----------------
56PlymRear.jpg (130KB - 1806 downloads)
|
|
| |
|
Expert 5K+
Posts: 9654
Location: So. Cal | At the end of 2014, I was finally ready to pull the 331 out and put the 392 into it's place. As I unbolted the exhaust, oil literally dripped out of it. Wow, that's a lot of oil in there. Then I drained the oil, and to my amazement, about 12 qts of oil came out of that motor! When I originally installed the motor, I didn't have the right dipstick for the 392 pan. So I used an aftermarket one and filled the motor and marked the stick with the oil that was on it. But it was registering on some puddle in the tube.  I ended up lengthening the dipstick a good 5 inches to get it in the right spot. I ended up lengthening the dipstick a good 5 inches to get it in the right spot. 
Once I had the right amount of oil in the car, I started it up and it blew a big puddle of oil from the open headers onto my driveway and instantly lit it on fire! That was pretty fun. Fortunately, the car was up on jack stands and the fire didn't do any harm. After I burned out all the oil in my mufflers, the car ran without smoking at all! So I put off swapping in the 392 for the time being and left the 331 in there.
Edited by Powerflite 2015-06-04 8:52 PM
|
|
| |
|
Expert
Posts: 2312
Location: Arizona | One of the cars I restored was a 69 Firebird. The bottom dipstick tube had fallen into the pan and the end of the dipstick was no longer "aimed" in the right spot. I drained almost 8 quarts out of it's 6 quart crankcase. People had just kept adding oil till it hit the no longer properly aimed dipstick. |
|
| |
|
Expert 5K+
Posts: 9654
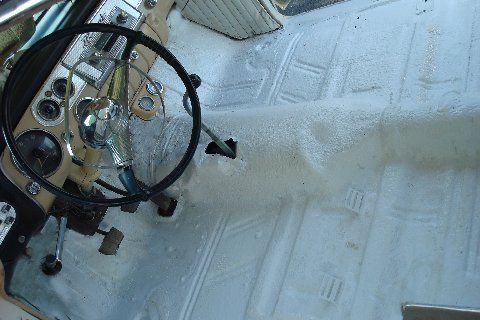
Location: So. Cal | I decided to go forward with the transmission upgrade since I was in between jobs and had more time on my hands. So I pulled the powerflite trans and installed a 700R4 overdrive. I had devised a way to shift it with the original push buttons, but eventually I decided to use the car for towing a camping trailer around and I needed access to 1st and 2nd gear. So I shift it with a cable mounted next to the steering column for the time being. In order to accomplish the transmission swap I needed to:
1. Cut the trans crossmember and move the mount back 2 inches.
2. Use a B-body driveshaft with a GM slip yoke (cut to length) on the end of it.
3. Use a radiator with a trans cooler in it. Fortunately, mine already had them.
4. Route cooling lines and shifter brackets.
5. Use a converter lockup unit from Ron Francis wiring and wire it up to the brake switch etc.
6. Hook up the E-brake to the rear axle by using a small connector cable & mount.
7. Mount & adjust the kickdown cable to the throttle linkage.
You can see the original thread about it here:
http://www.forwardlook.net/forums/forums/thread-view.asp?tid=56159&...
Edited by Powerflite 2015-06-04 11:26 PM
 (700R4Trans.jpg) (700R4Trans.jpg)
 (FrontCableConnection.jpg) (FrontCableConnection.jpg)
 (CableRearConnection.jpg) (CableRearConnection.jpg)
Attachments
----------------
700R4Trans.jpg (47KB - 701 downloads)
FrontCableConnection.jpg (28KB - 713 downloads)
CableRearConnection.jpg (34KB - 673 downloads)
|
|
| |
|
Expert 5K+
Posts: 9654
Location: So. Cal | Yeah Jim, not one of the brighter moments in my life. To think that I let the car sit for many years thinking the motor was gone, when it just needed the right amount of oil.  |
|
| |
|
Expert 5K+
Posts: 9654
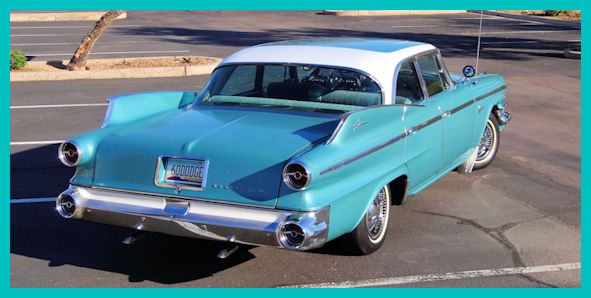
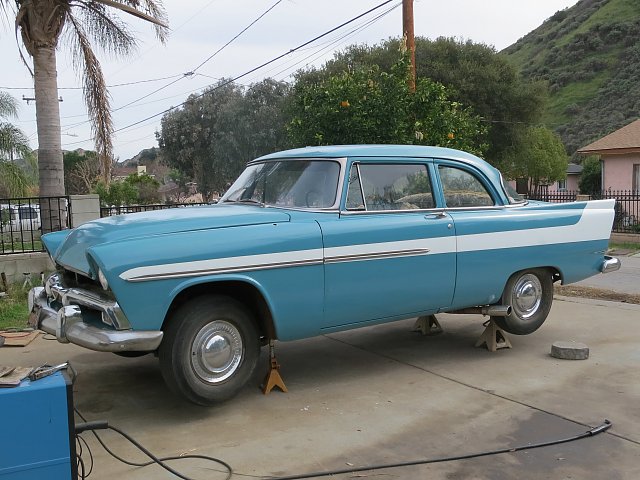
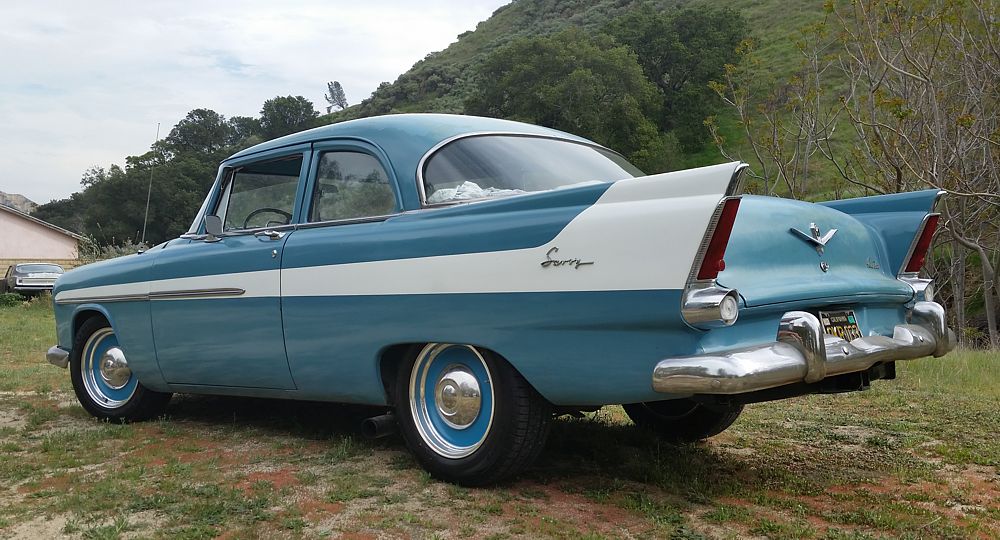
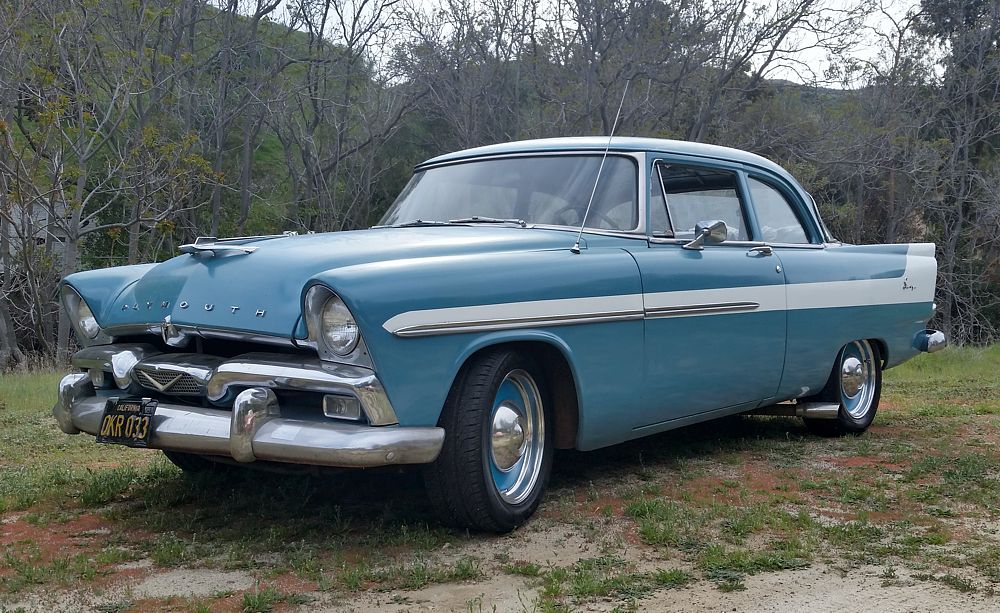
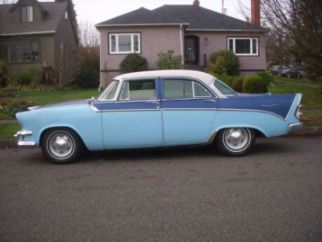
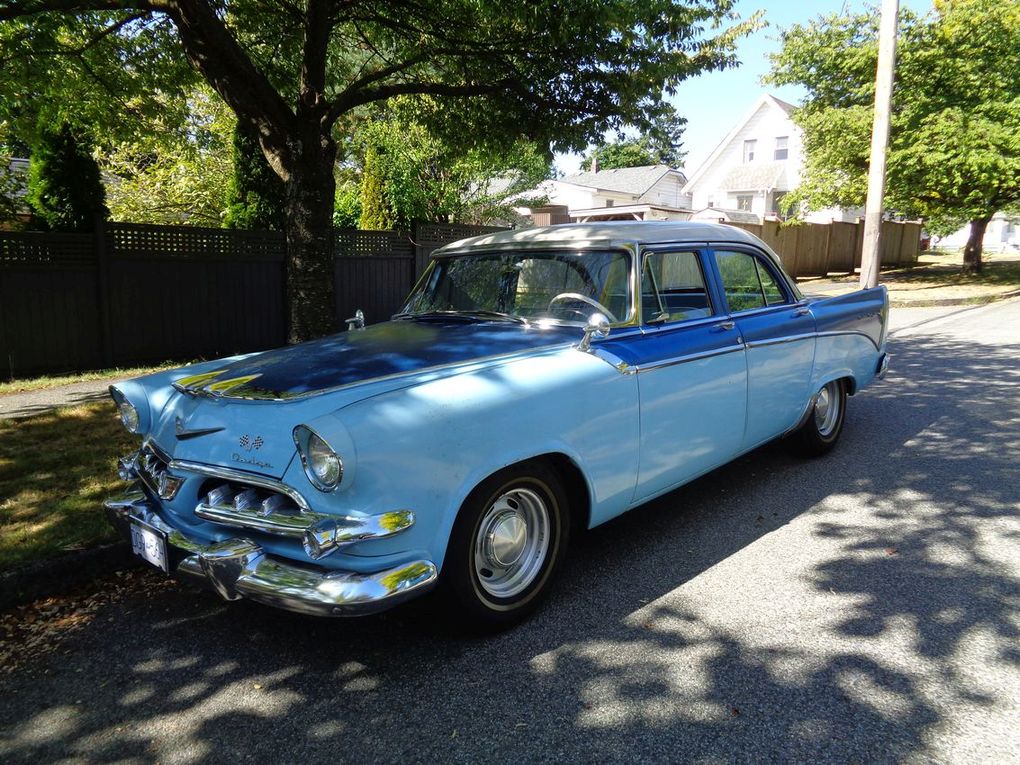
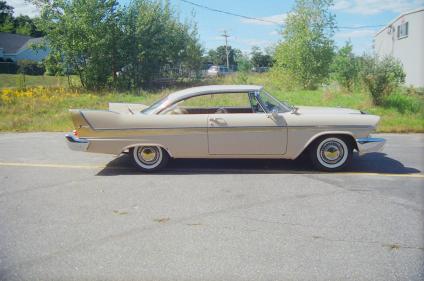
Location: So. Cal | I wanted to drive my car around again, but the paint had become badly oxidized from sitting in the California sun. It was pretty bad. So I wet sanded the old paint and painted a white '56 Fury stripe on the side like I had always wanted to do. then I painted the whole car with a coat of clear.
 ('56Stripe.jpg) ('56Stripe.jpg)
 (56NewLook.jpg) (56NewLook.jpg)
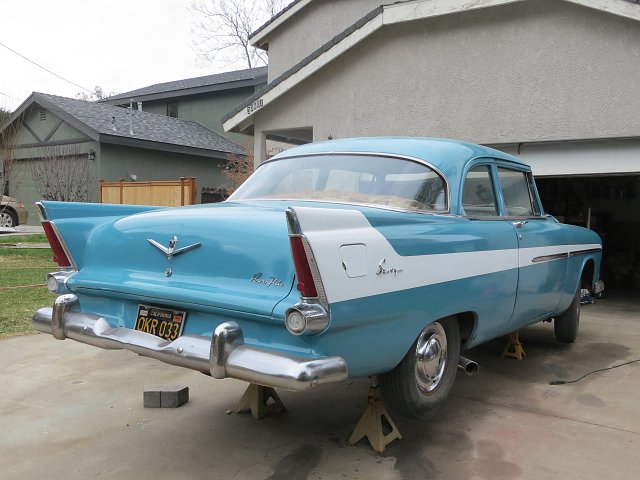 (56NewLookBack.jpg) (56NewLookBack.jpg)
Attachments
----------------
'56Stripe.jpg (90KB - 695 downloads)
56NewLook.jpg (78KB - 677 downloads)
56NewLookBack.jpg (59KB - 708 downloads)
|
|
| |
|
Expert 5K+
Posts: 9654
Location: So. Cal | I bit the bullet and installed 3-point seatbelts so I would feel good about driving it around on a more regular basis. A sedan is much easier for doing this then a hardtop, but it required a lot more work than I expected because there really wasn't a lot of reinforcement designed into the B & C pillars. I had to add a lot of structural metal to the backsides of the inner body to be able to secure a good mount there. I used 3/16" plate cut & bent to the shape of the inside sheet metal and another 3/16 plate behind that to put the mount into. I welded a nut on the backside of the plate and another one on the front with threads in between all lined up to each other.
I wanted to install a retractable seatbelt in the back seat as well, but I needed to modify the seat frame to keep it from pinching the belt and give it enough room to move freely. I didn't want to do that right now so I installed fixed belts for the time being. I also would have used more classic chrome buckles that are available now to better match the '50's style. But I had already purchased these belts a long time ago and will use them until I get tired of them.
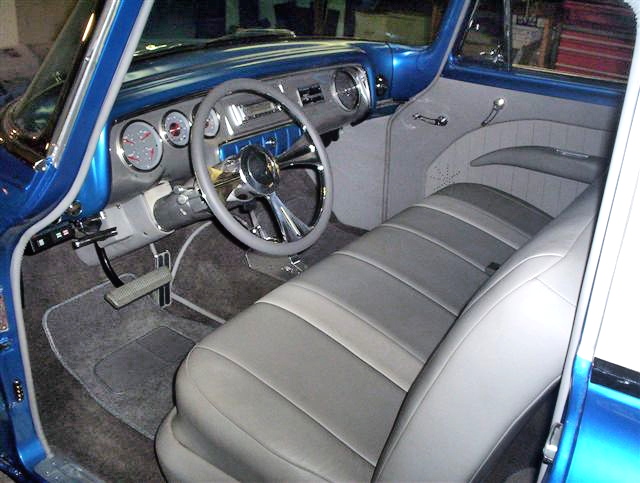
My original seats had become ripped and sun-rotted so my wife and I installed some gray "Zink" seat covers on them. These seat covers are cheap and won't last long, but I keep a sacrificial cloth over the back seat area to protect them from the sun through the back window. Hopefully that will make them last long enough to give me time to figure out what I really want to do with the seats. We also replaced the carpet while we were at it. The headliner is next, hopefully soon.
Edited by Powerflite 2015-06-04 10:49 PM
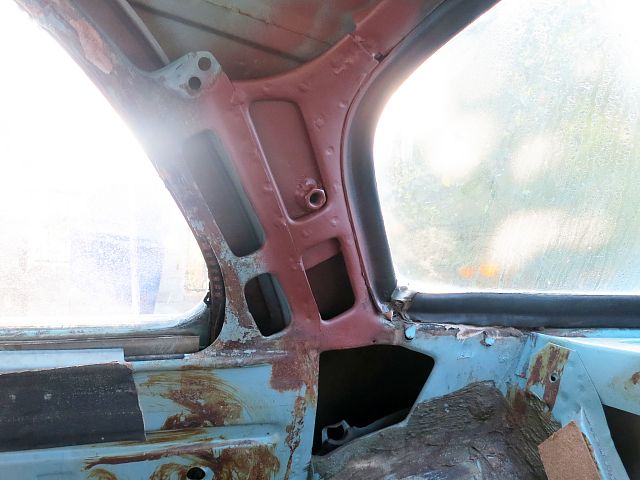 (RRUpperMount.jpg) (RRUpperMount.jpg)
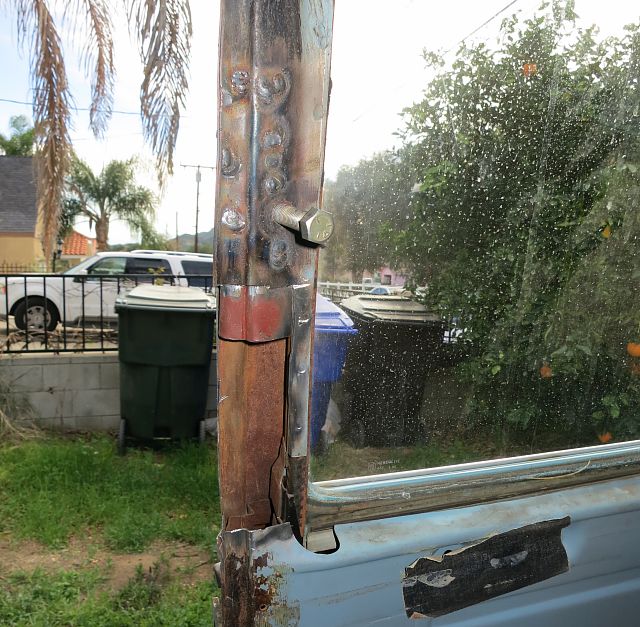 (RFUpper Mount.JPG) (RFUpper Mount.JPG)
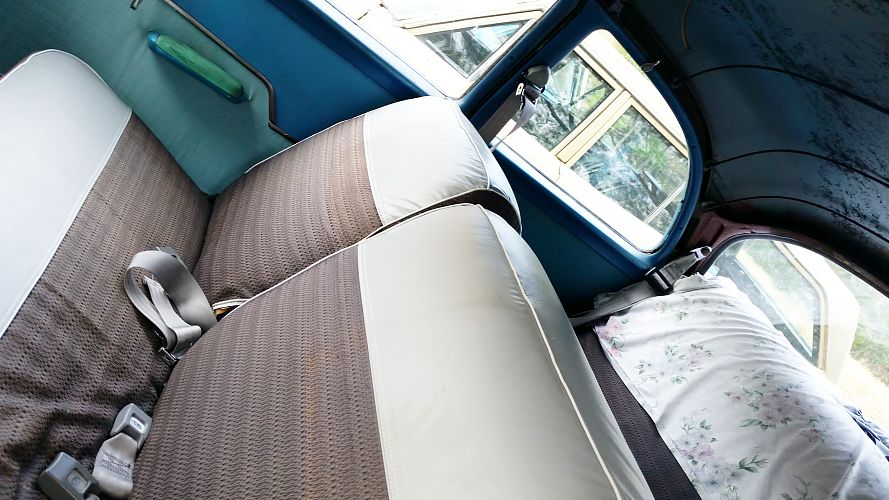 (56Seats.jpg) (56Seats.jpg)
Attachments
----------------
RRUpperMount.jpg (48KB - 719 downloads)
RFUpper Mount.JPG (104KB - 714 downloads)
56Seats.jpg (95KB - 732 downloads)
|
|
| |
|
Expert 5K+
Posts: 9654
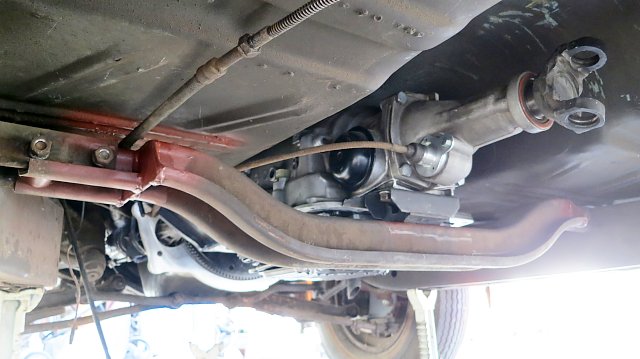
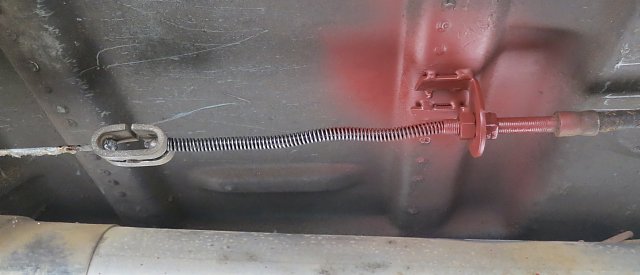
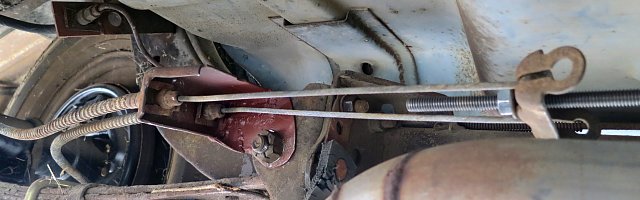
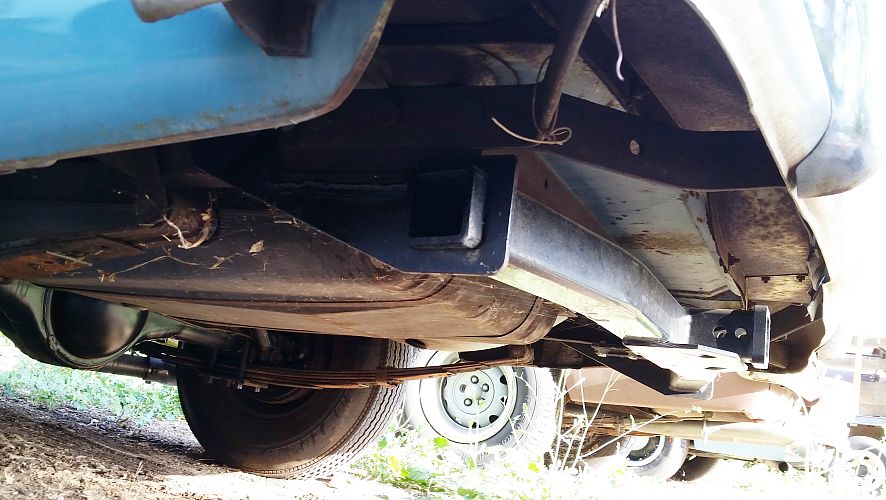
Location: So. Cal | I recently installed a hitch to tow our camping trailer. My mother-in-law's neighbor threw this hitch to the curb for garbage collection, so of course I grabbed it.  I don't know what it went to, but it is wider than the typical hitch and was a near perfect match for the '56 Plymouth. The only problem was that it hung too low. So I cut the horizontal mount off and lowered it by 3-4 inches. It is mounted to the bottom of the frame at 3 points on each side. You can't see it in the picture, but I also mounted it to the side of the frame at one point that already had a nut in place for the front-most bumper mount. I don't know what it went to, but it is wider than the typical hitch and was a near perfect match for the '56 Plymouth. The only problem was that it hung too low. So I cut the horizontal mount off and lowered it by 3-4 inches. It is mounted to the bottom of the frame at 3 points on each side. You can't see it in the picture, but I also mounted it to the side of the frame at one point that already had a nut in place for the front-most bumper mount.
I also added 2 extra leafs to each of the springs so that they could handle the weight. They made the ride a little more harsh when it is empty, but not by much. The car no longer sags when it is loaded like it used to.
Edited by Powerflite 2015-06-05 12:20 AM
 (UnderHitch.jpg) (UnderHitch.jpg)
Attachments
----------------
UnderHitch.jpg (88KB - 708 downloads)
|
|
| |
|
Exner Expert 19,174 posts. Neil passed away 18 Sep 2015. You will be missed, Neil!
Posts: 19146
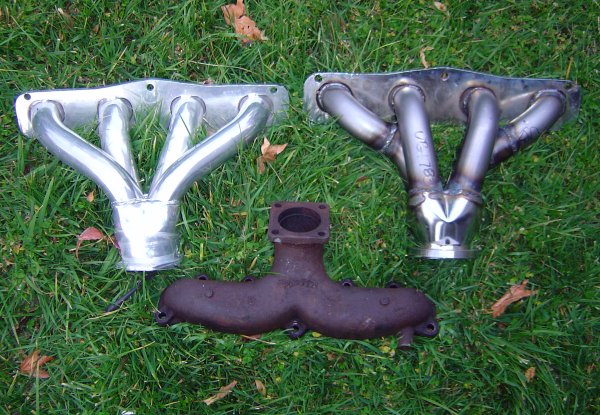
Location: bishop, ca | Nathan....do you happen to have both of the cast iron exhaust manifolds, seen above?
|
|
| |
|
Expert 5K+
Posts: 9654
Location: So. Cal | I do, why? I am planning to use them in my '57 Windsor. I am hoping I can use them unmodified with a 392 since the car has manual steering. |
|
| |
|
Expert
Posts: 2196
Location: Muskego, WI | The exhaust manifold is the more desirable square flange with 4 bolt holes, I believe those were used on trucks and 300s only. |
|
| |
|
Expert 5K+
Posts: 9654
Location: So. Cal | I purchased some new tires & wheels for the car. I didn't care for the way whitewalls looked on this car. And I wanted a wider tire with a smaller sidewall that was about the same height as the originals and could take the original Plymouth dog dish caps. So I decided to go with 17" aluminum rims to keep the weight reasonable. These are Centerline "Elite" wheels. I had a machine shop drill & tap (3) 1/4-20 holes into each wheel, evenly spaced at a 9.5" diameter circle around the hub. I then took some stainless flathead screws and ground the outside diameter of the head down to round it up more and inserted those into the wheel to mount the caps onto them. the angled portion of the flathead makes it easier to pop the caps back off and grinding it down makes it easier to get it to go on.
I really like them, but I think I would like them better if they were painted black. The extra color is a little too much for me. The tires are 225/55/17 on 7" rims in the front and 235/60/17 in the back with 8" rims. I was originally going with 245/55/17 in the back, but it was in danger of rubbing the fender and they are a lot more expensive. The way the car drives & handles is like night and day. So much better now. 
 (SavoyTiresRear.jpg) (SavoyTiresRear.jpg)
 (Savoy TiresLR.jpg) (Savoy TiresLR.jpg)
 (SavoyTiresFrt.jpg) (SavoyTiresFrt.jpg)
Attachments
----------------
SavoyTiresRear.jpg (152KB - 686 downloads)
Savoy TiresLR.jpg (145KB - 693 downloads)
SavoyTiresFrt.jpg (193KB - 689 downloads)
|
|
| |
|

Expert
Posts: 2119
Location: atlanta | Nice ride, lottta work, but Your there now, congrats. |
|
| |
|
Expert 5K+
Posts: 9654
Location: So. Cal | Thanks Roger, if only that were true The motor has been running since '55 without a rebuild and really should be replaced with a strong & lightened 392. It will likely never happen while this one keeps ticking on. But even if it is no hotrod yet, it has definitely come to the point that it is very enjoyable to drive and use, just like yours. So here's (glass raised) to enjoying them! |
|
| |
|

Location: North Australia | In my opinion the new wheels and tyres really suit your car. They look great! In fact the whole look of your car is pretty exceptional. well done creating a unique car.
Steve.
|
|
| |
|
Expert 5K+
Posts: 9654
Location: So. Cal | Thanks Steve! |
|
| |
|
Expert 5K+
Posts: 9654
Location: So. Cal | For future reference, I looked up the part number on the hitch that I used on this car. It is a Towing Products or Reese No. 51024 which is made for a '97-'02 Lincoln Navigator or Ford Expedition.
Also I should list the backspacing on the wheels that I used. The front wheels have 4" backspacing on 7" wheels which give 0 offset. The rear wheels are 8" with a 5" backspace that results in a +1/2" offset. This is with the '68-'70 B-body rear axle. |
|
| |
|
Expert
Posts: 2196
Location: Muskego, WI | I think the tires and wheels (and the car in general) look really sharp. |
|
| |
|
Expert
Posts: 3033
Location: N.W. Fla. | Powerflite - 2016-03-04 11:22 PM
But even if it is no hotrod yet, ! With the 331 Chr in it, it is a hot rod! |
|
| |
|
Expert
Posts: 3033
Location: N.W. Fla. | Powerflite - 2015-06-04 5:48 PM
But now I wish I had tried to make it look more stock. This motor is going to really ruin the nostalgic factor of my Plymouth. Too much bling on it, but I do like how light it is. I need to find a good compromise. Well...ditch the cheezy looking fake "bug catcher", put on an OEM water crossover, & adding a coat of Plastikote would go a long way to solving that problem. Ditch the Fram also & get a Wix. |
|
| |
|

Elite Veteran
Posts: 792
Location: Buena Park, CA | The new wheels and tires look great Nathan.
Edited by DepsilonD 2016-03-10 5:36 PM
|
|
| |
|

Expert 5K+
Posts: 7806
Location: Williams California | Very cool!! |
|
| |
|
Expert 5K+
Posts: 9654
Location: So. Cal | Thanks guys, I'm starting to warm up to the color on them now too.
George, that motor is now slated to go into my '58 New Yorker so it is going back to mostly stock form... I think. Unfortunately, I can't use a stock crossover with those heads because it won't fit. But I am thinking of cutting up a stock one and lengthening it to make it work, but it isn't easy to do if you want to keep the generator mount in the right spot. But I'll give it a shot when I get time to play with it. |
|
| |
|
Expert 5K+
Posts: 9654
Location: So. Cal | This is a business card of the car dealer that the 2nd previous owner bought the car from. I know that this company went out of business quite a while ago because I can't find any ads from them beyond the mid 60's. I am not sure if he bought it from them new or used, but it looks like they specify just Dodge and Plymouth so it sounds like a new car dealership. Is that PLeasant 3-2401 an old type of phone number?
Edited by Powerflite 2016-03-31 2:22 AM
 (Bank MotorsCard.jpg) (Bank MotorsCard.jpg)
Attachments
----------------
Bank MotorsCard.jpg (111KB - 670 downloads)
|
|
| |
|
Expert 5K+
Posts: 9654
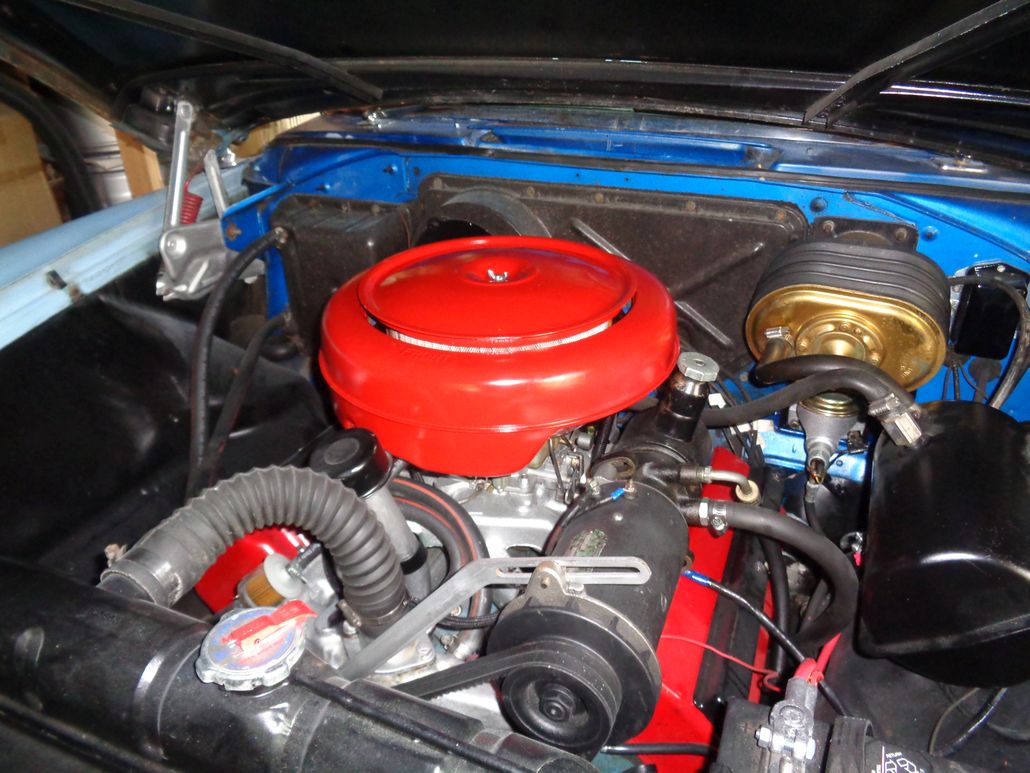
Location: So. Cal | I was always planning to run dual quads on a 392 hemi for this car. Now I am thinking a single 4 with an original air cleaner would be better. I am even thinking that I may go with a 354 stroker @ 412 cubic inch just to keep it all '56 instead. That's probably more in line with it's current use for pulling my camping trailer & family outings. So I cut up the original air cleaner I had and welded a large 4bbl rim to it from the inside so I could run it with a fuel injection throttle body or a Fi-Tech setup. Watch out when you cut the lids on these things. If you catch the inside on fire, you get to smell what 60 year old burnt horse hair smells like.
 (Air Cleaner Base.jpg) (Air Cleaner Base.jpg)
Attachments
----------------
Air Cleaner Base.jpg (149KB - 610 downloads)
|
|
| |
|
Expert 5K+
Posts: 9654
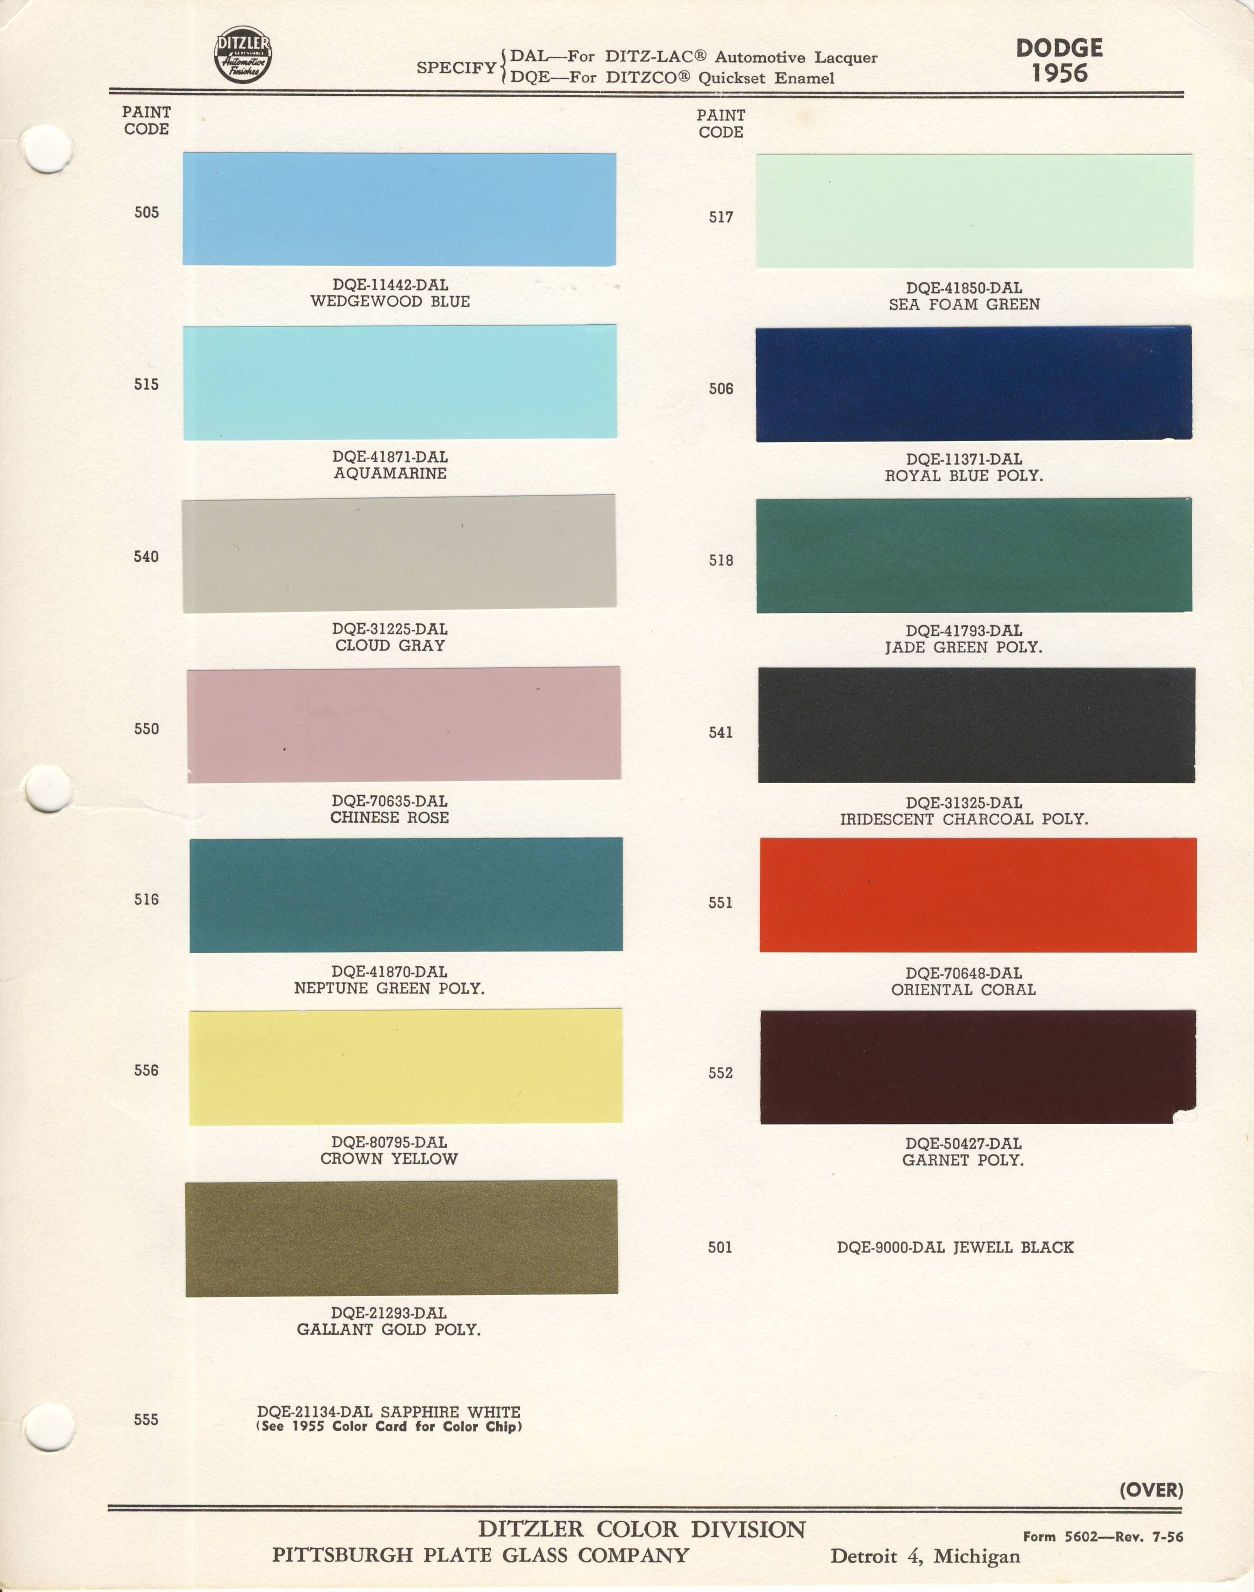
Location: So. Cal | This is the first time I have looked at this tag even after owning the car for 15 years. Weird that it says 607: wedge-wood blue paint. The paint on the firewall, which has got to be original, is much lighter than that, as is the paint on the underside, C-pillars & roof in the previous pictures. I had always assumed that it was painted a powder blue or turquoise blue. Does anyone know what a 505 trim looks like? I have some of the original fabric on the seats still, but now I am wondering what is original and what isn't. Since the tag is mounted with regular screws, I guess it is possible that the tag has been replaced, but that doesn't make a lot of sense either.
Edited by Powerflite 2017-10-03 10:51 AM
 (56PlymBodyTag.jpg) (56PlymBodyTag.jpg)
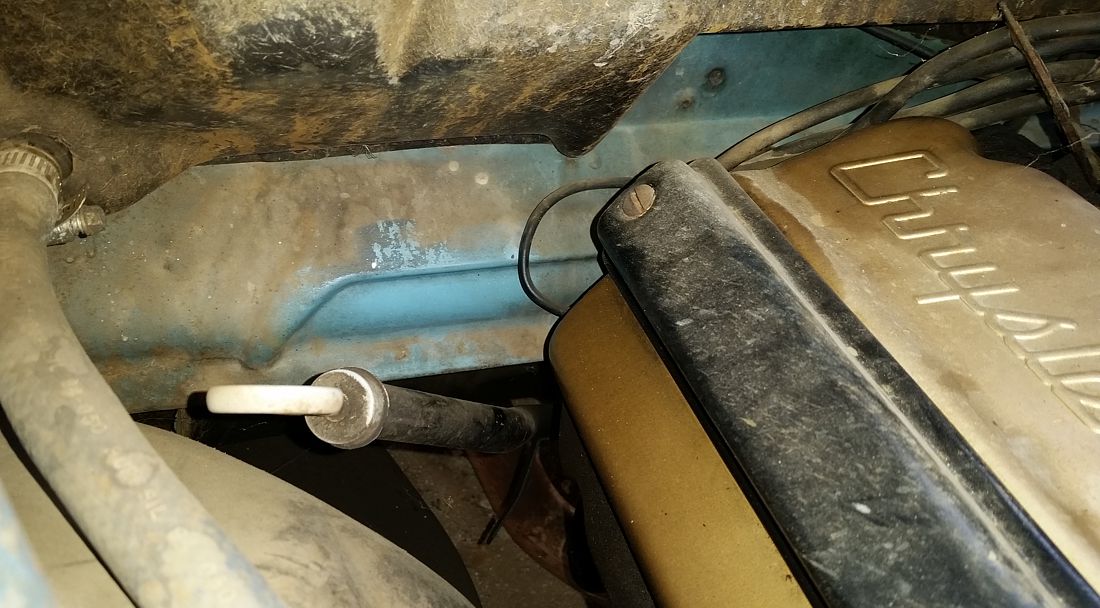 (56FirewallColor.jpg) (56FirewallColor.jpg)
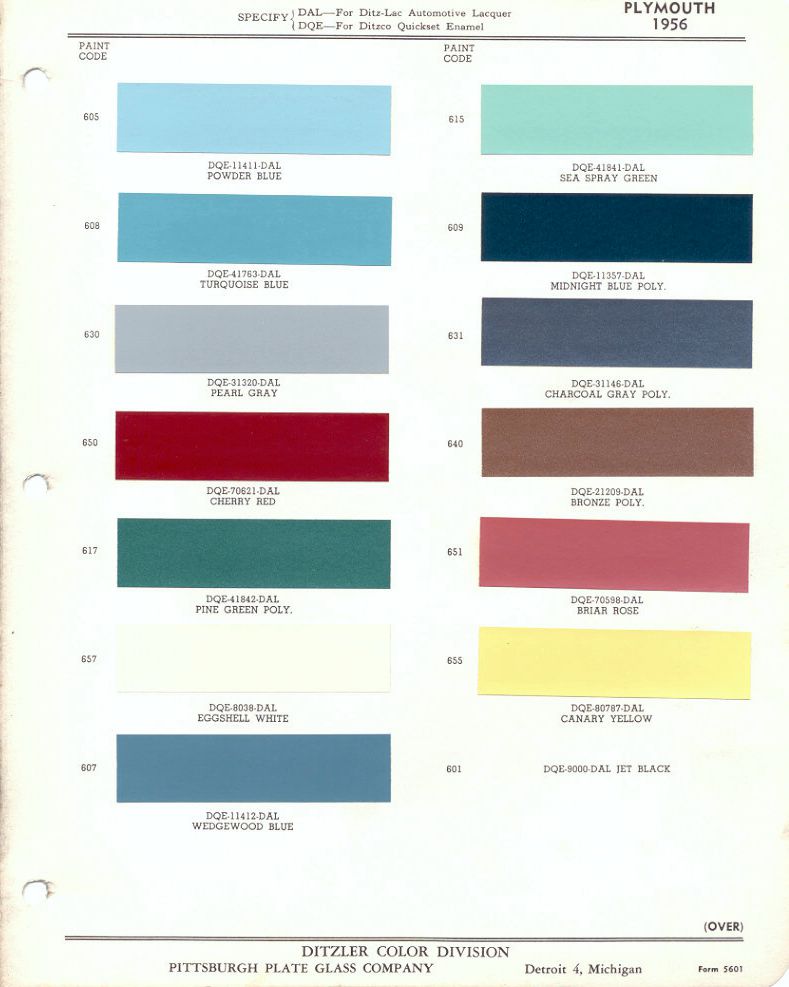 (1956_plymouth_ppg_c_01.jpg) (1956_plymouth_ppg_c_01.jpg)
Attachments
----------------
56PlymBodyTag.jpg (124KB - 612 downloads)
56FirewallColor.jpg (153KB - 614 downloads)
1956_plymouth_ppg_c_01.jpg (74KB - 605 downloads)
|
|
| |
|
Expert 5K+
Posts: 9900
Location: Lower Mainland BC | Interesting. I doubt that the tag has been replaced.
My 56 Dodge lower paint is Wedgewood blue but it looks a lot lighter than yours. Paint codes are NOT the same (DQE- 11442- DAL for mine, DQE- 11412- DAL for yours). My firewall is the darker Royal Blue Poly.
The more I look at yours, I would say it is the original Plymouth version of Wedgewood blue (607).

Edited by 56D500boy 2017-10-03 1:55 PM
|
|
| |
|
Expert 5K+
Posts: 9654
Location: So. Cal | Interesting that Dodge calls it the same color, but is a much lighter shade. |
|
| |
|
Expert 5K+
Posts: 9654
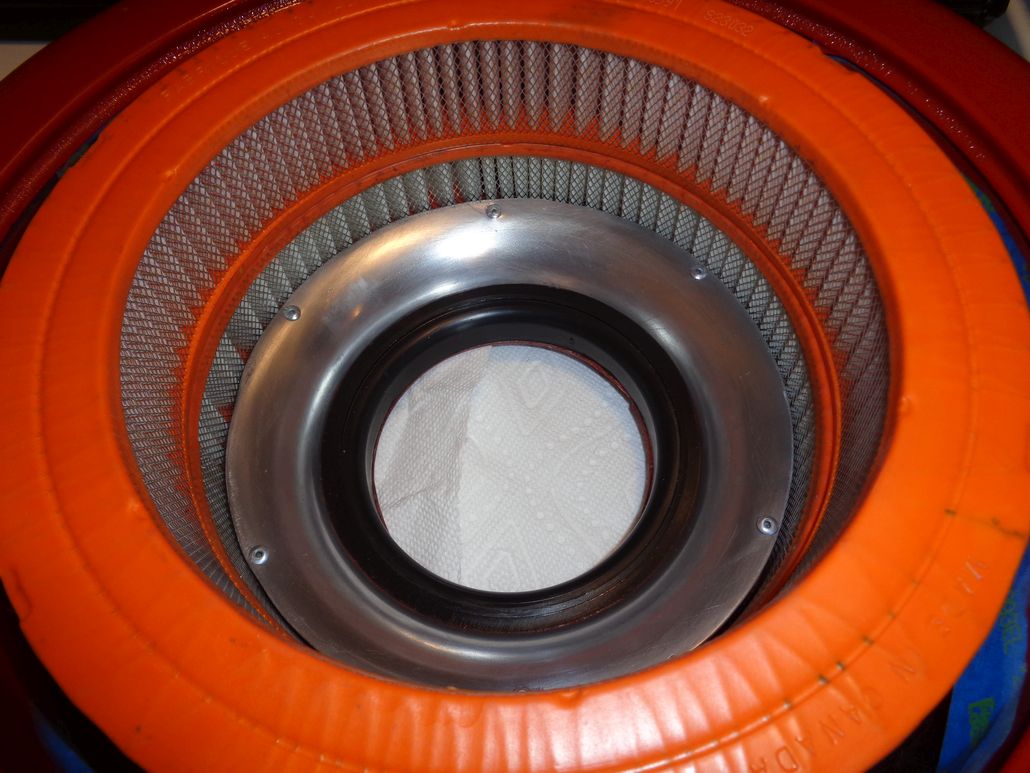
Location: So. Cal | I got the filter elements and decal for the 4bbl air cleaner and put it all together. Not sure if super glossy is the look I wanted, but I'll go with it for now. If I re-do it, I may try a semi-gloss instead. But this should look a lot better than that Moroso air cleaner that I had on there.
Edited by Powerflite 2017-11-11 11:20 AM
 (56AirCleaner.jpg) (56AirCleaner.jpg)
Attachments
----------------
56AirCleaner.jpg (220KB - 596 downloads)
|
|
| |
|
Expert 5K+
Posts: 9900
Location: Lower Mainland BC |
Powerflite - 2016-03-31 2:19 AM Is that PLeasant 3-2401 an old type of phone number?
P = 7 and L = 5 so the phone number (pre-additional area code needs) was 753-2401
Powerflite - 2017-11-11 11:19 AM
I got the filter elements and decal for the 4bbl air cleaner and put it all together. Not sure if super glossy is the look I wanted, but I'll go with it for now. If I re-do it, I may try a semi-gloss instead. But this should look a lot better than that Moroso air cleaner that I had on there. :)
Maybe this could be an option for you:
Edited by 56D500boy 2017-11-11 11:42 AM
 (57CoronetWith331ChryslerHemiAndFakedHemiHeadAirCleaner.jpg) (57CoronetWith331ChryslerHemiAndFakedHemiHeadAirCleaner.jpg)
Attachments
----------------
57CoronetWith331ChryslerHemiAndFakedHemiHeadAirCleaner.jpg (269KB - 592 downloads)
|
|
| |
|
Expert 5K+
Posts: 9900
Location: Lower Mainland BC | 56D500boy - 2017-11-11 11:40 AM
Powerflite - 2016-03-31 2:19 AM Is that PLeasant 3-2401 an old type of phone number?
P = 7 and L = 5 so the phone number (pre-additional area code needs ) was 753-2401

1801 W Manchester is gone. Replaced by Kim's Mobil Oil station at 1803 (takes the whole corner including what was 1801). Phone 323-758-6233 (so still PLeasant)
Next door shops also have 75n pre-fixes.
Edited by 56D500boy 2017-11-11 12:08 PM
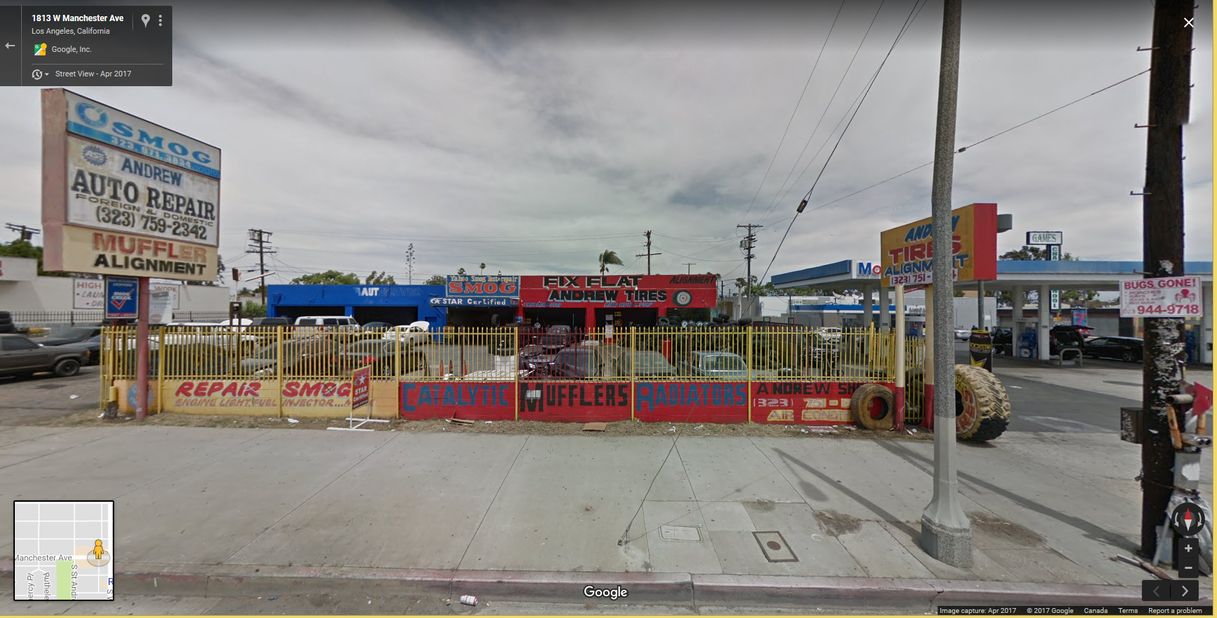 (1813WestManchesterLosAngeles.jpg) (1813WestManchesterLosAngeles.jpg)
Attachments
----------------
1813WestManchesterLosAngeles.jpg (122KB - 593 downloads)
|
|
| |
|
Expert 5K+
Posts: 9654
Location: So. Cal | 56D500boy - 2017-11-11 9:05 AM
Maybe this could be an option for you:
Nah, I am going for an original look even though the drive-train, wheels & paint aren't original. I decided that I want to eventually swap in a '56 354 motor and I am going to make it look completely stock for 1956. It will be as if someone ordered a transplanted Chrysler motor in their Plymouth. I am calling it the P501. That means using the stock Chrysler air cleaner and going back to silver valve covers. I will probably use the Dodge "no-name" truck covers that would be more applicable to a Plymouth, and the same covers that they used on the D501.
56D500boy - 2017-11-11 9:05 AM
P = 7 and L = 5 so the phone number (pre-additional area code needs) was 753-2401
1801 W Manchester is gone. Replaced by Kim's Mobil Oil station at 1803 (takes the whole corner including what was 1801). Phone 323-758-6233 (so still PLeasant)
Next door shops also have 75n pre-fixes.
That's cool to find out how they worked that. I just remember Andy Griffith calling up Sara and telling her to patch him into Floyd's shop. But with a bigger city like LA, that would be very impractical.
Edited by Powerflite 2017-11-11 3:35 PM
 (andy-griffith.jpg) (andy-griffith.jpg)
Attachments
----------------
andy-griffith.jpg (11KB - 623 downloads)
|
|
| |
|
Expert 5K+
Posts: 9900
Location: Lower Mainland BC | Powerflite - 2017-11-11 3:16 PM
56D500boy - 2017-11-11 9:05 AM
P = 7 and L = 5 so the phone number (pre-additional area code needs) was 753-2401
1801 W Manchester is gone. Replaced by Kim's Mobil Oil station at 1803 (takes the whole corner including what was 1801). Phone 323-758-6233 (so still PLeasant)
Next door shops also have 75n pre-fixes.
That's cool to find out how they worked that. I just remember Andy Griffith calling up Sara and telling her to patch him into Floyd's shop. But with a bigger city like LA, that would be very impractical.
When I was a kid living in Regina, Saskatchewan, the phone number of my parents house was JOrdan 9 - 1523, known later as 569-1523. That was like 60 years ago and I still remember that phone number (long since gone).
The other telephone exchange at the time was LAkeside which included 522 and 527 numbers. So that is why I knew what was up with PLeasant 3 - 2401.
|
|
| |
|
Elite Veteran
Posts: 792
Location: Buena Park, CA | Screws are correct for the firewall tag. And I had to laugh at the P-501 comment. My wife and I were joking when I was looking for a 315 Hemi for our '56 Plymouth. I was also going to do all of the suspension to D500 spec for our "P500". |
|
| |
|
Expert 5K+
Posts: 9654
Location: So. Cal | So those screws are correct for a Los Angeles car too? I know in '57-'58 they used one-way screws in LA only. I am assuming this is a Los Angeles car, but I actually don't know for sure. But the tag codes look like LA codes from '57. |
|
| |
|
Elite Veteran
Posts: 792
Location: Buena Park, CA | Nathan, I was hunting for a picture of the data plate on my LA Built '56 Plymouth and couldn't find one so I will confirm the screws when I get home. I know that my Detroit built '56 Dodge has standard phillips screws. According to build information in the 55-56 Plymouth FSM for a P-29-2 (Savoy w/ V-8): A serial number between 15,873,001 and 22,247,00 = Detroit built; 22,247,001 and 26,552,000 = Evansville; and 26,552,001 - up = Los Angeles. |
|
| |
|
Expert 5K+
Posts: 9654
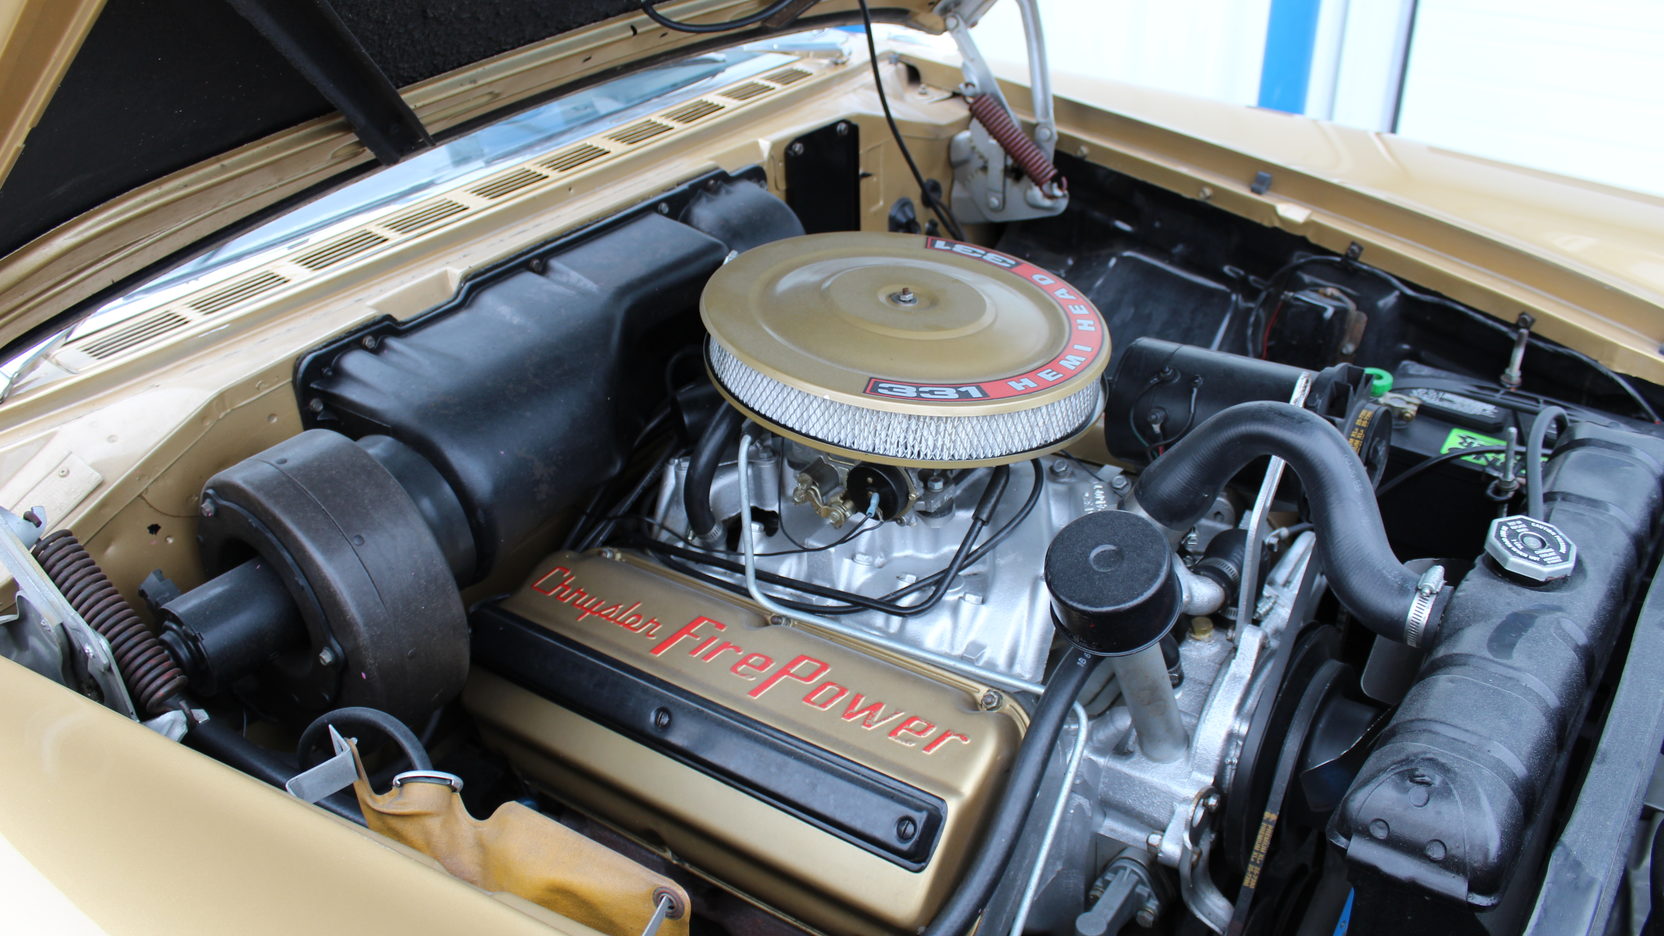
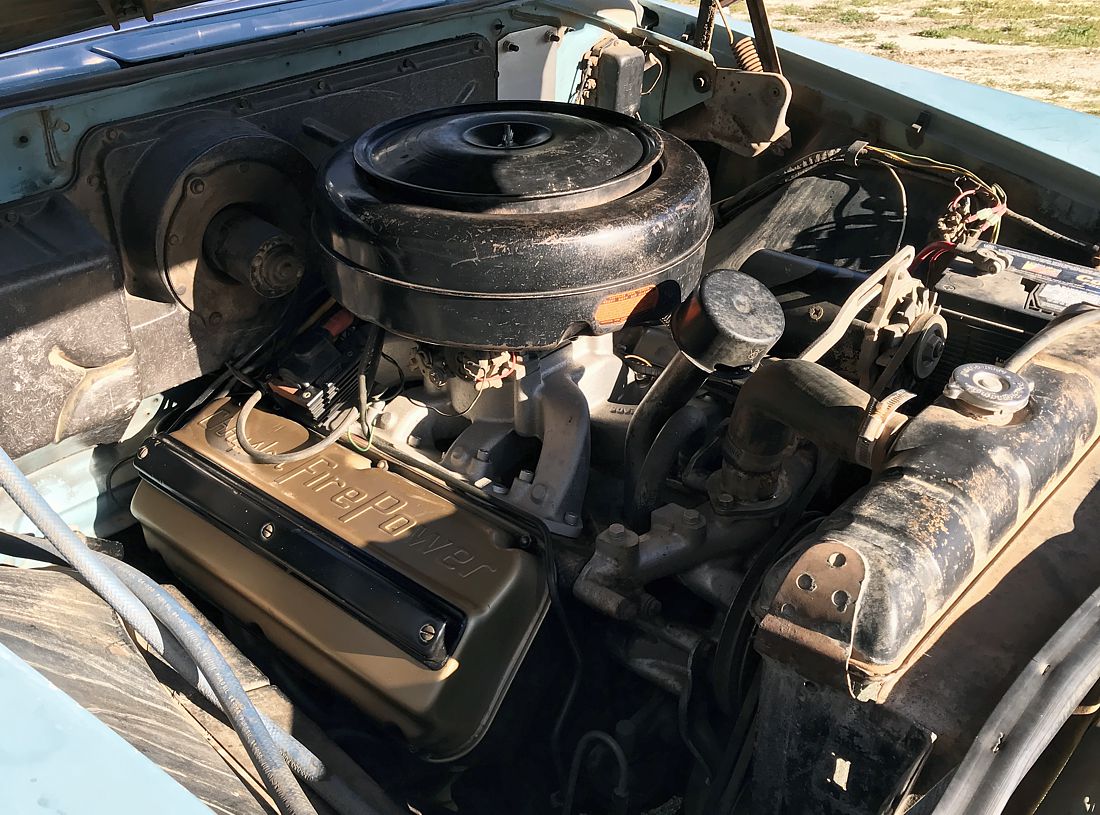
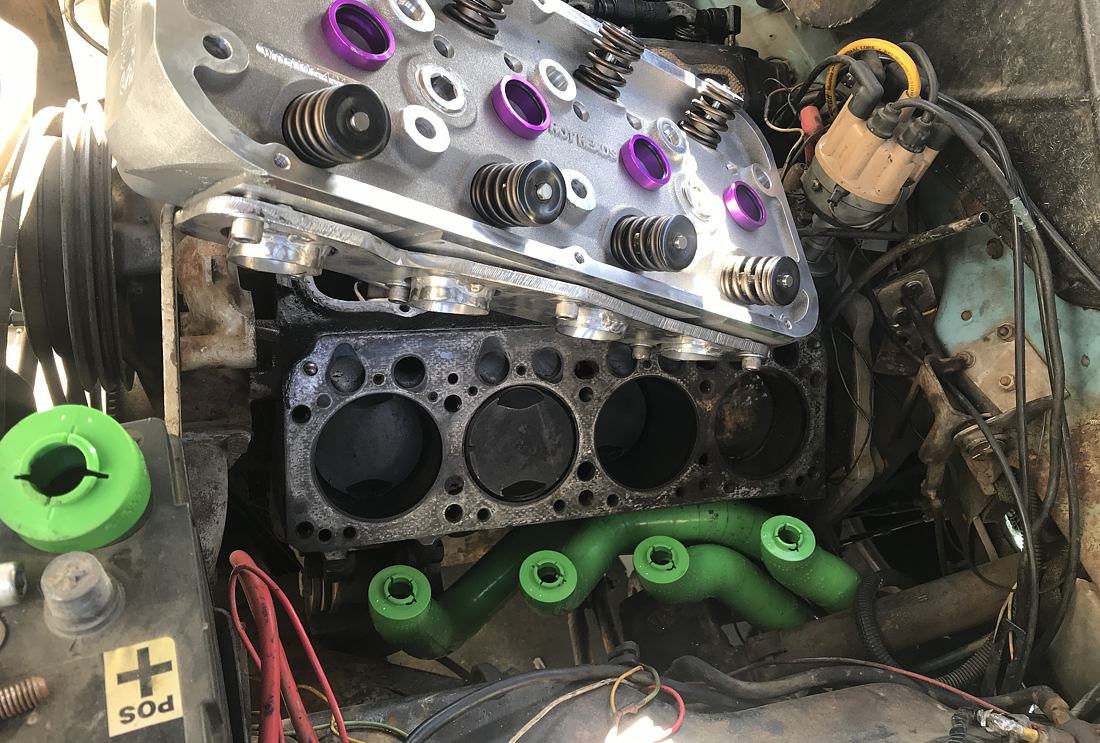
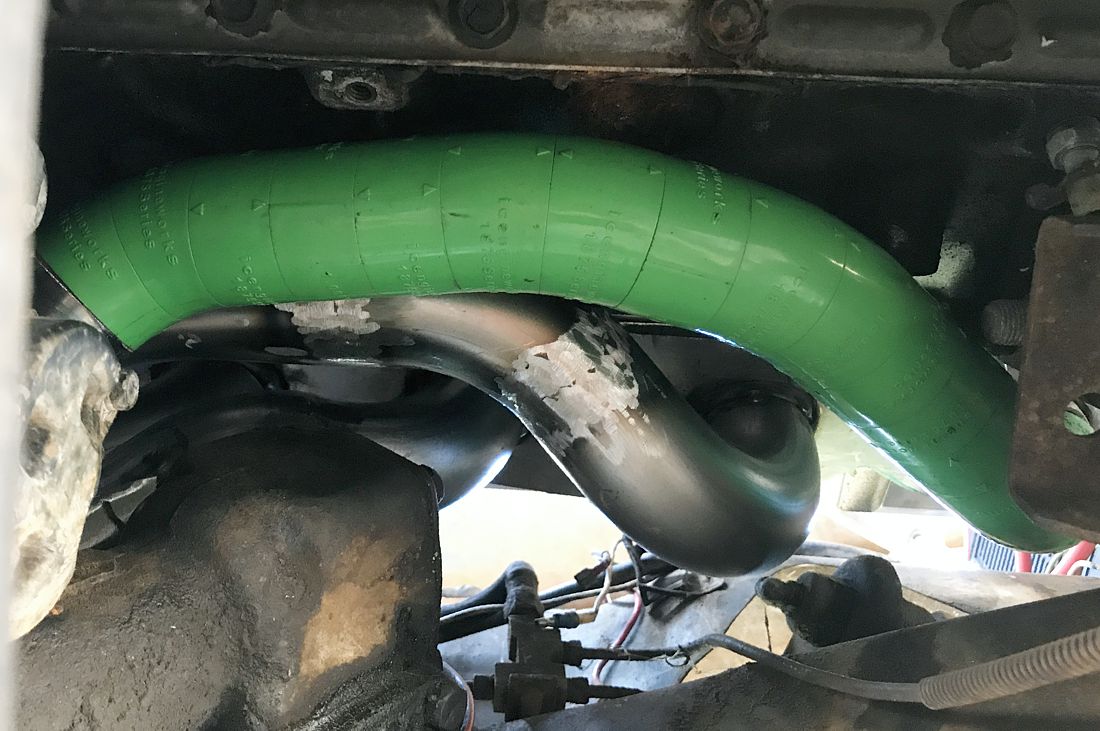
Location: So. Cal | Thanks for the info Dave. My VIN is 265568XX So this car was an early production build at the LA plant. Last summer one of the freeze plugs rusted a hole into it and started spewing coolant in a high pressure stream - while I was 250 miles away from home, towing a camping trailer on the way back from a family outing. Getting a tow truck for the car, another one for the trailer, and somehow getting all my family back home again is a huge pain in the neck so I was very motivated to make it work. We stopped every 30 miles to let it cool and refill with coolant. It got us home fine and the motor didn't overheat so that was good, but it spewed rusty coolant everywhere and made a big mess in the engine compartment. Now that I have my New Yorker movable, I have the driveway space I need to work on this car and get it going again. I cleaned everything up as much as I could with dish soap. Some of that stuff just doesn't come off - especially from the rubber parts for some reason. But it sure is a lot better than it was.
While I am messing with the motor, I decided to eliminate 35 lbs from my front end by installing the Hot Heads intake and hopefully make it perform a little better too. The carb sits higher than it used to, even with the 1" spacer that I had under it, but not by much. This car has a huge amount of hood clearance so that isn't an issue. I had to fabricate a bracket for the rear generator (now alternator) mount because the new intake doesn't come with anything to support it there, but other than that, it was really easy to swap in place. I also removed the down-draft tube and attached a PCV valve setup to the back of the carburetor. My newly installed '56 Chrysler air cleaner looks a lot better on there than the old Moroso job I used to have! When I get a 354 stroker motor built for it, the valve covers will be painted silver like a stock '56 Chrysler motor, but I am going to leave them gold until then. Now I just need to replace all those freeze plugs!
 (FreezePlug Failure Filth.jpg) (FreezePlug Failure Filth.jpg)
 (HH Intake & Chrysler AirCleaner.jpg) (HH Intake & Chrysler AirCleaner.jpg)
Attachments
----------------
FreezePlug Failure Filth.jpg (208KB - 585 downloads)
HH Intake & Chrysler AirCleaner.jpg (233KB - 600 downloads)
|
|
| |
|
Expert 5K+
Posts: 9900
Location: Lower Mainland BC | Nathan: Your engine bay is much improved. Must have been a lot of work. (Nice paint job on the air cleaner BTW)
A couple of questions:
1. Are you running that 56 Chrysler air cleaner as an oil bath or did you convert it to paper like I am trying to do (based on Dave Homstad's hints)?
2. When you removed the old intake did you have much trouble? I have several reasons to remove the intake on my 56 D500 hemi but I am concerned that I will open a can of worms by snapping off a bolt (or two) in the process.
|
|
| |
|
Expert 5K+
Posts: 9654
Location: So. Cal | If you look further up this thread you will see this air cleaner dangling in primer and you can tell that it has been converted to use paper filters. The black paint on it is the same paint I am using to paint the '57 New Yorker, much better quality than the old paint on the oil cap and wire covers. It is a polyurethane paint and is a little thicker than most paints - which is good and bad.
The only issue with removing the intake is that there is water in the ports so you have to drain some of your coolant before you do it. But none of the bolts sit in coolant so I don't think you should have any issues with broken bolts. I removed the intake before I installed the motor because I had to fix a couple of cracks that were in it. So this isn't the first time it has come off. |
|
| |
|
Expert 5K+
Posts: 9900
Location: Lower Mainland BC | Powerflite - 2018-03-13 7:12 PM
If you look further up this thread you will see this air cleaner dangling in primer and you can tell that it has been converted to use paper filters. The black paint on it is the same paint I am using to paint the '57 New Yorker, much better quality than the old paint on the oil cap and wire covers. It is a polyurethane paint and is a little thicker than most paints - which is good and bad.
Thank Nathan.
Okay I went back up the thread and found this:
Powerflite - 2017-05-19 3:13 PM
I was always planning to run dual quads on a 392 hemi for this car. Now I am thinking a single 4 with an original air cleaner would be better. I am even thinking that I may go with a 354 stroker @ 412 cubic inch just to keep it all '56 instead. That's probably more in line with it's current use for pulling my camping trailer & family outings. So I cut up the original air cleaner I had and welded a large 4bbl rim to it from the inside so I could run it with a fuel injection throttle body or a Fi-Tech setup. Watch out when you cut the lids on these things. If you catch the inside on fire, you get to smell what 60 year old burnt horse hair smells like.
Sorry. That primer photo wasn't enough for me to figure out that you converted it. Any chance of a photo of the inside?
Thanks for the paint info. Good to know.
Powerflite - 2018-03-13 7:12 PM
The only issue with removing the intake is that there is water in the ports so you have to drain some of your coolant before you do it. But none of the bolts sit in coolant so I don't think you should have any issues with broken bolts. I removed the intake before I installed the motor because I had to fix a couple of cracks that were in it. So this isn't the first time it has come off.
Good news about the intake bolts. However, I am confused about the coolant in the ports (!!??). Might be true of a 392 but I don't think that is true for a Dodge 315 or 325 hemi (which is all good). And then again, I am a hemi newbie. 
Edited by 56D500boy 2018-03-13 7:30 PM
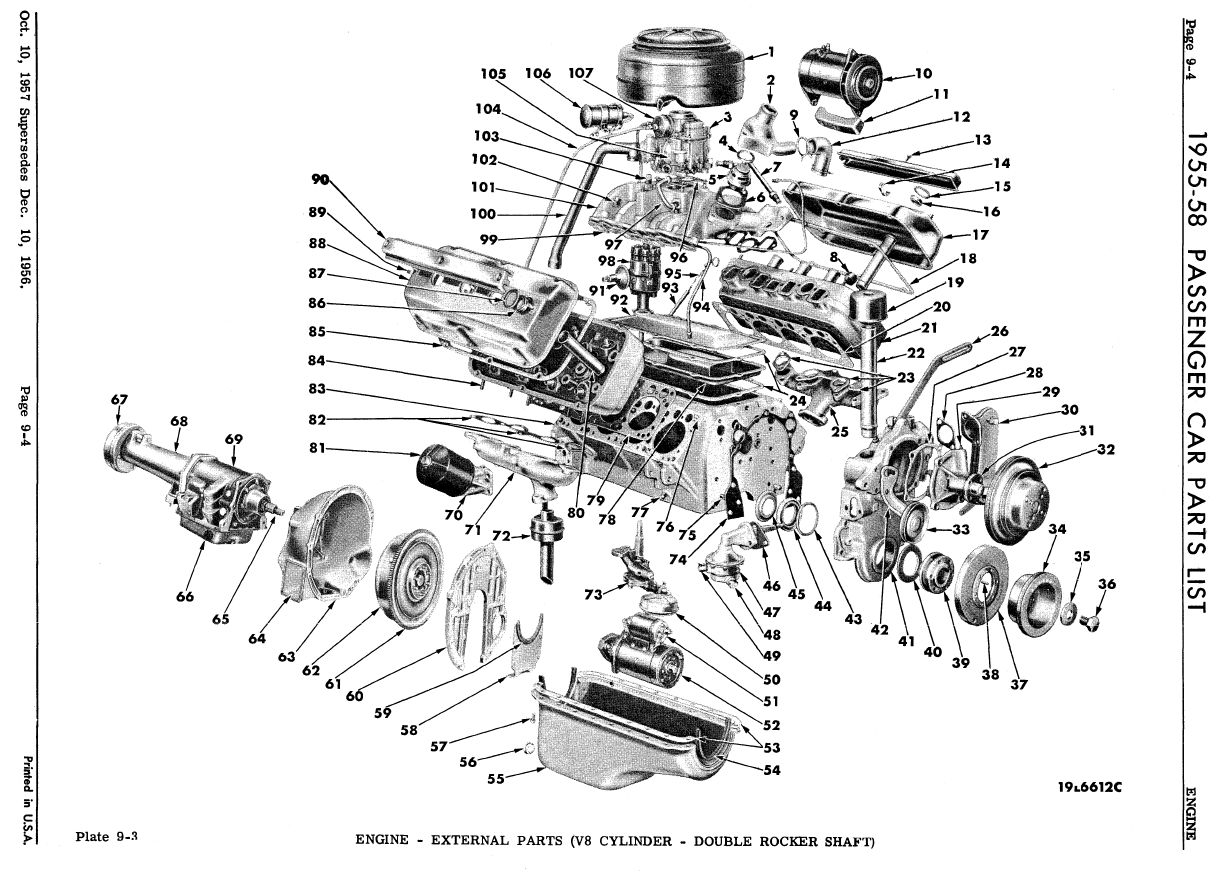 (55-57GenericHemiEnginePartsDiagram.jpg) (55-57GenericHemiEnginePartsDiagram.jpg)
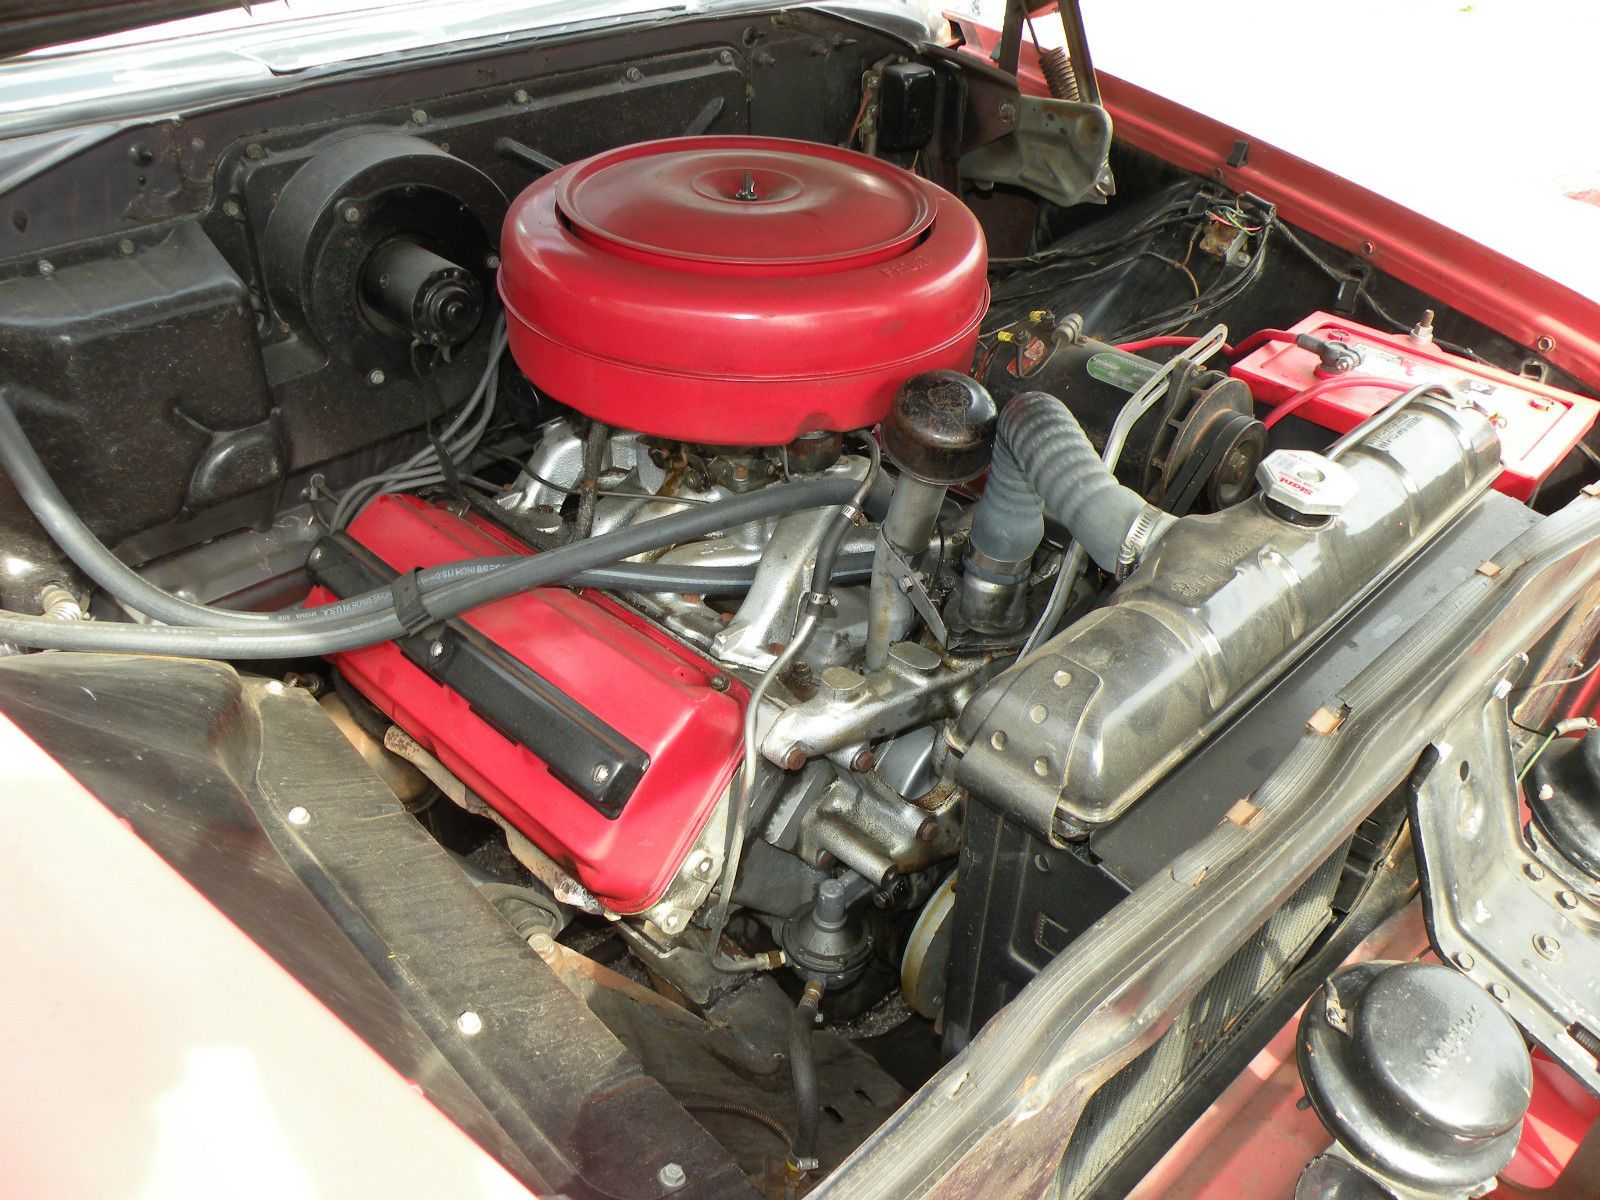 (1956DodgeCustomRoyalD500StockEngineBay.jpg) (1956DodgeCustomRoyalD500StockEngineBay.jpg)
Attachments
----------------
55-57GenericHemiEnginePartsDiagram.jpg (199KB - 601 downloads)
1956DodgeCustomRoyalD500StockEngineBay.jpg (345KB - 575 downloads)
|
|
| |
|
Expert 5K+
Posts: 9654
Location: So. Cal | The Dodge has water at the intake too. It is located at the 2 round ports between the intake ports as I have circled. I will post a picture of the inside of the cleaner when I get it apart again.
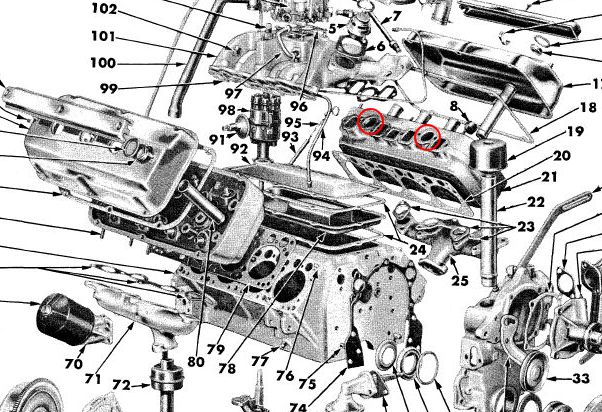 (55-57GenericHemiEnginePartsDiagram.jpg) (55-57GenericHemiEnginePartsDiagram.jpg)
Attachments
----------------
55-57GenericHemiEnginePartsDiagram.jpg (100KB - 579 downloads)
|
|
| |
|
Expert
Posts: 3033
Location: N.W. Fla. | Powerflite - 2016-03-10 10:58 PM
George, that motor is now slated to go into my '58 New Yorker so it is going back to mostly stock form... I think. Unfortunately, I can't use a stock crossover with those heads because it won't fit. But I am thinking of cutting up a stock one and lengthening it to make it work, but it isn't easy to do if you want to keep the generator mount in the right spot. But I'll give it a shot when I get time to play with it. Wasn't aware that the HH heads wouldn't take the OEM crossover. |
|
| |
|
Expert
Posts: 3033
Location: N.W. Fla. | 56D500boy - 2017-11-11 10:40 AM
Maybe this could be an option for you:
Any idea where the air cleaner decal came from? |
|
| |
|
Expert 5K+
Posts: 9900
Location: Lower Mainland BC | Mopar1 - 2018-03-14 10:35 AM
Any idea where the air cleaner decal came from?
I'm not Nathan but I know of a few places to buy those or similar decals:
https://www.classicindustries.com/shop/1965/dodge/all-models/parts/e...
https://www.ebay.com/itm/Mopar-1962-1963-Stage-I-Max-Wedge-3447-Air-...
|
|
| |
|
Expert 5K+
Posts: 9654
Location: So. Cal | Hello George, the decal came from Ebay. They have an earlier version of it too for '53-'55.
https://www.ebay.com/itm/1956-DODGE-CHRYSLER-PLYMOUTH-DESOTO-IMPERIA...
The Hot Heads won't take the OEM crossover only for the 392. For the 331 or 354, there shouldn't be an issue. |
|
| |
|

Expert 5K+
Posts: 7395
Location: northern germany | nice little bomb. have you ever measured 0-60 times? |
|
| |
|
Expert 5K+
Posts: 9654
Location: So. Cal | Thanks Sid. No, I haven't taken it to the track at all. The motor has never been rebuilt so it still has the original '55 Imperial cam, rings & 8.5:1 pistons in it. Originally it was rated at 250hp, now with the better intake, exhaust and carburetor, it might be around 270hp, but it has also been running a LONG time. Nevertheless, it will easily break the tires loose from a standstill if you nail it, so it is pretty decent, but not as impressive as other cars that were built for power. I mainly use it to tow my camping trailer around and take it on family outings. The low 1st gear of the 700R4 trans is really nice with a trailer behind you in the mountains, but the 11" disc brakes are a little small for the extra weight. I may end up converting the rear to disc and/or going to 12" rotors in the front to handle it better when fully loaded.
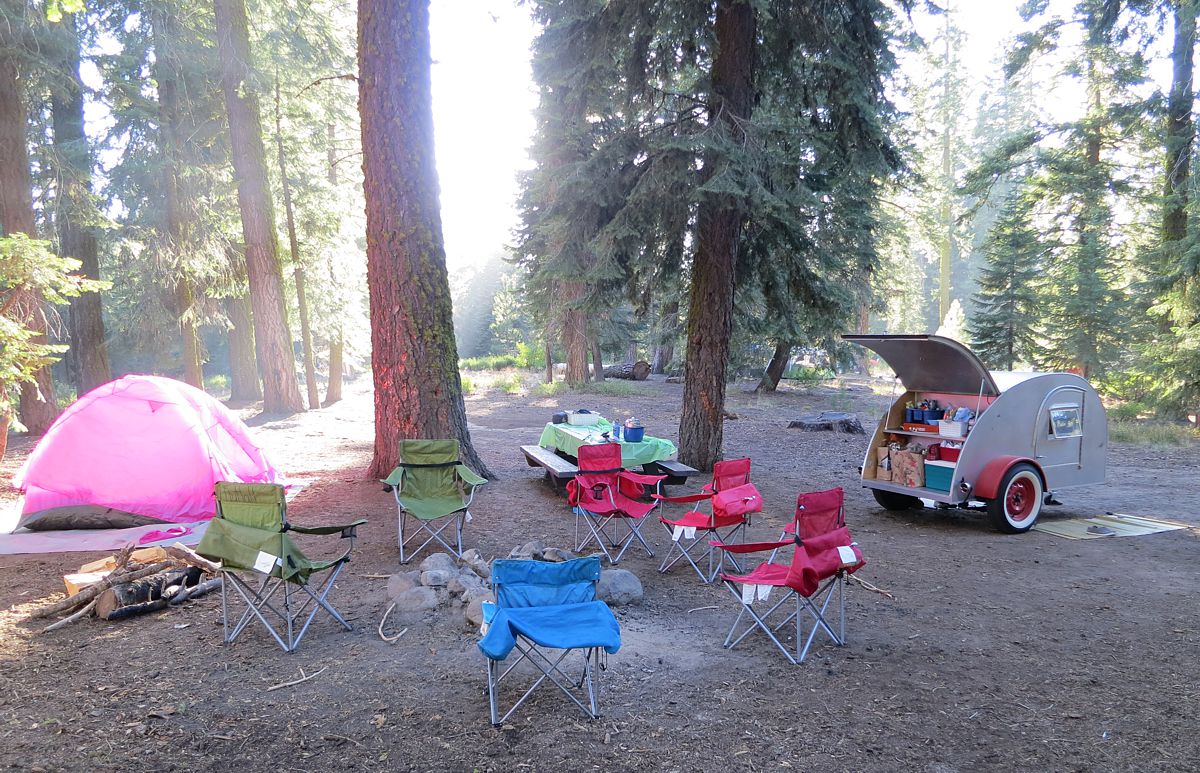 (Teardrop Camping.jpg) (Teardrop Camping.jpg)
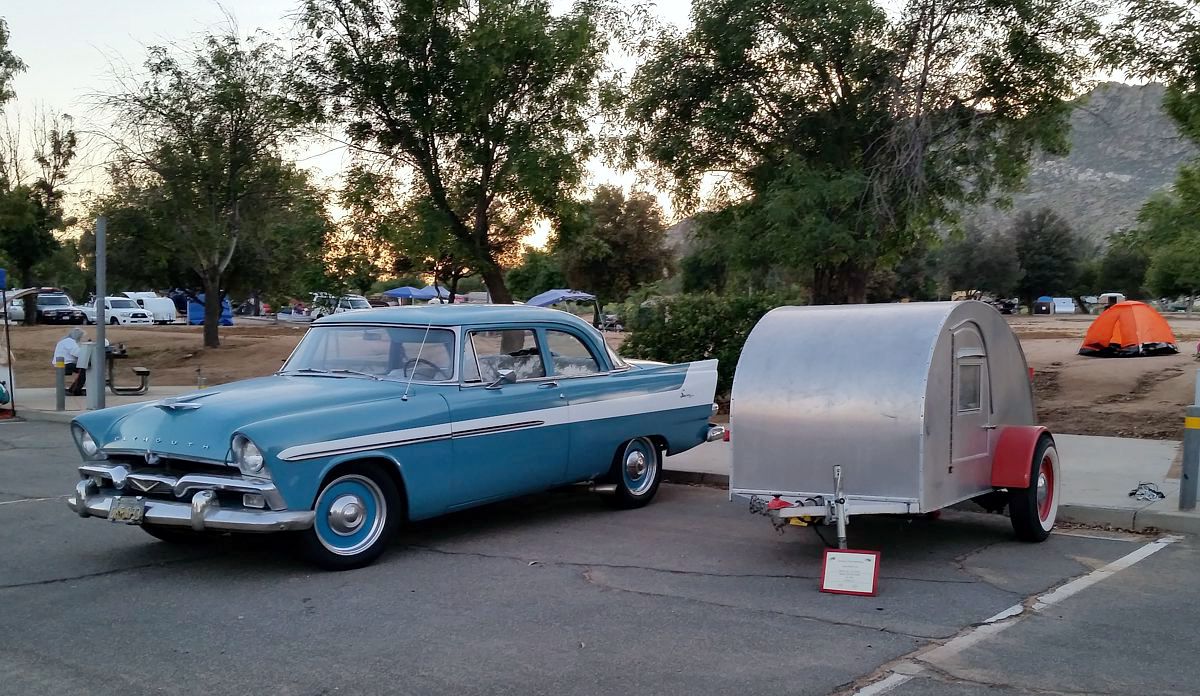 (SavoyTeardrop.jpg) (SavoyTeardrop.jpg)
Attachments
----------------
Teardrop Camping.jpg (296KB - 623 downloads)
SavoyTeardrop.jpg (240KB - 608 downloads)
|
|
| |
|
Expert
Posts: 3033
Location: N.W. Fla. | Actually referring to the "331 hemi Head" decal, obviously modeled on the 426 decal. |
|
| |
|
Expert 5K+
Posts: 9900
Location: Lower Mainland BC | Mopar1 - 2018-03-15 11:07 AM
Actually referring to the "331 hemi Head" decal, obviously modeled on the 426 decal.
I'm guessing that was a one-off, just like the one I made for my 315 D500 Hemi. I started with a 426 Hemi decal image.
Edited by 56D500boy 2018-03-15 11:38 AM
 (DaveFsD500EngineWithFaked315HemiHeadVinylSticker.jpg) (DaveFsD500EngineWithFaked315HemiHeadVinylSticker.jpg)
Attachments
----------------
DaveFsD500EngineWithFaked315HemiHeadVinylSticker.jpg (174KB - 569 downloads)
|
|
| |
|
Expert
Posts: 3033
Location: N.W. Fla. | nice! |
|
| |
|
Expert 5K+
Posts: 9654
Location: So. Cal | I took it to work and took some pictures for the new insurance. Should be much cheaper than what I currently have.
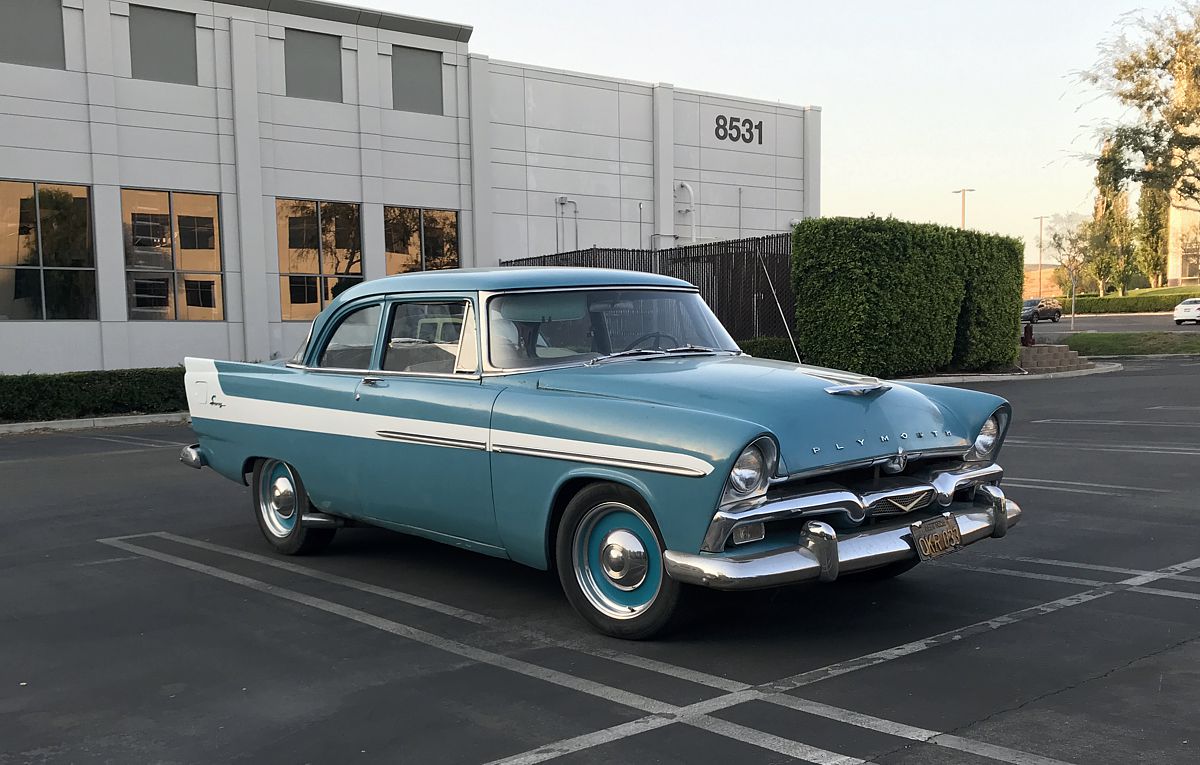 (Savoy At Work.jpg) (Savoy At Work.jpg)
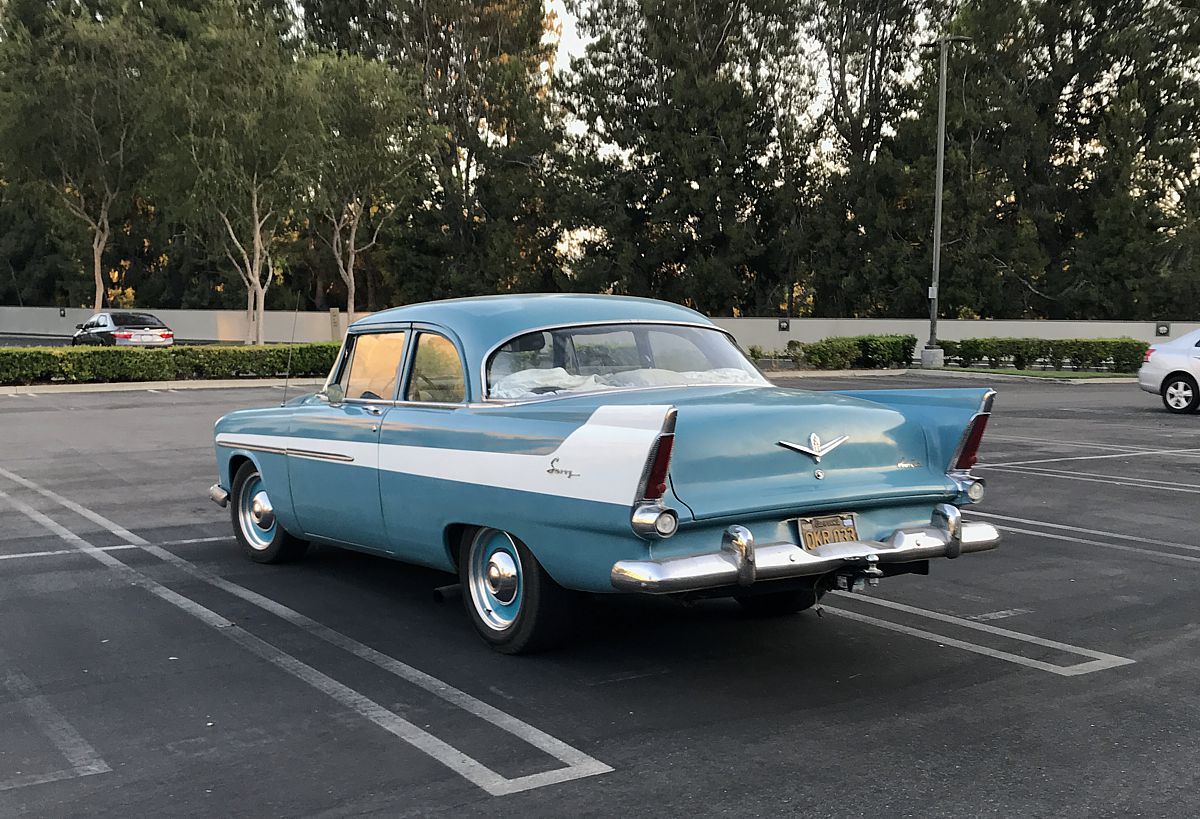 (Savoy At Work Rear.jpg) (Savoy At Work Rear.jpg)
Attachments
----------------
Savoy At Work.jpg (160KB - 564 downloads)
Savoy At Work Rear.jpg (234KB - 550 downloads)
|
|
| |
|

Expert
Posts: 3967
Location: DFW, TX | That is a great looking ride, man! |
|
| |
|
Expert 5K+
Posts: 9654
Location: So. Cal | Thanks Danny. I have made some mistakes on it along the way, but I like it and it's a fun car. It has recently developed a backfire problem while under load, so I can no longer take it camping until I get that fixed. But it cruises fine still. I am going to try changing the timing chain to see if that fixes it. This motor has never been touched since new. It still had the original spark plug wires on it until a month ago so it's probable that the chain may be loose now. |
|
| |
|
Expert 5K+
Posts: 7395
Location: northern germany | Great car and a good example that aluminum rims don't have to be tasteless on a 50s car. |
|
| |
|
Expert 5K+
Posts: 9654
Location: So. Cal | Thanks Sid, I agree. I wish I had picked 16" instead of 17", but too expensive to change my mind now, so they are staying as-is.
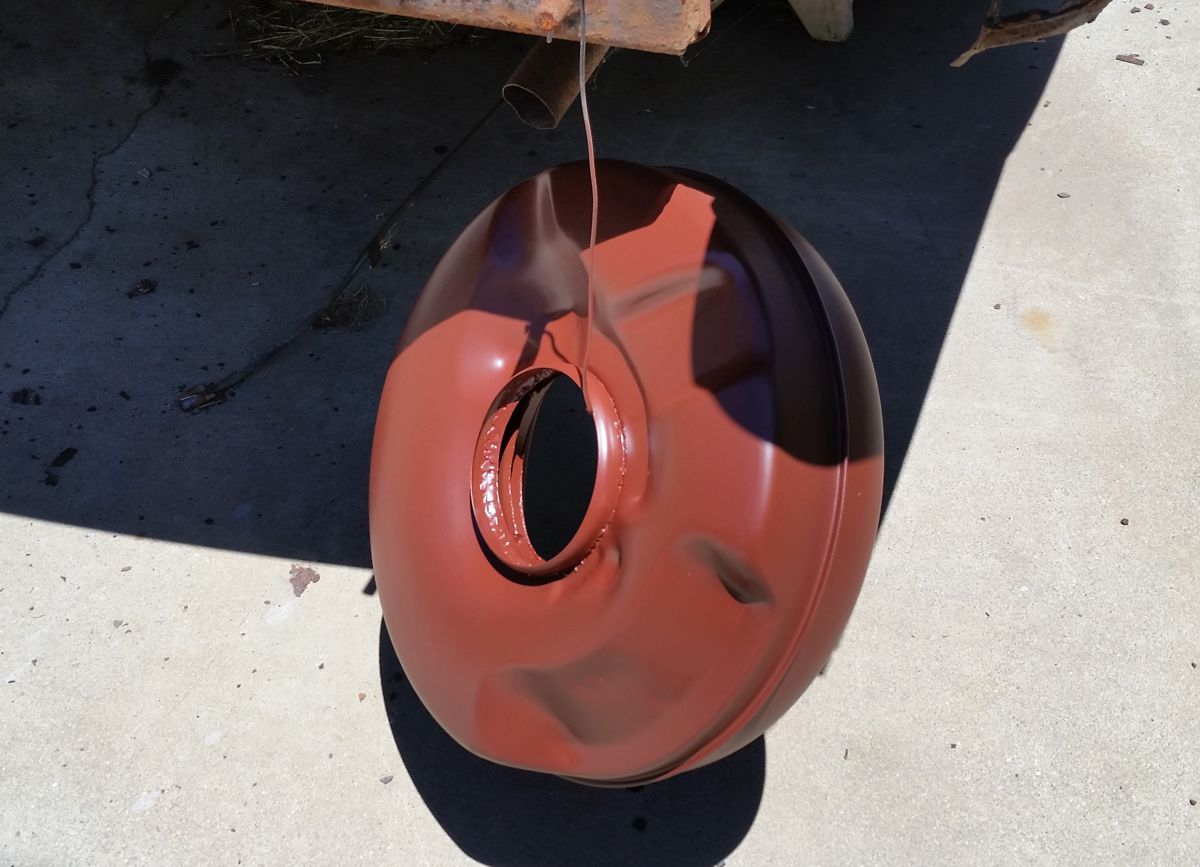
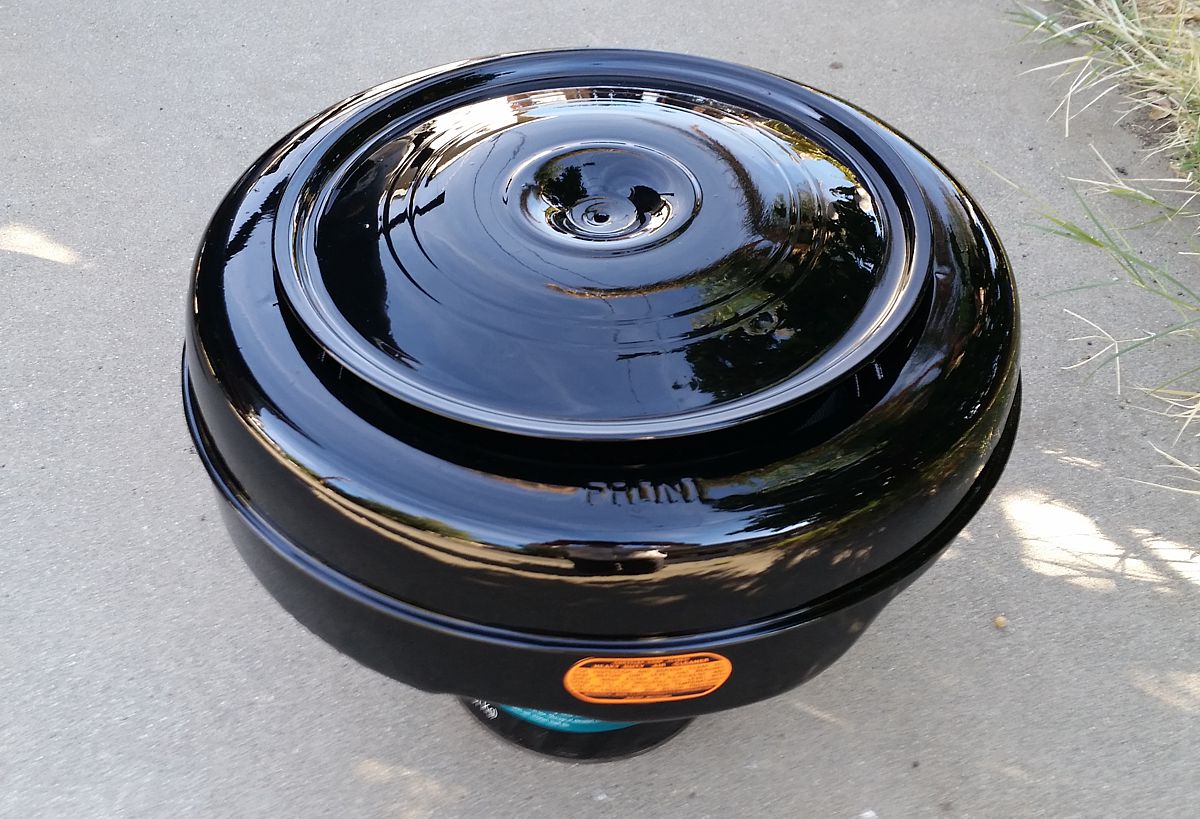
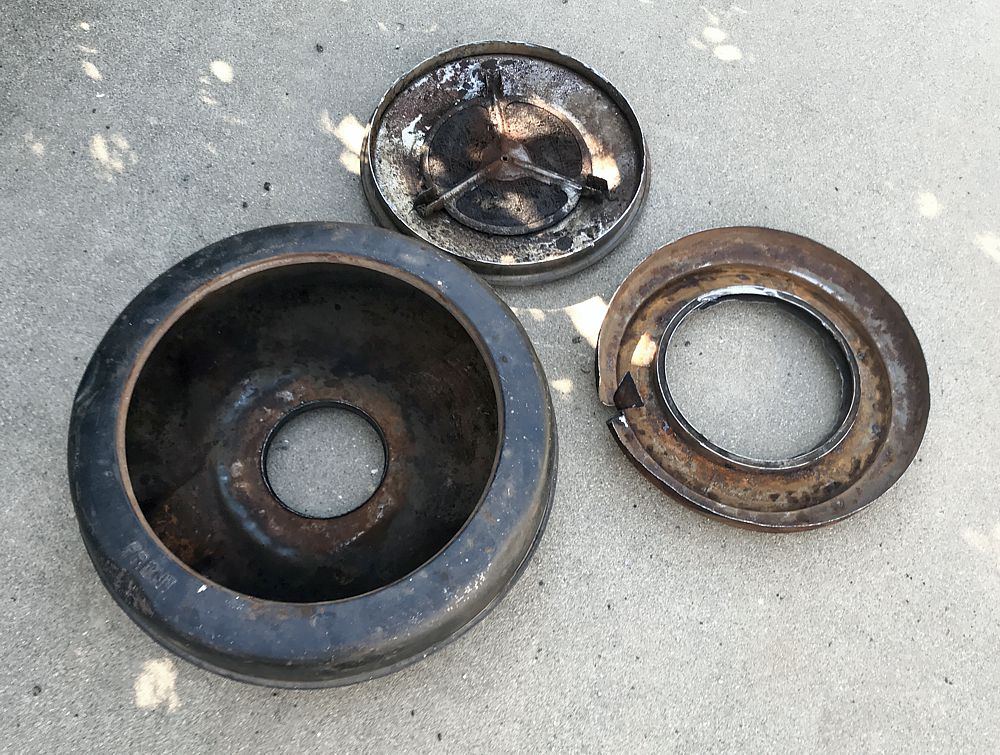
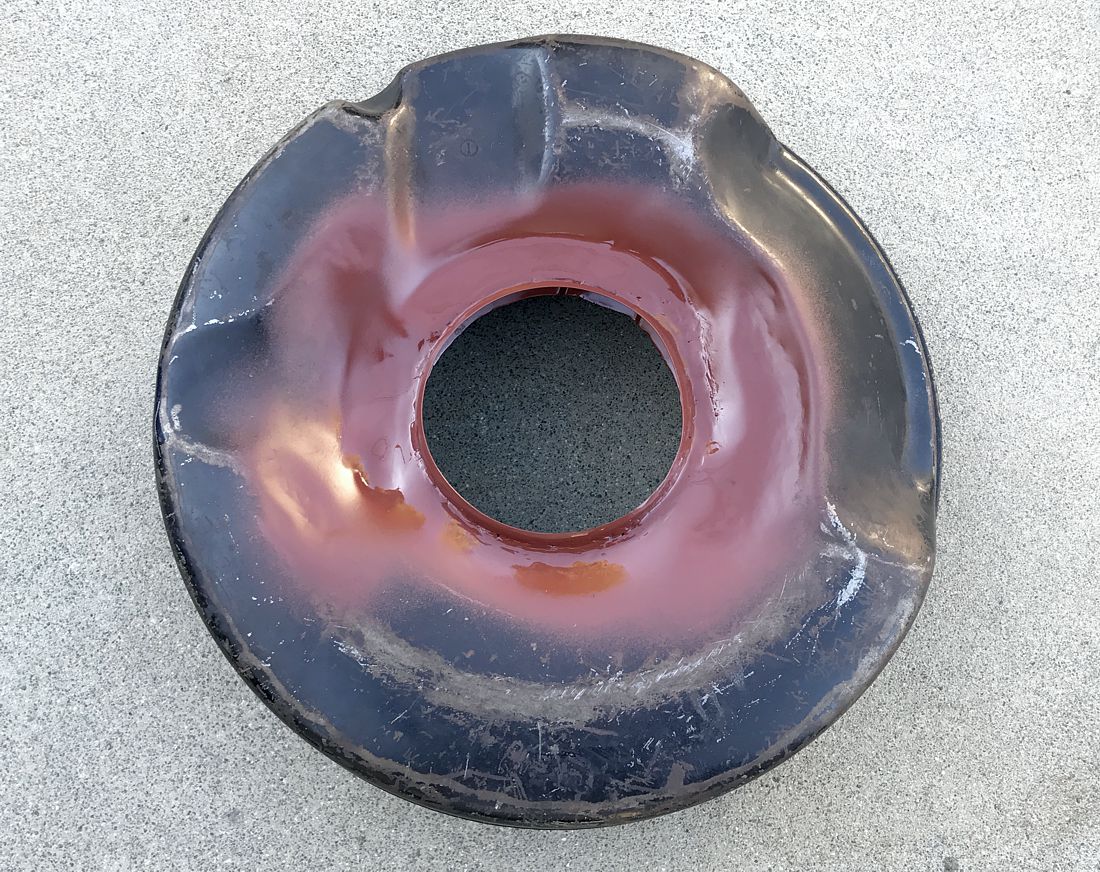
Someone decided that they needed my air cleaner more than I did and stole it from me. Of all the things to steal. What are they going to do with it? I seriously doubt they have a '55-'56 Chrysler product to put it on....but whatever. So now I am making another one. I have a temporary air cleaner on it in the mean time.
This one is heavily dented around the upper edge of it. That's unacceptable because they are usually pretty impossible to fix. However, I cut out the inside of it along the top inner lip and it detached the whole inner structure. I removed the top section of it and notched it at the bottom to be able to remove it from the can. Now I can get inside the outer can, all around to repair the dents. It also allows me to clean up the inner structure to make it look better and allows for better air flow around the filters - especially at the top entrance near the lid. But I will need to create lower mounts to support the tray to the bottom of the can now, and weld them into place. I will also make a flat section to mount to the bottom ring to provide a flat surface for the air filters to sit on instead of the thinner, slanted section that they would have otherwise. I will also try to reduce the carburetor mounting ring extension so the cleaner sits lower than my old one. That was the one thing that bothered me about the way I set up the old one, so this gives me a chance to fix that.
 (Oil Bath Cut Out.jpg) (Oil Bath Cut Out.jpg)
Attachments
----------------
Oil Bath Cut Out.jpg (205KB - 594 downloads)
|
|
| |
|
Expert 5K+
Posts: 9900
Location: Lower Mainland BC |
Sorry to hear about the theft Nathan.:( You had done a great job on that air cleaner. Much nicer than my oil to paper conversion or my "Ram Air" versions.
Think of it this way, you have the opportunity to make this next one even better.
Yours:

Mine
Oil to paper:
"Ram Air":
Edited by 56D500boy 2018-09-15 2:11 PM
|
|
| |
|
Expert 5K+
Posts: 9654
Location: So. Cal | I ended up purchasing another air cleaner from the Turlock swap meet in much better shape than the other one, so I decided to use that one instead. I cut it out and welded in the larger carb mount. This time I welded it in about 3/8" lower than before to make it sit lower on the carb. I had to clearance the bottom of the air cleaner in 3 places as a result, but it wasn't bad. I decided not to paint it yet because it doesn't look terrible as it is. I like how it sits on there now, so I'm happy with it.
 (AirCleaner 2.0.jpg) (AirCleaner 2.0.jpg)
 (56 Chrysler Air Cleaner Lower.jpg) (56 Chrysler Air Cleaner Lower.jpg)
Attachments
----------------
AirCleaner 2.0.jpg (272KB - 505 downloads)
56 Chrysler Air Cleaner Lower.jpg (214KB - 529 downloads)
|
|
| |
|
Expert 5K+
Posts: 9654
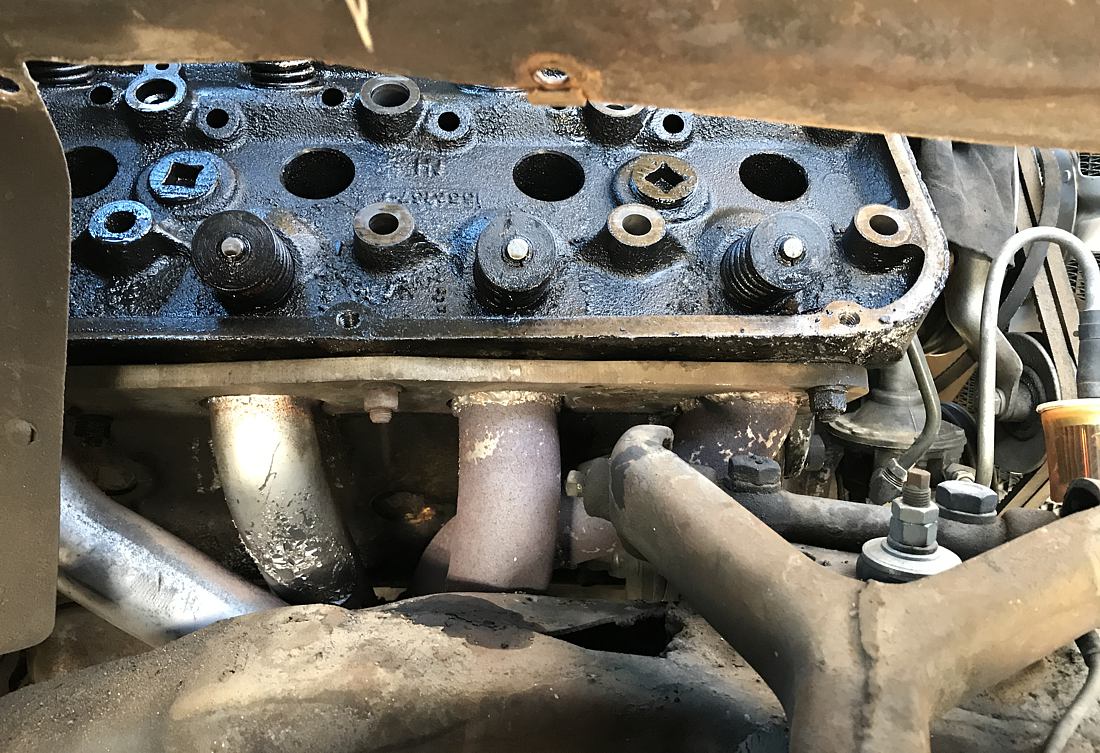
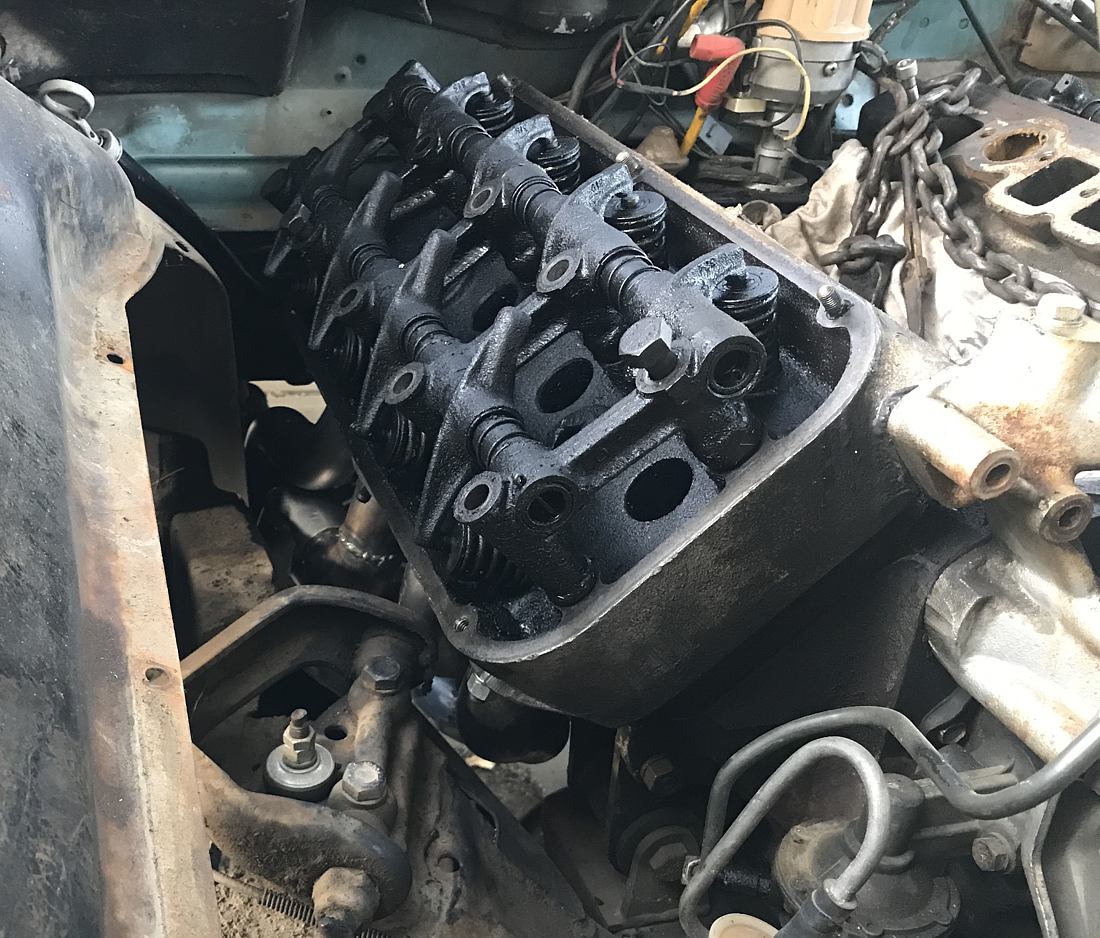
Location: So. Cal | The motor has been losing power any time it is under load, and then will backfire if you try to push it as well. I have determined that the problem has nothing to do with the ignition or the fuel so it is either a problem with the valves, cam, lifters or timing chain. It has been getting worse and makes it impossible to pull a loaded trailer with the car, which is my primary use for it. So I am tearing it down for a refreshing and will rebuild the top end & replace the cam.
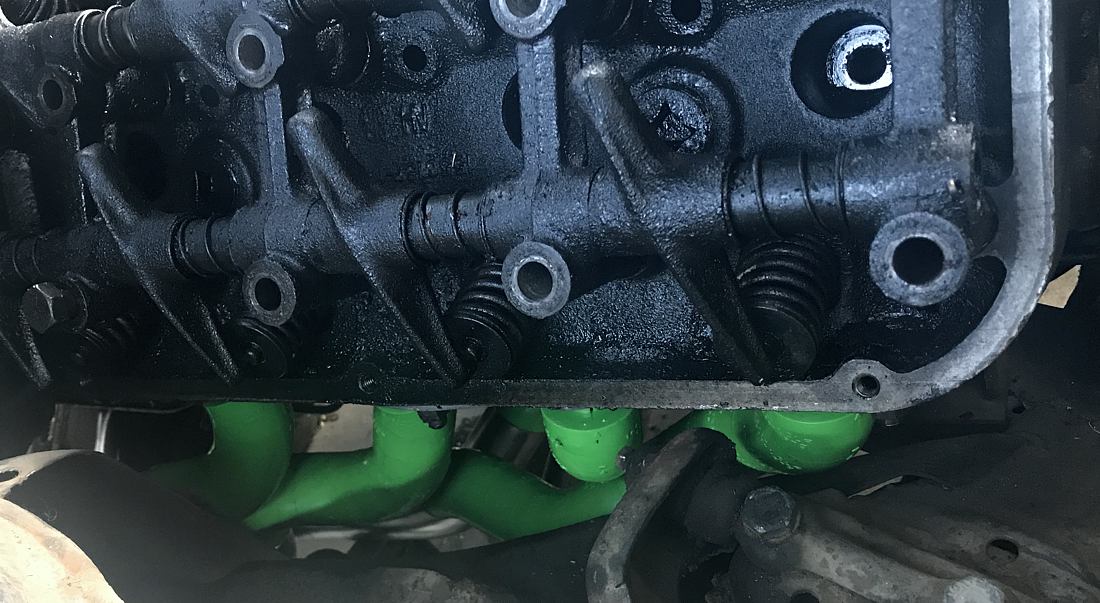
When I pulled the valve covers, I was surprised to see that none of the valves were depressed very much. I can also turn the valve springs by hand and they don't seem to be putting much pressure on the valves. What would cause the valves not to be depressed like that? I pulled the lifters and there was a good amount of wear on them, but no gouging or other major issues. Maybe the lifters were leaking down really fast? Or maybe the wear had reduced the lift to a point that it wasn't opening very far? Could any of that cause backfiring under load?
I put up an easy-up to make ti bearable to work out in 105 degree weather without dying. I had to lift the head with an engine puller too because I don't trust my back to survive such an endeavor. Hemi heads are not to be trifled with.
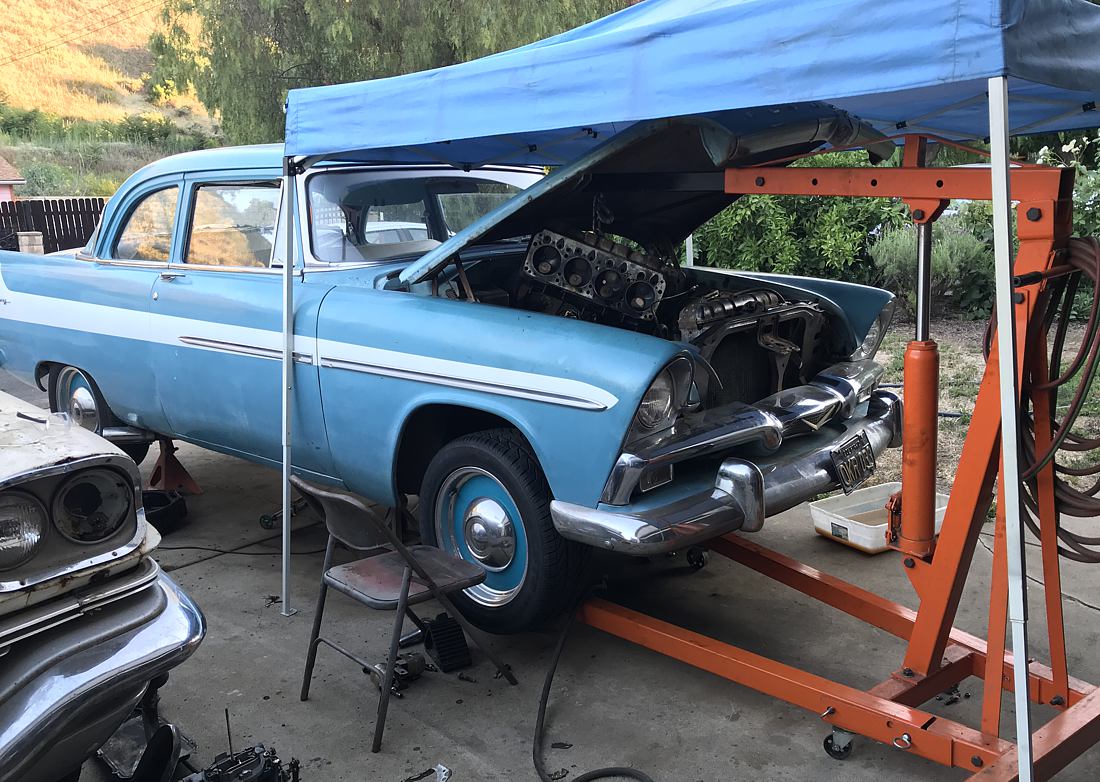 (56Plym Hemi Head Pull.jpg) (56Plym Hemi Head Pull.jpg)
Attachments
----------------
56Plym Hemi Head Pull.jpg (192KB - 520 downloads)
|
|
| |
|
Expert 5K+
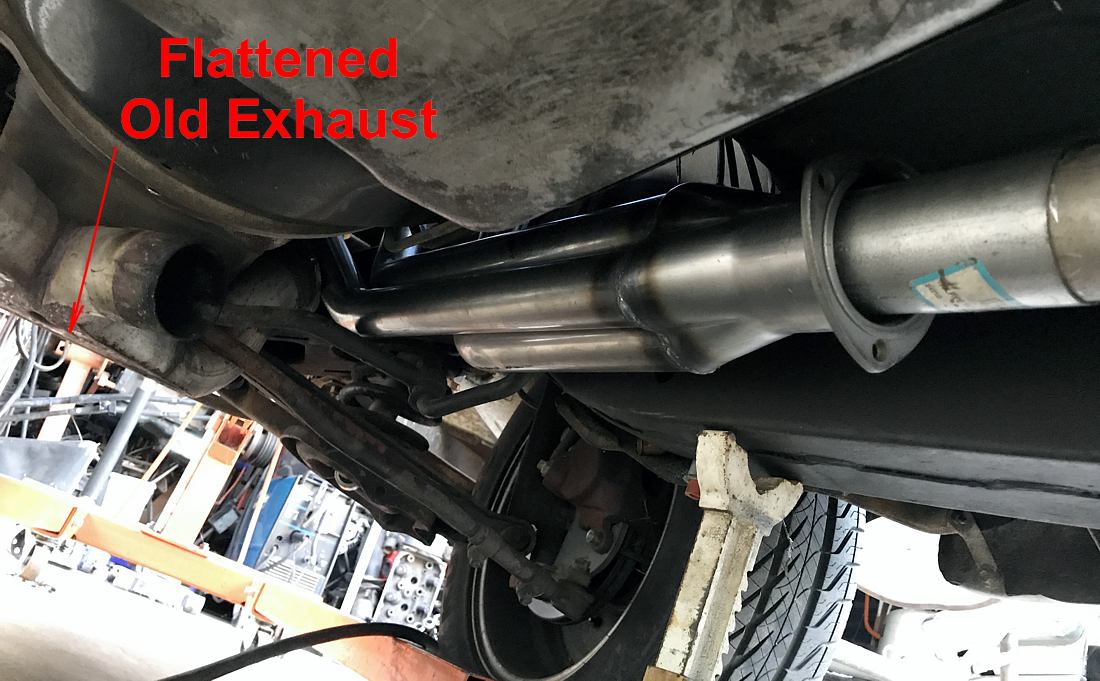
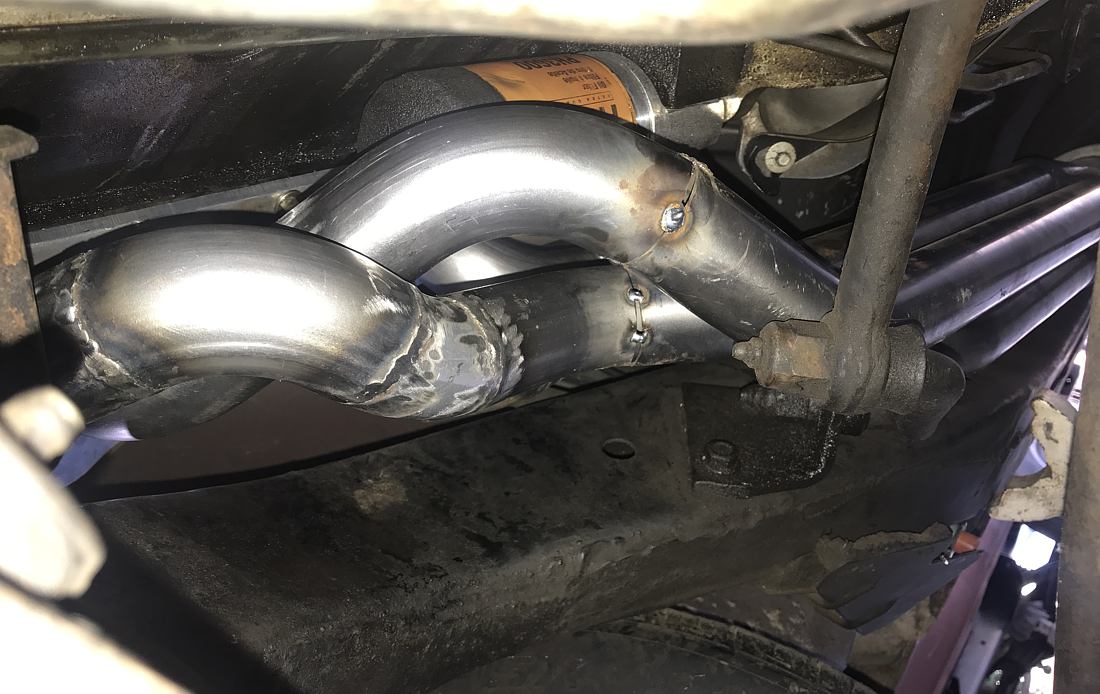
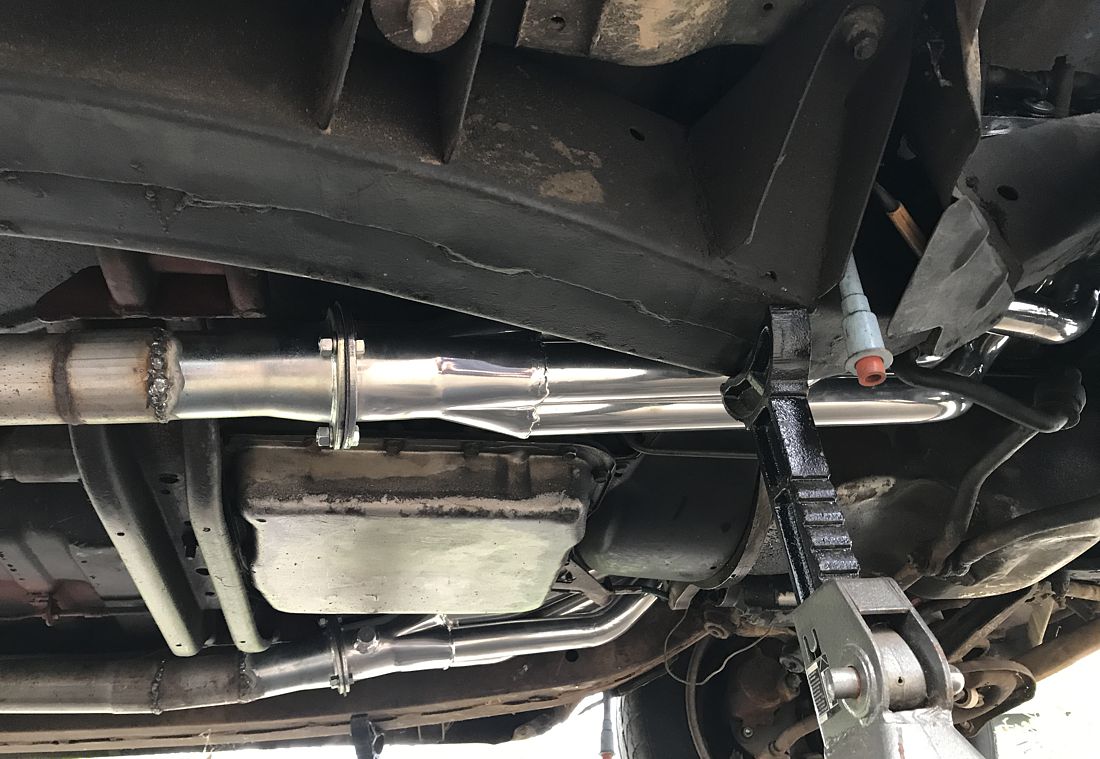
Posts: 9654
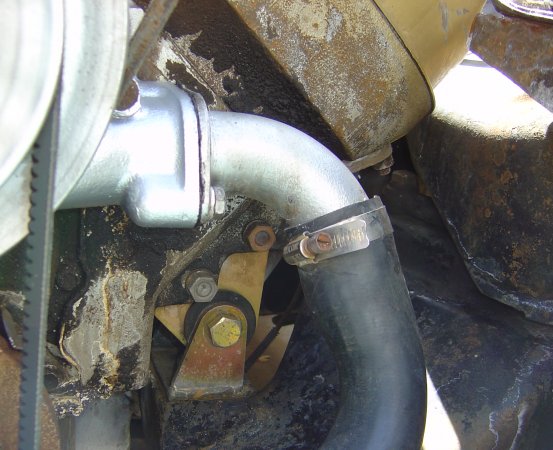
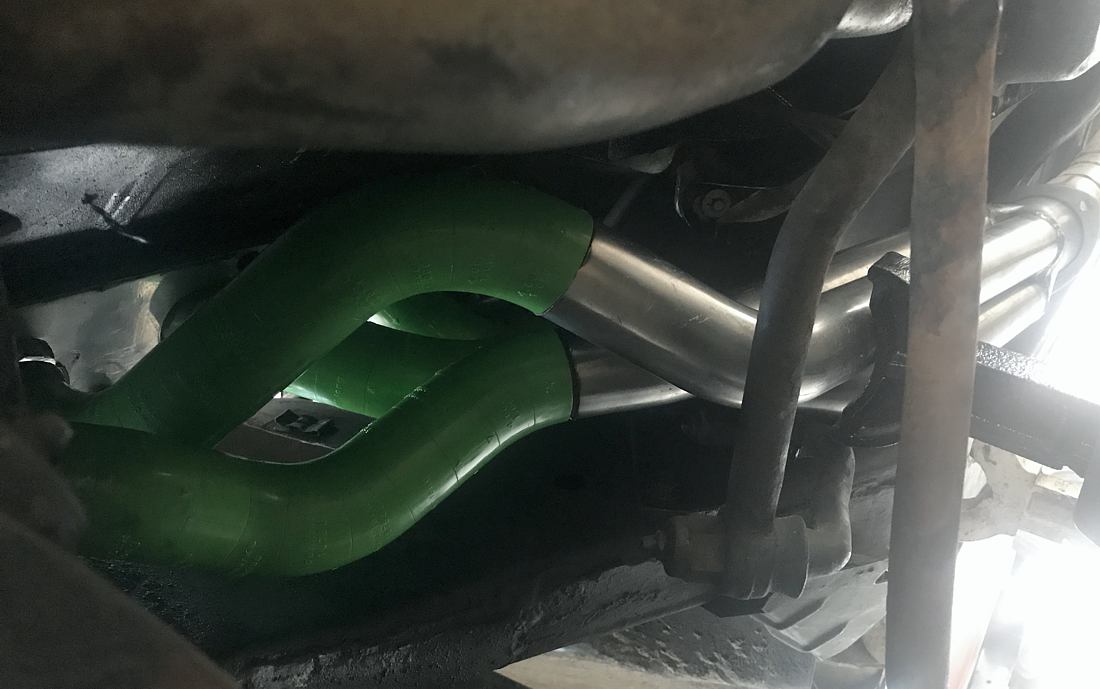
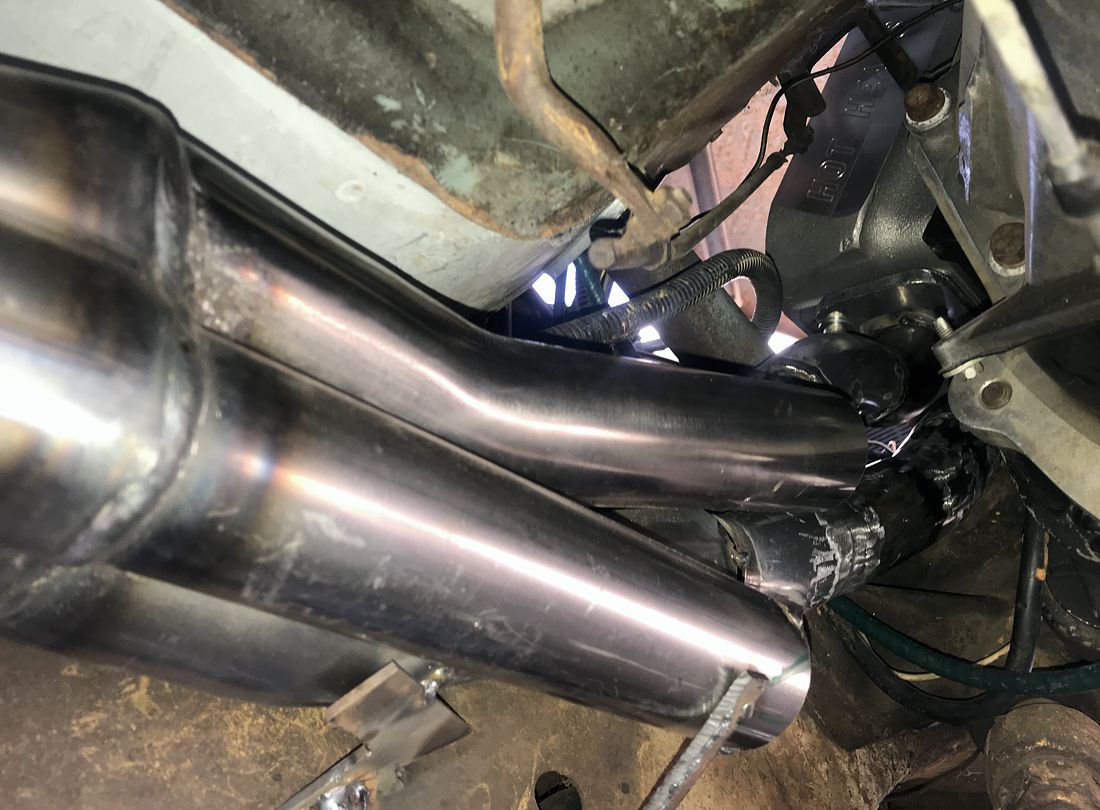
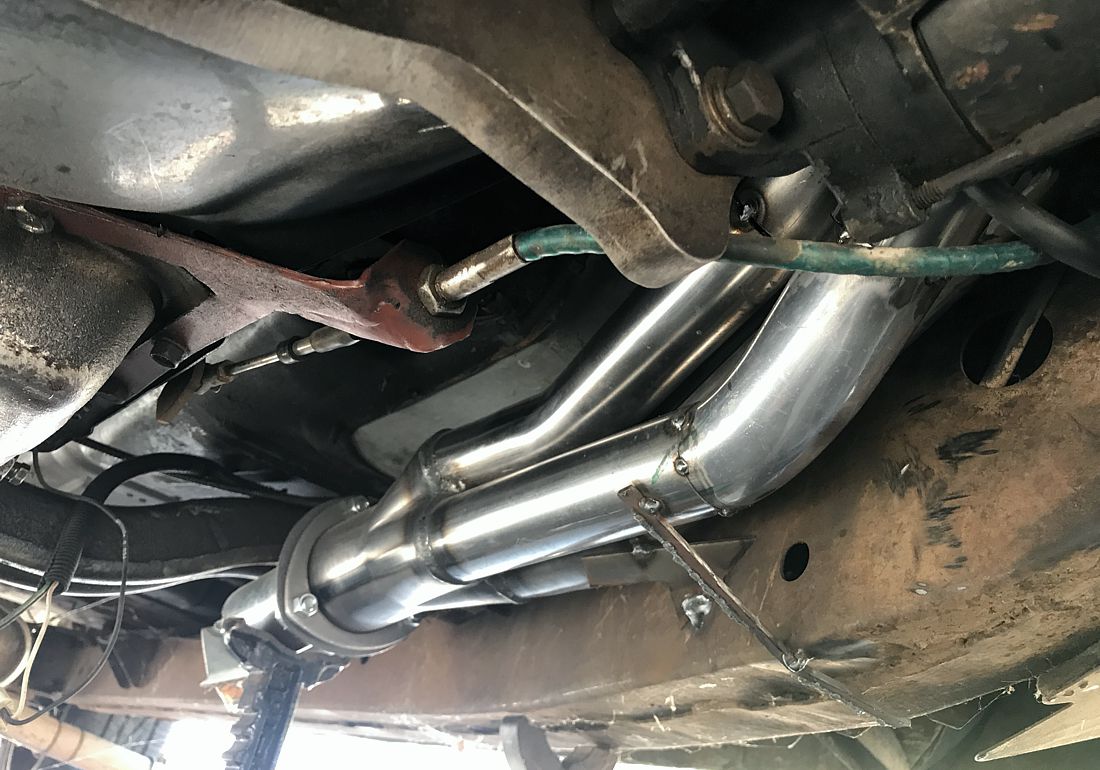
Location: So. Cal | For future reference, this is how I had re-arranged the pipes on the header to make this motor fit well in this car. The upper control arm fits between the two front exhaust pipes so that you can get the motor to sit down low in the engine bay as it should. This is why stock exhaust manifolds don't work well here. Custom pipes are pretty much the only way to go without raising the motor enough to clear the upper control arms. However, this Chinese shorty header dumps straight down as they all do. This requires that you route the exhaust under the steering linkage, giving you something to hit on speed bumps or any time the car bounces when loaded down. Over the course of time, I have flattened mine out pretty good.
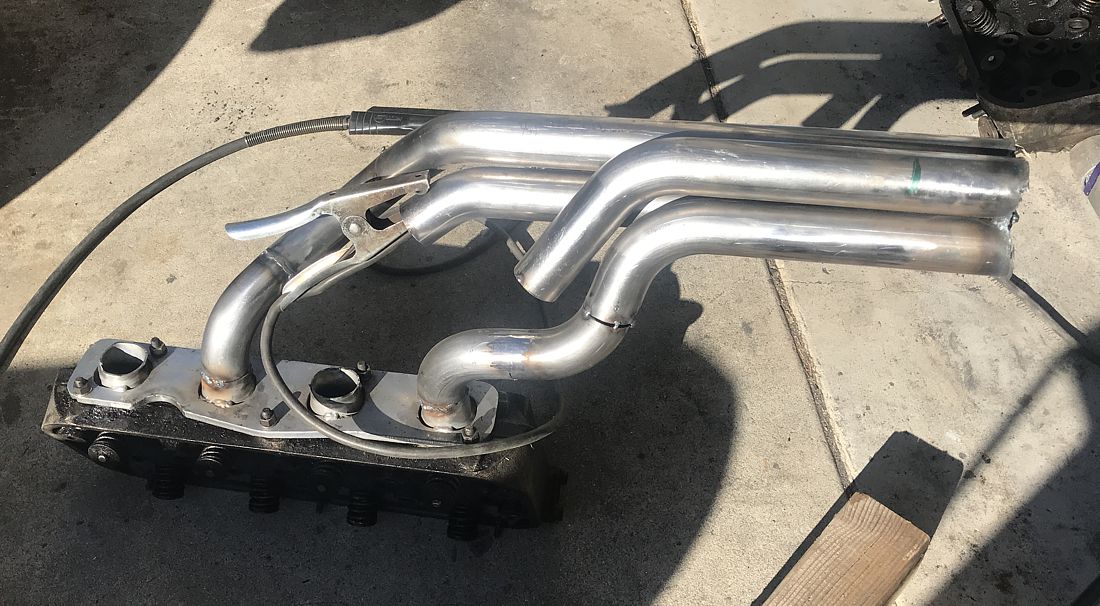
So while I am tearing the top end of the motor apart, I am going to build a custom set of long headers, starting from ones made by Patriot Exhaust for a big block in a '57 Chevy. The collector fits along the right side pretty nicely.
 (56Plym Shorty Heaader Config Side.jpg) (56Plym Shorty Heaader Config Side.jpg)
 (56Plym Shorty Heaader Config Front.jpg) (56Plym Shorty Heaader Config Front.jpg)
 (56Plym Hemi-Chevy Collector.jpg) (56Plym Hemi-Chevy Collector.jpg)
Attachments
----------------
56Plym Shorty Heaader Config Side.jpg (211KB - 507 downloads)
56Plym Shorty Heaader Config Front.jpg (123KB - 505 downloads)
56Plym Hemi-Chevy Collector.jpg (135KB - 488 downloads)
|
|
| |
|
Expert 5K+
Posts: 9654
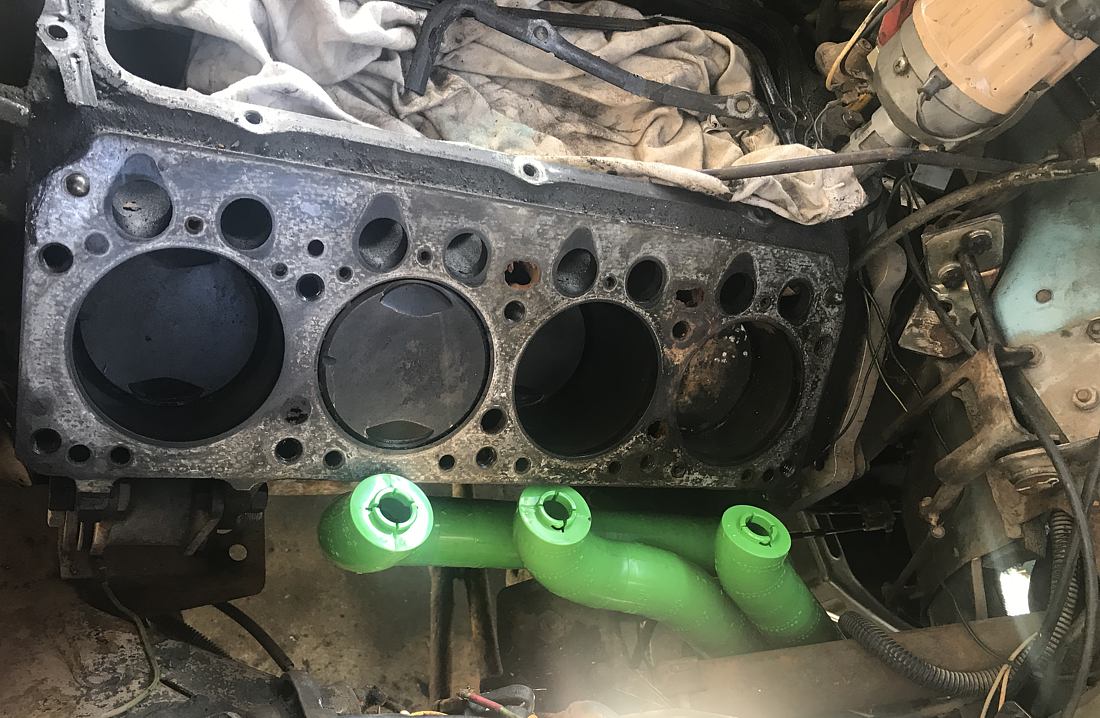
Location: So. Cal | These '57 Chevy headers are a nice starting point because the bodies are similarly shaped and it uses 1 7/8" tubes with equal spaced ports like the old hemi does. It also uses thick 16 gauge tubes so they shouldn't be obnoxiously loud when finished. They might fit between the idler arm and the trans if I keep the forward ports lined up, but I am thinking I might shorten the rear-most pipes to turn upward before the idler arm (or lengthen the front ones?). This would give it a lot more room around the idler arm. Looks like the best oil filter with this setup would be one that points forward, not downward as I currently have it.
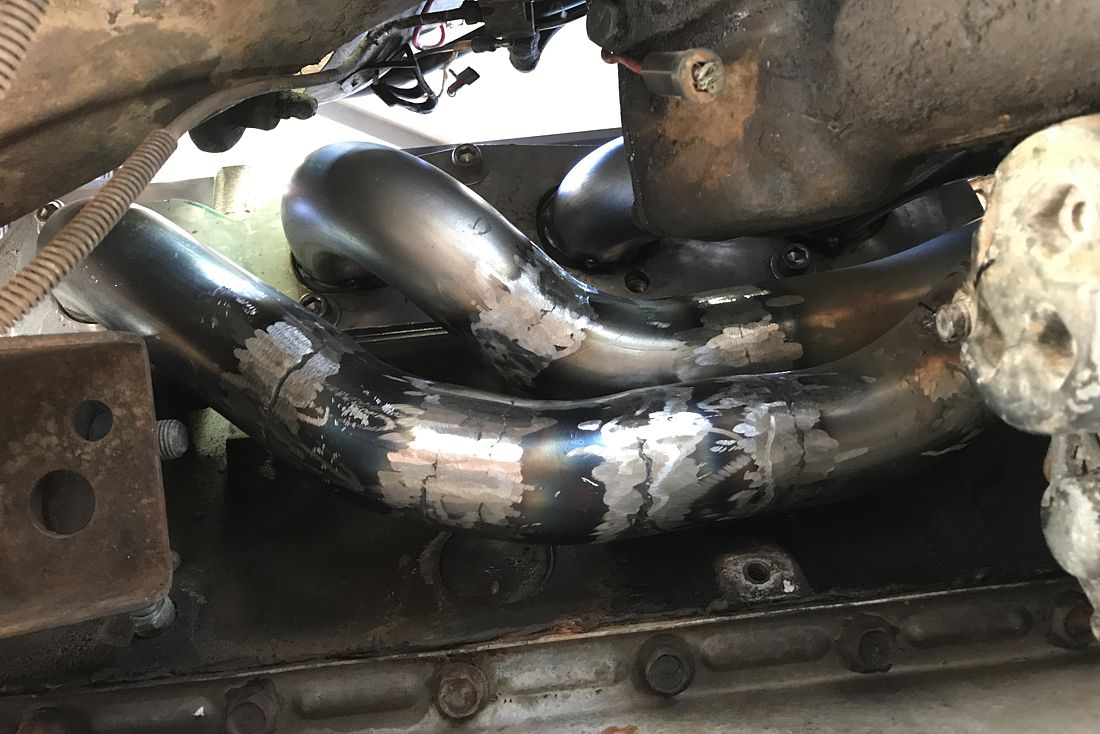
I wasn't able to remove my old headers without removing the head first. There just isn't a lot of room to get to those inner nuts while it's on the motor. I am a little worried about the assembly sequence for these long headers because I wouldn't be able to assemble them off the car first; they are just too big for that. So I'll have to make sure I can access all the mounting nuts somehow ahead of time. These cylinders have surprisingly little wear to them. I was expecting much worse! The front piston is at TDC, so this is what 8.5:1 compression pistons look like for a 331. I am thinking of milling the heads to gain a compression point if I can get away with that.
 (56Plym Hemi-Chevy Header.jpg) (56Plym Hemi-Chevy Header.jpg)
Attachments
----------------
56Plym Hemi-Chevy Header.jpg (175KB - 490 downloads)
|
|
| |
|
Expert
Posts: 1740
Location: Alaska | I have seen broken valve springs cause a backfire under load, I suppose if they are very weak it might act the same. |
|
| |
|
Veteran
Posts: 296
Location: South Central PA | How about a Hemi powered 55 Wagon.
 (Picture 350.jpg) (Picture 350.jpg)
 (Picture 354.jpg) (Picture 354.jpg)
 (Picture 351.jpg) (Picture 351.jpg)
Attachments
----------------
Picture 350.jpg (174KB - 480 downloads)
Picture 354.jpg (179KB - 481 downloads)
Picture 351.jpg (147KB - 475 downloads)
|
|
| |
|
Expert
Posts: 3033
Location: N.W. Fla. | Powerflite - 2019-07-14 2:54 AM
I am thinking of milling the heads to gain a compression point if I can get away with that. Milling effects the valve geometry. I wouldn't mill unless there's a really good reason for it. Live with the 8.5 until it needs a rebuild & then get the higher C/R pistons. |
|
| |
|
Expert 5K+
Posts: 9654
Location: So. Cal | Thanks a lot for the input, Rolland. This thing has me a little baffled so I am looking for answers. The timing chain seems to me to be the most plausible cause, but checking the slack at the distributor by rotating the motor back and forth, it doesn't seem bad enough to cause what I am experiencing.
George, I knew that milling would affect the intake fit, so you can only go so far before you run into trouble, but I would expect that adjustable push rods should take care of the valve timing. Nevertheless, I am a little worried about valve clearances to the pistons if I start milling because even on a flat top piston, the valves can get pretty close to it with the hemi valve angle.
That '55 wagon looks really nice Bill and I am sure it has more than enough power, but I prefer to use a first gen hemi in these cars. Even though my car is obviously not stock, I try to keep most of it *looking* like it could have been built back in the '50's. I haven't always felt this way about the car so my wheels deviate from that goal a little bit, but I find I like it better that way. I would be more tempted to drop a 426 hemi into my '70 Satellite wagon where it would look more at home. |
|
| |
|
Expert 5K+
Posts: 9654
Location: So. Cal | I got to play with my expensive legos today to design the new headers for the right side. I have them mounted in the collector pipes because the head flange is too un-circular to make the connectors work. The 2 rear pipes are currently too close to each other so I need to cut the forward one down and re-adjust the pipes afterward. I am planning to use the legos to get the parts cut and matched to the design, but then check & mark them first under the car before welding it together. I'll start at the back cylinder and move forward as I go. I thought I had a forward facing oil filter to check the fit, but after digging through my stuff, I apparently don't so I'll have to get one soon. I also need to check the idler arm movement before I get too far...
 (Right Header Design Bottom.jpg) (Right Header Design Bottom.jpg)
 (Right Header Design Top.jpg) (Right Header Design Top.jpg)
Attachments
----------------
Right Header Design Bottom.jpg (79KB - 461 downloads)
Right Header Design Top.jpg (135KB - 465 downloads)
|
|
| |
|
Expert 5K+
Posts: 9654
Location: So. Cal | I haven't had a lot of motivation to work on this project, probably because of the heat; but I made some progress on it yesterday and got the 2 rear-most pipes tacked down into place. Two down, six to go. Because the design is done, the front two shouldn't take too long, but the trick is to be able to install it without removing the head or lifting the motor first. I think I can achieve that on the right side, but the left is going to be more difficult. Looks like I will be able to use the Chevy & hemi pipes that I cut up and only 2 J-bends for the right side. Maybe only 4 J-bends for the whole set of headers.
 (56Plym Right Header 2Rear.jpg) (56Plym Right Header 2Rear.jpg)
Attachments
----------------
56Plym Right Header 2Rear.jpg (118KB - 457 downloads)
|
|
| |
|
Expert 5K+
Posts: 9900
Location: Lower Mainland BC | Are you using this? What clever person that was who came up with that.
https://www.trick-tools.com/Icengineworks-1-7-8-inch-Pro-Header-Mode...
 |
|
| |
|
Expert 5K+
Posts: 9654
Location: So. Cal | Yes, but they are too expensive for what they are. I paid $650 for a glorified set of legos. I got the same set as shown in your link but found an older, cheaper price. Can you believe that the price actually went up on these??? Also, it's nice to have a large selection of bends, but if you are piecing it together from J-bends like most home people, there are usually only 1 or 2 radii available to purchase so all those others are just wasted money and garage space. But they have priced it so that buying them in individual packages doesn't save you any money. They do help a whole lot with the design phase of a header build though.
Edited by Powerflite 2019-09-03 7:36 PM
|
|
| |
|
Expert 5K+
Posts: 9654
Location: So. Cal | I finished tack welding in the front 2 pipes. The front one was a little more difficult because It had a tendency to want to interfere with the second pipe, but I got it to work well by making a couple of small adjustments. I tried out the forward facing oil filter too, and I can get it on and off, so that's a bonus. The idler arm in the picture is turned to it's worst case position to ensure it doesn't hit the header. Next, I will try to remove the header without moving the head to see if it is possible or what is required to install it. I suspect that I will need to replace the front 2 studs with bolts to make install easier, but I don't really want to do that. In any case these should be a lot easier to install than the shorties that I had on there. Dumping all the pipes inwards makes it impossible to get to the inner bolts without pulling the motor or the head. I really like how this header turned out. It should be a nice improvement from the previous setup. I am thinking I should pay to have the headers coated after I get them done to help them last longer, although I made them out of 16 gauge so they aren't as likely to rust out as cheap headers. I also removed the left side shorty (by pulling the head off with an engine hoist) to start the prep for making a design on that side.
Edited by Powerflite 2019-09-08 10:48 AM
 (56Savoy RtHeader Tacked.jpg) (56Savoy RtHeader Tacked.jpg)
 (56Savoy RtHeader Top.jpg) (56Savoy RtHeader Top.jpg)
Attachments
----------------
56Savoy RtHeader Tacked.jpg (122KB - 464 downloads)
56Savoy RtHeader Top.jpg (203KB - 474 downloads)
|
|
| |
|
Expert
Posts: 3033
Location: N.W. Fla. | Powerflite - 2019-07-14 5:09 PM
George, I knew that milling would affect the intake fit, so you can only go so far before you run into trouble,
. The intake can be milled to fit. It's better to leave the C/R alone or adjust with pistons of higher C/R. |
|
| |
|
Expert 5K+
Posts: 9654
Location: So. Cal | Thanks, George, but I am going to leave the bottom end alone because if I have to touch it at all, I am just going to build a 354 and drop it into there. This is a last ditch effort to get this motor to run as well as possible. If I don't like it, it will be pulled & set aside for something else eventually.
The left side exhaust is much more challenging to design well. There isn't any hope to be able to install it without lifting the motor first either so it is much more painful than the right side. The Chevy header that I started with wasn't nearly as ideal of a starting point on the left side either. I had it cut it back almost to the collector, and still, it looks like I will have to place the collector at a small angle instead of horizontal. After it's done, I need to be able to remove the starter as well and hope that it doesn't get heat soaked. Just difficult all around.
 (56Ply Left Header Design.jpg) (56Ply Left Header Design.jpg)
Attachments
----------------
56Ply Left Header Design.jpg (163KB - 455 downloads)
|
|
| |
|
Expert 5K+
Posts: 9654
Location: So. Cal | I've had a lot of trial and error with this header design. It is so tight all over, that each pipe is co-dependent on the design of the others next to it. I used an aluminum head to mock it up so that I didn't have to use the engine puller to lift it out every time I needed to. I had to tack weld my best design of the major part of the front-most pipe to the header in order to make the other lego pipes above it stable enough to design properly, because their weight was causing everything to move around. Also, that pipe comes the closest to the starter so it was more critical and determined where everything else needed to end up. I congratulated myself for giving quite a bit of room around the starter, but that didn't end up being the hard part. The hard part is the 2 rear-most pipes like to share the same space with the steering box. I had to cut the stub at the flange for those as short as I could make them, and this helped a lot, but didn't fix the problem. I was able to barely make it work by bending the rear pipe upward first so that it had more room at the end near the port. But everything is so close around there that I am sure the steering box is going to create its own clearance once the motor vibrates on its mounts. A power steering box doesn't have a chance to work here. Afterward, I had to remove a good portion of the front pipe I had welded, because the pipe next to it needed to bend downward first to be able to enter the port at a better angle. And I'm still not certain I can get this thing in and out without pulling the motor first - even with the head off. The starter definitely has to come off, we'll see how it works out.
I'm just glad I could do this trial and error design in legos. The right side I could have done OK without them, but this one would have been a total nightmare. At one point I was about to give up and make the pipe 2nd to the rear go around the steering box, but I came to my senses and figured out a way to make it work. It would have probably been easier with smaller pipe like 1 5/8" or maybe 1 3/4", but the 1 7/8" is what most of these headers are made to because of the large exhaust port design on the Chrysler hemi. If I would have forseen all the trouble on this side, I probably would have lived with what I had in there. I was tempted at one point to just put it back in.
 (56Plym Left Header Design2.jpg) (56Plym Left Header Design2.jpg)
Attachments
----------------
56Plym Left Header Design2.jpg (182KB - 466 downloads)
|
|
| |
|
Expert 5K+
Posts: 9900
Location: Lower Mainland BC | Great work there Nathan. Keep it up.
|
|
| |
|
Expert 5K+
Posts: 9900
Location: Lower Mainland BC | Nathan: You might want to check this one out:
1956 Fury with 392 (since 1958 - according to the story):
http://topclassiccarsforsale.com/plymouth/496166-1956-plymouth-fury...
|
|
| |
|
Expert 5K+
Posts: 9654
Location: So. Cal | I know that car very well. It is owned by Ron Swartley, a long-time member on here, and from the old email server. He did the 392 hemi conversion to it back in the late '50's and raced the car. He used cast iron manifolds and raised the motor up higher to prevent them from hitting the control arms. I like the custom header approach better. Also, the 331 or 354 is shorter so it might make that manifold issue even worse than with the 392. |
|
| |
|
Expert
Posts: 3967
Location: DFW, TX | Ron is quite a character. His posts are some of my favorites on this site! He had a lot of fun with his '56 Fury(s) and it shows.
http://forwardlook.net/forums/forums/thread-view.asp?tid=22218 |
|
| |
|
Expert 5K+
Posts: 9654
Location: So. Cal | After redesigning the 2nd to the rear pipe 3 more times, I came to the conclusion that my original design is the best. One of them bent around the steering box more and looked pretty good, but it completely obscured 2 bolts making it very difficult to install them. I welded the header to the frame using the straps that you see and another one at the rear. This keeps it stable to make the designs. Now the 2 rear pipes are finished & tacked into place. Only 2 more to go. These last 2 should be easier to do as there is more room for them.
 (56Plym Left Header 2pipes.jpg) (56Plym Left Header 2pipes.jpg)
Attachments
----------------
56Plym Left Header 2pipes.jpg (144KB - 447 downloads)
|
|
| |
|
Expert 5K+
Posts: 9654
Location: So. Cal | I should be further along than I am because I had to redo the 2nd to the rear pipe. It stuck out too far into the space of the pipe going next to it. My welding wasn't as close as my design was able to put it. So I redesigned it to go up more, to give it more room. I finished that, and then finished the 2nd to the front pipe without any issues. I put the rear-most part of the front pipe back in with some mods as well. I just have the front section of the front pipe to go. I should be able to finish it by the end of the week and then take them all out to finish all the welds on them and weld an oxygen sensor bung into one of the collectors too.
 (56Plym Left Header 3pipes.jpg) (56Plym Left Header 3pipes.jpg)
 (56Plym Left Collector.jpg) (56Plym Left Collector.jpg)
Attachments
----------------
56Plym Left Header 3pipes.jpg (136KB - 462 downloads)
56Plym Left Collector.jpg (153KB - 452 downloads)
|
|
| |
|
Expert 5K+
Posts: 9654
Location: So. Cal | Finished the last pipe today. Time to take it out and hope that I can get to all the bolts well enough. Once finished, I will take them to get coated. Hopefully that will help prevent issues with the starter. I may try to install a heat sheild over it as well.
 (56Plym Left Header Tacked.jpg) (56Plym Left Header Tacked.jpg)
Attachments
----------------
56Plym Left Header Tacked.jpg (138KB - 446 downloads)
|
|
| |
|
Expert 5K+
Posts: 7395
Location: northern germany | Very nice, smooth bends. I build headers before (not as complicated as yours) and I know the work involved!!! |
|
| |
|
Expert 5K+
Posts: 9654
Location: So. Cal | Thanks, yeah, a lot of work - about 2 months worth of weekends. I compromised the port exit a little on the 2nd to rear pipe on the left side -above the steering box, but it wasn't nearly as compromised as the big block chevy headers that I cut up. Those port exits were really sharp. I guess it's easier to build them that way. |
|
| |
|
Expert 5K+
Posts: 9654
Location: So. Cal | After pulling the headers off, I found that it was extremely difficult to get the front lower bolts off with the front pipe so close to it. So I re-routed the front pipe on the left side and cleaned up some of the welds on it. Now I am doing the same on the right side. I also re-adjusted the 3rd pipe a little because it wasn't connected well due to my inability to see it properly under the car. The right header is a little too long to fit as well as I would like on the right side so I am moving the collector up on it about 3 inches as well. Hopefully it will seal well and still fit fine after I am done, but I have good confidence in it. I do all the tack welding with the header fully secured to the head to ensure that the flange remains flat.
 (56Plym Rt Side Header Redo.jpg) (56Plym Rt Side Header Redo.jpg)
Attachments
----------------
56Plym Rt Side Header Redo.jpg (156KB - 440 downloads)
|
|
| |
|
Expert 5K+
Posts: 9654
Location: So. Cal | I think I am finally nearing the close of this never-ending project. I finished all the welding and grinding today and my garage floor is fully covered with metal shavings at this point from all the cutting and grinding over the last 3 months. I just need to weld an Oxygen sensor bung into a collector now. I am thinking of only doing one side, maybe the passenger side but not sure if I would need it on both sides or not. Next week, I'll pay to get them coated on the inside and outside to reduce the heat conduction and prevent rusting. Installation on the right side is pretty straight forward with the front studs replaced by bolts, but the left side requires removing the heads and motor mount bolts and sliding the motor over to get the header in place. Either that, or remove the motor or steering column entirely. It stinks, but is unavoidable due to the proximity of the steering box to the head. You can see in the pic that I also added material to one bolt hole at the back end of the flange due to very poor Chinese tolerances; and I cut a dip into the front part of it to make it easier to get past the upper control arm during installation or removal.
I'm now going to replace the timing chain, cam, lifters, and do a valve job. Hopefully that work won't take as long as building these headers have.
Edited by Powerflite 2019-11-17 1:24 AM
 (56Plym Headers Welded.jpg) (56Plym Headers Welded.jpg)
Attachments
----------------
56Plym Headers Welded.jpg (171KB - 493 downloads)
|
|
| |
|
Expert
Posts: 1740
Location: Alaska | That's great Nathan, now that you are practiced up can you make a set for me to put a 354 hemi in my 58 Plymouth? |
|
| |
|
Expert 5K+
Posts: 9654
Location: So. Cal | I've actually considered making a set of headers for the early hemi in the '57-up cars, but after this experience, I think the 4 bolt manifolds are perfectly fine. |
|
| |
|
Expert 5K+
Posts: 9654
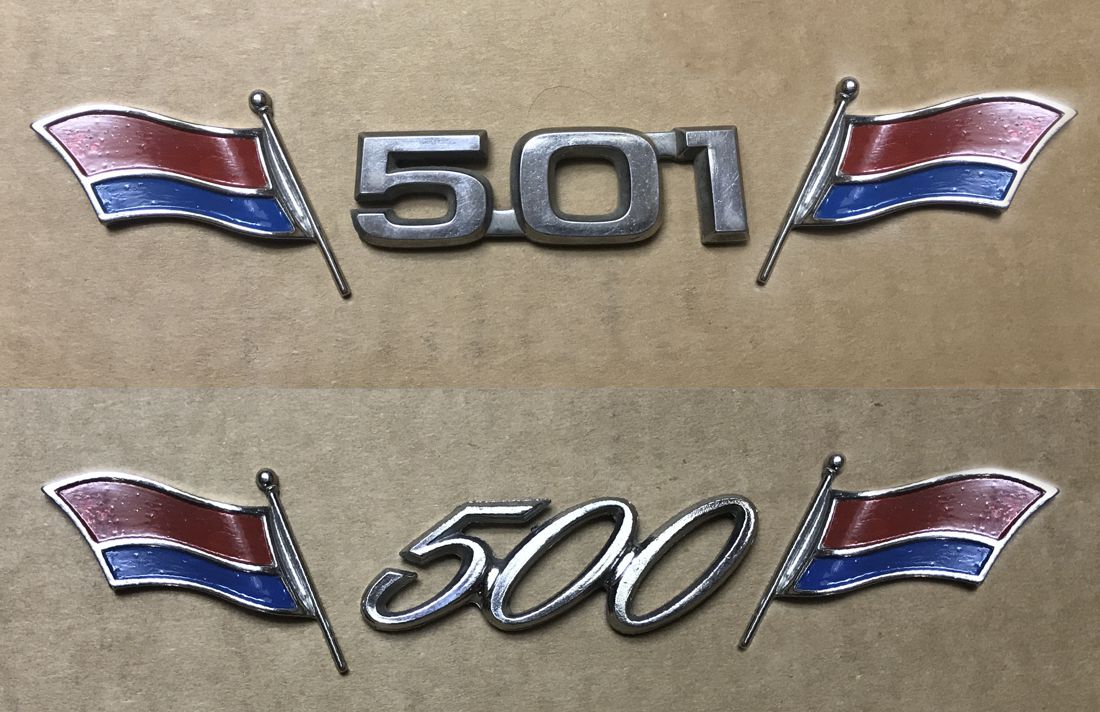
Location: So. Cal | I've been working on a new emblem for the trunk lid of my car. I want to show that the car is a P501 model from Plymouth. I cut up an F150 emblem to create the 501 script and used a Galaxie 500 emblem to make the P500 version that I would use if I were running a Dodge hemi. The flag emblems are from a '54 Plymouth. I like the P500 script better. It's more suitable for a '56 car, but I still want it to say 501. I'll look at some older stuff and see if I can find anything that would look better.
 (P501 Emblems.jpg) (P501 Emblems.jpg)
Attachments
----------------
P501 Emblems.jpg (151KB - 433 downloads)
|
|
| |
|
Expert 5K+
Posts: 9654
Location: So. Cal | ...or how about this one with the numbers going vertically?
 (P501 Emblem Vertical.jpg) (P501 Emblem Vertical.jpg)
Attachments
----------------
P501 Emblem Vertical.jpg (108KB - 445 downloads)
|
|
| |
|
Expert
Posts: 1740
Location: Alaska | Nathan, not sure I understand your model number. I thought a 56 Plymouth was a P29. |
|
| |
|
Expert 5K+
Posts: 9654
Location: So. Cal | Yes, of course, but I'm creating a fictional model for what Plymouth would have called it, had they sold their car with a Chrysler hemi installed into it like mine has; hence the P501. |
|
| |
|
Expert 5K+
Posts: 9654
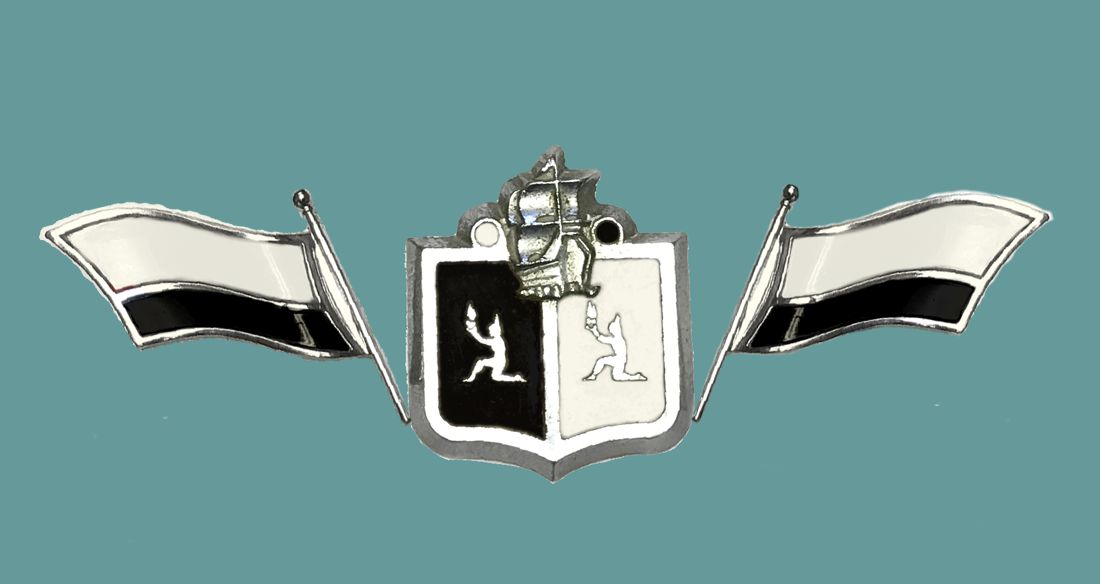
Location: So. Cal | I'm leaning towards getting rid of the numbers. It's hard to make them look good and fit in well with the '50's style, although the vertical ones aren't bad looking. They can also be confused for engine displacement. I kinda like this from the '54 and '55 Plymouth, but painted up like a '56 would be.
 (Plymouth n Flags2.jpg) (Plymouth n Flags2.jpg)
Attachments
----------------
Plymouth n Flags2.jpg (51KB - 436 downloads)
|
|
| |
|
Expert 5K+
Posts: 9900
Location: Lower Mainland BC | .
I was curious about the appearance of "Indians" on the Plymouth crest. I found this as part of the History of the Plymouth Colony and the first Thanksgiving:
https://historyofmassachusetts.org/plymouth-colony-history/

|
|
| |
|
Expert 5K+
Posts: 9654
Location: So. Cal | Interesting. I wondered where that little Indian character came from. |
|
| |
|
Expert 5K+
Posts: 9654
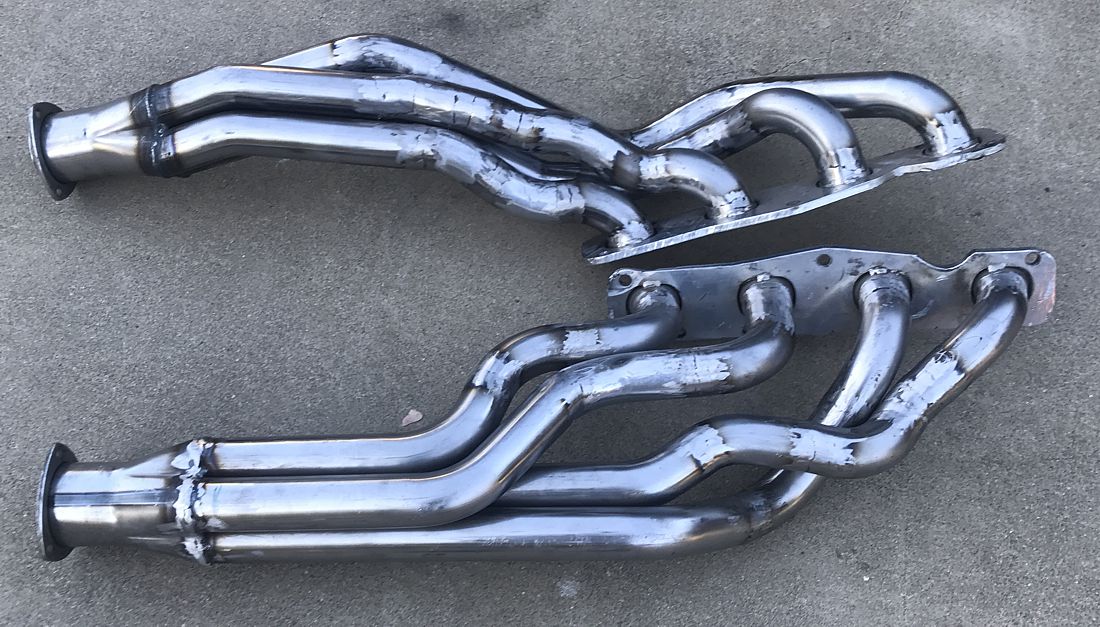
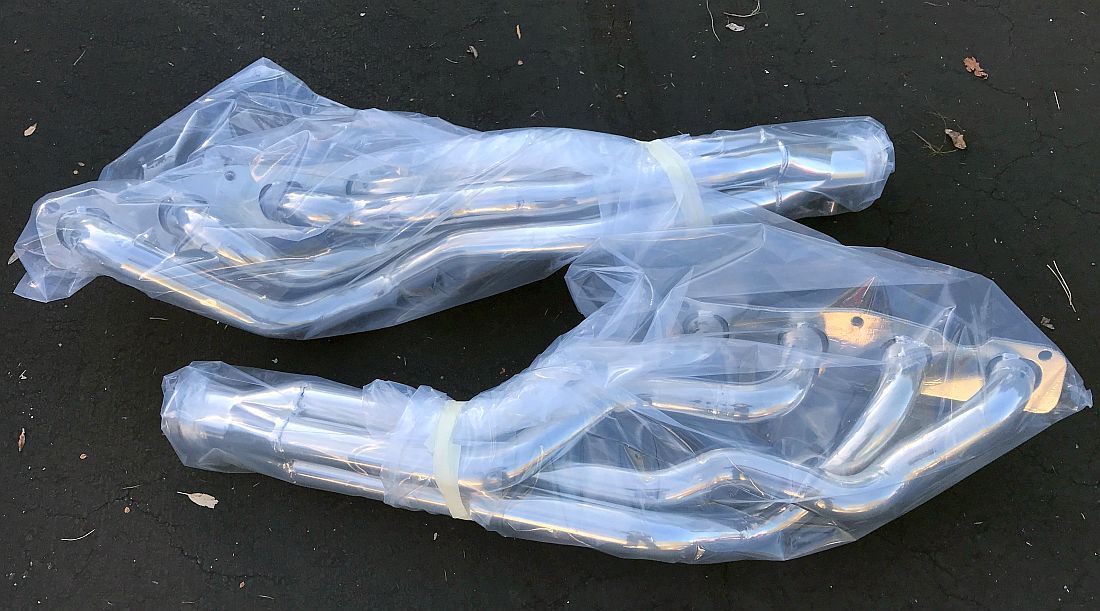
Location: So. Cal | I got the headers ceramic coated on the inside and outside by Engineered Applications near downtown LA. They came out great and were cheaper than any other options. The inside coating is a different one than the outside and can withstand higher temperatures. Hopefully this will reduce the heat transfer to the starter and steering box, improve performance, and keep underhood temperatures down.
 (56Plym Hemi Headers Coated.jpg) (56Plym Hemi Headers Coated.jpg)
Attachments
----------------
56Plym Hemi Headers Coated.jpg (146KB - 432 downloads)
|
|
| |
|
Expert
Posts: 3033
Location: N.W. Fla. | Powerflite - 2019-11-23 11:16 AM
Yes, of course, but I'm creating a fictional model for what Plymouth would have called it, had they sold their car with a Chrysler hemi installed into it like mine has; hence the P501. |
|
| |
|
Expert 5K+
Posts: 9654
Location: So. Cal | What would you do for it, other than nothing? |
|
| |
|
Expert
Posts: 3033
Location: N.W. Fla. | Powerflite - 2019-12-02 7:05 PM
What would you do for it, other than nothing? I didn't stick any 331 badges n my '60 Plym…. |
|
| |
|
Elite Veteran
Posts: 1117
Location: STL, MO | Nathan in past conversations we've had I told you your car was a inspiration for me to build a FL car with a early Chrysler. When I was having grief fitting a decent free flowing exhaust in my Plymouth, Chaney (Dukeboy) suggested using a front frame clip from a crown vic-impala-Dakota and I thought no way would I get rid of torsion bars for coils especially on a 57-58 car however in your case to me it doesn't seem bad. You would pick up room, get rid of kingpins, better brakes, parts avail anywhere, a swaybar, etc etc just a thought. And I still dig your car hydramatic or not. |
|
| |
|
Expert 5K+
Posts: 9654
Location: So. Cal | A rack & pinion would give me more space, but I'm not fond of such suspension conversions. If this were the only car I played with, I might consider doing some trial & error with frame & suspension changes, but I just don't have the time or interest in going down that road. Not only that, but I have already finished the hard part of making the headers so I'm not going to back away now. I'm not really looking for stellar performance, just trying to get the exhaust from pointing straight down and getting it off the ground. I picked the 700R4 because I believe it is the best overdrive trans out there that doesn't use a computer. But I find that the overdrive isn't really needed with an automatic, so if I were to do it over again, I would just install a pushbutton 727 so I could still get park and use the buttons. Using the buttons & having park too on this overdrive trans is more trouble than it's worth so I'm shifting it with a hand cable instead. When the time comes that I stop using it to tow my camping trailer in the mountains, and I can live without park, I'll hook it up to the pushbuttons again.
By the way, I think I figured out why the motor would backfire under load. Once I took it apart, I found that the timing chain was VERY loose. Makes sense, but I tried measuring the slack with the distributor and only measured five degrees of play so it didn't sound bad. But checking out the chain directly, it feels pretty loose. I'll try measuring the slack at the cam and see how it compares, but I suspect that I just didn't measure it accurately enough at the distributor. |
|
| |
|
Expert 5K+
Posts: 9654
Location: So. Cal | The motor is finally starting to come together on this seemingly never-ending project. Got the heads back from machining & assembly and put them on, along with the new Isky camshaft. I moved the motor over to get the left side header installed too. I had to remove all the exhaust studs on that side to make it work. Hopefully I can get this thing together again soon and get started on the cam break in.
 (56Plym Heads On.jpg) (56Plym Heads On.jpg)
Attachments
----------------
56Plym Heads On.jpg (191KB - 511 downloads)
|
|
| |
|
Expert 5K+
Posts: 9654
Location: So. Cal | I got the exhaust installed, bolted and welded up yesterday. It took me 2 hours to get one bolt on the left side done because I didn't leave enough clearance to the pipe. So it made it very picky about the positioning of the wrench to install it. I had to modify the backside of the left motor mount to make room for it. But all the rest went in easier than I expected once I made an extra long Allen wrench socket from a crap Chinese Harbor Freight one and a good US made ball head Allen wrench. The Chinese ball socket doesn't swivel worth crap. They put the wrong dimensions on it for some reason. The left header is angled down more and required a bend in the pipe. I just cut a section and welded it in at an angle to compensate for it since the angle isn't large. My upside down welding skills aren't the greatest, but they should work well. While the car has been on jackstands, the trans fluid started leaking out the speedometer cable for some reason. I had replaced all those seals when I first installed the trans so they shouldn't be bad already. But I purchased new seals for it and will install them next week to keep it from leaking any more.
 (56Plym New Headers Installed.jpg) (56Plym New Headers Installed.jpg)
Attachments
----------------
56Plym New Headers Installed.jpg (146KB - 497 downloads)
|
|
| |
|
Expert 5K+
Posts: 9654
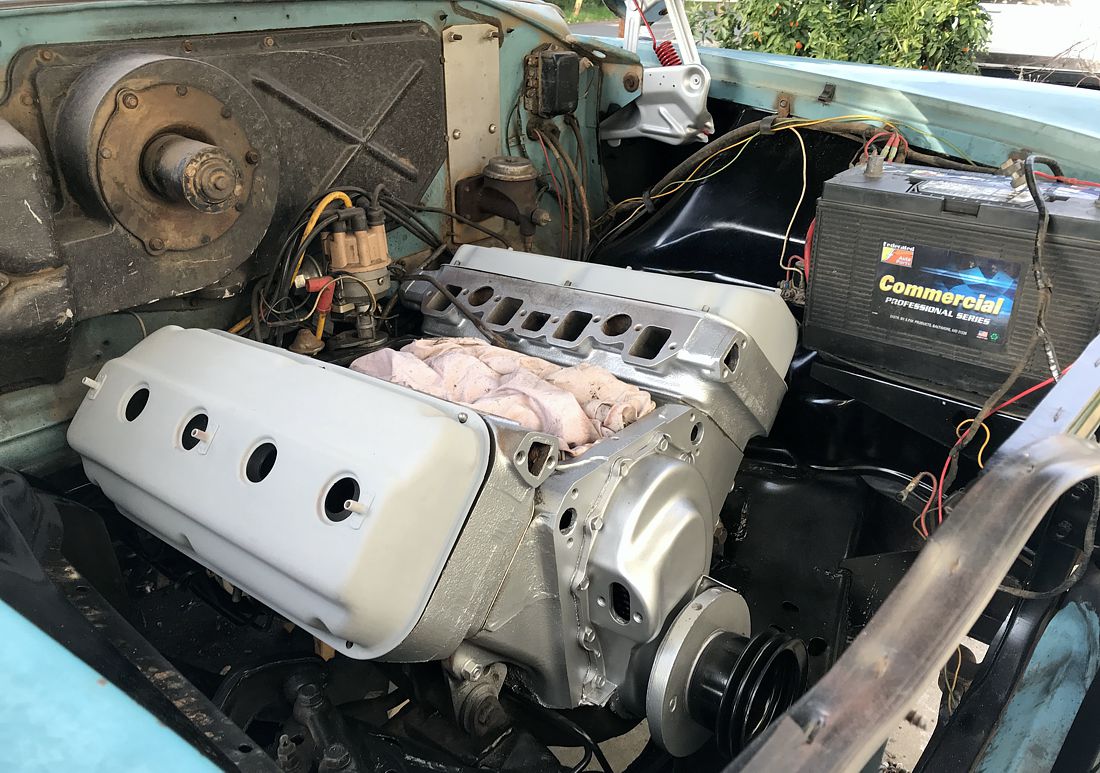
Location: So. Cal | I'm wrapping up the final assembly on the engine bay now. Getting close to doing the cam break in. I cleaned up these truck valve covers and painted them silver instead of gold to more closely match how Chrysler would have installed one of their motors into a '56 Plymouth, had they done so back then. I also tried to clean up and paint a lot of the engine bay parts & inner fenders, to make it more presentable than it was. Eventually, I'll get to re-painting the air cleaner as well.
It turned out that the trans was leaking through the speedometer gear because the plastic Chevy gear had worn a grove around it that the fluid passed through. So I purchased a new gear with a few less teeth to make the speedometer more accurate and replaced it. It doesn't leak anymore so far, but I won't know for sure until I get more fluid into the trans. The alternator wiring revealed a section of old original wires that had disintegrated insulation on one section so I have to replace that harness before I can go any further. Hopefully I can get it all done & ready to go by the weekend.
Edited by Powerflite 2020-02-07 12:30 AM
 (56Plym Engine Assembled.jpg) (56Plym Engine Assembled.jpg)
Attachments
----------------
56Plym Engine Assembled.jpg (222KB - 472 downloads)
|
|
| |
|
Expert 5K+
Posts: 9654
Location: So. Cal | I broke in the cam quite a while ago and all went well, took it for a drive and was really amazed at how much more power the car has now. Really very impressive just from a valve job, new headers, and cam change. Feels like a whole new car now and really moves when the 4bbls kick in. But I noticed that there was more than acceptable valve train noise coming from the right side of the motor. Because of the virus, I haven't driven it since then. It's just been sitting here waiting for me to need it. But next week, I am planning to take it camping so I decided to tear into the right valve cover and find out what is causing the noise there.
I suspected that some of the lifters were bad and would need to be replaced so I purchased a couple of extras to have on hand. When I tore it apart, I found that there as very little oil flow in the rockers for some reason. So I removed the rockers and found that the head gasket was partially blocking the flow for some reason. I took a long drill and cut through it by hand until I could clear it out. There was some sludge that had built up there too. I took the opportunity to test the lifters with the rockers off. Each lifter seemed tight and I wasn't able to push any of them down with my hands. So I didn't bother to remove the intake & replace any of them.
Afterward, I put the rockers back on and started it up without the valve covers. Air started bubbling at the end of the rocker shaft and blew out quicker with higher rpm. Soon, it filled up and I had oil coming from the rockers as it should. So clearing that head gasket seemed to solve the problem. But I still had quite a bit of valve tappet noise. I measured the gaps between the rockers and it was very large - like around .025" to .028". I wouldn't think it should be more than .005" with hydraulics, correct? It's odd, because if anything, they should be too tight as I removed .005" of material when I surfaced the heads. Anyway, I learned my lesson here. Always purchase the 3/8" adjustable pushrods & lifters. The bigger lifters are a lot cheaper too. Don't bother with using the original stuff. Fortunately, that's what I am doing with my 392 build. I'll have to see about purchasing some adjustables for this one now too to tighten up those clearances.
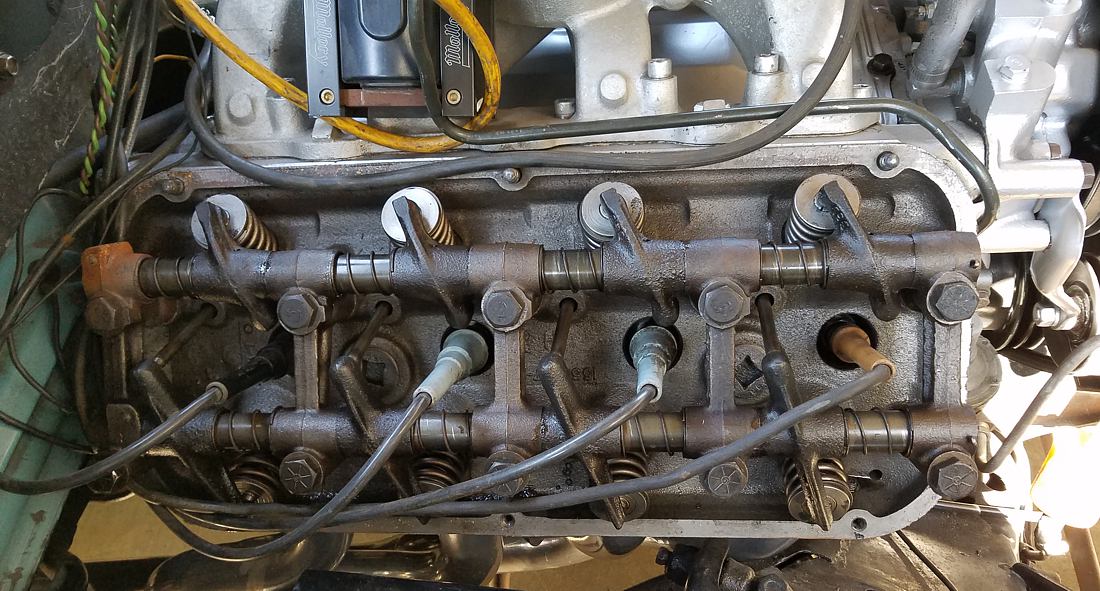 (56Plym Tappet Noise.jpg) (56Plym Tappet Noise.jpg)
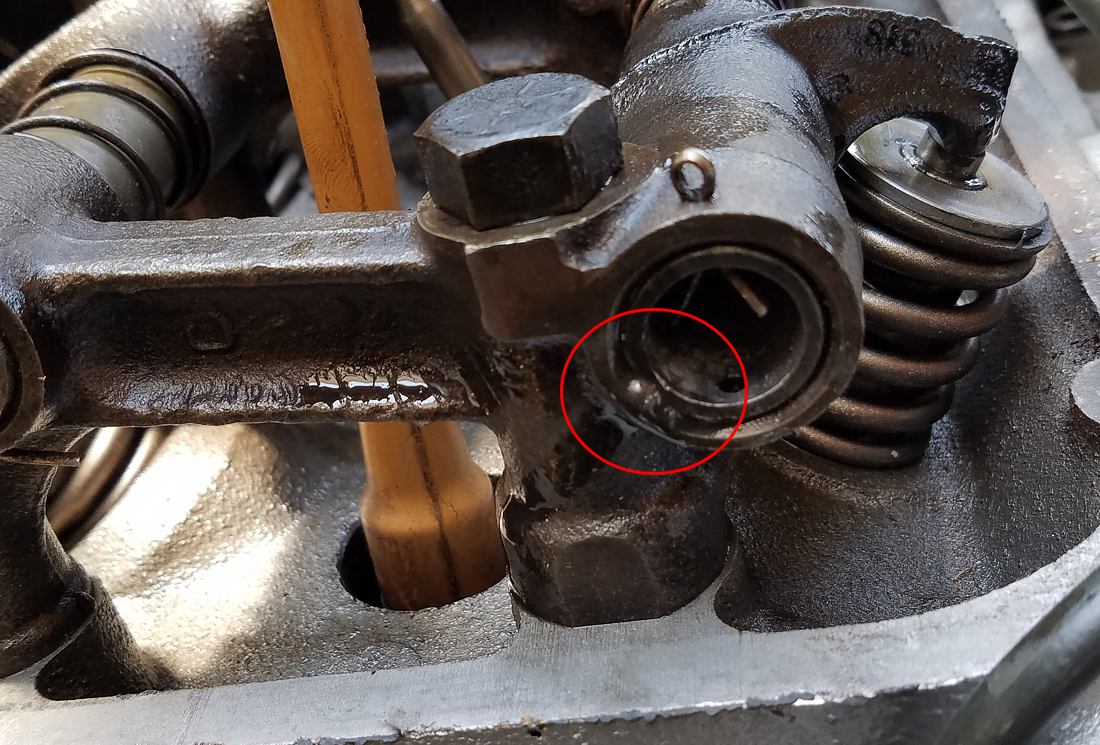 (56Plym Rocker Bubbles.jpg) (56Plym Rocker Bubbles.jpg)
Attachments
----------------
56Plym Tappet Noise.jpg (160KB - 446 downloads)
56Plym Rocker Bubbles.jpg (201KB - 440 downloads)
|
|
| |
|
Extreme Veteran
Posts: 443
Location: Beaumont TX | This is very interesting and very timely for me Powerflite. I have a 1955 259 V8 Poly head and I have too much slack at my rockers and noise and mine was due to zero oil going to the rockers because my cam bearings were installed wrong for that side. I can totally relate to the blockage from the head gasket and completely understand the problem.
I'm going to order new push rods from Smith Brothers to replace my worn push rods. I have already bought all new rockers from several places and I have a good shaft, so I just need push rods. I think original length push rods might be too short because I think but don't know for sure that the valve stem wore down a little when the engine was running without oil up there. Do you think I should get adjustable push rods made or just some solid rods that are just a little longer. I have not ordered yet because I'm trying to decide what to do to fix it right.
Thanks
Sam |
|
| |
|
Veteran
Posts: 129
| If I'm understanding your post, you have. 025-.028 clearance with hydraulic lifters? In general, I believe hydraulic lifters should have about. 020 preload. I see you had .005 removed from the heads. Did you check the old head gasket thickness compared to the new head gaskets? I ask because my 315 poly still had steel shim gaskets and the composite replacement gaskets were much thicker. I had. 025 taken off the heads just to compensate for gasket thickness difference. |
|
| |
|
Expert 5K+
Posts: 9900
Location: Lower Mainland BC | .
Just checked the original spec on tappet clearance in the 58 Chrysler FSM: 0.060 to 0.210 inches. Huge!
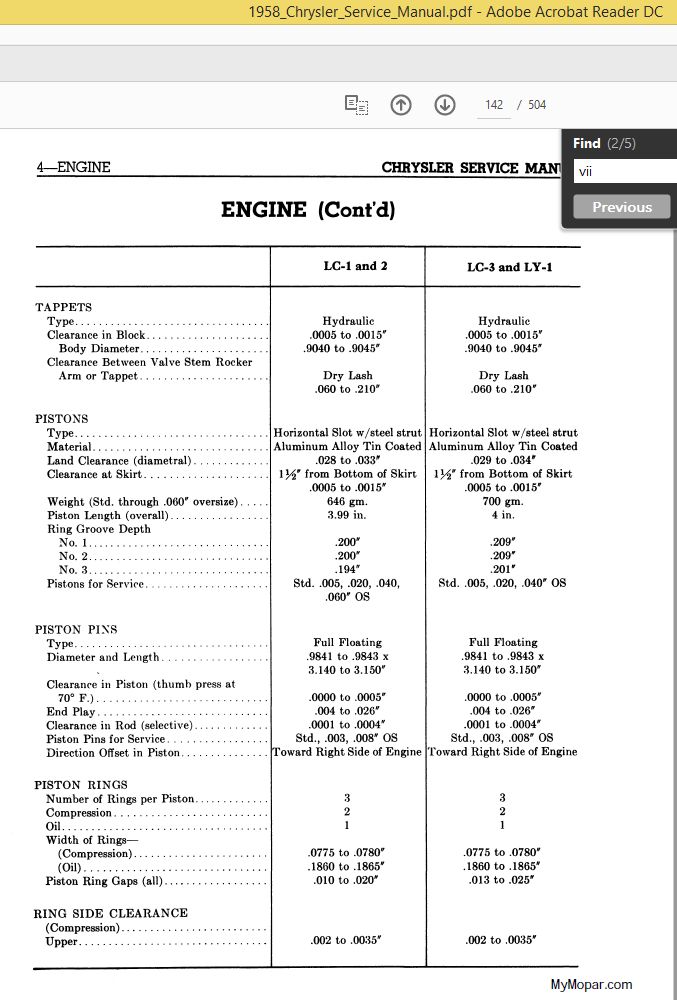 (58ChryslerHydraulicTappetClearance_1.jpg) (58ChryslerHydraulicTappetClearance_1.jpg)
 (58ChryslerHydraulicTappetClearance_2.jpg) (58ChryslerHydraulicTappetClearance_2.jpg)
Attachments
----------------
58ChryslerHydraulicTappetClearance_1.jpg (109KB - 448 downloads)
58ChryslerHydraulicTappetClearance_2.jpg (182KB - 446 downloads)
|
|
| |
|
Expert
Posts: 3033
Location: N.W. Fla. | Powerflite - 2020-06-27 6:54 PM
, and cam change.
I suspected that some of the lifters were bad . Why would you suspect new lifters would be bad? Unless you reused the old lifters, if so your cam will be destroyed by them. You have to use new lifters. |
|
| |
|
Expert 5K+
Posts: 9654
Location: So. Cal | Sam, I would definitely recommend purchasing adjustable pushrods. That way you can always account for changes from the original length that can occur. The ones that Hot Heads sells only work with later style lifters that use 3/8" pushrods so keep that in mind. I will be looking to try to get some adjustable 5/16" pushrods if I can find any, just so I don't have to replace my lifters at this point.
Scott, yes, I believe you are correct that I need preload with no clearance. What I have is definitely too large. You are also right that the new head gasket is thicker than the original and that may be the cause of most of my problem. What's odd though is that the left side seems to be OK - at least it isn't making any noise.
Dave, that is dry tappet clearance which is when the tappet is completely empty of oil. That's not really relevant here.
George, of course I replaced the lifters with new ones. I'm not that dumb. But I had 2 bad lifters right out of the box, and I used 2 that were marginal. I fully expected those two to be the cause of the problem, but they were holding pressure just fine |
|
| |
|
Extreme Veteran
Posts: 443
Location: Beaumont TX | Thanks Nathan, I'll see if Smith Brothers can make adjustable push rods for my car. I'm calling them tomorrow. Checked my push rod lengths today with a dial micrometer. I don't know the total length but the difference in mine that were damaged and tapping and the ones that were not damaged and not tapping was .010, 10/1000... I'm going to do some more checking tomorrow but you were asking about clearances and this might be one reference point that could help you. I'll also ask Smith Brothers if they can make adjustable push rods in 5/16 diameter rods for you.
Edited by samstrader 2020-06-29 6:03 AM
|
|
| |
|
Elite Veteran
Posts: 650
Location: Finland | Once I had annoying valve train noise on a 331 Hemi. It took a while until I understood that my lifters had the oil inlet groove on wrong height so no or very less oil came in to the lifters.
This was cured by widening the groove. This was 1986 or so so I had a good used cam and good used lifters. The engine was in boxes when I bought the car but I didn`t suspect
that the lifters were of wrong model. Nothing is impossible.. |
|
| |
|
Expert 5K+
Posts: 9900
Location: Lower Mainland BC | Powerflite - 2020-06-28 9:08 AM
Dave, that is dry tappet clearance which is when the tappet is completely empty of oil. That's not really relevant here.
Okay. DUH. Now I know what "Dry Lash" means. Sorry about that. Live and Learn. Too soon old, too late smart.
|
|
| |
|
Expert 5K+
Posts: 9654
Location: So. Cal | I got off the phone with Hot Heads and they are getting me a set of adjustable pushrods with the smaller original style ends on them for my hydraulic lifters. So they can make them. |
|
| |
|
Expert
Posts: 3033
Location: N.W. Fla. | Powerflite - 2020-06-28 11:08 AM
George, of course I replaced the lifters with new ones. I'm not that dumb. But I had 2 bad lifters right out of the box, and I used 2 that were marginal. I fully expected those two to be the cause of the problem, but they were holding pressure just fine The way you phrased it I wasn't sure. When I redid my 331 a couple years ago one box had just the lifter body in it! |
|
| |
|
Expert 5K+
Posts: 9654
Location: So. Cal | Yeah, I don't doubt it. Lifter quality has definitely been on the decline. I stay away from Comp Cam lifters too because of all the bad stories I've heard about them. |
|
| |
|
Extreme Veteran
Posts: 443
Location: Beaumont TX | Hi Nathan,
Smith Brothers can make the adjustable lifters for you too. Here's the reply to the question I sent them. I got the lead on Smith Brothers from Hot Heads.
End sizes can vary from engine to engine. And yes, we can build 5/16 adjustable pushrods
Sam |
|
| |
|
Expert 5K+
Posts: 9654
Location: So. Cal | The tips that go into the lifter on the originals are 1/4" just so there is no confusion. The tip size is what matters more. |
|
| |
|
Extreme Veteran
Posts: 443
Location: Beaumont TX | Hi Nathan,
I talked to Smith Brothers again today. They can't make push rods with a 1/4 inch shaft. The smallest shaft they make is 5/16 inch. But they can put the tips I need on a 5/16 inch shaft. I measured my hole for the push rods and there is plenty of room to put a 5/16 inch shaft so I'm going to order the adjustable push rods. They will have the correct tip and have a 5/16 shaft. The price for the adjustable push rods is about the same as the solid push rod, by the way.
How will you set the length on your adjustable push rods? I guess there are several ways to do it but just wanted to know what you think is the right way to set the adjustment on an adjustable push rod.
Thanks,
Sam |
|
| |
|
Expert 5K+
Posts: 9654
Location: So. Cal | Like I said, it is the tip size that matters even though previously, I was referring to the shaft size. I just received mine today from Hot Heads. They look to be good quality and should solve my problem. As far as the length, I just told Hot Heads what I needed - stock plus .03" and that's what he sent me. I'll try to install them next week. In the meantime, I am having too much fun with my car right now to tear it apart yet.
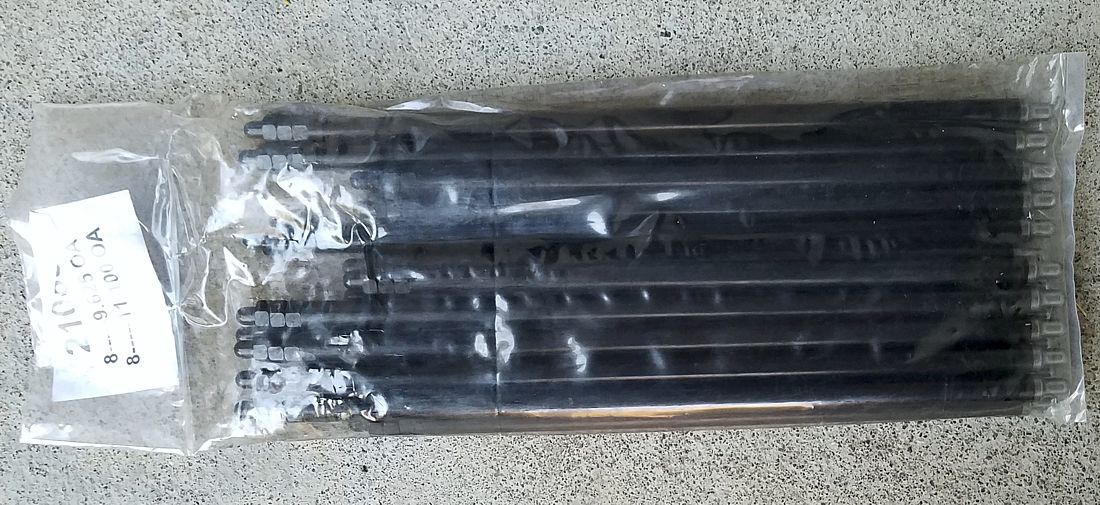 (Stock 331 Hemi Adjustable Pushrods.jpg) (Stock 331 Hemi Adjustable Pushrods.jpg)
Attachments
----------------
Stock 331 Hemi Adjustable Pushrods.jpg (164KB - 447 downloads)
|
|
| |
|
Expert 5K+
Posts: 9654
Location: So. Cal | I took the car camping at the beach and towed our teardrop trailer with it. We had a lot of fun and the motor worked really well, for most of the trip. Plenty of power and runs really well despite the ticking. But, I neglected to hook up the PCV valve so the dangling hose was sending fun fumes into my cabin as I was driving and the car overheated just as we arrived back home.
I connected the PCV hose up to solve the first problem. Old motors really are much more fun with a PCV despite what some might think. No more stink after that. The overheating seems to have occurred because the replacement freeze plug (o-ring style from Hot Heads) was slightly leaking most of the trip and slowly drained out most of the coolant in the motor until it started to run hot. As we pulled up the long hill toward my house, it didn't have enough coolant left to keep it cool. After cooling off and refilling with coolant, the experience didn't seem to hurt it and the freeze plug seems to have sealed itself shut now as I haven't been able to get it to leak again since refilling it. I'll take it to a non-car show tomorrow and monitor it to see how it goes.
Edited by Powerflite 2020-07-04 2:07 AM
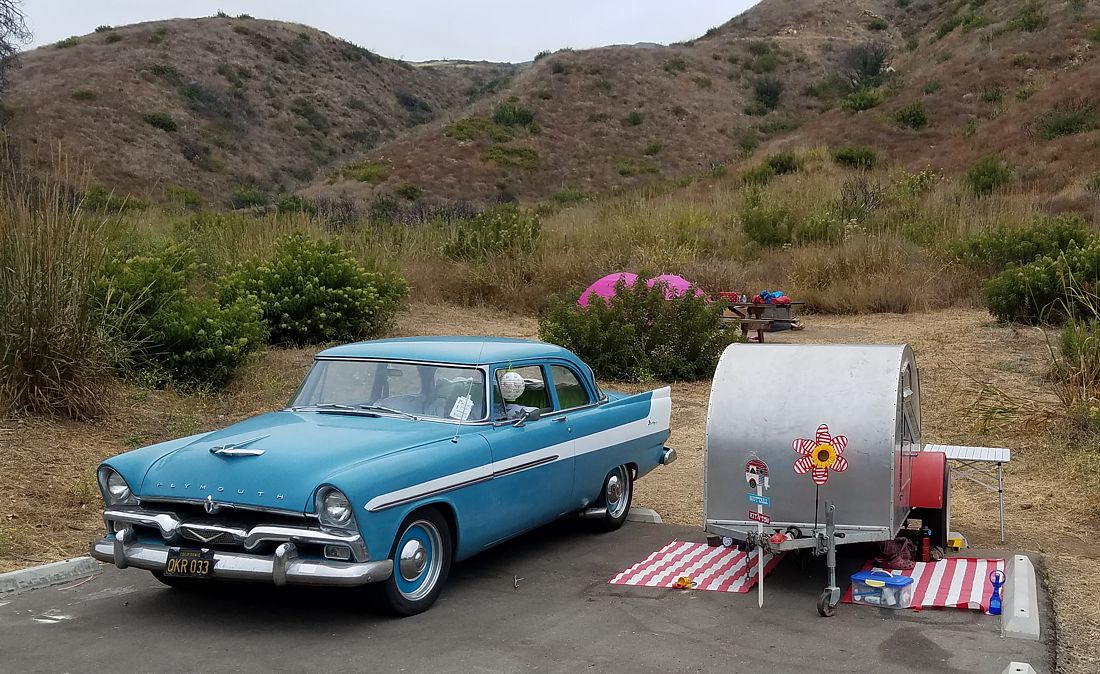 (56Savoy Beach Camp Front.jpg) (56Savoy Beach Camp Front.jpg)
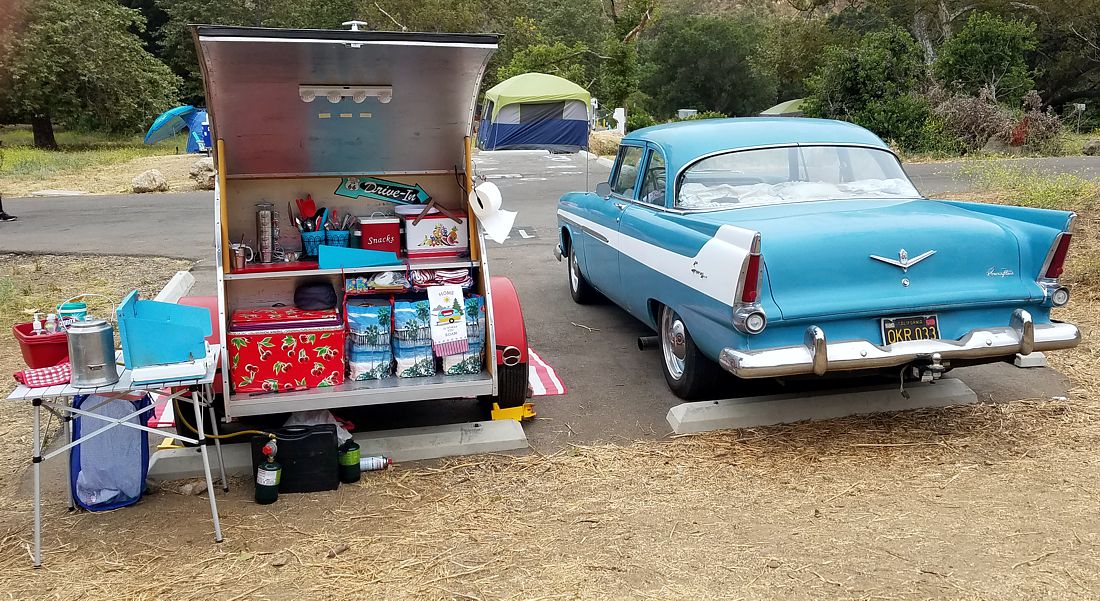 (56Savoy Beach Camp Rear.jpg) (56Savoy Beach Camp Rear.jpg)
Attachments
----------------
56Savoy Beach Camp Front.jpg (228KB - 434 downloads)
56Savoy Beach Camp Rear.jpg (256KB - 432 downloads)
|
|
| |
|
Extreme Veteran
Posts: 443
Location: Beaumont TX | That sure is a cool and fun set up you have. And a beautiful camping spot too. Looks like a great time in the making.
Thanks for sharing the photo of the adjustable push rods. I can sure see how that is indeed the only way to go. Perfect... |
|
| |
|
Expert 5K+
Posts: 9654
Location: So. Cal | Thanks Sam. This was a spot just North of Malibu that has camping just off the beach.
I replaced the pushrods and adjusted them to zero lash + 1/2 turn preload. When I started the car, it ran quite noisy, but most of it quieted down pretty quickly except a couple on the left side. Those eventually quieted as well once the motor warmed up a little. So it's now running the way it's supposed to, but the car seems to want to run hotter than it did before I rebuilt the top end of the motor, for some reason. I am eventually planning to add A/C to this car and that will increase the heat load further. So I bought a new radiator for it and am waiting for it to arrive. The radiator I chose is made for a '62-'64 Buick that is surprisingly similar to the '62-'65 Mopar radiator, but has the correct 1.75" inlet & outlet in the proper positions for the hemi motor transplant.
Edited by Powerflite 2020-07-22 5:04 PM
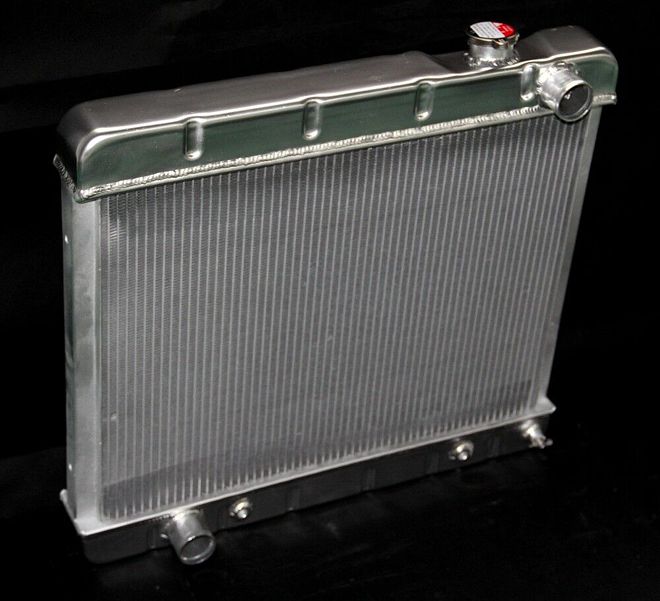 (62-64 Buick KKS Radiator.jpg) (62-64 Buick KKS Radiator.jpg)
Attachments
----------------
62-64 Buick KKS Radiator.jpg (53KB - 434 downloads)
|
|
| |
|
Extreme Veteran
Posts: 443
Location: Beaumont TX | I'm glad the adjustable push rods worked good. I'll bet the reason they were noisy at first was because it took a long time for the oil to fill up the rocker assembly shaft. I'm glad it is good for you. When you say zero lash plus 1/2 turn, does this mean to tightened the push rods with the engine not running until the clearance between the rocker and the valve was basically zero and then add one half turn to make the push rod a little longer and make the push rod tighter. I'm just trying to make sure I understand how to set the push rods. I think on mine that when the engine is off the push rods are pretty loose and they tighten up when the oil pressure comes up. Just want to make sure I understand right.
I was planning to use a dial micrometer to set all the push rods the same length after I found the right length but your way seems to be a better way to compensate for different slack places in the engine.
I think that radiator will solve all of your problems. I have to old kind but wish I would have gone with aluminum. They have a lot more cooling capacity I've heard. It will be interesting to find out from your conversion and then we will know for certain.
Camping near Malibu must be nice. I lived in El Segundo for a while and my daughter looked at going to Pepperdine. Really a beautiful place there.
Thanks,
Sam
I found this procedure for setting valve lash on the internet. Looks pretty easy.
https://www.speedwaymotors.com/the-toolbox/setting-valve-lash-on-hyd...
Edited by samstrader 2020-07-23 4:09 PM
|
|
| |
|
Expert 5K+
Posts: 9654
Location: So. Cal | I think you're right about filling the oil in the rocker shaft. The lifters that need the extra pressure just didn't come up until the rocker shaft was re-filled. You've got the basic idea right for adjustment. That website description is a little different because it's for a Chevy. The only thing you have to be careful about is if the motor has cooled off for a while, the lifters may not still be pressurized, so its easy to go too far. This was my procedure:
1. Remove the distributor cap (but keep the wires on it) and rotate the engine to the #1 cylinder firing.
2. Loosen the pushrods for #1 until you feel significant, obvious slap on the valve. If you start with the pushrods obviously too short, but with the locknut loose, that will save the most time.
3. Put a 3/8" wrench on the base of the pushrod to prevent it from rotating and rotate the adjuster with your fingers until you notice it becomes a little harder to turn. Check the transition with the slap. If the lifter has lost its pressure, you will still be able to move the rocker up and down, but it will no longer slap on the valve like it could with extra clearance. Once you get a feel for the change in difficulty to adjust the screw when you come to zero clearance, it will be more obvious.
4. Then get a second, cheap 3/8" wrench and bend the head of the open end at a 30 degree angle. This will help you to get to the intake adjuster on a hemi motor. Use that to turn the adjuster another 1/2 turn. You may have to do it in two 1/4 turn steps on the intake because of a lack of room.
5. Then tighten the lock nut down using your fingers first, and then tighten with the bent wrench.
6. Turn the motor to the next cylinder by checking the distributor rotor, or by going 90 degrees as the article says and repeat until they are finished. |
|
| |
|
Extreme Veteran
Posts: 443
Location: Beaumont TX | Thanks for this Nathan. This is very helpful for me. I just have one question about the lifter leaking down. I'm thinking all of my lifters leak down pretty fast so I think I would be setting the lash when the lifters have no pressure. And I noticed when I was running the oil pump with a drill that some of the push rods jumped up some when the oil pressure came up. I may not be understanding right but is there a way to tell if the lifters have leaked down. I am asking this because I am understanding that you have to set the lash when the lifter has not leaked down. If you set the lash when the lifter is leaked down, the push rod will be too tight, or too long so to speak, and your valve won't close. Am I thinking right? I'm just trying to make sure I understand.
Thanks again... |
|
| |
|
Expert 5K+
Posts: 9654
Location: So. Cal | If you follow my procedure, you can adjust them properly even when they have leaked down. |
|
| |
|
Extreme Veteran
Posts: 443
Location: Beaumont TX | Thanks Nathan. I think I understand now... |
|
| |
|
Expert 5K+
Posts: 9654
Location: So. Cal | I decided to install the aluminum radiator in this car now. Out of the four '56 Plymouths that I recently purchased, none of them came with a radiator. Since this car is more modified than the others, I will use the aluminum one here and free up the original radiator for one of the other cars. The Buick radiator doesn't come with any mounting brackets on it, just an aluminum channel on each side with 2 holes in it. I bent up these brackets for it that will mount the radiator in the stock (angled) location using the stock mounting points, and mounted them to the holes in the sides of the radiator that I threaded. The threads are not very strong so I may need to add a couple of screws to ensure it doesn't come loose. After I install it into the car, I will make up another sheet to spot weld over the top of these brackets, just like the original. And then I will paint the brackets black and probably paint the top of the radiator black as well.....or I may just leave it like this for a while to see if I can live with it or not.
Edited by Powerflite 2020-10-09 8:25 PM
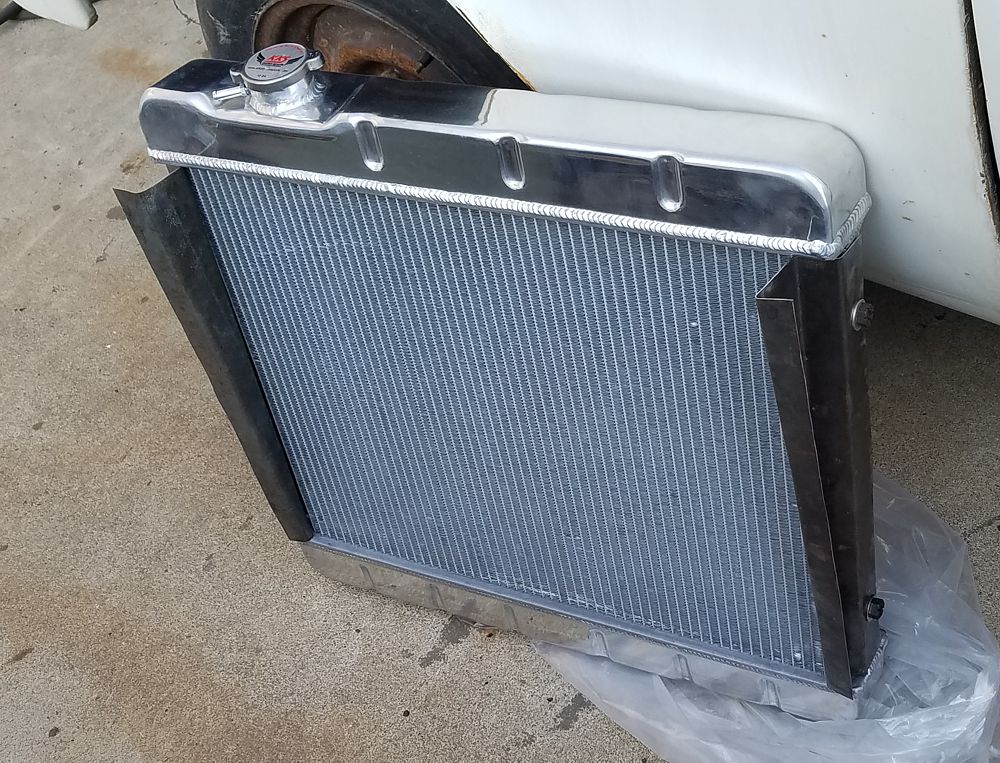 (56 Plymouth Aluminum Radiator Brackets.jpg) (56 Plymouth Aluminum Radiator Brackets.jpg)
Attachments
----------------
56 Plymouth Aluminum Radiator Brackets.jpg (235KB - 370 downloads)
|
|
| |
|
Expert 5K+
Posts: 9654
Location: So. Cal | I finished installing the aluminum radiator in my Savoy this weekend. I made the top piece to cover the hole left there by the brackets and welded it to the side brackets. I filled in the triangular gaps as well, which the original didn't do. I had to reduce the spacer under the fan to increase the clearance to the radiator. Gates 22896 from a 2004-08 Durango worked perfectly for the top hose without any modification, and Gates 23327 from a '06-'08 3/4 ton Silverado worked OK for the bottom hose after cutting it, although not perfectly. The radiator is wider than the original (the same width as the opening) but shorter than the original too. Next time I may try a '56 Ford radiator which is taller, but not as wide and see how I like that. The nice thing about the Ford radiator is they make it look stock, but the top tank does have a distinctive Ford look to it because of how wide it is. I used this one because I already knew how well it cooled and I really need to use this car to tow my camping trailer so we can have fun this weekend. I am hosting our first vintage camping event on Route 66 so I need to get there without overheating issues. Because time was short, I also had to do the install & modification while the paint was still partly wet, so there are small fingerprints & other irregularities in it that I couldn't avoid. I also didn't have time to paint the top tank either, but would definitely prefer it to be black rather than polished aluminum. My super expensive overflow tank moved from the driver's side to the passenger side and I haven't had a chance to secure it down yet either. Overall, it doesn't look bad, but not nearly as neat as my old one.
I tried it out last night by taking a hard run up the grapevine and it didn't even think about overheating. Nice. That's what I like to see. I don't know why my original suddenly crapped out on me, but it sure is nice not to have to deal with these issues and I feel a lot better about towing my camper, gear & family around in the heat now. I'll try to make it look a little less obvious as I get more time to work on it.
Edited by Powerflite 2020-10-13 6:57 PM
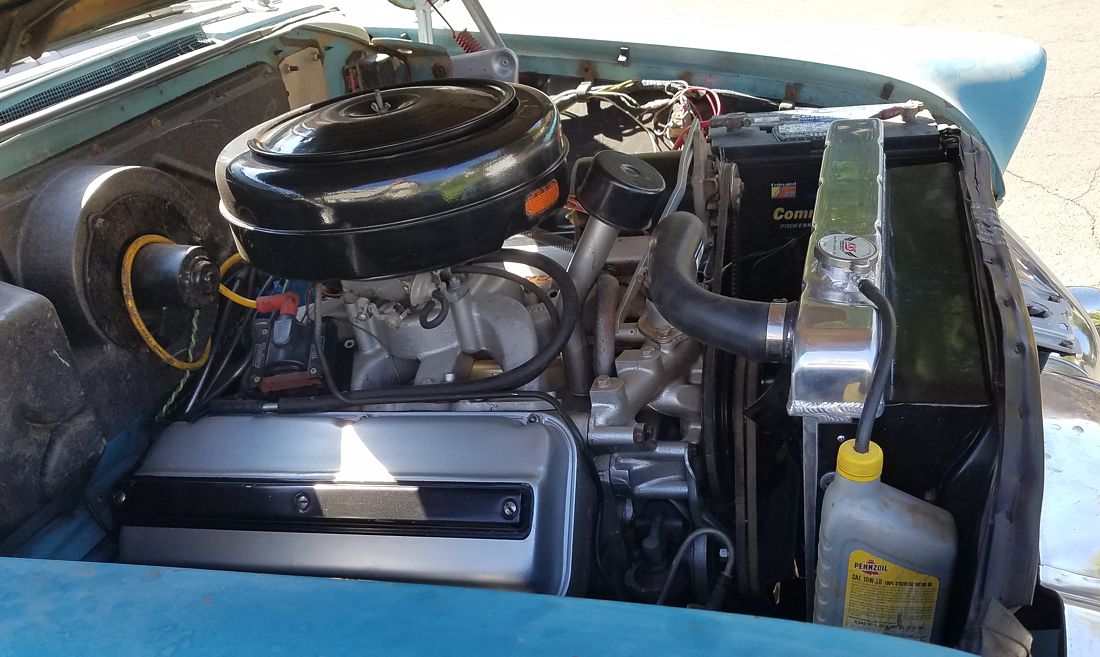 (56Savoy Aluminum Radiator Installed.jpg) (56Savoy Aluminum Radiator Installed.jpg)
Attachments
----------------
56Savoy Aluminum Radiator Installed.jpg (163KB - 378 downloads)
|
|
| |
|
Elite Veteran
Posts: 650
Location: Finland | There is for sure nothing that makes ones camping feeling go away as well as overheating...good looking radiator....I would also paint the top. Are you going to prime with a thin layer of epoxy
and paint wet on wet? That works at least for me. Cool to have your fingerprints on it if the maker has to be found in the future...
About the overflow tank you can claim that the price-quality ratio is top notch...
|
|
| |
|
Expert 5K+
Posts: 9654
Location: So. Cal | You got that right Ralf. Car troubles very easily ruin a vacation; especially when you are towing a trailer, because you might have to get 2 tow trucks to rectify the situation.
The gray NOS seat covers I had installed a while ago didn't last long before they began falling apart. We wrapped a blanket around them for a while to keep using the car, but my wife recently found some UV resistant upholstery fabric for $6/yard that closely matches the color of the car. She doesn't have an industrial sewing machine so she didn't add any vinyl or piping, but just sewed up some good seat covers for the car and I installed them yesterday. I think they came out great and look quite good for spending less than $50 on it. If I eventually end up moving to a bigger place, I'll have room to buy her an industrial and we'll make a more original looking version. We'll also modify the pattern to make some improvements for the next run.
 (56Savoy Homemade Seat Covers.jpg) (56Savoy Homemade Seat Covers.jpg)
Attachments
----------------
56Savoy Homemade Seat Covers.jpg (148KB - 361 downloads)
|
|
| |
|
Elite Veteran
Posts: 650
Location: Finland | The seat covers look good...far nicer than blankets for almost no cost. For you with about 10 cars needing interiors it is almost a must to get a sewing shop for your wife(or yourself).
The interior making pricing imo is horrible so everybody who is willing to accept cheaper materials and willing to learn to do the work themselves can save big dollars. |
|
| |
|
Expert 5K+
Posts: 9654
Location: So. Cal | Thanks Ralf, these seat covers have been really nice compared to the old deteriorating ones. I don't drive much anymore, but this car is a lot of fun when I do.
I decided that since this car has a Fury-like stripe on the side of it, that I would make it more Fury-like and add the bumper wings to the rear. I have an NOS right side wing that I purchased eons ago, but I had to extract the left side wing from the rusty Fury to use on here. The inside of the wing was very deeply pitted in many places and there is like pitting on the bumper in those locations. The reason is this sandwich of metals collects a lot of dirt in between them and there isn't a good way to prevent that from happening. With every car wash, rain, or dew that collects, it gets the dirt muddy in between and rusts out the metals. Let that be a lesson to all you Christine fans. Be sure to paint the insides of your bumper wings with a good sealer & top coat to prevent this from happening. The nickel/chrome plating on there isn't enough to protect it sufficiently. You should also paint the matching parts on the bumper for the same reason. Once these rust out or pit very deeply, it's really painful to try to fix them. But if you end up removing the wings, you can always use some acetone to remove the paint you put on, and the chrome underneath will be in better shape than the rest of the bumper, typically, rather than the other way around if you don't.
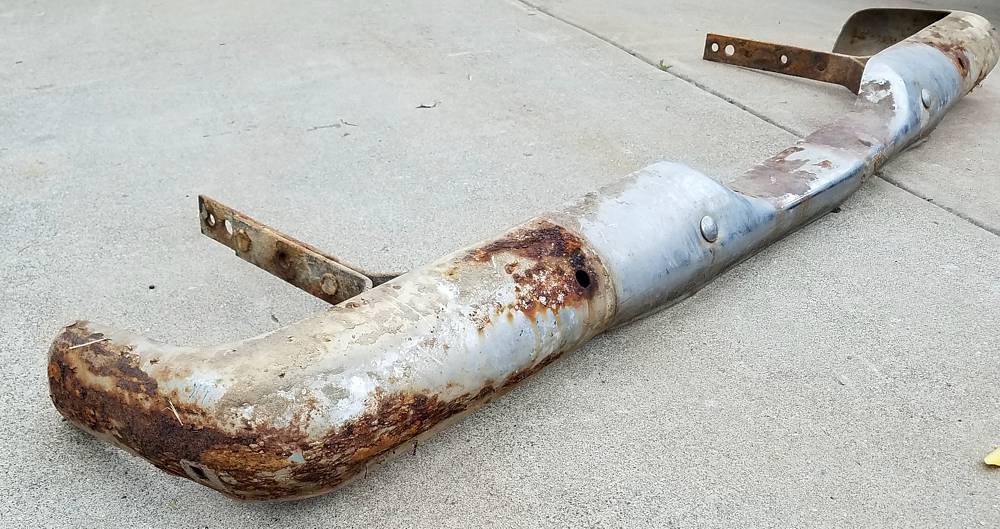 (56Fury Bumper Pits.jpg) (56Fury Bumper Pits.jpg)
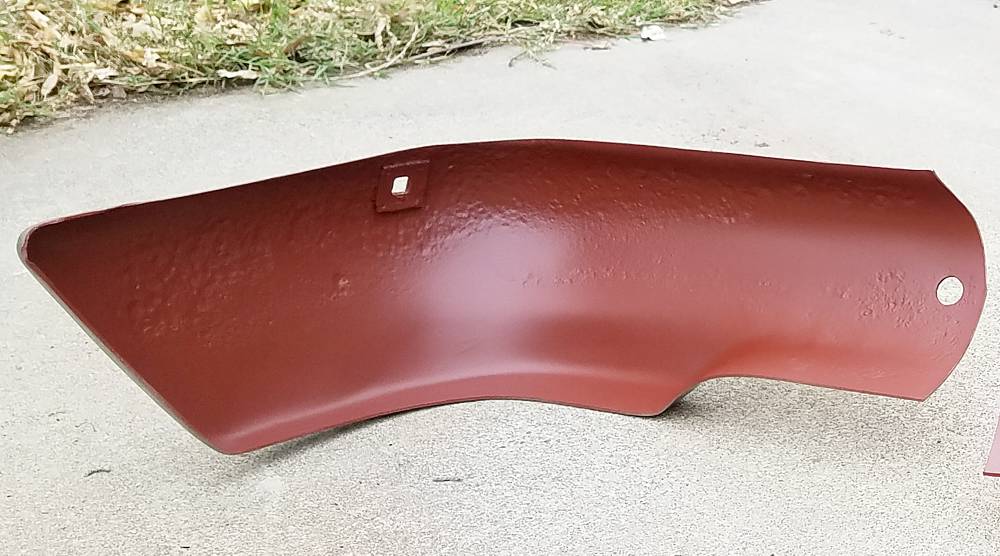 (56Fury Bumper End Pitted.jpg) (56Fury Bumper End Pitted.jpg)
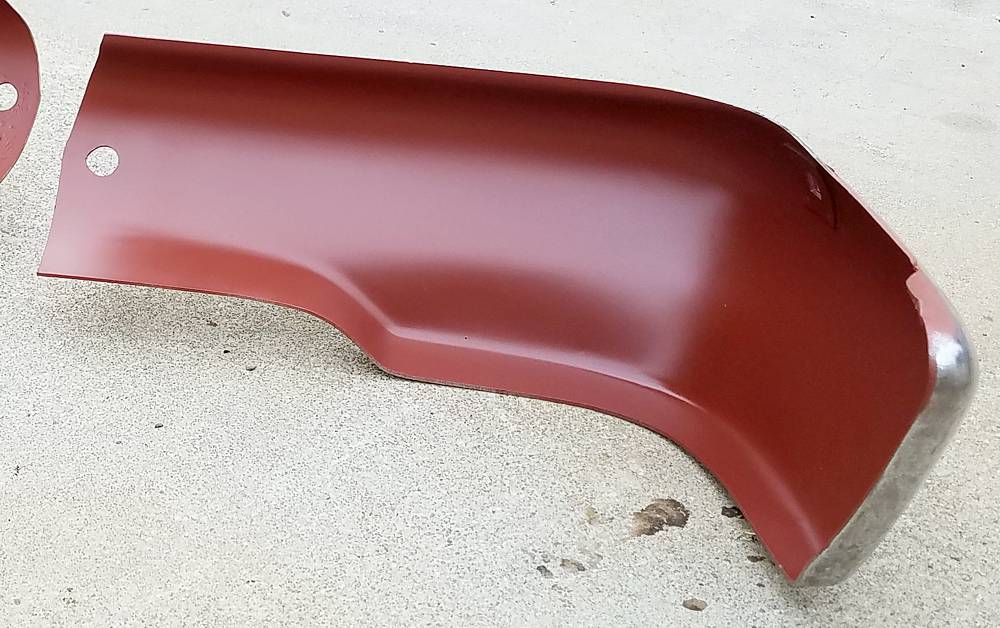 (56Fury Bumper End NOS.jpg) (56Fury Bumper End NOS.jpg)
Attachments
----------------
56Fury Bumper Pits.jpg (138KB - 321 downloads)
56Fury Bumper End Pitted.jpg (112KB - 304 downloads)
56Fury Bumper End NOS.jpg (124KB - 315 downloads)
|
|
| |
|
Expert 5K+
Posts: 9900
Location: Lower Mainland BC | .
Thanks for posting that Nathan. Reminded me of when I rehabbed by 56 Dodge grill bars. (see below).
I was under the front of the 56 Dodge today, playing with my MAC S-84 Center Plane brake tool and I looked up at the underside of my front bumper. Some surface rust (less than the grill bars) so when the weather gets better, I think the bumper is coming off for the wire wheel and Tremclad treatment.
The three stages of rehabbing that I will use on my bumper:
1. Hand brush off most of the surface rust:
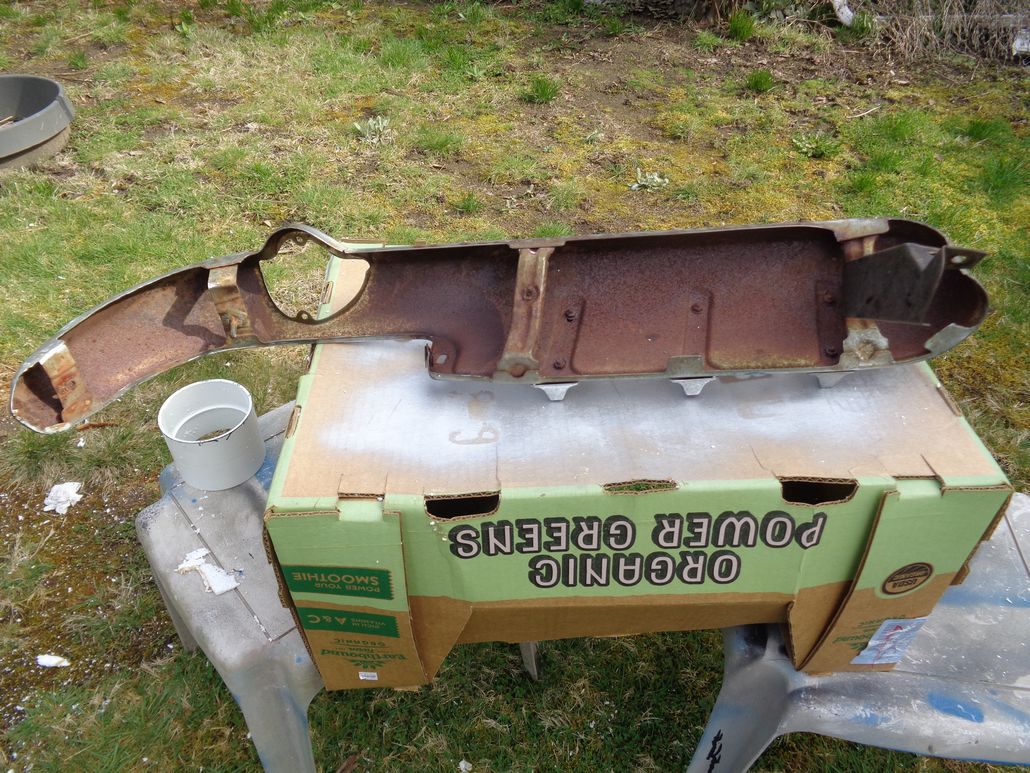
2. Chuck a wire cup brush in the drill and brush the h3LL out of the back of the item.
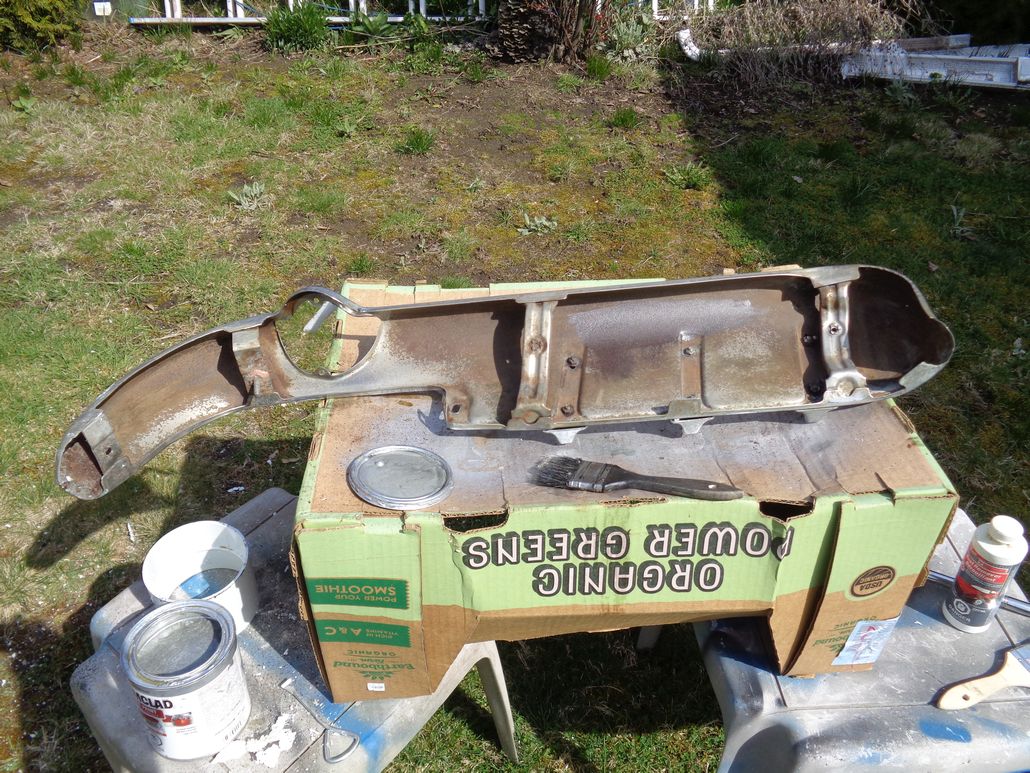
2B. (Which I didn't do on the grill bars). Spray/paint on Rust Stop Rust Converter and let dry.
3. Paint the back of the item with your favorite anti-rust paint:
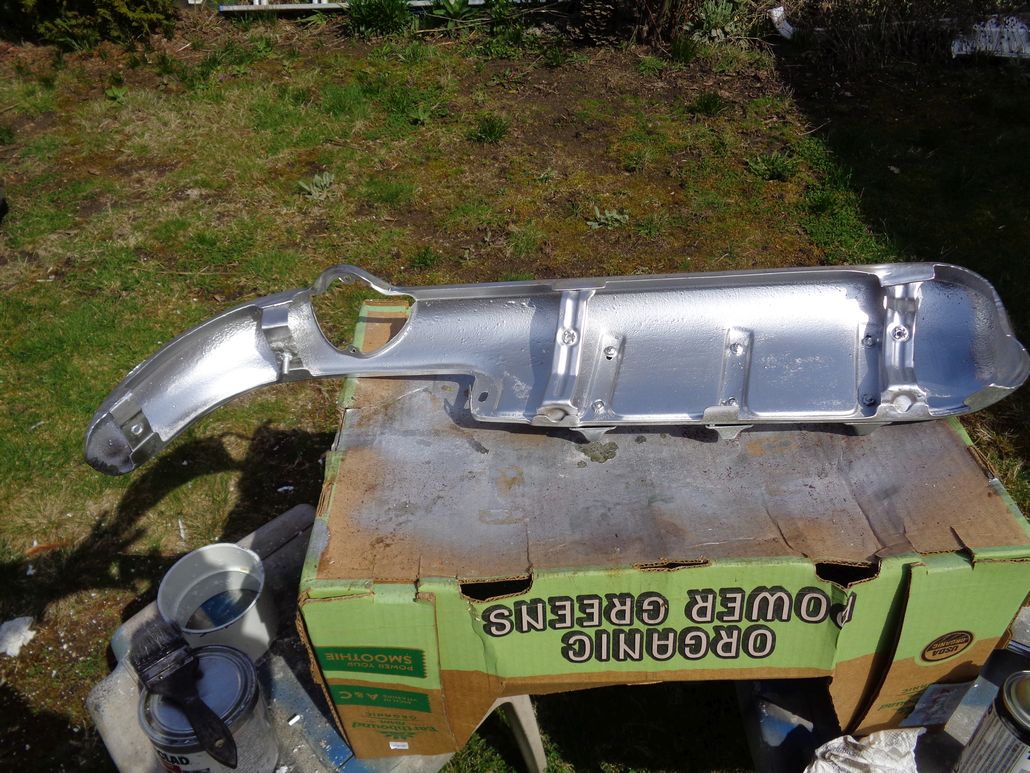 |
|
| |
|
Expert 5K+
Posts: 9654
Location: So. Cal | I've never used that Tremclad stuff. It sounds like it should work pretty well. I painted the bumper ends in preparation for the wings to go on tomorrow.
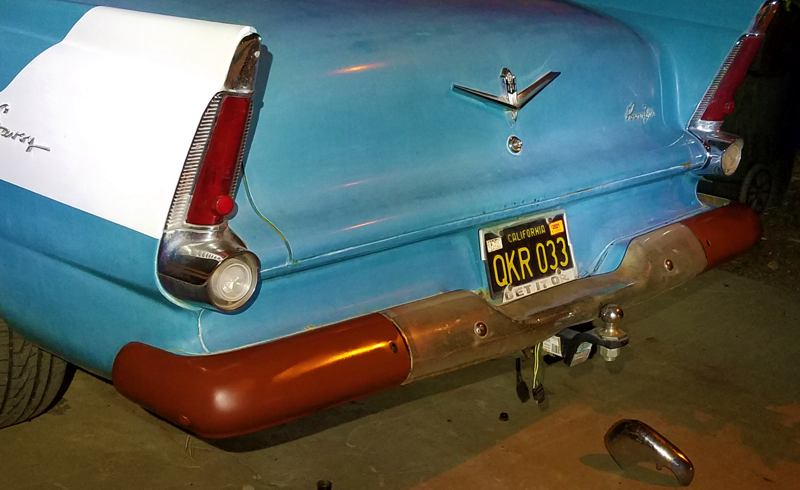 (56 Savoy Bumper Wing Prep.jpg) (56 Savoy Bumper Wing Prep.jpg)
Attachments
----------------
56 Savoy Bumper Wing Prep.jpg (66KB - 313 downloads)
|
|
| |
|
Expert 5K+
Posts: 9654
Location: So. Cal | Kind of lousy lighting for a picture, but the bumper wings look good on there. I should have installed some a long time ago, but I wasn't sure I would like it. Being around all these Furys has got me to appreciate them more. The right side seems to be angling downward a little. I may have to use a jack to tweak it upward a bit. It is mounted properly, but I think my original bumper isn't quite straight.
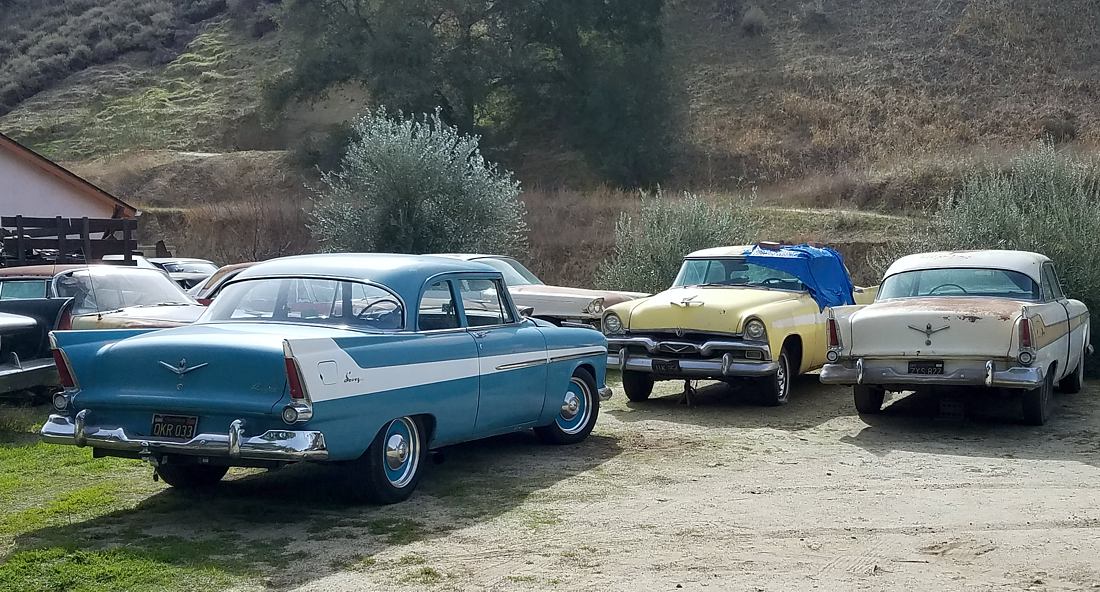 (56 Plymouths.jpg) (56 Plymouths.jpg)
Attachments
----------------
56 Plymouths.jpg (201KB - 316 downloads)
|
|
| |
|
Expert 5K+
Posts: 9654
Location: So. Cal | Took the car down to San Diego to hang out with Gary Pavlovich, buy some parts and talk about '56 Plymouths & poly motors. The motor is burning more oil than it should and starting to show its age, but working well & pulling strong otherwise.
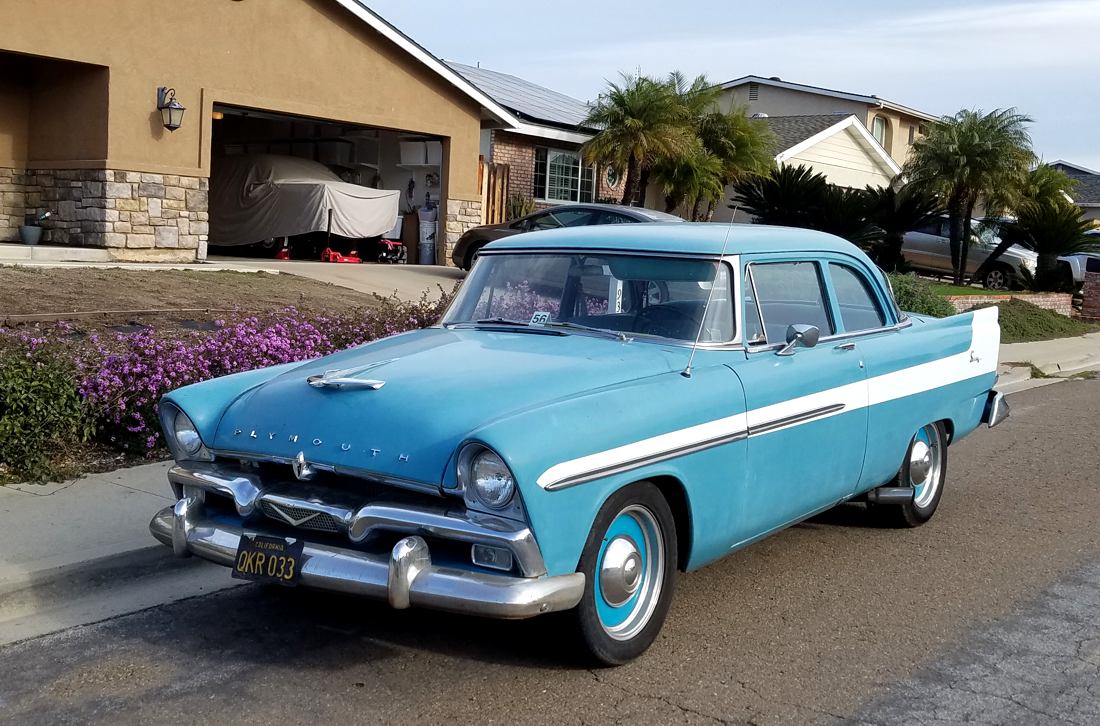 (56 Savoy Visit.jpg) (56 Savoy Visit.jpg)
Attachments
----------------
56 Savoy Visit.jpg (194KB - 301 downloads)
|
|
| |
|
Member
Posts: 30
| Hi Mr Powerflite,just recently discovered your blog,and naturally find it very interresting since I have the same car. I see you have responded to a problem I have with overheating the flathead six on another blog,and I appreciate that. Would really love to have my car like yours,with the Hemi and all,but that won't happen,just have to many cars,and too little money.you know. As you may have understood,I also have a 55' 2dr Plaza wagon in sorry shape,but it will have a Hemi, the tiny 241 Dodge.
See you have 56' Fury in your yard..wow ! Is it in nice shape ? |
|
| |
|
Expert 5K+
Posts: 9654
Location: So. Cal | Welcome to the board! I actually have 2 1/2 Furys. I only have half of the last one because I parted most of it out. The yellow car & white car in the photo above are both Furys. I am planning to put a 325 hemi into the yellow Fury and a 318 poly stroked out to 390-ish in the white car. Both are projects, but the white one is in better shape. The yellow one is missing most of the side trim, so that's a bummer. I am also currently working on a pink/white '56 Belvedere coupe for my daughter. You can see them in these threads:
Pink Belvedere: http://www.forwardlook.net/forums/forums/thread-view.asp?tid=74478&...
White Fury: http://www.forwardlook.net/forums/forums/thread-view.asp?tid=74533&...
Yellow Fury: http://www.forwardlook.net/forums/forums/thread-view.asp?tid=74451&...
Parted out Fury: http://www.forwardlook.net/forums/forums/thread-view.asp?tid=74558&...
|
|
| |
|
Member
Posts: 30
| I'm just finished reading trough your threads,and wow ! you are a real craftsman,and really get things done ! So impressed,and wish I had some of your energy..I like all your 56's Plymouths,and of course the Fury is the ultimate dream..felt sorry one of them went to scrap,but that was until I saw the pictures,it was too far gone. Seems like you have done some disc brake conversions,just wonder if you have found the key as to how to make them work good? Nothing but problems with my setup,the soft pedal.and lack of stopping power is a real dissapointment..
Looking forward to follow your threads in the future ! |
|
| |
|
Expert 5K+
Posts: 9654
Location: So. Cal | I assume that you've found my disc brake instructions by now. If not, it is here: http://forwardlook.net/forums/forums/thread-view.asp?tid=75631&post...
I replaced my tail light bulbs with some LED's and they have been working well. But I recently noticed that they are always on with some small leakage current going into them. It's a really small amount so it never drains my battery, even in the course of 2 weeks, but still, I don't like it. Anyone else had this problem and have a solution?
By the way, I may be offering this car up for sale soon in order to generate some money to purchase a new house.
Edited by Powerflite 2021-06-21 1:43 AM
 (56Savoy LED Leakage.jpg) (56Savoy LED Leakage.jpg)
Attachments
----------------
56Savoy LED Leakage.jpg (19KB - 227 downloads)
|
|
| |
|
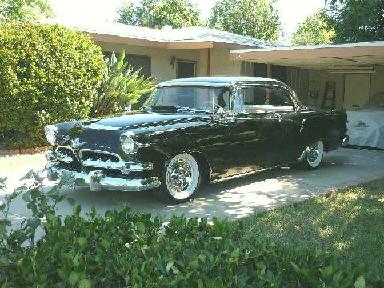
Veteran
Posts: 141
Location: Simi Valley, CA | Nathan, Was the aluminum radiator that you used and/or plan on adding A/C to your car a 2-core? I just reassemblied the front end of my 270 Hemi(timing chain replacement} in my 55Dodge and have corrected the orientation of the compressor. I have always had over heating issues with this, when I had the radiator rebuilt a number of years ago( stock 3core to a 4core). It still gets overheated, no matter what I do. I have duel A/C Units(rear deck unit and a front under dash unit). I'm trying to get the car dependable during the Summer(not working the past two years). Any advice would be greatly appreciated.
Thanks,
Ernir |
|
| |
|
Veteran
Posts: 141
Location: Simi Valley, CA | I just reread my post and I can't even spell my name right!
Ernie Baily ernestbaily@ att.net
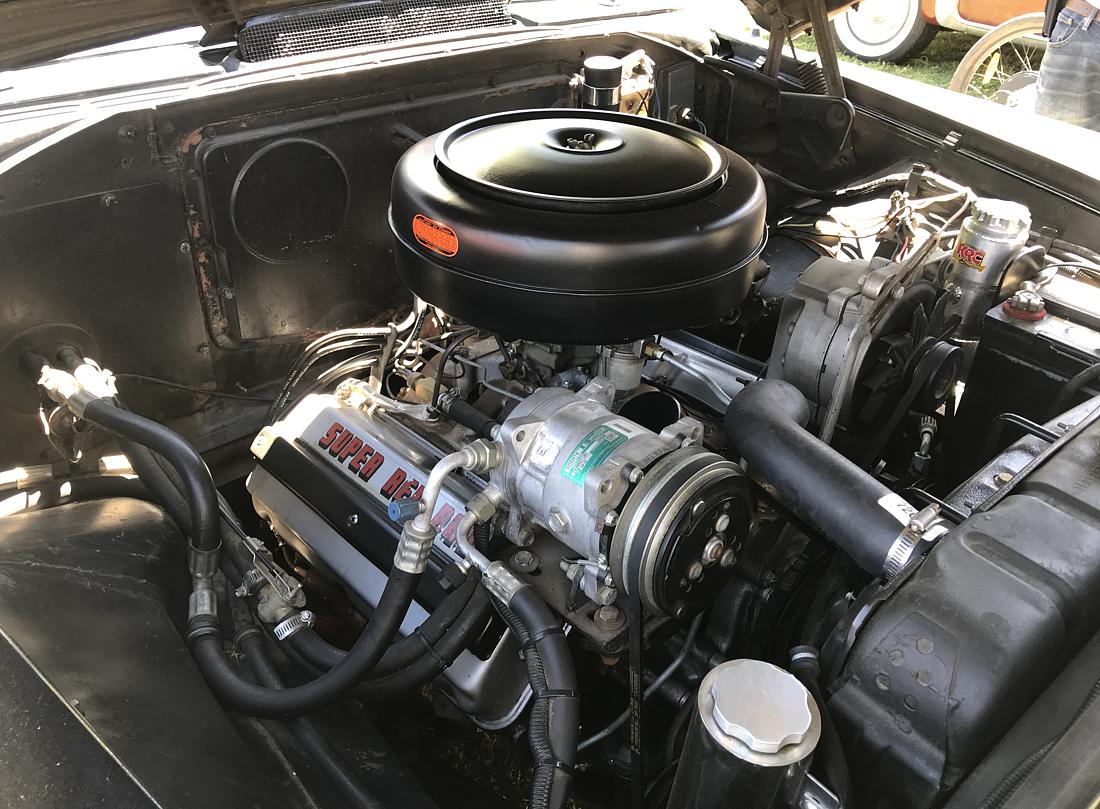 (My 55 CRL Motor.jpg) (My 55 CRL Motor.jpg)
Attachments
----------------
My 55 CRL Motor.jpg (168KB - 218 downloads)
|
|
| |
|
Expert
Posts: 3033
Location: N.W. Fla. | Burnemup - 2021-06-25 10:14 AM
I have always had over heating issues with this, when I had the radiator rebuilt a number of years ago( stock 3core to a 4core). It still gets overheated, no matter what I do.
Thanks,
Ernir What degree thermostat are you running? |
|
| |
|
Veteran
Posts: 141
Location: Simi Valley, CA | I have a 160 thermostat. I was thinking about putting a electric pusher fan on the front, but that just means that their is one more thing blocking the air flow. I currently have a electric fan & shroud instead of the original fan setup supposedly rated for a 500hp engine(from Vintage Air). |
|
| |
|
Expert 5K+
Posts: 9654
Location: So. Cal | The aluminum radiator is a 2 core, but you shouldn't gauge it by that because aluminum vs. brass are completely different from each other. Practically all aluminum radiators are 2-core and they will easily out-perform any 4-core brass radiator. If you are having overheating issues, the aluminum radiator will very likely solve your problems. They are just way more efficient than a brass radiator. They can look really stupid, unfortunately, but if you purchase one of the KKS radiators with rounded tanks and paint the top tank black, they won't look as out-of place. I used one for a '62-'64 Buick just because the mopar versions were out of stock. But the best radiator to use would be the '62-'65 B-body mopar radiator. It will fit & work the best for you. Just make sure the lower & upper hose positions are correct for you before you purchase. You'll have to come up with new mounts for your electric fan. Don't use the plastic tabs that stick through the core to mount it. Bad idea. |
|
| |
|
Expert
Posts: 3967
Location: DFW, TX | I've never seen an aftermarket electric fan that worked worth a flip. Find an OEM electric fan that fits your radiator instead, or go back to a stock mechanical fan with a shroud. And if you decide to go electric, be sure you're using a relay to deliver maximum current to the fan.
Be sure the cooling system is completely full of coolant. It's not always easy to get out the last bit of air.
The 160 thermostat may be fighting you too. I have heard arguments both ways on whether to run a high or low temp 'stat, but I have always had good luck with 195 thermostats in all my cars. The engine temperature is just more stable, and that allows you to properly tune the timing and fuel curve for the consistent temp. I could not care less about peak horsepower on a cruiser with a/c. Or if I did, I'd let the engine cool off before strapping it down to a dyno or making a pass at the drag strip.
And finally, the radiator is only going to cool the coolant if there is sufficient airflow through it. It is equally important that there is a path for the hot air to escape. Take a look at how air is moving into and out of your engine compartment. Be sure you have a seal at the hood to stop air from going over the top of the core support, instead of passing through the radiator.
|
|
| |
|
Expert 5K+
Posts: 9654
Location: So. Cal | Also, check your timing and try to advance it a little. Advancing your timing beyond the stock spec is a really good idea as long as you don't have pinging issues. It will increase the performance and dramatically reduce the heat produced by the motor. Move in small increments and drive up a large hill to see if there are any pre-ignition issues at that setting. Advance it until you start to have issues, and then back it off slightly.
Good point about the fan & hood seal, Danny. Once you stack an A/C condenser in front of a 4-core radiator, the pressure required to get the air to pass through them gets to be quite high so a good fan and a good seal becomes more important.
Edited by Powerflite 2021-06-25 12:59 PM
|
|
| |
|
Expert 5K+
Posts: 9654
Location: So. Cal | I've been running the original master cylinder on this car with disc brakes for the last 17 years now without issues. But last week, it finally died on me. So I decided to convert to a dual reservoir master. It's always a joy to drive a brakeless car onto my driveway! But it wasn't too bad with a good working E-brake on it.
I had pre-bent up 4 sets of lines when I did the brakes on my '56 Fury. It's nice to have them already made up. Saves a lot of time. However, that rear line refused to cooperate with me. Had a dickens of a time getting it off. Even used torch heat to no avail. I eventually got it off, but it stripped off the head so I had to pull the line and install a new tube nut onto it. The upper hose was also very difficult to remove, mostly because of a lack of space to apply enough force to it. I eventually got it off using a 5/8" crow's foot. I rarely ever use those things, but this was one situation where it came in handy. I was able to adjust the push rod back to the right position without modifying it, so that was nice. But I still need to bleed the the system and get a new switch for the brake light. I have a mount on the pedal already, that's required for the 700R4 cutoff, but I'll have to check if it has the brake light circuit on it as well (they work opposite from each other so you can't tie them together).
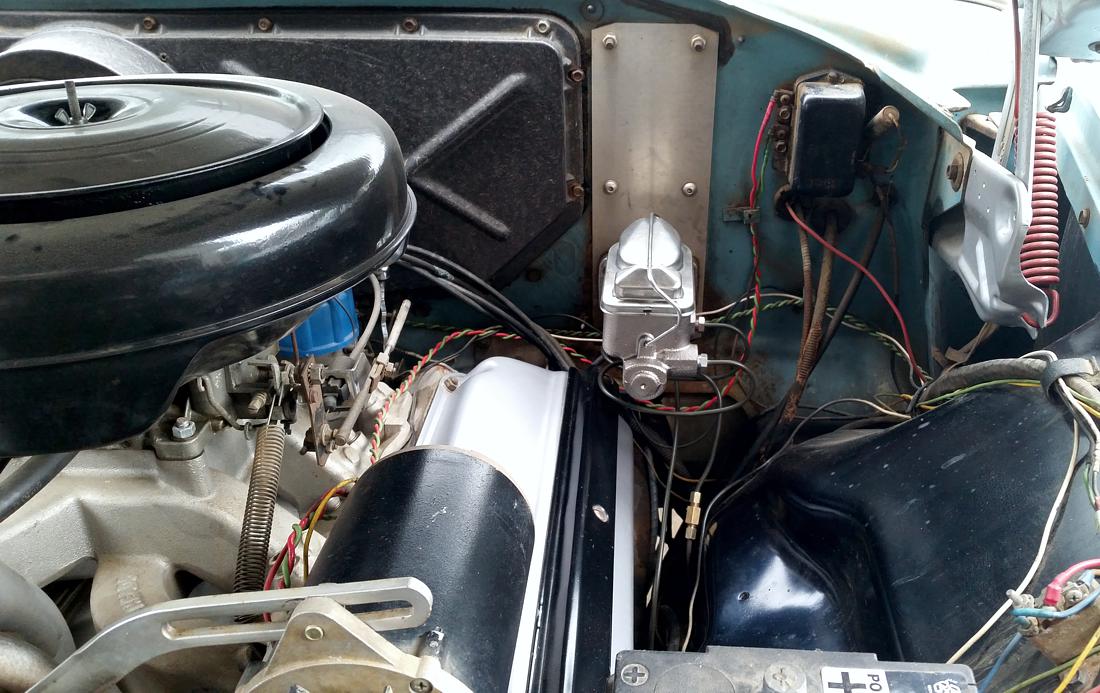 (56Savoy Dual Circuit Master.jpg) (56Savoy Dual Circuit Master.jpg)
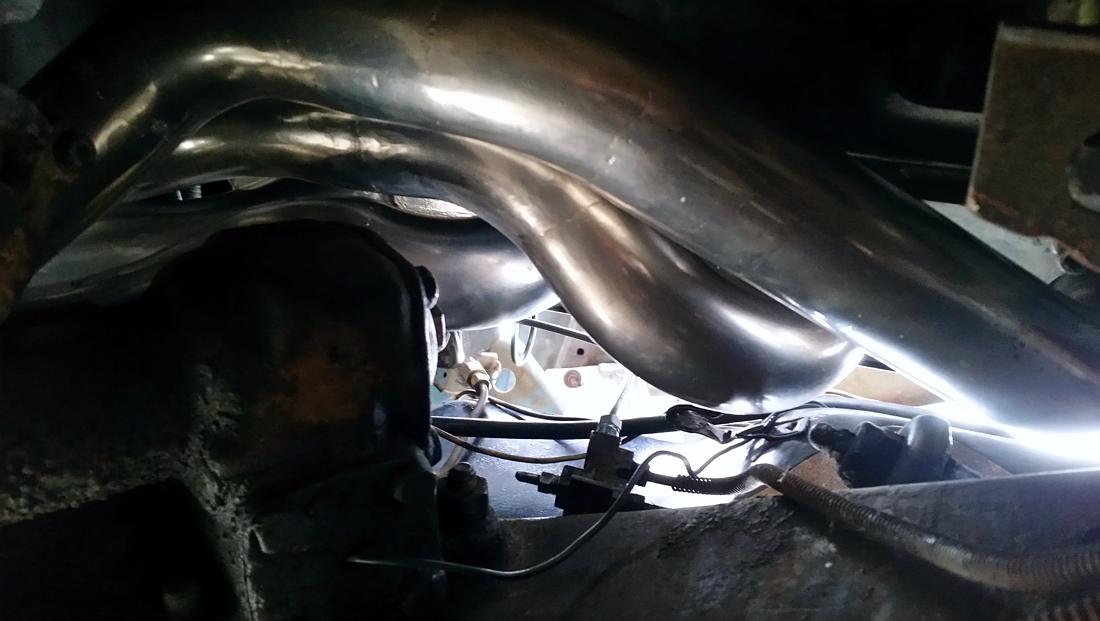 (56Savoy Brake Tee.jpg) (56Savoy Brake Tee.jpg)
Attachments
----------------
56Savoy Dual Circuit Master.jpg (167KB - 180 downloads)
56Savoy Brake Tee.jpg (74KB - 173 downloads)
|
|
| |
|
Expert 5K+
Posts: 9654
Location: So. Cal | While the car is up on jack stands, I decided to play with the front bumper mount. I found that I could move the bumper back by 1.4" with only minor changes to the bumper brackets and no changes to anything else. I think it looks a lot better this way, and it's really easy to do. To finish it off, you would need to cut the same amount out of the bumper sides, weld them together and get it re-chromed so the bumper isn't hanging into the wheelwell afterward. I'm probably going to do this on both of my Fury's because I don't want to modify them too much, but really hate the stock position of the front bumper.
But I don't think that 1.4" is quite enough for me so I'm going to try to move it a full 3.5-4" back, which is where my head thinks it belongs. But that much movement is going to take quite a bit more modifications to the bumper, splash pan, & bumper brackets.
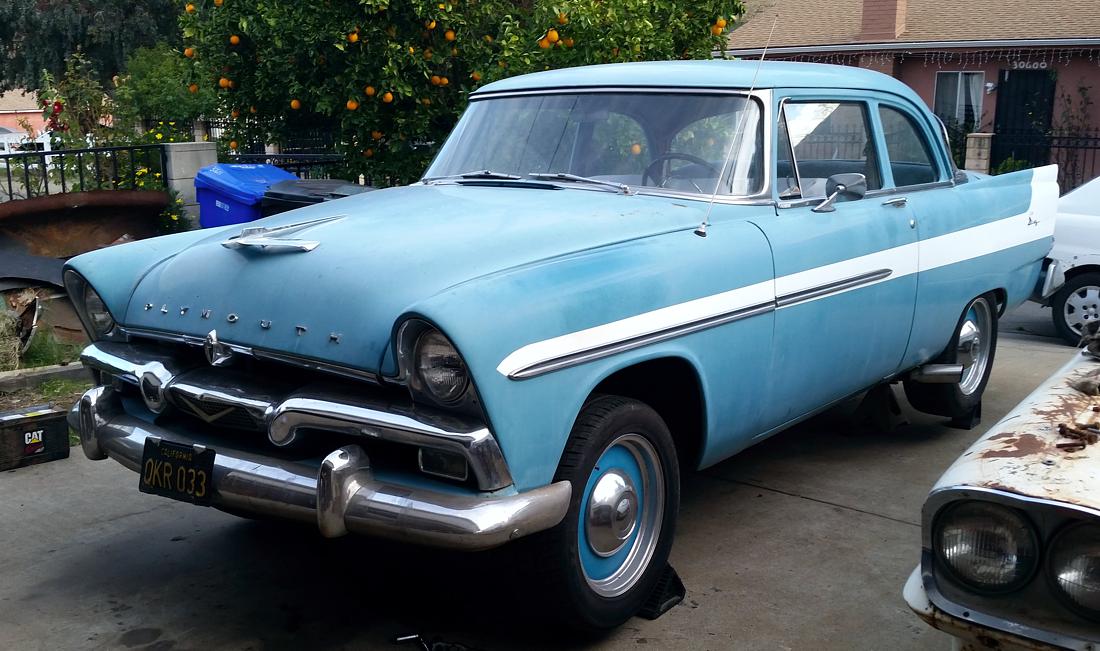 (56Savoy 1.4in Bumper Push.jpg) (56Savoy 1.4in Bumper Push.jpg)
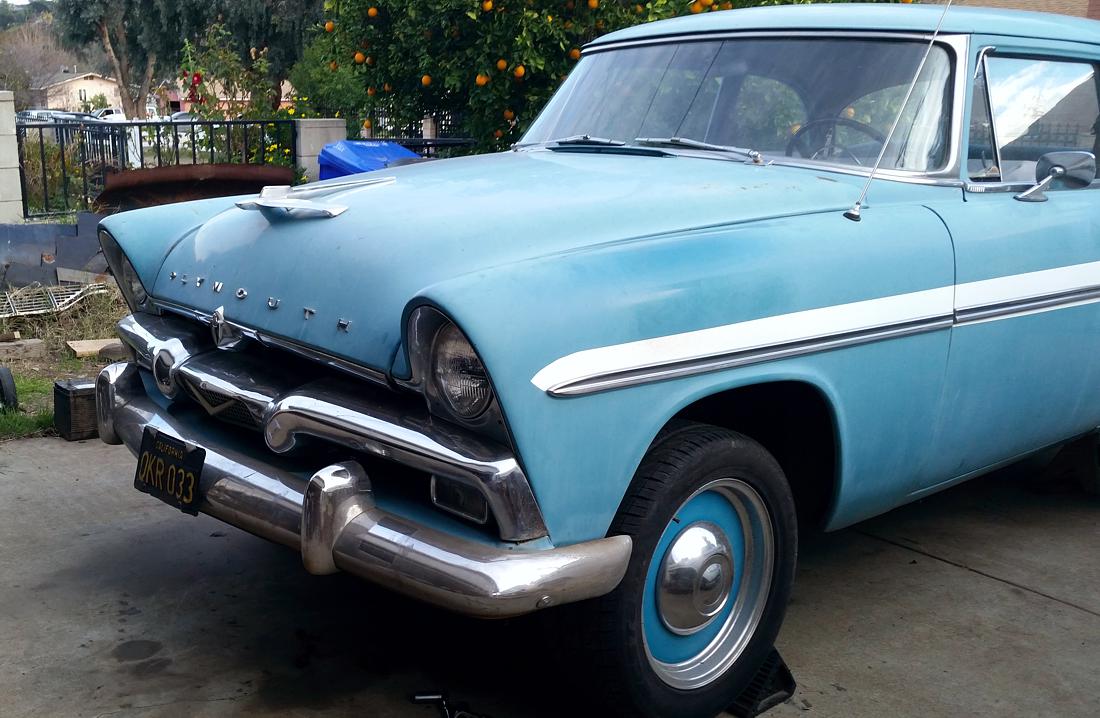 (56Savoy 1.4in Bumper Push Side.jpg) (56Savoy 1.4in Bumper Push Side.jpg)
Attachments
----------------
56Savoy 1.4in Bumper Push.jpg (158KB - 175 downloads)
56Savoy 1.4in Bumper Push Side.jpg (153KB - 176 downloads)
|
|
| |
|
Elite Veteran
Posts: 650
Location: Finland | It sure looks slimmer with the bumper as close to the body as possible. Would it be possible to just cut off the bumpers about in the line of the fenders
front line? If you then cut off as much as you want you could make the cut off pieces fit inside the main bumper... no chrome costs then..
|
|
| |
|
Expert 5K+
Posts: 9654
Location: So. Cal | It's a nice idea Ralf, but I'll just get it re-chromed eventually anyway. From all the welding repair I had to do with the DeSoto bumper guards, I've found that you can grind & file them down to a nice semi-polished finish, and then just clear coat it. When you do this you can hardly tell that it's been done, when sitting on old chrome. So that's what I'll do until I get around to a full re-chrome job.
I modified the front splash pan and bumper brackets to push the bumper back to where I had envisioned it to be. It looks good to me, but surprisingly, it seems a little too far. I put the center of the bumper, sticking out at a sloped line to the center of the hood & grill, so I thought it would look best there, but I think the problem is that the headlights stick further out than the ends of the bumper, making it look a little pug-nosed. So I am going to try pulling it out a little until the bumper ends are a little further out from the headlights and see how I like it. |
|
| |
|
Expert 5K+
Posts: 9654
Location: So. Cal | These are the pictures of the bumper pushed in most of the way. I thought it was too far so I pulled it out more. In this configuration, the sides of the bumper are pushed all the way between the grill and splash pan.
Edited by Powerflite 2022-02-19 10:44 PM
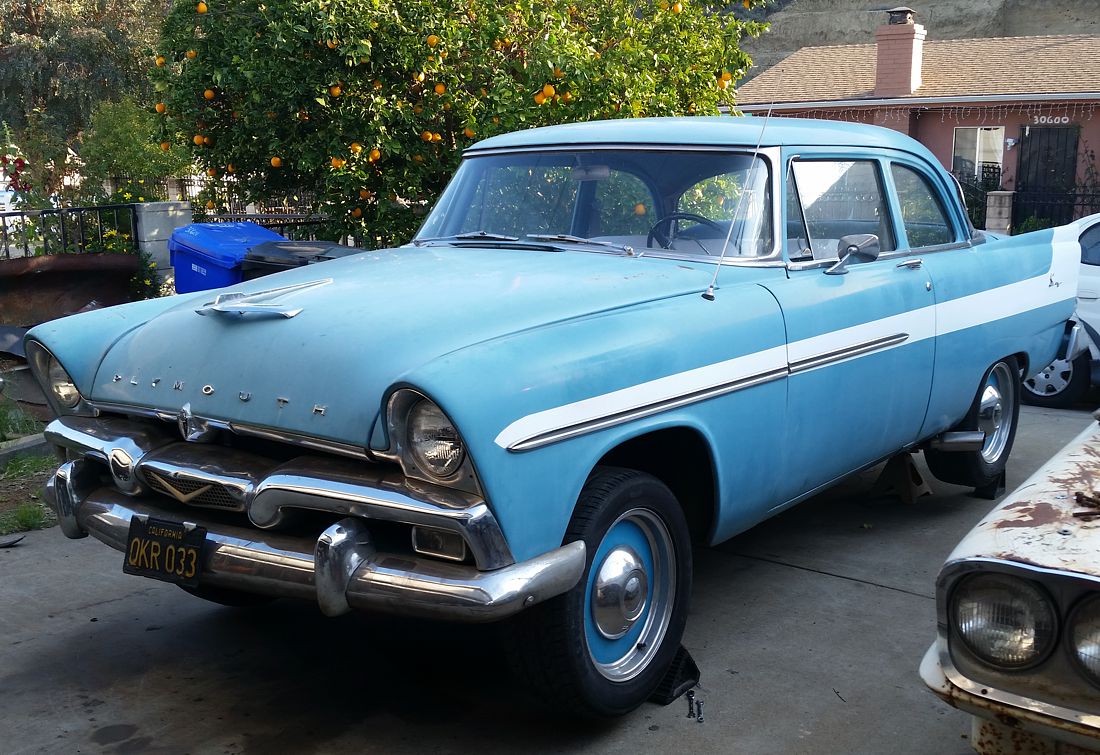 (56Savoy Full Bumper Push.jpg) (56Savoy Full Bumper Push.jpg)
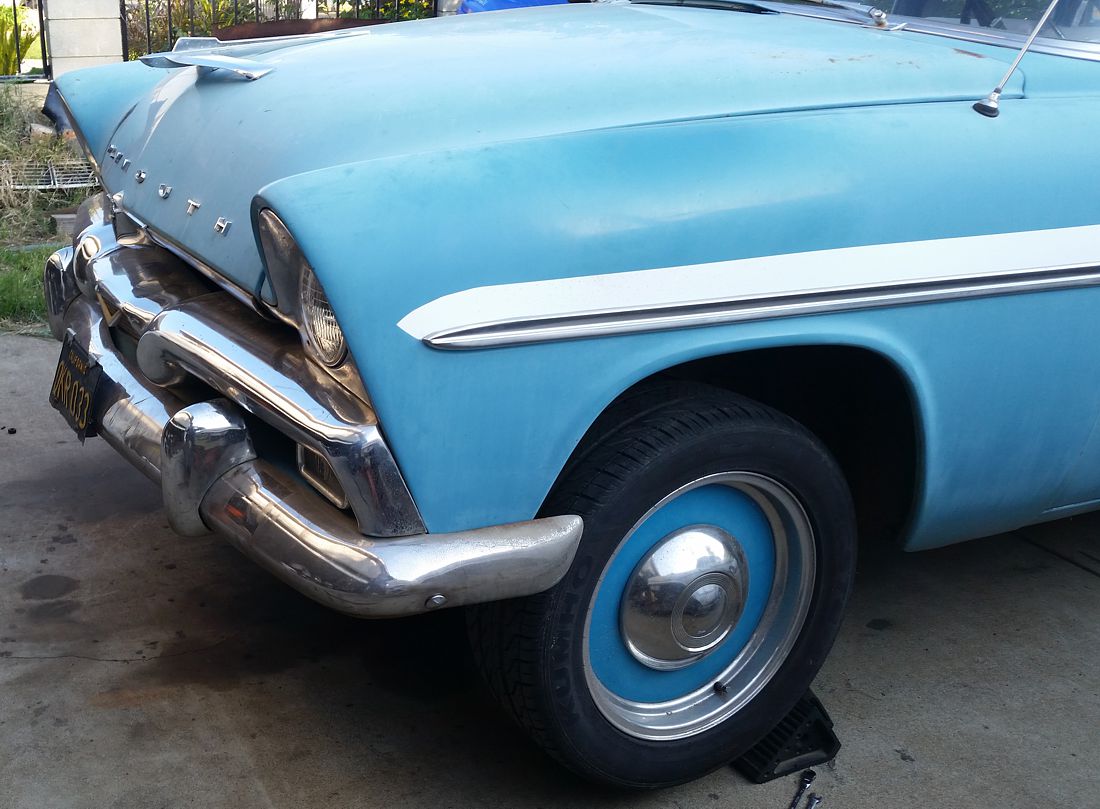 (56Savoy Full Bumper Push Side.jpg) (56Savoy Full Bumper Push Side.jpg)
Attachments
----------------
56Savoy Full Bumper Push.jpg (227KB - 155 downloads)
56Savoy Full Bumper Push Side.jpg (156KB - 156 downloads)
|
|
| |
|
Expert 5K+
Posts: 9654
Location: So. Cal | I wanted to move the bumper in on this car ever since I bought it. Almost 20yrs later, I actually get it done! I ended up setting it at 2 1/8" shorter - about .75" shorter than the first picture above. Not sure which version is harder to do as they both require making new holes in the bracket and cutting the back end off to make it shorter. Though, I did modify the front edge of the splash pan and that was probably necessary to go to 2.125". It wasn't difficult to modify, except drilling the holes wasn't easy in that hard steel. I used the plasma cutter to cut the holes into it and then cleaned them up with a carbide burr. The bumper still goes between the grill and splash pan going this far in, but not as far as in the picture above. Moving in by 1.4" is about as far as you can go without inserting the bumper between them, or modifying the splash pan.
I'll section the sides of the bumper shorter at a later date. I need to move the car off the driveway to work on a boring commuter car for a while.
Edited by Powerflite 2022-02-19 11:17 PM
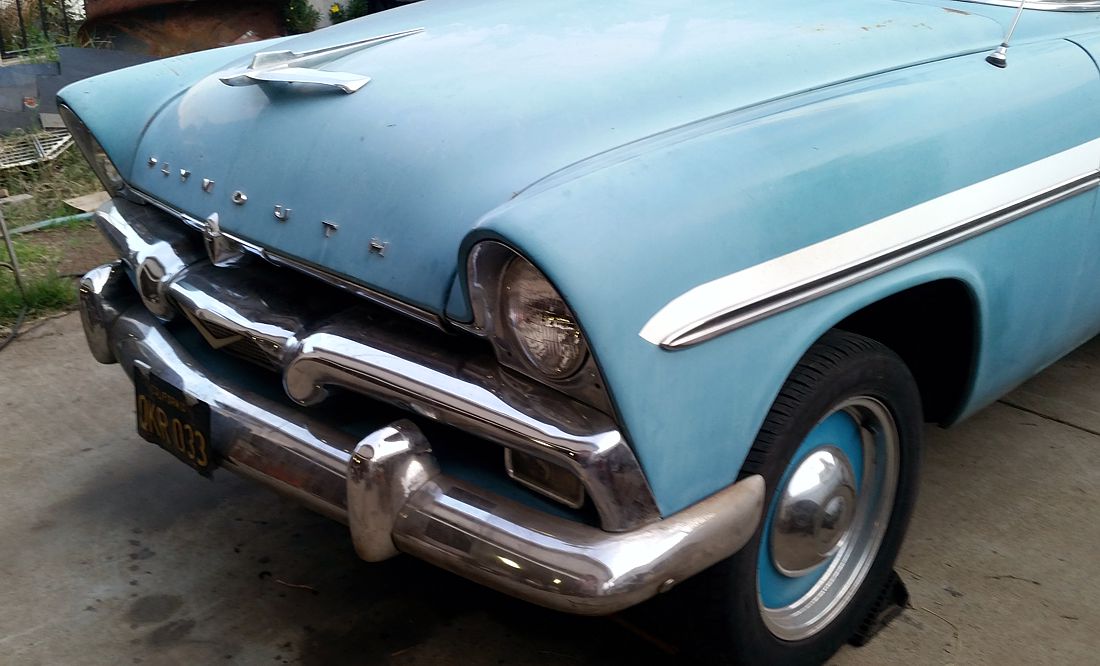 (56Plym 2.125 in Push Side.jpg) (56Plym 2.125 in Push Side.jpg)
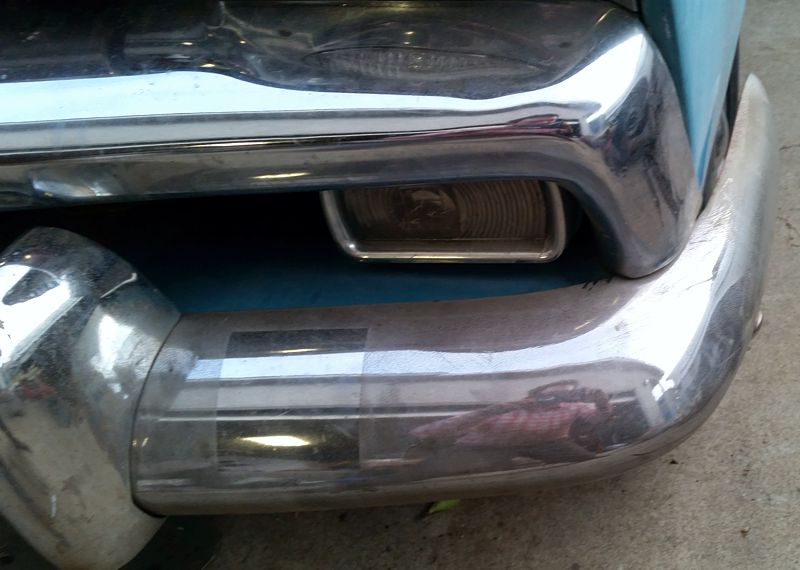 (56Plym Bumper Tuck.jpg) (56Plym Bumper Tuck.jpg)
Attachments
----------------
56Plym 2.125 in Push Side.jpg (131KB - 154 downloads)
56Plym Bumper Tuck.jpg (88KB - 150 downloads)
|
|
| |
|
Expert 5K+
Posts: 9654
Location: So. Cal | I feel really dumb. I wanted to move this car during the night, so I put a battery into it, except backwards because I didn't bring a flashlight. Lots of sparks and heard the starter relay kicking. I turn it around and the starter turns briefly and then just clicks. Great, sounds like I killed the starter. So I jacked the car up in the daylight, used my ghetto creeper for the dirt ground and pulled the starter. Yep, good solenoid action, but no turning. I take it to the garage and try it on a new battery and it works fine. Looks like I just drained a lot of power from battery. I put the starter back in, jumped the battery, and everything works fine. A lot of trouble for nothing.
The only good thing was I got to see how awesome my header design is for removing the starter. Couldn't have been nicer. And the finish on them is still looks new.
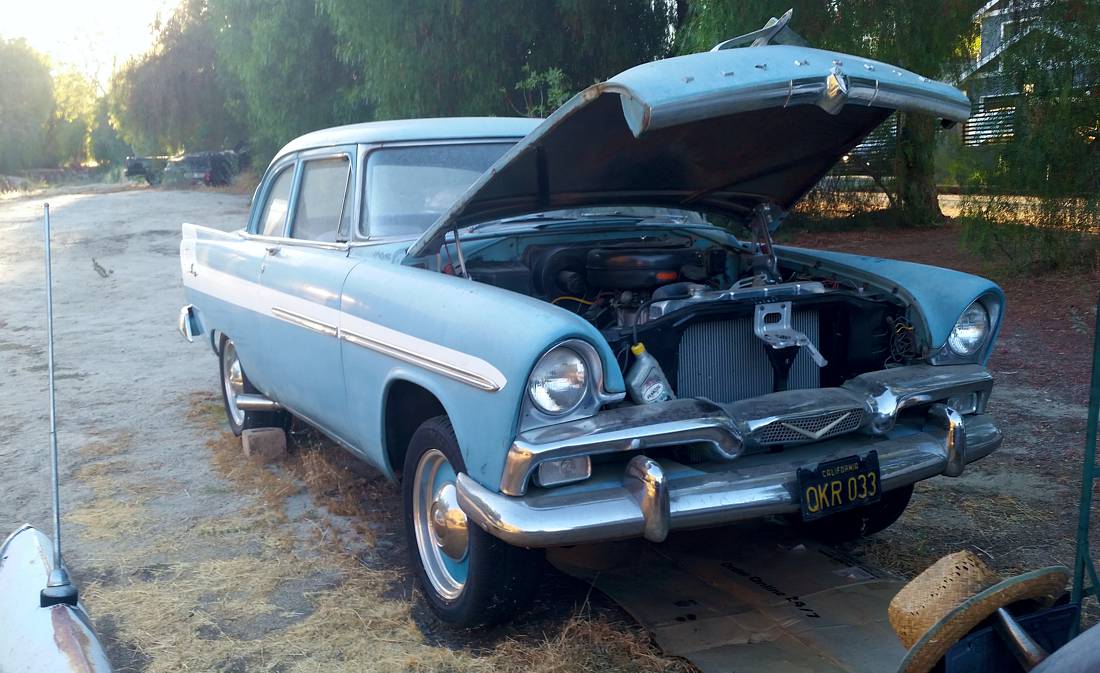 (56 Savoy Starter.jpg) (56 Savoy Starter.jpg)
Attachments
----------------
56 Savoy Starter.jpg (150KB - 109 downloads)
|
|
| |
|
Expert 5K+
Posts: 9900
Location: Lower Mainland BC | .
Nathan: You dodged a bullet (figuratively speaking)
there, man. Lesson learned and shared.
|
|
| |
|
Expert 5K+
Posts: 9654
Location: So. Cal | I sectioned the front bumper to shorten the sides on it, after moving it back a couple inches. I matched the length to what I see on my '56 Belvedere. Now, I'll cut the welds down and file the final bit before a little polishing, and then a coat of clear to cover it. I'm also going to take the bumper off and add another bead on the backside before I send the bumper in for chrome plating. That should ensure that it remains as strong as it was before cutting.
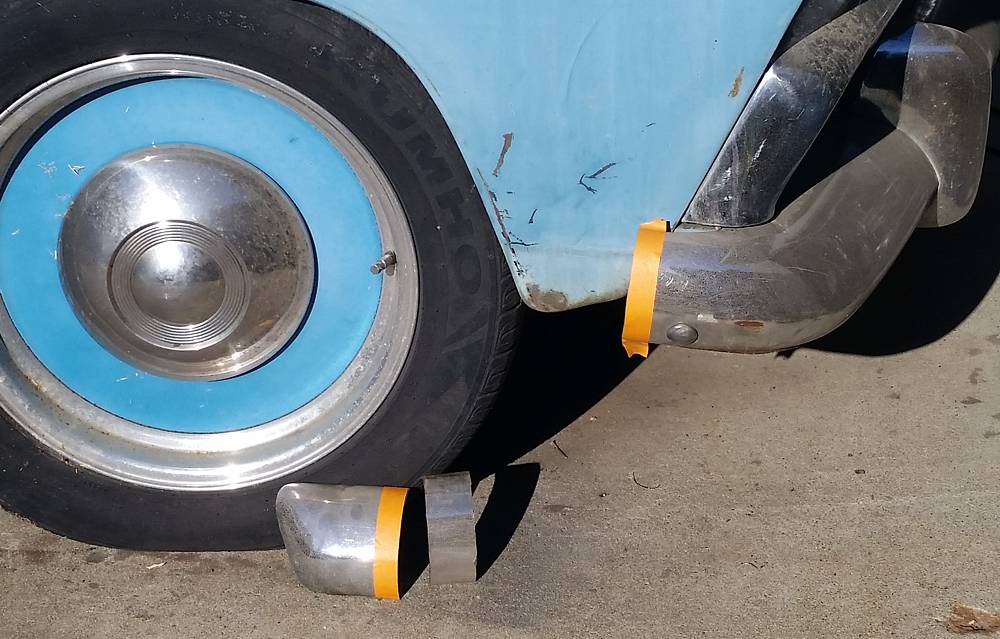 (56Savoy Bumper Cut.jpg) (56Savoy Bumper Cut.jpg)
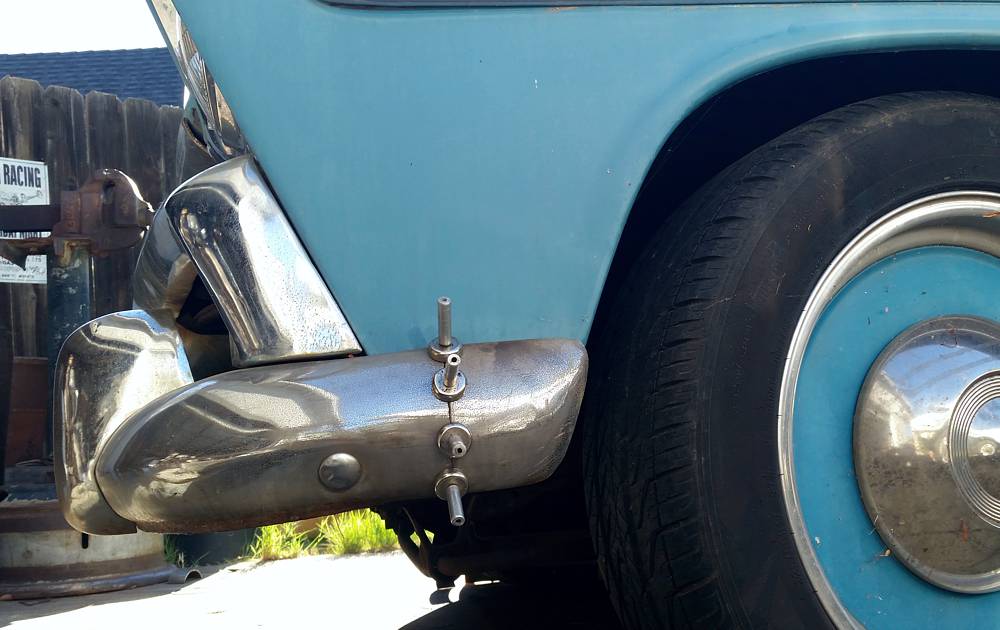 (56Savoy Bumper Shortened.jpg) (56Savoy Bumper Shortened.jpg)
 (56Savoy Bumper Welded.jpg) (56Savoy Bumper Welded.jpg)
Attachments
----------------
56Savoy Bumper Cut.jpg (122KB - 91 downloads)
56Savoy Bumper Shortened.jpg (102KB - 78 downloads)
56Savoy Bumper Welded.jpg (100KB - 92 downloads)
|
|
| |
|
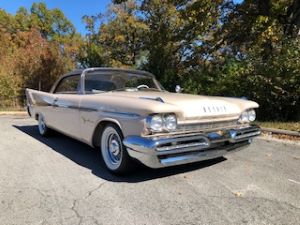
Expert
Posts: 2002
Location: Branson, MO | Super nice job.
I was at an orphan car show a couple of weeks ago with my DeSoto and there was an AMC there that the owner did the same thing to. His was easier
though since his had the collapsible bumpers and he basically just let the fluids out, collapsed them to the desired distance, and then secured them.
The results were impressive like yours. |
|
| |
|
Extreme Veteran
Posts: 443
Location: Beaumont TX |
This is a question about adjustable push rods that are discussed in this thread on 7/23/20. I started installing the adjustable push rods I bought from Smith Brothers and when I set them according to Nathan's instructions, I noticed they were shorter than the original push rods that are already tapping. I finally figured out that the ball on the original push rods is smaller than the ball on the adjustable push rods and this is what is causing them to adjust shorter. See the picture. I ordered 1/4 inch balls but the original push rods have smaller than 1/4 inch balls which I didn't notice.
The question is do you think it is safe to use these adjustable push rods even though the ball is a slightly bigger. I think the answer may be no but just want to get some advice before I go any further with this project.
Thanks,,
Sam
 (Adjustable push rods vs Stock push rodsX.jpg) (Adjustable push rods vs Stock push rodsX.jpg)
Attachments
----------------
Adjustable push rods vs Stock push rodsX.jpg (439KB - 82 downloads)
|
|
| |
|
Expert 5K+
Posts: 9654
Location: So. Cal | That's the widest point of the ball that you are measuring. The part that actually seats into the rocker could still be the same size. I really doubt that a difference of .01" or .005" on each side is going to make a big difference in terms of the seat. But to be safe, take a rocker and place the pushrod into the end of it to check how it seats in there. The other reason why I think it is OK, is that I believe they only made these fittings to more standard sizes, not in .01" increments. So I think you are probably OK. |
|
| |
|
Extreme Veteran
Posts: 443
Location: Beaumont TX | Thanks Nathan, I'll check both a lifter and a rocker. I have the intake manifold off so I can get to the lifters real easy and I'll take one out and get a close look at it. I'll post back this afternoon. |
|
| |
|
Extreme Veteran
Posts: 443
Location: Beaumont TX | I think you are right Nathan. The adjustable push rods fit in the lifters and rockers good. I have two rockers that are used and older and the smaller diameter original push rods fit in those a little deeper because the older rocker is worn in some.
I have a circular template with all sizes of circles and I checked the curvature (actually the diameter) of the grinding on the end of both types of push rods. The diameter on both is 1/4 inch. And I could see this pretty clearly because the circles one size smaller and one size bigger than 1/4 inch on my template were not as good a fit for the curvature. It's just that there is more ball on the new adjustable push rods than on the smaller diameter tips of the original push rods.
I'm going to put the adjustable lifters in and adjust them like you said a couple of years ago and see how they work out. It sure is hard to get to the adjustment nuts however. My hands don't seem to want to fit in the right direction.
Thanks for your help. I didn't see what you saw when considering the fit up of the two types of push rods. I'll post how they work out in a couple of days hopefully. |
|
| |
|
Extreme Veteran
Posts: 443
Location: Beaumont TX | I got the new adjustable push rods installed and set up per Nathan's instructions which is zero lash plus add 1/2 turn longer and they sound good. I have some very light tapping that you can only hear with a stethoscope but I am happy with the results.
My engine is an early 1955 P 27 259 V8 with Poly heads.
Comments about the project.
1. The push rod hole size in a 1955 259 V8 is 3/8 of an inch. The OEM solid pushrod has a rod diameter of 1/4 inch. And the adjustable push rods I bought from Smith Brothers had a rod diameter of 5/16 of an inch. 5/16 is the smallest diameter rod Smith Brothers makes.
The head gaskets used during my engine rebuild didn't fit up perfectly so there was a crescent of the head gasket sticking into each push rod hole. This crescent of head gasket didn't interfere with the 1/4 inch OEM push rods but it did interfere with the 5/16 inch adjustable push rods. So I used a round file to file out the head gasket material and then used a magnet to pick up all of the metal filings. I planned to do this without pulling the intake manifold and lifter valley cover. Did you know that you can lift a lifter out of it's hole with a magnet? I pulled the valve cover and got access to the lifters to put that lifter back in and then finished filing out all of the holes. It was a better job with the lifters exposed because I could make sure no metal filings got into the lifters and I could clean up the metal filings better with a magnet and then swab out the push rod holes with a gun cleaning swab. All push rod holes now look like the bore of a cleaned shotgun.
2. I put the adjustable push rods in place and installed the rocker assembly and tried to adjust the length of the push rods like Nathan said with the push rods installed and with two wrenches but I couldn't see the push rods well enough to be sure I was adjusting and tightening them properly and I was having a lot of trouble actually locking them down.
So I adjusted all of the lifters for zero lash with my hands and feel. This is actually pretty easy to do. You spin the push rod with your fingers and slowly lengthen the adjuster until you feel the spinning get tighter. You have to pay attention but it is quite noticeable and I'm confident I found zero lash. After I found zero lash, I pulled the rocker assemble, carefully removed the push rods one at a time and took them to my work bench and added the 1/2 turn of extra length and them locked them down and reinstalled them. I used yellow paint marks to mark each adjusting nut before turning them to make sure I adjusted the right amount. I am confident I got them adjusted to the right length.
3. I measured the relative length of the push rods on the driver side and the results are as follows...... Remember that the reason I had this problem in the first place is because the cam bearing that oils the driver side rockers was installed wrong and no oil at all went to the rockers for the first 500 miles I drove the car. So I have some unusual wear and this is why the push rods are so different in length. I used a dial indicator to measure the extra length (relative length). I don't have a micrometer long enough to measure the whole length of the push rod. This just means that 1 intake is 16 mills longer than 1 exhaust for example (0.104-0.088).
1 exhaust +0.088
1 intake +0.104
3 exhaust +0.113
3 intake +0.088
5 exhaust +0.117
5 intake +0.111
7 exhaust +0.098
7 intake +0.093
4. The nice thing about having adjustable push rods is that if you get some tapping, it's real easy to fix the one or two rockers that are tapping. You just have to run the engine with the valve cover off, find the tapping lifters, and lengthen the push rods on those rockers. Just increase the length on flat at a time.
It may be nice to have a thread just on Adjustable Push Rods. I was going to cut and paste but couldn't figure out exactly how to do it. If someone can give me a couple of tips, I'll be glad to put together a separate thread for this.
Thanks for all the help, especially to Nathan.
Edited by samstrader 2022-10-28 5:55 AM
|
|
| |
|
Expert 5K+
Posts: 9654
Location: So. Cal | Thanks Sam, I'm glad you got it to work well. That's crazy about the head gasket though, never run into that before. I'll have to keep an eye out for it when I dig into my '58 Dodge motor. The other great thing about adjustables is that, as you can see, there is some variation in the wear & lengths required to get it done right. You may never be able to get it run well with fixed length pushrods. |
|
| |
|
Expert 5K+
Posts: 9654
Location: So. Cal | Now I can go back to Bank Motors and get my regular service intervals done.
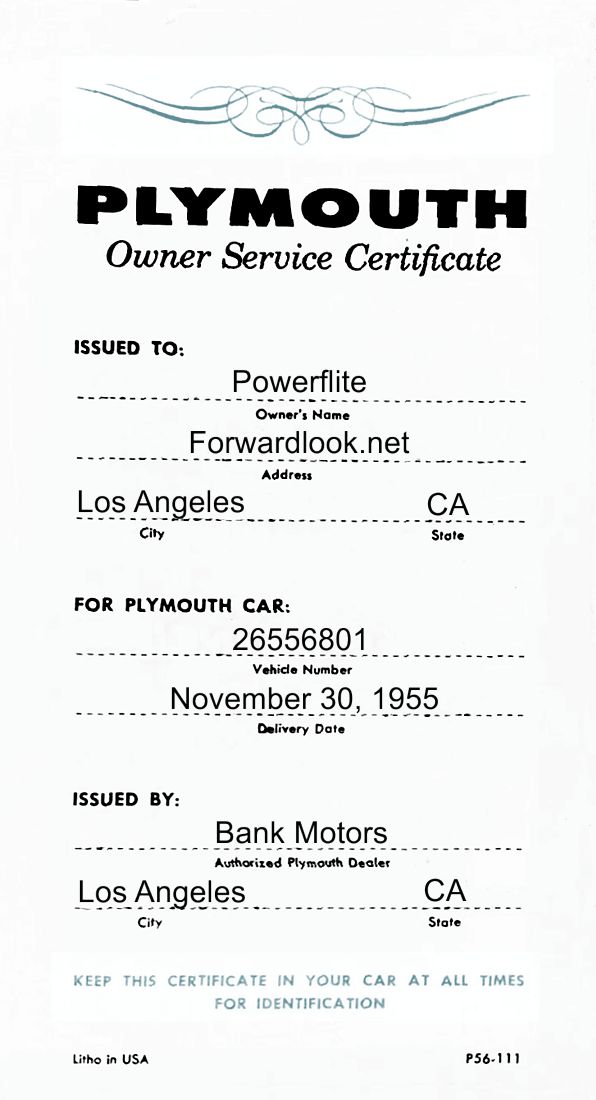 (56 Savoy Service Certificate.jpg) (56 Savoy Service Certificate.jpg)
Attachments
----------------
56 Savoy Service Certificate.jpg (77KB - 71 downloads)
|
|
| |
|
Expert 5K+
Posts: 9654
Location: So. Cal | I purchased this car from a company in Burbank that rents old cars out to the movie industry. Picture Cars was their name, and they had purchased the car from an auction when the original owner died. I used to know his name and more information about him from the previous registration (which was way out of date), but I haven't been able to find it again. But this is the business card for Picture Cars, which is no longer there. It was neat to check over their back lot as they had a lot of stuff back there from familiar movies like the Terminator etc.
 (Picture Cars Card.jpg) (Picture Cars Card.jpg)
Attachments
----------------
Picture Cars Card.jpg (58KB - 15 downloads)
|
|
| |