|
|
Extreme Veteran
Posts: 428
 
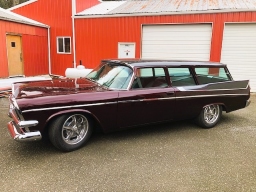
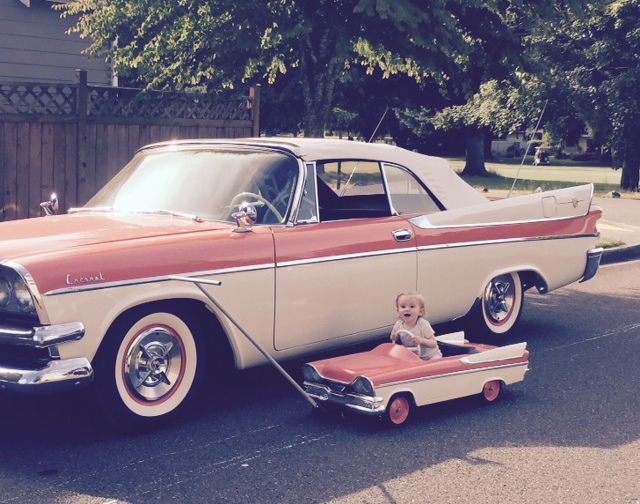
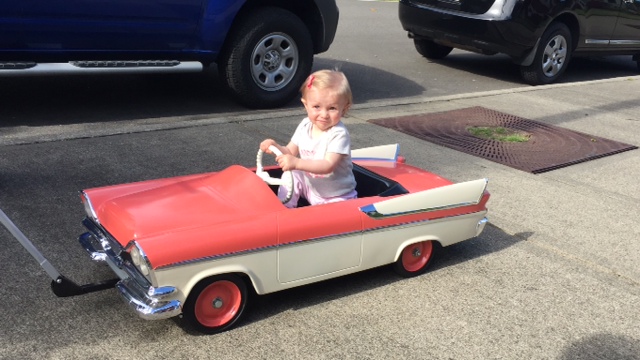
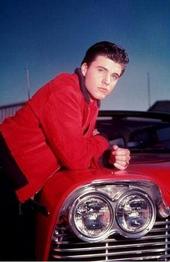
Location: McCleary WA | I just finished my granddaughter's new car so thought I'd post a picture. She loved it and didn't want to get out. I found the body on ebay and then hand built the chassis. The handle fits on either end, so it's a wagon or a stroller. I also have all the parts to make it electric and remote controlled - that will be phase 2.
 (Kolbey car 5.jpg) (Kolbey car 5.jpg)
 (Kolbey car 7.JPG) (Kolbey car 7.JPG)
Attachments
----------------
 Kolbey car 5.jpg (161KB - 180 downloads) Kolbey car 5.jpg (161KB - 180 downloads)
Kolbey car 7.JPG (108KB - 191 downloads)
|
|
| |
|
Expert
Posts: 1886
 
| That is BEYOND cool |
|
| |
|
Expert
Posts: 3480

Location: Montreal, Canada | Great work! That looks fantastic! |
|
| |
|
Extreme Veteran
Posts: 380
Location: Kennewick Wa | Two COOL convertibles... Great work... |
|
| |
|

Expert 5K+
Posts: 9670

Location: So. Cal | Neat! How did you do the chrome? What did you use for a start on the chassis? Very cute grand-daughter, by the way! |
|
| |
|
Extreme Veteran
Posts: 428
Location: McCleary WA | Powerflite - 2017-06-12 9:52 AM
Neat! How did you do the chrome? What did you use for a start on the chassis? Very cute grand-daughter, by the way!
The chrome is vinyl vehicle wrap material. The chassis is 1" square tube, with a homemade front axle that swivels up and down for bumps. Hardest part was making the steering - from the front, rear, and steering wheel - all work together. The headlights, made from real '57 Dodge parking lights, and taillights will work once a battery is installed for the future motor. I built it in secret over a 3 year period, then called the kids and told them I was bringing a new convertible to show them. |
|
| |
|
Expert
Posts: 2633
Location: Minor Hill, TN | that is awsome when she gets older you should pass the big '57 dodge to her so that way the car stays in the family |
|
| |
|
Expert 5K+
Posts: 6500
Location: Newark, Texas (Fort Worth) | So cool! Need some hubcaps to finish off:
https://www.ebay.com/p/AMF-Pedal-Car-Chrome-Spinner-Hub-Cap/92874510...
http://www.speedwaymotors.com/shop/pedal-car-hubcaps~14-131-549-179... |
|
| |
|
Extreme Veteran
Posts: 428
Location: McCleary WA | I agree, but had not found any yet that I like. The ones you linked to are I believe only 3 1/8" and I need at least 4 1/4" diameter. Plus I may go to larger wheels when I add the electric motor next winter. These are to scale, but kinda small for a kiddie car. |
|
| |
|
Expert 5K+
Posts: 6500
Location: Newark, Texas (Fort Worth) | Maybe these will work on there own:
http://www.ebay.com/itm/1957-Dodge-Lancer-hub-cap-spinners-/1322116...
http://www.ebay.com/itm/1957-Dodge-Royal-Lancer-Spinner-Hub-Cap-/35... |
|
| |
|
New User
Posts: 4
Location: joliet,il. | very very nice. |
|
| |
|

Extreme Veteran
Posts: 406
Location: Hilltown, PA |
That's super cool, and clearly a lot of work. Very nice!
Gregg |
|
| |
|
Extreme Veteran
Posts: 428
Location: McCleary WA | Kolbey's Car is now electric and remote controlled (and/or driver controlled). Can't wait for spring! |
|
| |
|
Expert 5K+
Posts: 9670
Location: So. Cal | Pics? What did you use and how did you do it?
Edited by Powerflite 2018-01-21 3:08 PM
|
|
| |
|
Extreme Veteran
Posts: 428
Location: McCleary WA | Powerflite - 2018-01-21 12:07 PM
Pics? What did you use and how did you do it?
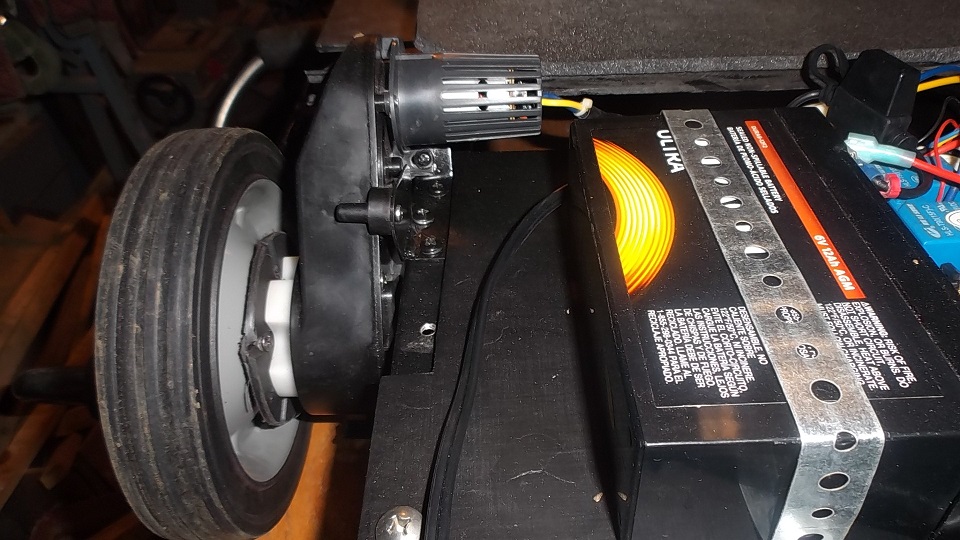
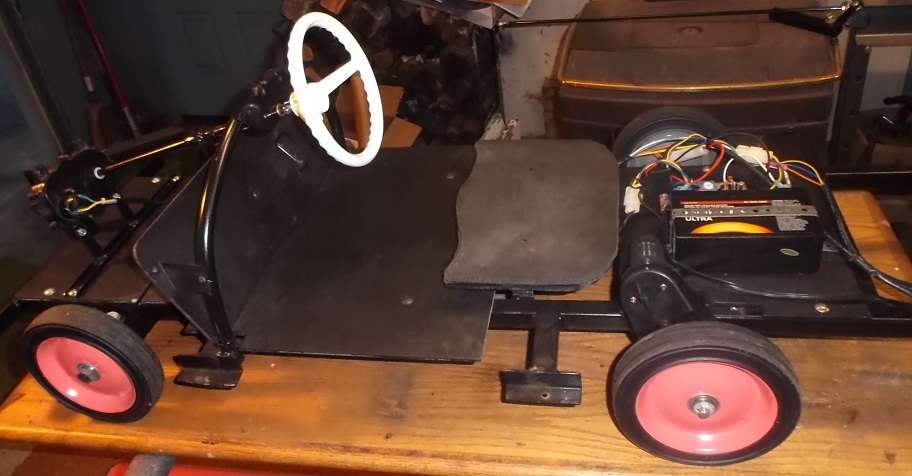
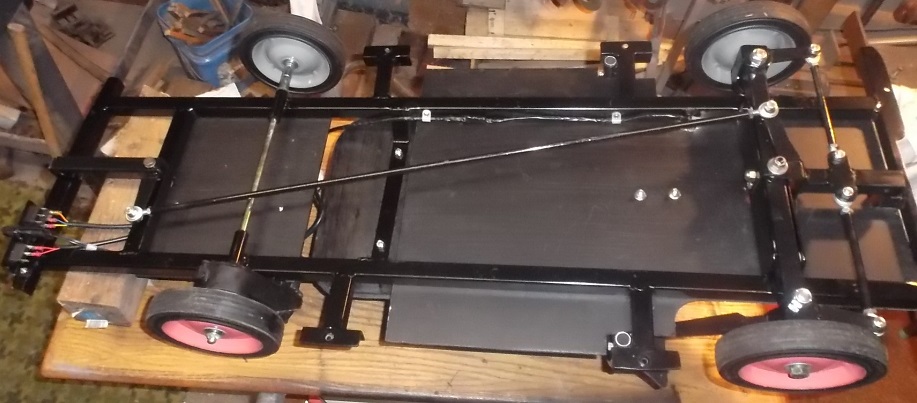
Before I started this project I was searching ebay for remote controlled ride-on kiddie cars and found someone selling the electronics out of one - motor, steering motor, pc board, wiring plus axle and rear wheels. I bought it all for $45 and then found a matching remote control. When first building it as a wagon/stroller I allowed space for the future motor etc. Installation only took a couple of days. Only problem was I used a 1/2" rear axle the first time and the motor fit a 10mm one. A couple of bushings took care of that. I'll take some chassis pics the next time I take the body off.
Edited by Darryl T 2018-01-22 12:58 AM
|
|
| |
|
Extreme Veteran
Posts: 428
Location: McCleary WA | Darryl T - 2018-01-21 3:05 PM
Powerflite - 2018-01-21 12:07 PM
Pics? What did you use and how did you do it?
I'll take some chassis pics the next time I take the body off.
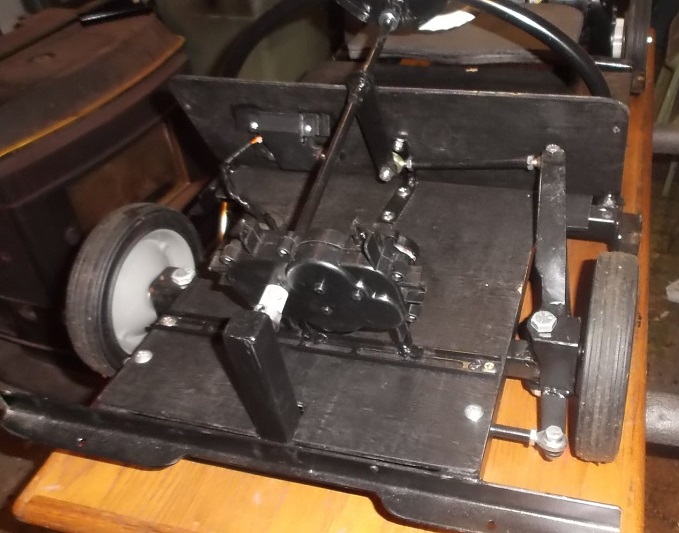
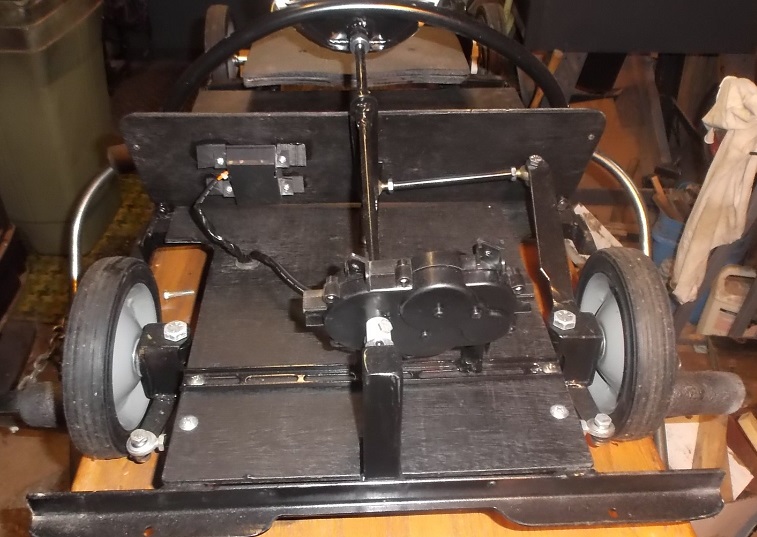
If anyone is interested here are a few shots of the chassis (last one is bottom side):
Edited by Darryl T 2018-01-31 10:54 PM
 (0001.jpg) (0001.jpg)
 (0002.jpg) (0002.jpg)
 (0004.jpg) (0004.jpg)
 (0007.jpg) (0007.jpg)
 (0010.jpg) (0010.jpg)
Attachments
----------------
0001.jpg (193KB - 170 downloads)
0002.jpg (225KB - 152 downloads)
0004.jpg (285KB - 141 downloads)
0007.jpg (207KB - 141 downloads)
0010.jpg (211KB - 141 downloads)
|
|
| |