|
|

Expert
Posts: 1234
  
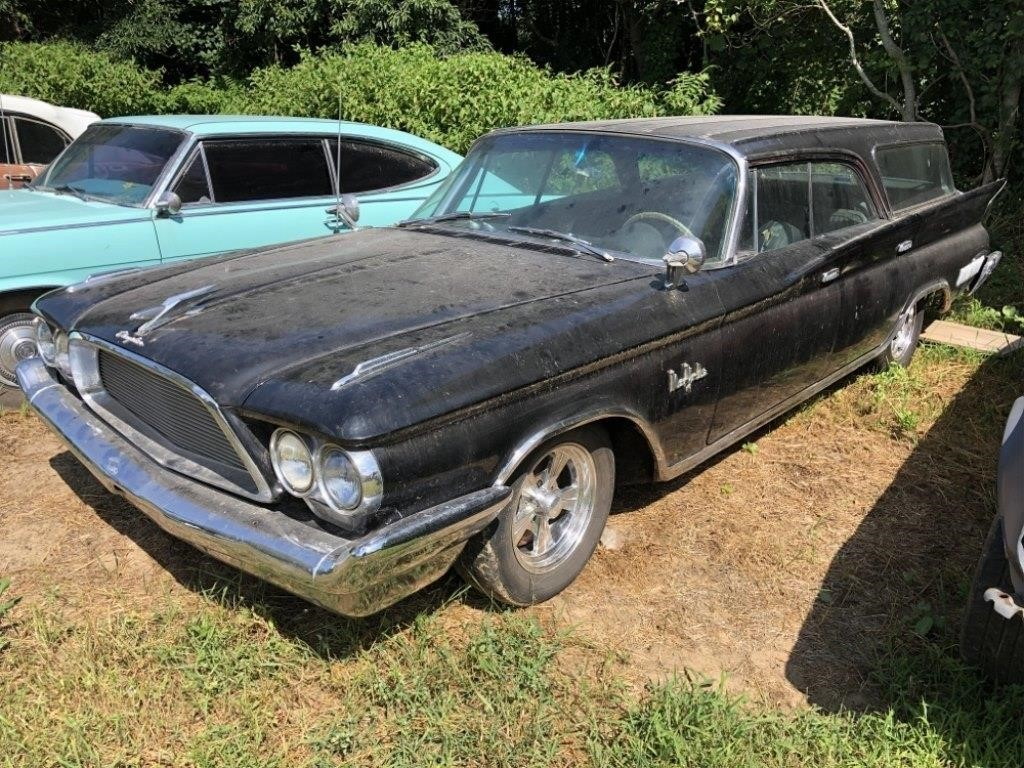
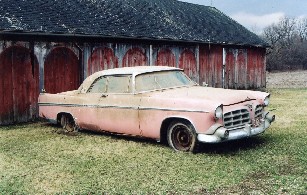
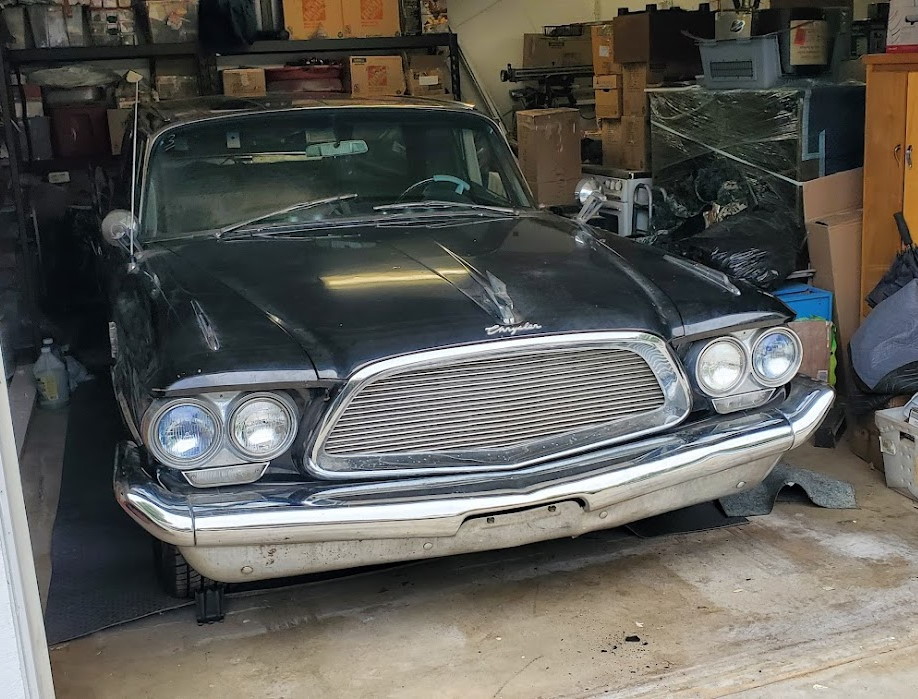
Location: Ramona, CA | I'm trying to buy this wagon and it's not in as good of shape as the seller advertised. It's pretty crusty and has bondo in the lower body. Other problems with the car includes missing the gas tank. I haven't been able to find a tank anywhere. He can't start the car and said he's never driven it but said that the transmission engaged when he had it running 8 years ago. He said the brakes don't work either. The exhaust system is shot. Also the car was full of mice so probably has wiring damage along with other issues. Stinks really bad, the upholstery is a wreck. All the exterior potmetal is bad. He claimed it just came out of 40 years of storage in a climate controlled garage. But unless that climate was a swamp, I'm not sure what he means.
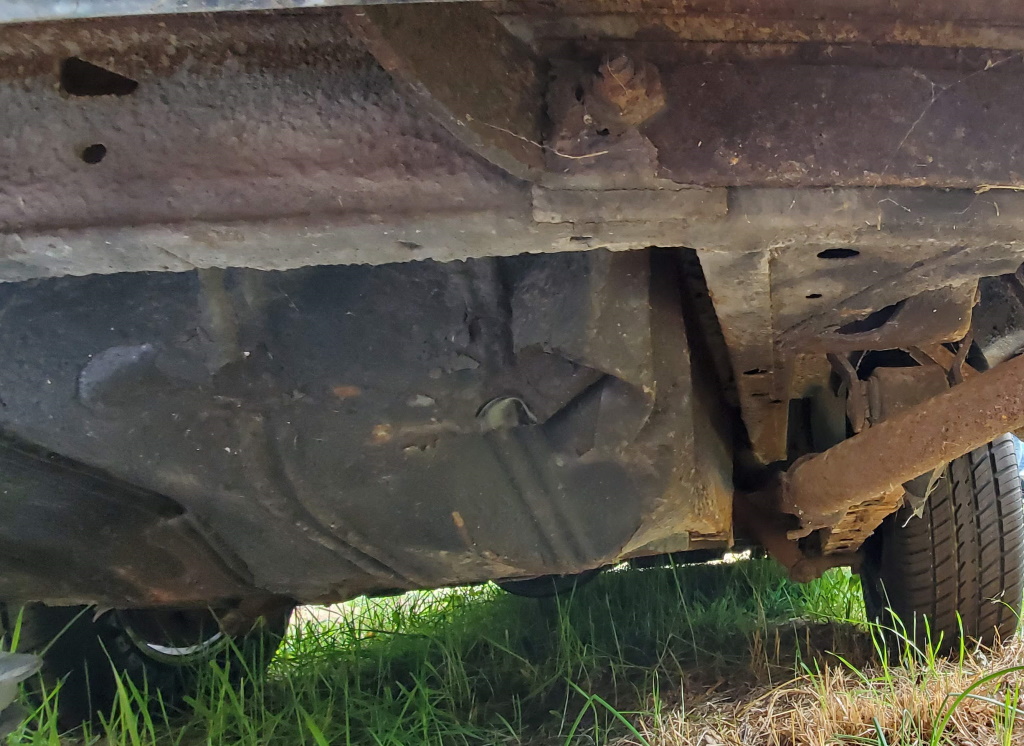
Another big problem is that the rear underbody is badly damaged like they backed up over a boulder and smashed in the rear compartment. Is this area the same for all the '60-64 big wagons? Anyone have a gas tank?
Edited by NicksGarage 2019-10-15 8:48 PM
 (001.jpg) (001.jpg)
 (smash.jpg) (smash.jpg)
Attachments
----------------
 001.jpg (403KB - 460 downloads) 001.jpg (403KB - 460 downloads)
smash.jpg (299KB - 453 downloads)
|
|
| |
|
Expert
Posts: 1900

| Someone is going to end up paying over 10k for that thing tomorrow |
|
| |
|
Expert
Posts: 1234
Location: Ramona, CA | Mike McCandless - 2019-10-15 7:09 PM
Someone is going to end up paying over 10k for that thing tomorrow
Probably me! |
|
| |
|
Expert
Posts: 1234
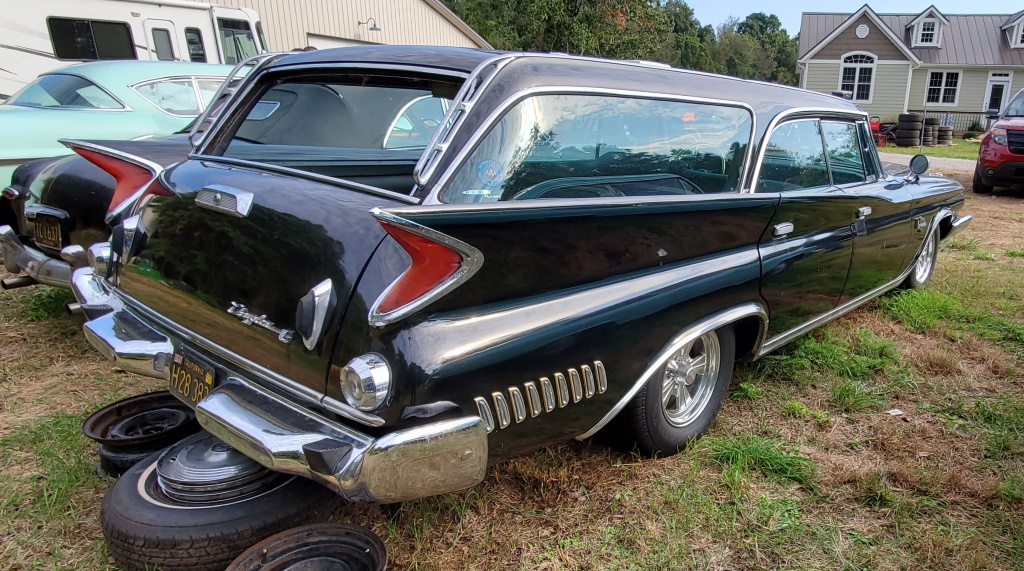
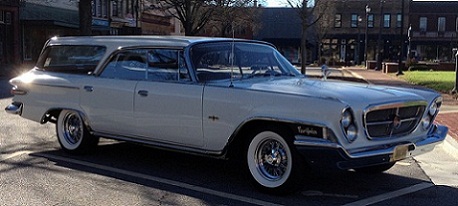
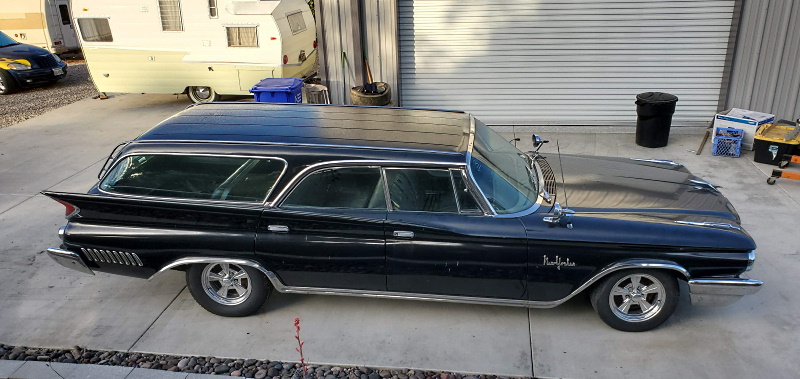
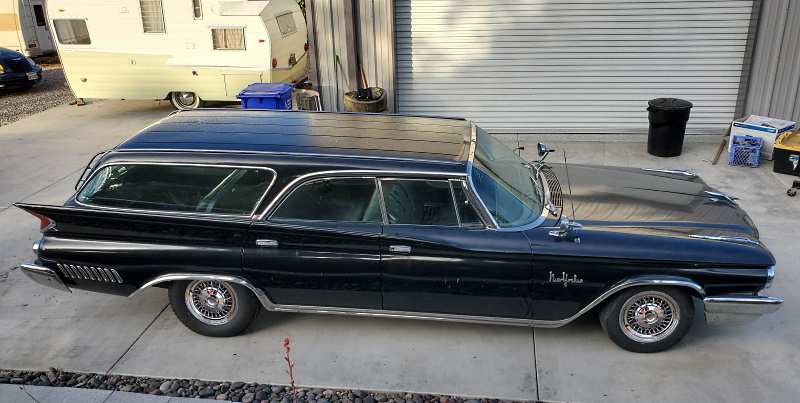
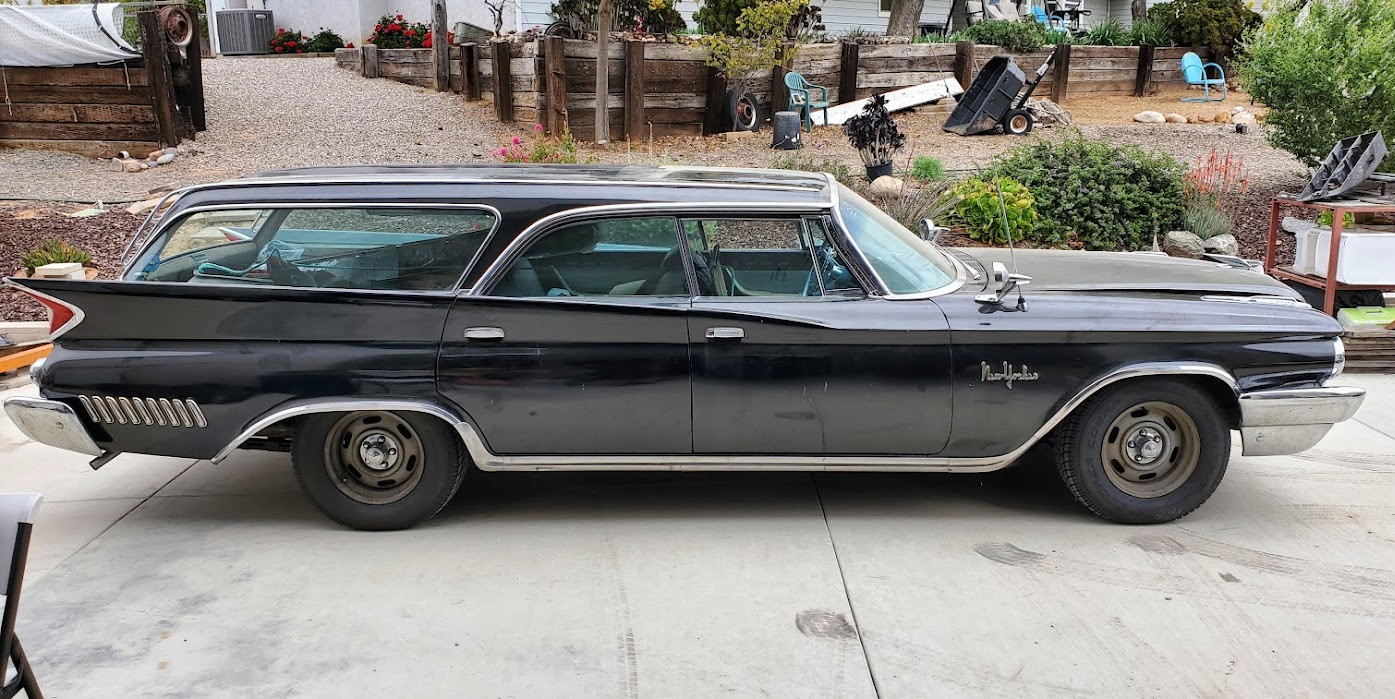
Location: Ramona, CA | Well I bought it. So now my black 300F will have a garage companion. I'll post more pictures later. Looks a lot better washed off but still lots of issues. Especially the chrome and that pesky missing gas tank.
 (003.jpg) (003.jpg)
Attachments
----------------
003.jpg (343KB - 444 downloads)
|
|
| |
|
Exner Expert 10K+
Posts: 10621

Location: Lower Mainland BC | NicksGarage - 2019-10-16 2:03 PM
Well I bought it. So now my black 300F will have a garage companion. I'll post more pictures later. Looks a lot better washed off but still lots of issues. Especially the chrome and that pesky missing gas tank.
Looking good. Cleaned up real nice.
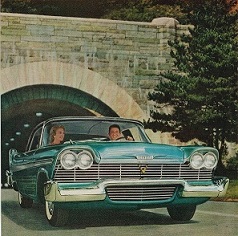
Here's a finished one you could use as a guide:
https://www.hemmings.com/classifieds/cars-for-sale/chrysler/new-york...

Edited by 56D500boy 2019-10-16 7:56 PM
|
|
| |
|
Expert
Posts: 1900
| Hell of a project, good luck
|
|
| |
|

Expert
Posts: 2519

Location: central Illinois | I've never noticed before but the horizontal grill bars are the same style as the 60 DeSoto. Different openings so no interchange of course.
That New Yorker will be quite an eye catcher when it's back on the road. |
|
| |
|
Expert
Posts: 1234
Location: Ramona, CA |
I love the red interior with the black. They used that car to try and get the bids up. Even that car has a few restoration issues. I'd like to see what they started with. I want to make mine a driver. |
|
| |
|
Exner Expert 10K+
Posts: 10621
Location: Lower Mainland BC | b5rt - 2019-10-16 5:22 PM
I've never noticed before but the horizontal grill bars are the same style as the 60 DeSoto. Different openings so no interchange of course.
 |
|
| |
|

Exner Expert 10K+
Posts: 10251
Location: So. Cal | Congrats. If you want one of these, it was probably the right decision to purchase it. If the bottom of the tank isn't rusted, I would cut the top off enough to work out all the dents well. Then weld it back up, maybe even put a fuel injection pump, baffle & pickup in there while you are at it. Then weld the top back on. After welding, clean up the welds nice, and then braze over the top of them. That will ensure that it is sealed well. Just clean out the tank well with dish soap first, fill it mostly with water and a steady flow of compressed air when you make the first cut so you are safe. I've done this multiple times. Looks like a great project even with its issues. Congratulations. |
|
| |
|
Expert
Posts: 1234
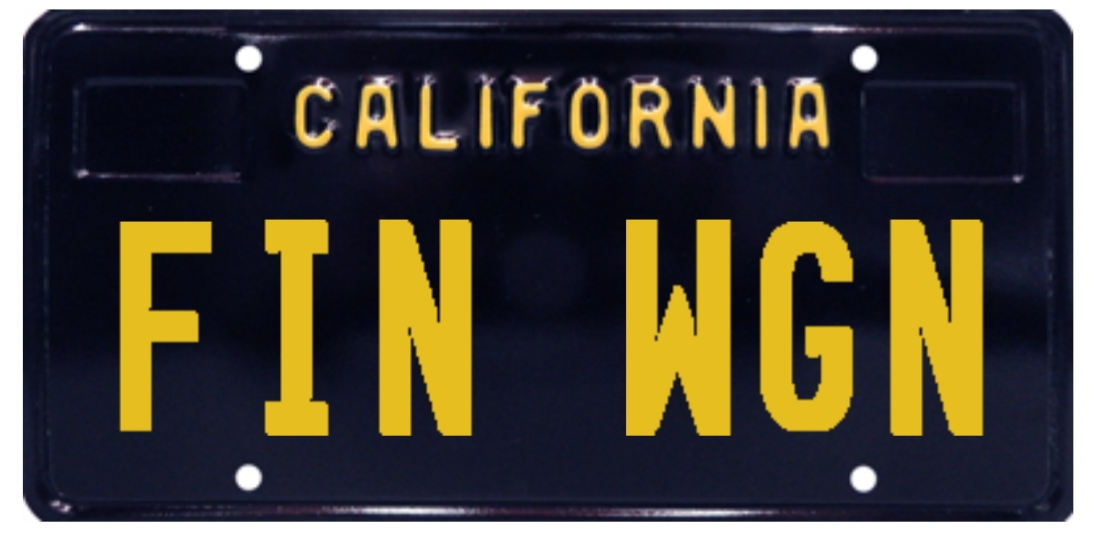
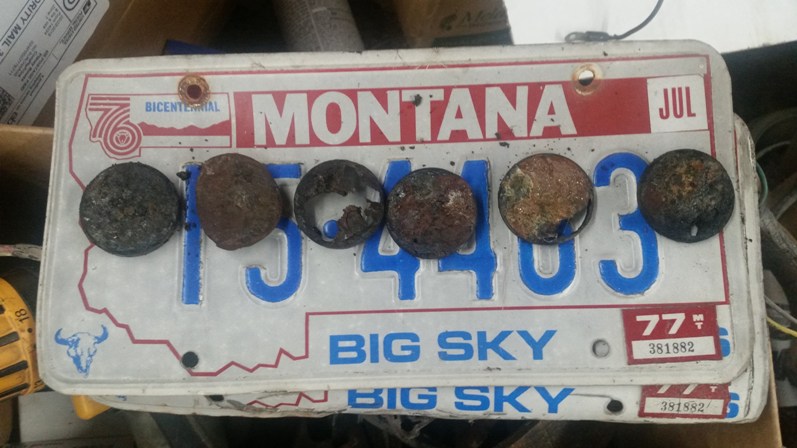
Location: Ramona, CA | I ordered the license plates for the car. Been wanting to get these for years.
 (20191016_175043.jpg) (20191016_175043.jpg)
Attachments
----------------
20191016_175043.jpg (217KB - 457 downloads)
|
|
| |
|
Expert
Posts: 1234
Location: Ramona, CA | Powerflite - 2019-10-16 7:10 PM
Congrats. If you want one of these, it was probably the right decision to purchase it. If the bottom of the tank isn't rusted, I would cut the top off enough to work out all the dents well. Then weld it back up, maybe even put a fuel injection pump, baffle & pickup in there while you are at it. Then weld the top back on. After welding, clean up the welds nice, and then braze over the top of them. That will ensure that it is sealed well. Just clean out the tank well with dish soap first, fill it mostly with water and a steady flow of compressed air when you make the first cut so you are safe. I've done this multiple times. Looks like a great project even with its issues. Congratulations.
Problem is that there is no tank at all. Trying to get one from another wagon that has rust holes in it that are visible and they're not sure how fixable it is one they get it out. I have a friend who is a sheet metal fabricator and he's going to see what he can do. |
|
| |
|

Board Moderator & Exner Expert 10K+
Posts: 13152
Location: Southern Sweden - Sturkö island | Very nice project
- the long roofs are totally cool |
|
| |
|
Expert
Posts: 3579
Location: Netherlands | IMO, the best looking year of all the FWLK wagons. One of the holy grails 
4dr Hardtop, Power everything, what else is there to want?
|
|
| |
|
Expert
Posts: 1234
Location: Ramona, CA | Found a good gas tank, or I should say a good gas tank found me.
I was looking at my friend's '64 New Yorker Town & Country, which uses the same tank, and his has a splash shield in front of it. Anyone know what year they started doing that? I might have to fabricate one for mine to protect the tank.
|
|
| |
|
Expert
Posts: 1234
Location: Ramona, CA | I'll probably put disk brakes on the car with a dual master cylinder. Would like to find something that will fit with the auto pilot. Maybe a modern master with a remote reservoir? Lots of research to do.
 (booster.jpg) (booster.jpg)
Attachments
----------------
booster.jpg (316KB - 443 downloads)
|
|
| |
|
Expert
Posts: 3579
Location: Netherlands | My '62 NY wagon has a splash shield in front of the tank.
I installed disc brakes on both my '60 NewYorker and '62 NewYorker wagon.
|
|
| |
|
Expert
Posts: 1234
Location: Ramona, CA | BigBlockMopar - 2019-10-20 2:23 PM
My '62 NY wagon has a splash shield in front of the tank.
I installed disc brakes on both my '60 NewYorker and '62 NewYorker wagon.
That's good to know. I'm going to go look at parts on a '62 wagon next week.
Looking at options for doing the brakes, I also found that in '62 they moved the Auto Pilot servo over to clear the '62 style booster and master cylinder. |
|
| |
|
Expert
Posts: 1234
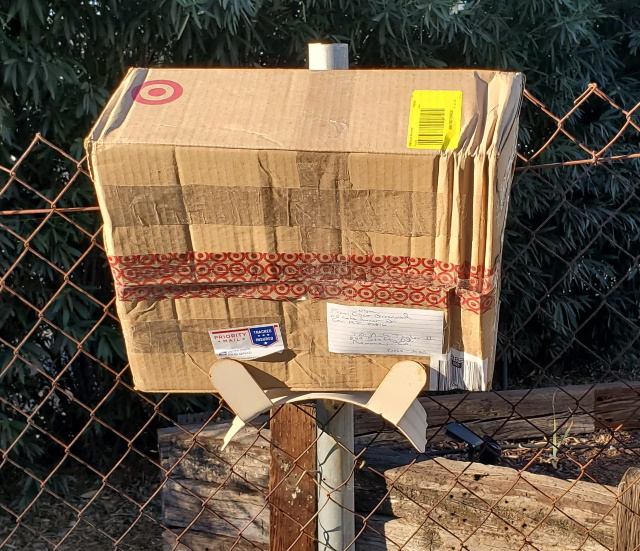
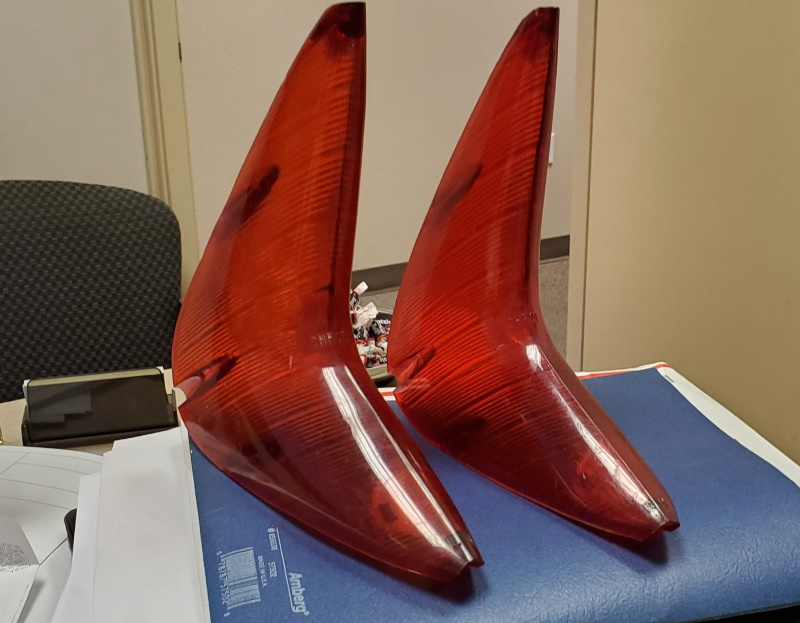
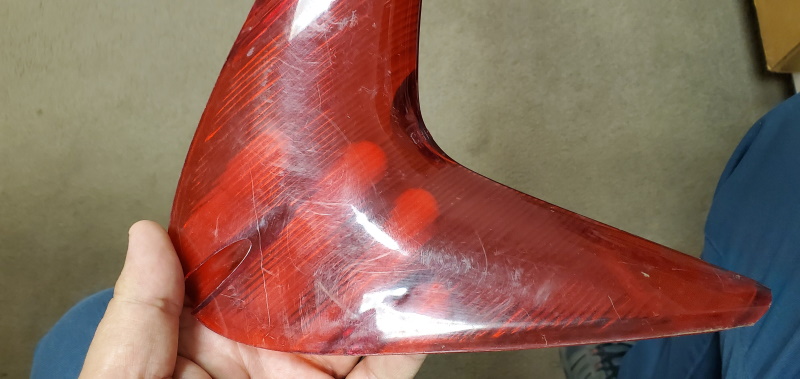
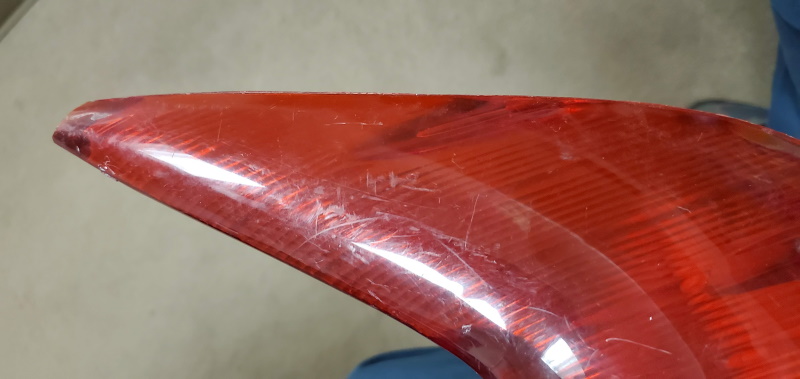
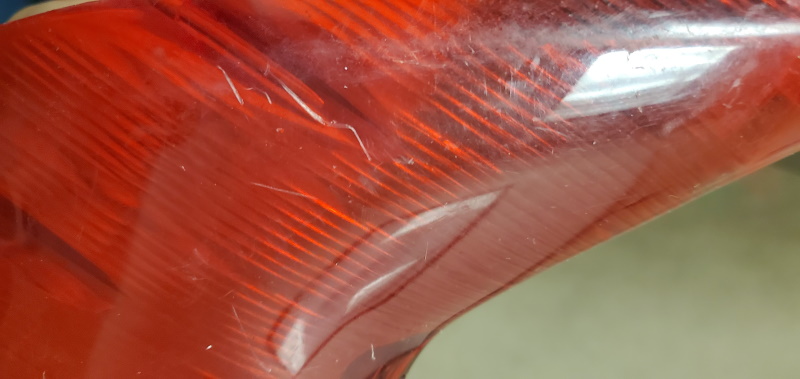
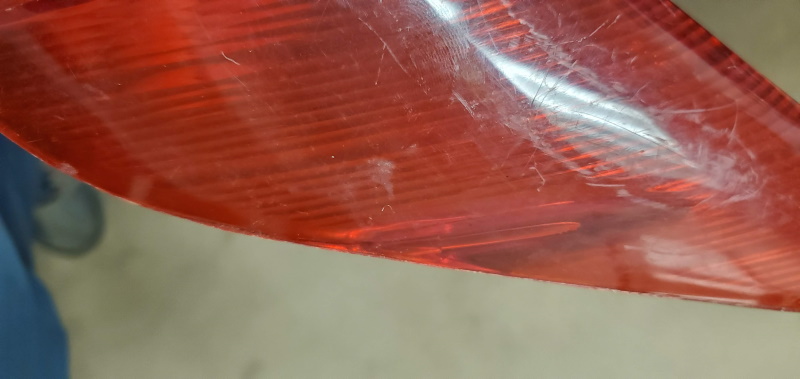
Location: Ramona, CA | Not a good sign when your NOS taillight lenses arrive in a box looking like this. Creative place to deliver them to, never had that happen before. Fortunately the lenses weren't broken. The right hand one has a lot of scratches in it but they did advertise it that way. The ones on the car are cloudy and brittle.
Edited by NicksGarage 2019-10-21 1:38 PM
 (taillightbox.jpg) (taillightbox.jpg)
 (lens01.jpg) (lens01.jpg)
 (lens02.jpg) (lens02.jpg)
 (lens03.jpg) (lens03.jpg)
 (lens04.jpg) (lens04.jpg)
 (lens05.jpg) (lens05.jpg)
Attachments
----------------
taillightbox.jpg (216KB - 447 downloads)
lens01.jpg (145KB - 466 downloads)
lens02.jpg (103KB - 461 downloads)
lens03.jpg (78KB - 481 downloads)
lens04.jpg (86KB - 463 downloads)
lens05.jpg (76KB - 439 downloads)
|
|
| |
|
Veteran
Posts: 212
Location: Suwanee, GA | Plastic polish will take out a lot of those scratches. |
|
| |
|
Elite Veteran
Posts: 705
Location: California | Parts are us, a wrecking yard in orland, ca. Has a beat 60 plymouth wagon. May still have a gas tank in it |
|
| |
|
Expert
Posts: 1234
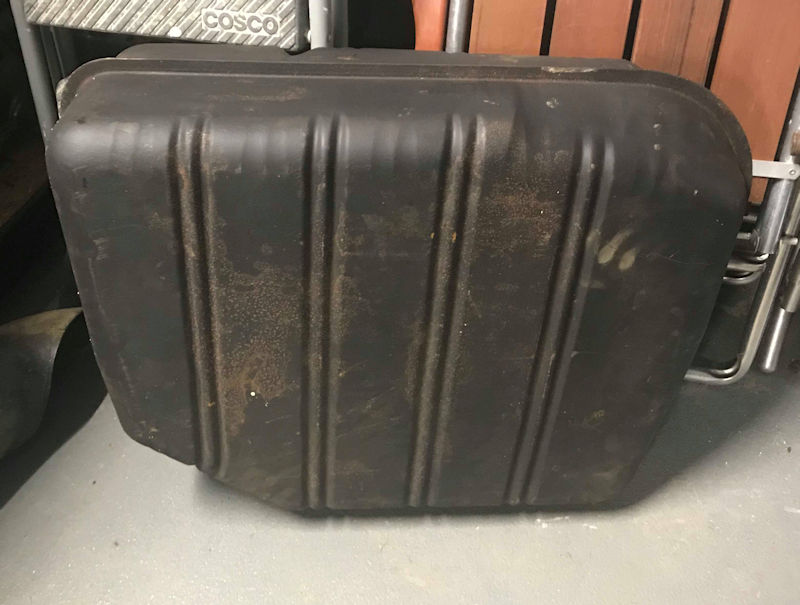
Location: Ramona, CA | Thanks but an gas tank found me. Haven't actually got my hands on it but should be no problem. Thanks for letting me know though.
 (tank001.jpg) (tank001.jpg)
 (tank002.jpg) (tank002.jpg)
Attachments
----------------
tank001.jpg (82KB - 493 downloads)
tank002.jpg (94KB - 460 downloads)
|
|
| |
|
Expert
Posts: 1234
Location: Ramona, CA | Anyone have a 1960 or 1961 Chrysler wagon that could show me what the gas tank stone shield looks like. I guess I'm missing that as well.
|
|
| |
|
Extreme Veteran
Posts: 471
Location: Ohio | NicksGarage - 2019-10-15 8:45 PM
Another big problem is that the rear underbody is badly damaged like they backed up over a boulder and smashed in the rear compartment. Is this area the same for all the '60-64 big wagons?
The spare tire / rear cargo storage well is the SAME on the following wagons:
1960-61 Plymouth Suburban
1960-64 Chrysler
1960-61 Dodge
1962-64 Dodge Custom 880
That area always seems to be rusted out or dented / damaged. Finding one from a parts car in nice condition can be difficult. Since it’s just a floorboard, usually easier to cut out and make patch panels to weld in.
If it’s not rusted out you maybe able to hammer the metal back into shape |
|
| |
|
Elite Veteran
Posts: 988
Location: Kansas City, Kansas | NicksGarage - 2019-10-21 12:31 PM
Not a good sign when your NOS taillight lenses arrive in a box looking like this. Creative place to deliver them to, never had that happen before. Fortunately the lenses weren't broken. The right hand one has a lot of scratches in it but they did advertise it that way. The ones on the car are cloudy and brittle.
I wonder if a headlight restoration kit would be a good way to go to "restore" those scratched tail lights. I have used them on my 11 year old daily Mazda's headlights and it went from horribly foggy to clear as new.
Perhaps you can test it on the old tail lights. I used this one:
https://www.amazon.com/SYLVANIA-Headlight-Restoration-Headlights-Pro... |
|
| |
|
Expert
Posts: 1234
Location: Ramona, CA | slimwhitman - 2019-10-29 11:47 AM
I wonder if a headlight restoration kit would be a good way to go to "restore" those scratched tail lights. I have used them on my 11 year old daily Mazda's headlights and it went from horribly foggy to clear as new.
Perhaps you can test it on the old tail lights. I used this one:
https://www.amazon.com/SYLVANIA-Headlight-Restoration-Headlights-Pro...
I have a few lenses to practice on before I got after the NOSS one.
|
|
| |
|
Expert
Posts: 1234
Location: Ramona, CA | NicksGarage - 2019-10-23 5:44 PM
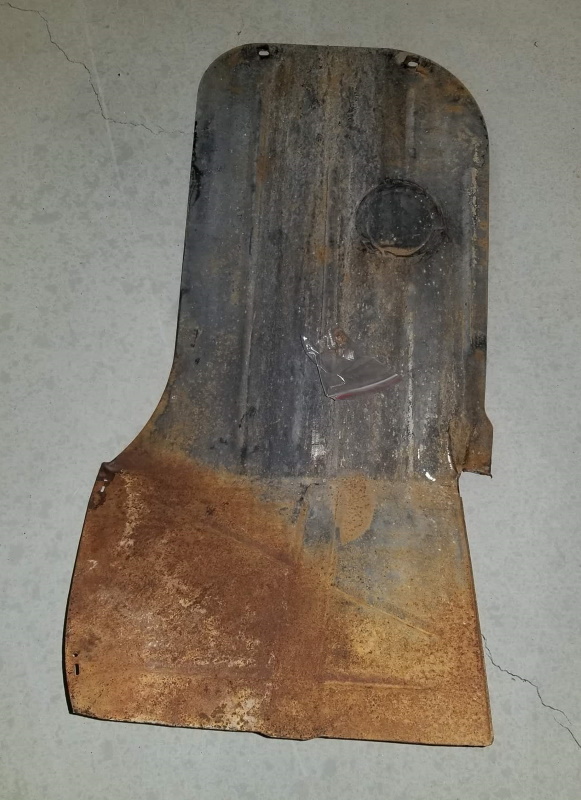
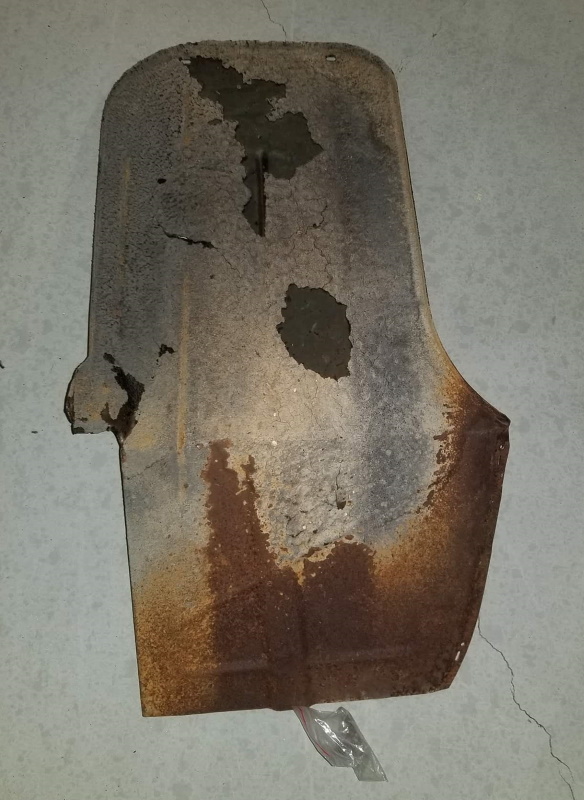
Anyone have a 1960 or 1961 Chrysler wagon that could show me what the gas tank stone shield looks like. I guess I'm missing that as well.
Here is the stone shield. I found 2 of them.
 (tank_shield_1t.jpg) (tank_shield_1t.jpg)
 (tank_shield_2t.jpg) (tank_shield_2t.jpg)
Attachments
----------------
tank_shield_1t.jpg (172KB - 422 downloads)
tank_shield_2t.jpg (165KB - 471 downloads)
|
|
| |
|

Expert
Posts: 3974
Location: DFW, TX | The scratches in that lens are pretty deep. You may want to sand it with 800 / 1000 / 1200 grit paper and then polish it. Wagon lenses are very rare! |
|
| |
|
Elite Veteran
Posts: 988
Location: Kansas City, Kansas | 57burb - 2019-10-29 6:07 PM
The scratches in that lens are pretty deep. You may want to sand it with 800 / 1000 / 1200 grit paper and then polish it. Wagon lenses are very rare!
...and that Sylvania kit has those sandpapers in the kit. |
|
| |
|
Expert
Posts: 1234
Location: Ramona, CA | I still don't have the car home but I did get the title in the mail today. The guy I got the car from had told me he bought it from San Diego 8 years ago but then in the auction listing it said that the car was just pulled from 40 years of climate controlled storage. When I went to the auction and talked to him in person, he told me that it had been in a basement. Now being a San Diego native and a car guy since almost birth, I know that didn't add up. We don't have climate controlled garages or basements here. Anyway, I looked at the car myself and bought it based on what I saw.
What the title showed me is that it was titled in Indiana from at least 1976 through 2008. I looked up the name on the title, and the gentleman had passed away in 2016. Of course the title was signed by him last month, from the grave apparently. It didn't take me long to track down his son based on an obituary so I sent an e-mail seeking more information on the car. About 30 minutes later, I get a call from Plymouth Indiana from the son of the man on the title. And now the history of the car is coming into focus.
Gary tells me he bought the car around 1973 when he was a teenager and his father had to register it because he was too young to drive. He drove the car the car through high school and into college. Around 1978, he parked the car in a carport at a lake house and there it sat until 3 or 4 years ago when he took it to a couple shops to try and get it running. One was able to get it running off of a gas can as the gas tank was rusted out. So that explains why the tank is missing.
Gary is a really nice guy and he's going to write up the details and send them to me. He's trying to recall the name of the guy he bought the car from as that was someone who brought it from California.
Moral of the story is, never believe what people tell you when they are trying to sell you a car. You have to go look at it yourself and make up your own mind. Was the same deal with my 300F, got a story from the seller that just didn't add up and every time he told it the details were different.
The car is supposed to arrive tomorrow, and then the work begins to get it on the road again.
|
|
| |
|
Expert
Posts: 1234
Location: Ramona, CA | The car has made it home and the work to get it running and driving will begin this weekend.
 (004.jpg) (004.jpg)
Attachments
----------------
004.jpg (139KB - 430 downloads)
|
|
| |
|
Expert
Posts: 1234
Location: Ramona, CA | Mock up with the wire wheels...
 (005.jpg) (005.jpg)
Attachments
----------------
005.jpg (146KB - 430 downloads)
|
|
| |
|
Expert
Posts: 1234
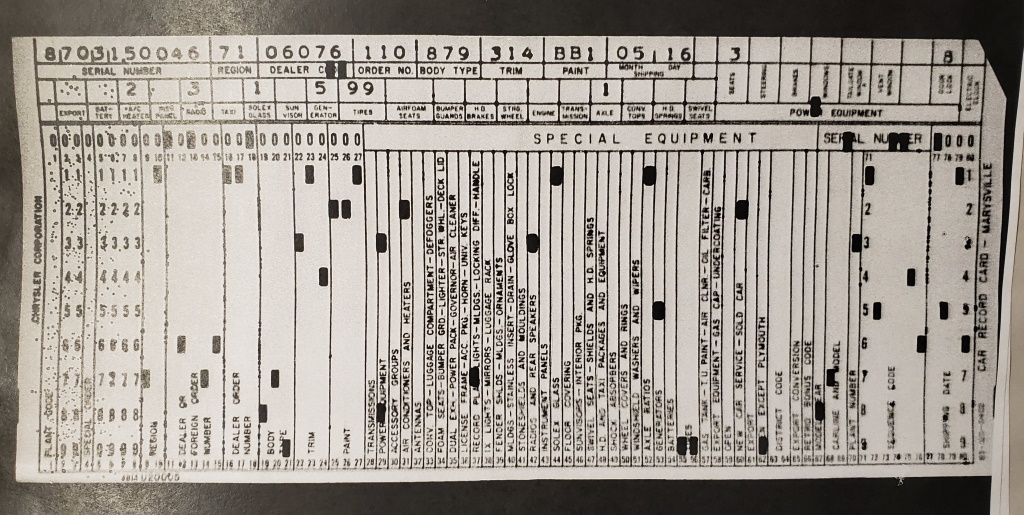
Location: Ramona, CA | Got my build record from FCA yesterday. Pretty clear copy. They also let me know that the original selling dealership was Barish Chrysler-Plymouth located at 401 S La Brea Ave, Los Angeles, CA. Building is still there but not a car dealership anymore. Looks like they closed in 1995.
 (ibm02.jpg) (ibm02.jpg)
Attachments
----------------
ibm02.jpg (289KB - 397 downloads)
|
|
| |
|
Exner Expert 10K+
Posts: 10251
Location: So. Cal | You can bet that the original owners of that car weren't poor. |
|
| |
|
Expert
Posts: 1234
Location: Ramona, CA | Powerflite - 2019-12-10 8:04 PM
You can bet that the original owners of that car weren't poor.
With the options it has I figure it was over $6600 new. About $56,000 today. |
|
| |
|
Extreme Veteran
Posts: 471
Location: Ohio | Paul Hettick - 2019-10-22 11:31 AM
Parts are us, a wrecking yard in orland, ca. Has a beat 60 plymouth wagon. May still have a gas tank in it
Paul- PM sent regarding the 60 Plymouth that’s in junkyard. |
|
| |
|
Member
Posts: 17
Location: Fort Collins, Colorado | I have a nearly perfect air cleaner for your New Yorker. It's yours for the shipping.
Doug in Fort Collins, Colorado |
|
| |
|
Expert
Posts: 1234
Location: Ramona, CA | Douglas - 2019-12-13 11:46 AM
I have a nearly perfect air cleaner for your New Yorker. It's yours for the shipping.
Doug in Fort Collins, Colorado
Thanks, I'll send you a private message. |
|
| |
|
Expert
Posts: 1234
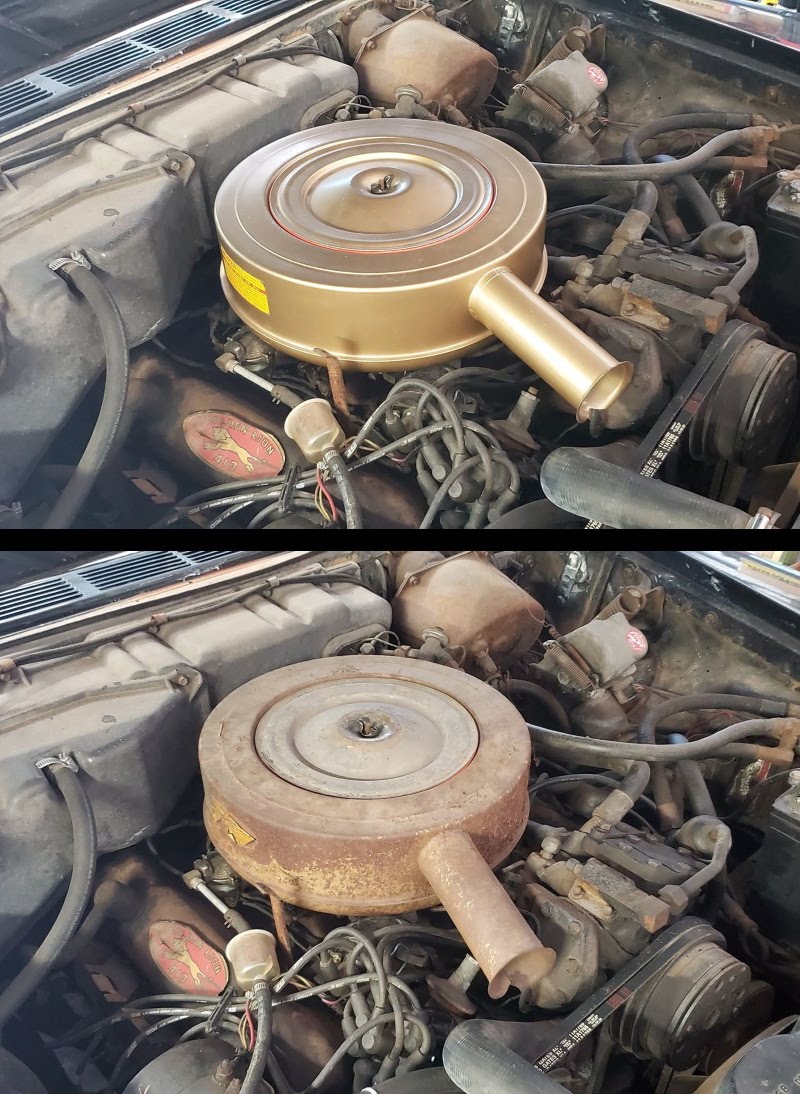
Location: Ramona, CA | A fellow forum member offered me an air cleaner for my wagon for the cost of the shipping! Looks great on the car. My old one will be traveling to Australia to help out a friend who needs one for his car.
 (aircleaners.jpg) (aircleaners.jpg)
Attachments
----------------
aircleaners.jpg (221KB - 399 downloads)
|
|
| |
|
Expert
Posts: 1234
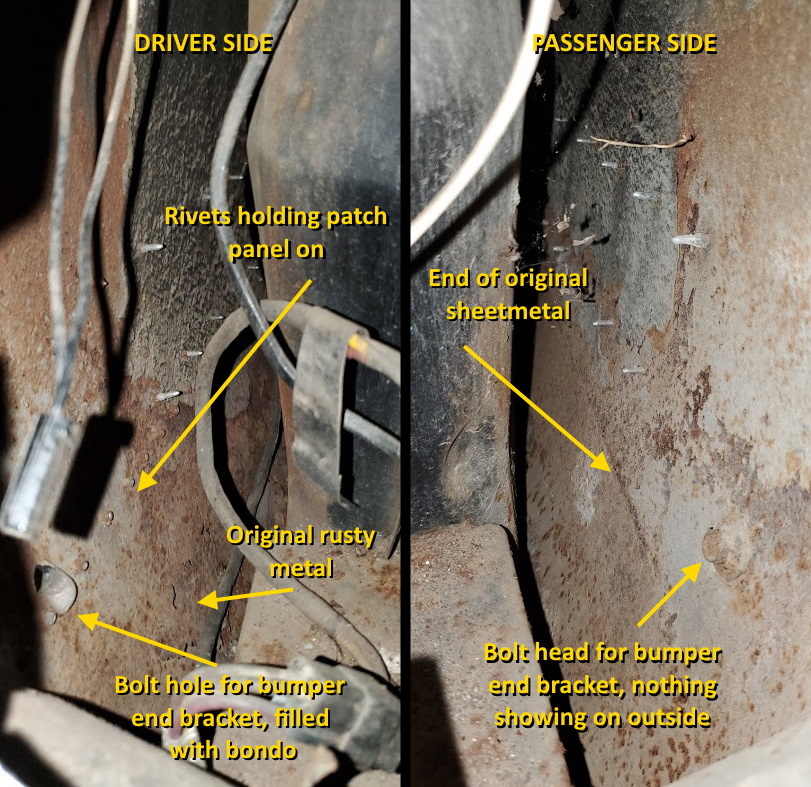
Location: Ramona, CA | Pulled the backup lights today on the wagon to look inside the quarter panels to see what patching was done. This seems to be the only area on the car that is patched. A common rust prone area on the wagons.
 (quarter_patches.jpg) (quarter_patches.jpg)
Attachments
----------------
quarter_patches.jpg (318KB - 330 downloads)
|
|
| |
|
Extreme Veteran
Posts: 403
Location: California | Beautiful wagon! Congratulations on your new purchase. I would agree with the others who said these are the most beautiful of the Chrysler wagons. Love the boomerang twilights. I also like the 1960 Dodge polara 4dr Ht wagons too. |
|
| |
|
Expert
Posts: 2163
| .
Could you post a picture of the data plate, please?
I need to confirm my guesses for Auto Pilot code 377…
Thanks.
|
|
| |
|
Expert
Posts: 1234
Location: Ramona, CA | frwl - 2020-08-16 11:42 AM
.
Could you post a picture of the data plate, please?
I need to confirm my guesses for Auto Pilot code 377…
Thanks.
Here you go.
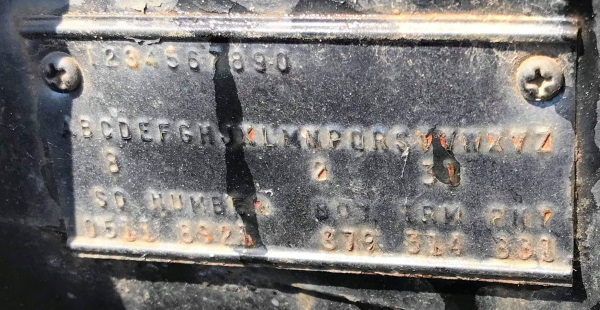 (bodytag3.jpg) (bodytag3.jpg)
Attachments
----------------
bodytag3.jpg (114KB - 335 downloads)
|
|
| |
|
Expert
Posts: 1234
Location: Ramona, CA | Suddenlyits1960! - 2020-08-14 6:37 AM
Beautiful wagon! Congratulations on your new purchase. I would agree with the others who said these are the most beautiful of the Chrysler wagons. Love the boomerang twilights. I also like the 1960 Dodge polara 4dr Ht wagons too.
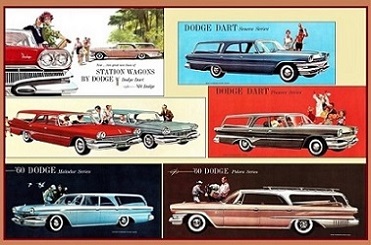
1960 was a great year for the wagons. Not only did hardtop wagons appear but it was the first time that each brand had their own distinct body instead of just changing the taillights and trim of the same shared body. However Dodge had to compromise to get one body to work between the Dodge and Dart models.
The next year was a mixed bag. Chrysler using the '60 rear styling and Dodge being stuck with Plymouth bodies and then in 1962 the big Plymouth wagon was gone but Dodge and Chrysler had to use the Plymouth body again. '63-64 Chryslers sort of got their own again but Dodge soldiered on with the Plymouth one. |
|
| |
|
Expert
Posts: 2163
| .
Thank you very much, Nick!
C8 = 298 = Power Vacuum Door Locks = $56.00
N2 = 312 = Heater and Air Conditioning – Dual Unit = $714.25
T3 = 423 = Radio Golden Touch Tuner (less Rear Seat Speaker) = $124.10
V1 = 441 = Solex Tinted Glass – All Windows = $43.10
SO 0511 = Scheduled on May 11, 1960
NUMBER 8921 = 21th Station Wagon built that day
BDY 379 = Chrysler New Yorker Town and Country 4door Hardtop Station Wagon, 9P
TRM 314 = Black Vinyl and Black Weave Upholstery
PNT BB1 = Formal Black monotone paint
So I knew it: Auto Pilot option coded on the IBM card and broadcast sheet only; and did not on the data plate…
PS, PB, PW are standard on NY and did not code too nowhere…
|
|
| |
|
Expert
Posts: 1234
Location: Ramona, CA | frwl - 2020-08-17 8:38 AM
.
Thank you very much, Nick!
C8 = 298 = Power Vacuum Door Locks = $56.00
N2 = 312 = Heater and Air Conditioning – Dual Unit = $714.25
T3 = 423 = Radio Golden Touch Tuner (less Rear Seat Speaker) = $124.10
V1 = 441 = Solex Tinted Glass – All Windows = $43.10
SO 0511 = Scheduled on May 11, 1960
NUMBER 8921 = 21th Station Wagon built that day
BDY 379 = Chrysler New Yorker Town and Country 4door Hardtop Station Wagon, 9P
TRM 314 = Black Vinyl and Black Weave Upholstery
PNT BB1 = Formal Black monotone paint
So I knew it: Auto Pilot option coded on the IBM card and broadcast sheet only; and did not on the data plate…
PS, PB, PW are standard on NY and did not code too nowhere…
My 300F was built very close to the wagon with the VIN being 8403150442 and the wagon being 8703150046.
An interesting thing on the build card is that it had special order tires. The only thing I can figure that would be was blackwall Captive Air tires. It's interesting what they would code on the body tag.
The options my car is missing are roof rack (supposedly only dealer installed on the Chrysler wagon in '60), auto beam changer, sure grip, mirrormatic (they were dealer installed) and swivel seats.
|
|
| |
|
Expert
Posts: 2163
| .
I have some info about tires used on ’60 Chrysler:
It seems that blackwalls were coded as 40, 50 and 60… all other were whitewalls…
Correct me if I’m wrong
40 = Black Side Wall Tires – 8.00 x 14 Rayon (Windsor except Wagon)
42 = White Side Wall Tires – 8.00 x 14 Rayon (Windsor except Wagon)
46 = White Side Wall Tires – 8.00 x 14 Nylon (Windsor except Wagon)
50 = Black Side Wall Tires – 8.50 x 14 Rayon (Windsor Wagon and Saratoga)
52 = White Side Wall Tires – 8.50 x 14 Rayon (Windsor Wagon and Saratoga)
56 = White Side Wall Tires – 8.50 x 14 Nylon (Windsor Wagon and Saratoga)
59 = White Side Wall Tires – 8.50 x 14 Captive Air (Windsor Wagon Only)
60 = Black Side Wall Tires – 9.00 x 14 Rayon (New Yorker)
62 = White Side Wall Tires – 9.00 x 14 Rayon (New Yorker)
66 = White Side Wall Tires – 9.00 x 14 Nylon (New Yorker)
69 = White Side Wall Tires – 9.00 x 14 Captive Air (New Yorker Wagon Only)
96 = White Side Wall Tires – 8.00 x 15 Nylon Blue Strike (300F only)
99 = White Side Wall Tires – 8.50 x 14 Rayon Tubeless
I think the tire codes never stamped on body tags!
|
|
| |
|
Expert
Posts: 1234
Location: Ramona, CA | Here is a corrected version of your list. 300F tires are 9.00 x 14.
40 = Black Side Wall Tires – 8.00 x 14 Rayon (Windsor except Wagon)
42 = White Side Wall Tires – 8.00 x 14 Rayon (Windsor except Wagon)
46 = White Side Wall Tires – 8.00 x 14 Nylon (Windsor except Wagon)
50 = Black Side Wall Tires – 8.50 x 14 Rayon (Windsor Wagon and Saratoga)
52 = White Side Wall Tires – 8.50 x 14 Rayon (Windsor Wagon and Saratoga)
56 = White Side Wall Tires – 8.50 x 14 Nylon (Windsor Wagon and Saratoga)
59 = White Side Wall Tires – 8.50 x 14 Captive Air (Windsor Wagon Only)
60 = Black Side Wall Tires – 9.00 x 14 Rayon (New Yorker)
62 = White Side Wall Tires – 9.00 x 14 Rayon (New Yorker)
66 = White Side Wall Tires – 9.00 x 14 Nylon (New Yorker)
69 = White Side Wall Tires – 9.00 x 14 Captive Air (New Yorker Wagon Only)
96 = White Side Wall Tires – 9.00 x 14 Nylon Bluestreak (300F only)
99 = Special Order Tires - See below.
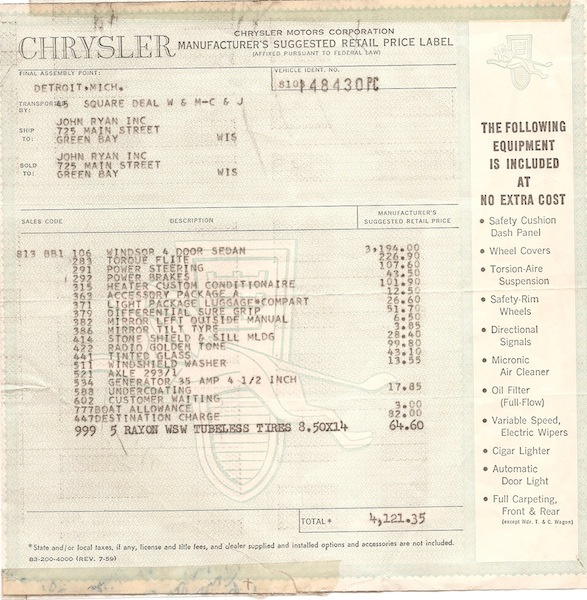
Special order tires would be any tire not available on the particular model even if they were available on other models. Below is a window sticker for a Windsor sedan showing 999 for the tires, interestingly typed onto the sticker, showing it got the Windsor Town & Country White Side Wall Rayon 8.50x14 tires.
Unless my wagon got 300F tires, which I doubt, I'm figuring it got Black Side Wall Captive Air tires, which were available from Goodyear even though not listed on the 1960 Chrysler order form. The second owner of the car bought it in 1973 and says he remembers that it didn't have a jack but did have a spare tire. The dealer gave them what looks like a truck bottle jack which was still in the car when I got it. By 1973 the Captive Air tires were no longer available and I'd assume that most people would have gotten a spare wheel/tire and jack once they couldn't use them anymore. No indication that my car had a jack installed under the middle seat.
Edited by NicksGarage 2020-08-17 3:50 PM
 (windowsticker2.JPG) (windowsticker2.JPG)
Attachments
----------------
windowsticker2.JPG (165KB - 335 downloads)
|
|
| |
|
Extreme Veteran
Posts: 340
Location: Tacoma, WA | Thanks, this is very interesting. As you and I have discussed Nick, my project car is a 1960 Windsor T&C wagon, converted by Richard Brothers, and sold through their unique relationship to Chrysler and it's dealers, into a combination ambulance/ hearse. Chrysler Historical provided me with documentation that Goodyear was trying to interest Richard Brothers in their CaptiveAir tires. I have 1960 Richard Brothers publicity photos that show white sidewall CapriveAir tires on their display vehicles. I also have 999 on the build sheet for my tires. Note I believe because it is a SWB Windsor it would have had 6" wide wheels, not the 6.5". So if I am understanding you correctly, perhaps my "999" was for a blackwall CaptiveAir option. No evidence of a jack.
Edited by Dave L. 2020-08-18 2:53 AM
|
|
| |
|
Extreme Veteran
Posts: 403
Location: California | NicksGarage - 2020-08-17 11:10 AM
Suddenlyits1960! - 2020-08-14 6:37 AM
Beautiful wagon! Congratulations on your new purchase. I would agree with the others who said these are the most beautiful of the Chrysler wagons. Love the boomerang twilights. I also like the 1960 Dodge polara 4dr Ht wagons too.
1960 was a great year for the wagons. Not only did hardtop wagons appear but it was the first time that each brand had their own distinct body instead of just changing the taillights and trim of the same shared body. However Dodge had to compromise to get one body to work between the Dodge and Dart models.
The next year was a mixed bag. Chrysler using the '60 rear styling and Dodge being stuck with Plymouth bodies and then in 1962 the big Plymouth wagon was gone but Dodge and Chrysler had to use the Plymouth body again. '63-64 Chryslers sort of got their own again but Dodge soldiered on with the Plymouth one.
I agree 100 per cent. The 1960 hardtop wagons are stunning. Im also fond of the Dodge Polara hardtop wagon as well. I would really like to have a 60 Chrysler 2dr hardtop one day I’ve always wondered why the Chrysler wagons in 1960 kept the 1960 style boomerang tailights,but the cars used the car less attractive 61 style chrome fillers. I still wonder why anyone thought the change was acceptable after the beauty of the 60 leneses. |
|
| |
|
Expert
Posts: 1234
Location: Ramona, CA | Dave L. - 2020-08-17 11:49 PM
Thanks, this is very interesting. As you and I have discussed Nick, my project car is a 1960 Windsor T&C wagon, converted by Richard Brothers, and sold through their unique relationship to Chrysler and it's dealers, into a combination ambulance/ hearse. Chrysler Historical provided me with documentation that Goodyear was trying to interest Richard Brothers in their CaptiveAir tires. I have 1960 Richard Brothers publicity photos that show white sidewall CapriveAir tires on their display vehicles. I also have 999 on the build sheet for my tires. Note I believe because it is a SWB Windsor it would have had 6" wide wheels, not the 6.5". So if I am understanding you correctly, perhaps my "999" was for a blackwall CaptiveAir option. No evidence of a jack.
I have a feeling on yours that you probably got the larger 9.00x14 whitewall Captive Air tires. That would explain the 999 code like on the window sticker above. I think I remember that all your promotional photos from Richard Brothers showed whitewalls. Since they put the same 9.00x14 tires on both 6" and 6.5" wheels, I don't know which ones you would have gotten. Do you have original wheels for your car?
Edited by NicksGarage 2020-08-18 11:08 AM
|
|
| |
|
Extreme Veteran
Posts: 340
Location: Tacoma, WA | Thanks for the additional feedback, Nick. Nah, the previous owner installed C-Body road wheels t move it around. Correct, the Richard Brothers publicity photos I have all show the narrow whitewalls. |
|
| |
|
Expert
Posts: 1234
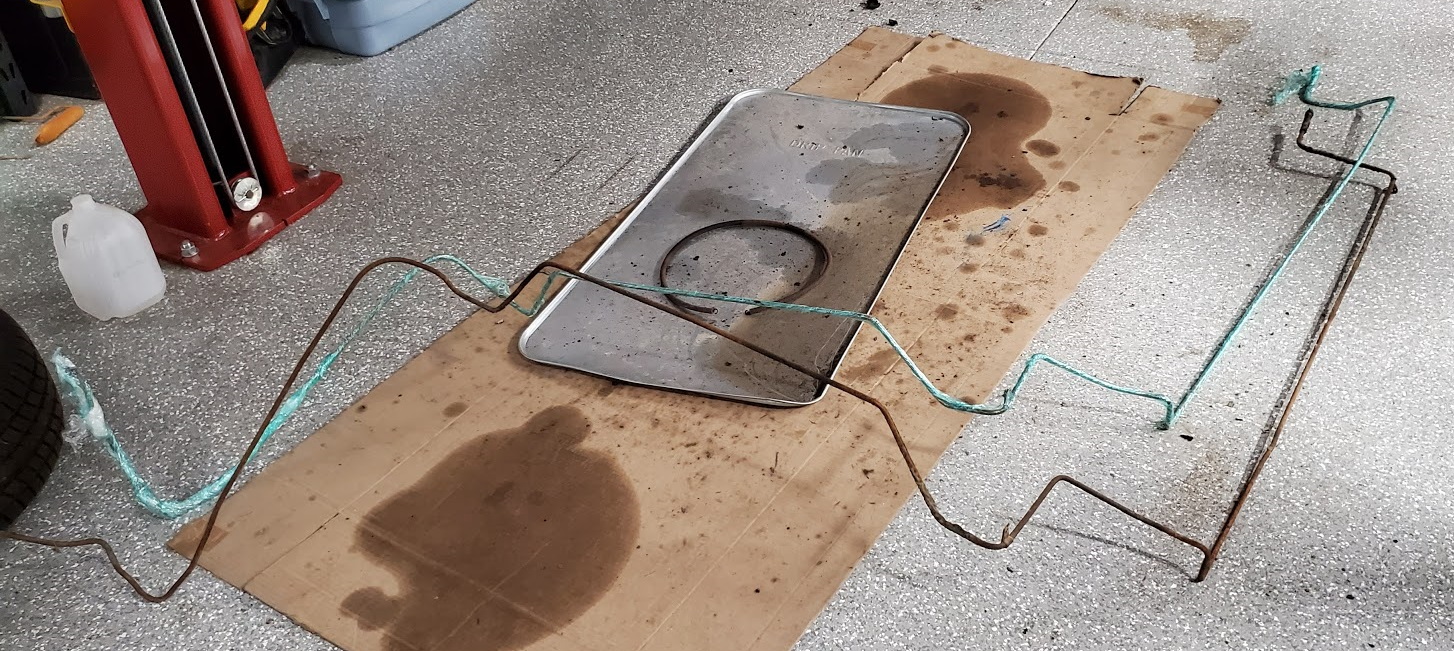
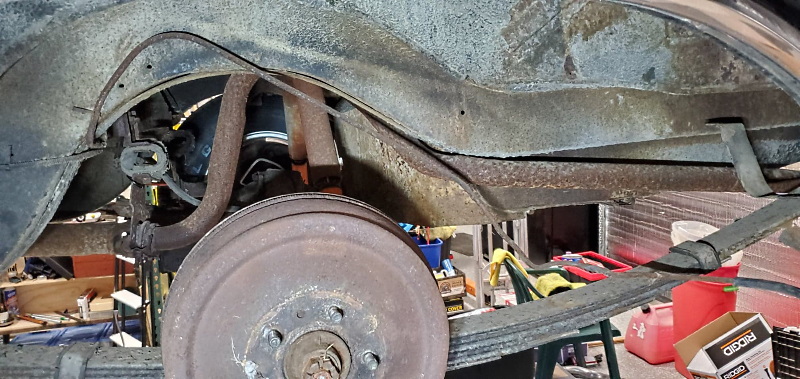
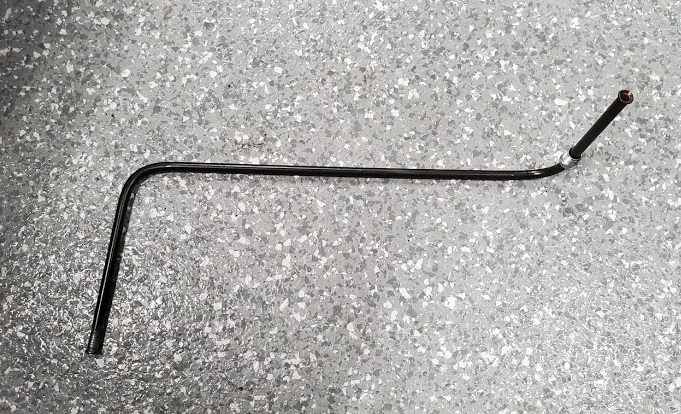
Location: Ramona, CA | Today I replaced the rear fuel line in the wagon. The original was pretty crusty and got damaged when the car was unloaded by the shipper. There was no tank in the car so the line was flopping around back there and hooked on the truck. I lucked out and found someone parting out a '64 Dodge 880 wagon and got the fuel and brake lines as well as the gas tank and other parts. Fortunately the '64 is the same as the '60 underneath. I still need to replace or fabricate the line going through the subframe as I didn't think to get that one. When trying to take the hose off of it where it connects to the rear line, it broke off.
 (fuel_line01.jpg) (fuel_line01.jpg)
 (fuel_line02.jpg) (fuel_line02.jpg)
 (fuel_line03.jpg) (fuel_line03.jpg)
 (fuel_line04.jpg) (fuel_line04.jpg)
Attachments
----------------
fuel_line01.jpg (494KB - 398 downloads)
fuel_line02.jpg (168KB - 414 downloads)
fuel_line03.jpg (179KB - 412 downloads)
fuel_line04.jpg (86KB - 403 downloads)
|
|
| |
|
Extreme Veteran
Posts: 310
Location: Kalispell, MT USA | Is the guy with the 880 wagon close to you? I'm always looking for stuff for my 64 880 sedan. |
|
| |
|
Expert
Posts: 1234
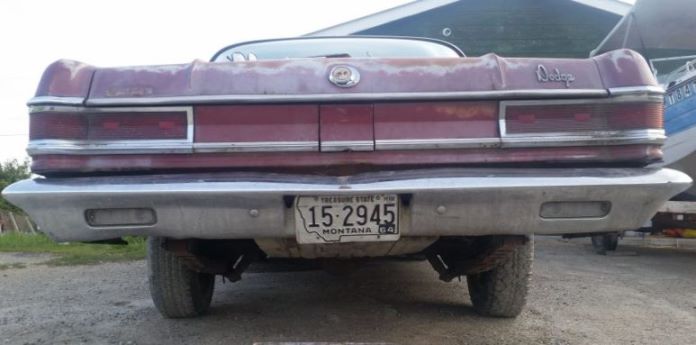
Location: Ramona, CA | normsclassicradio - 2020-08-20 3:56 PM
Is the guy with the 880 wagon close to you? I'm always looking for stuff for my 64 880 sedan. ;)
He's in the Sacramento area but the car is gone by now. There wasn't much to it as it was a "race car" and stripped of most parts.
 (880tank06b.jpg) (880tank06b.jpg)
Attachments
----------------
880tank06b.jpg (277KB - 407 downloads)
|
|
| |
|
Expert
Posts: 1234
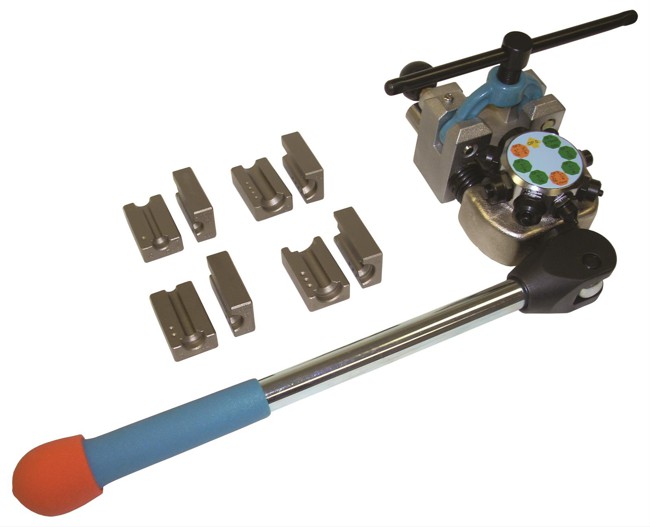
Location: Ramona, CA | Today I got the fuel line out of the subframe. The end that connected to the rear line was rotted off. Of course it fell down inside the subframe so it took me a while to fish the end out so I could pull it out. Need to make a new one. When they tried to get the car running they removed the mechanical fuel pump and blocked it off. They mounted an electric fuel pump to the inner fender and two fuel filters to the carburetor. I got a rebuilt original-style Carter pump and need to make a new line from the pump to the carb so I can get the fuel filter back to the correct location. All I have is an old cheap flaring tool. Need to get a better one.
 (subframefuelline.jpg) (subframefuelline.jpg)
 (carbfuelline.jpg) (carbfuelline.jpg)
Attachments
----------------
subframefuelline.jpg (189KB - 403 downloads)
carbfuelline.jpg (185KB - 398 downloads)
|
|
| |
|
Exner Expert 10K+
Posts: 10251
Location: So. Cal | If you don't mind doing the flare on the bench, I highly recommend purchasing this one. You will need to mount it in a vise, but it works effortlessly, even for large tubes or even stainless.
https://www.summitracing.com/parts/kti-70081
 (Flaring Tool kti-70081_xl.jpg) (Flaring Tool kti-70081_xl.jpg)
Attachments
----------------
Flaring Tool kti-70081_xl.jpg (42KB - 441 downloads)
|
|
| |
|
Expert
Posts: 1234
Location: Ramona, CA | Powerflite - 2020-08-24 12:57 AM
If you don't mind doing the flare on the bench, I highly recommend purchasing this one. You will need to mount it in a vise, but it works effortlessly, even for large tubes or even stainless.
https://www.summitracing.com/parts/kti-70081
I looked at that one and a hydraulic one. The advantage of the hydraulic one is it's easier to use under the car. When I thought I was going to have to do the lines in the car I was leaning that way. A friend works in a tractor shop and he has access to this stuff.
|
|
| |
|
Expert
Posts: 1234
Location: Ramona, CA | Put the new exhaust in the car this weekend. Still needs a bit of fiddling to get things lined up right. Also got all the fuel lines done and fuel pump installed. Had to make a new one to go through the subframe as well as the one going from the pump to the carburetor. Got the gas tank ready to install but the welded in nut for the tank strap to the body broke loose. Have to fix that. Once I get that done and put the new spark plugs I'll be ready to try and fire this thing up.
 (exhaust_020.jpg) (exhaust_020.jpg)
 (subframe_line.jpg) (subframe_line.jpg)
 (carb_line2.jpg) (carb_line2.jpg)
 (carb_line.jpg) (carb_line.jpg)
Attachments
----------------
exhaust_020.jpg (236KB - 401 downloads)
subframe_line.jpg (158KB - 404 downloads)
carb_line2.jpg (181KB - 399 downloads)
carb_line.jpg (151KB - 403 downloads)
|
|
| |
|
Veteran
Posts: 212
Location: Suwanee, GA | Exhaust looks nice. Is the "fiddling" bending/welding, or purely assembly? When you get it all done and running, I'd love to hear feedback on the sound as well as to see a photo of the tailpipes in the rear. Been think of replacing my exhaust with the proper dual setup as original as somewhere over the years mine was converted to single. Were you able to use the original hangers/locations?
Robert |
|
| |
|
Expert
Posts: 1234
Location: Ramona, CA | Ev's62Chrysler - 2020-09-07 8:35 PM
Exhaust looks nice. Is the "fiddling" bending/welding, or purely assembly? When you get it all done and running, I'd love to hear feedback on the sound as well as to see a photo of the tailpipes in the rear. Been think of replacing my exhaust with the proper dual setup as original as somewhere over the years mine was converted to single. Were you able to use the original hangers/locations?
Robert
Robert, I got the exhaust kit from Waldrons. It's all the stock size which is pretty small. 2" exhaust pipes with 1 7/8" tail pipes. I had to get new muffler hangers as mine were rotten beyond use. I found 1967 B-body ones that were for 1 7/8" pipes and replaced the rubber to make them work. On the forward hangers I had to install new hooks for the pipes but used the original straps. The tail pipe hangers are the originals that I cleaned up. The fiddling will be moving the pipes around before clamping everything tight. No welding. I may end up having to take it to an exhaust shop for adjustment as the tails don't fit exactly right. The car was missing all the mufflers and the pipes between them and parts of the pipes in front of the resonators. And one of the tail pipes was not original.
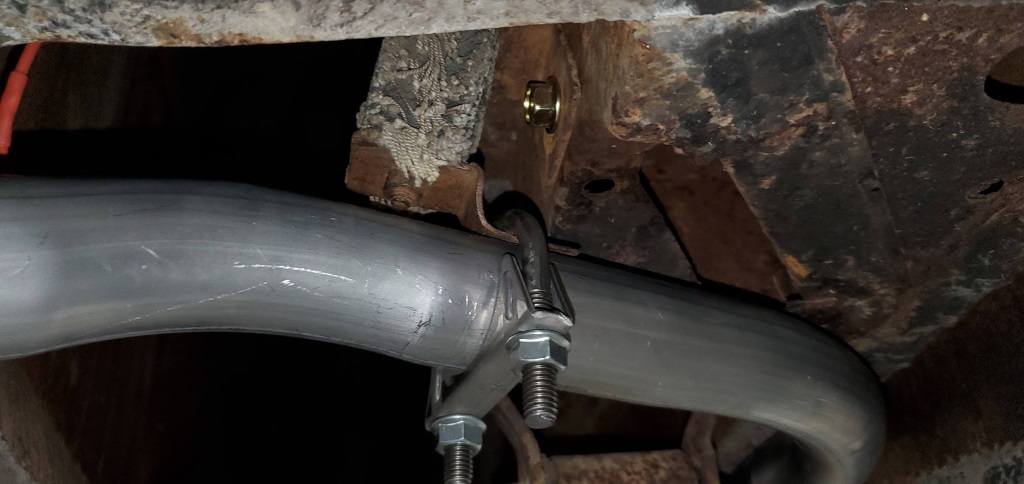
Here are the tail pipes where they exit. I don't know how similar the '62 exhaust is to my '60.
Edited by NicksGarage 2020-09-08 1:04 AM
 (tailpipe_left.jpg) (tailpipe_left.jpg)
 (tailpipe_right.jpg) (tailpipe_right.jpg)
Attachments
----------------
tailpipe_left.jpg (158KB - 383 downloads)
tailpipe_right.jpg (190KB - 403 downloads)
|
|
| |
|
Expert
Posts: 1234
Location: Ramona, CA | These are the front hangers. They go in the subframe next to the ends of the torsion bars. I replaced the hooks with ones from generic hangers.
 (front_hanger_01.jpg) (front_hanger_01.jpg)
 (front_hanger_02.jpg) (front_hanger_02.jpg)
 (front_hanger_04.jpg) (front_hanger_04.jpg)
Attachments
----------------
front_hanger_01.jpg (126KB - 399 downloads)
front_hanger_02.jpg (159KB - 392 downloads)
front_hanger_04.jpg (197KB - 389 downloads)
|
|
| |
|
Expert
Posts: 1234
Location: Ramona, CA | These are the muffler hangers. Tried with the u-shaped strap but it didn't provide enough support so replaced it with a loop like the originals. I may end up modifying them to have plates inside the loop like the original to give more support to the rubber than just a washer that I have in there now.
http://www.accurateltd.com/Hanger-main-support-A-B-body-with-1-78-A...
They have other sizes if you are running bigger pipes.
Edited by NicksGarage 2020-09-08 1:15 AM
 (muffler_hanger_01.jpg) (muffler_hanger_01.jpg)
 (muffler_hanger_02.jpg) (muffler_hanger_02.jpg)
 (muffler_hanger_03.jpg) (muffler_hanger_03.jpg)
Attachments
----------------
muffler_hanger_01.jpg (155KB - 397 downloads)
muffler_hanger_02.jpg (149KB - 393 downloads)
muffler_hanger_03.jpg (166KB - 392 downloads)
|
|
| |
|
Expert
Posts: 1234
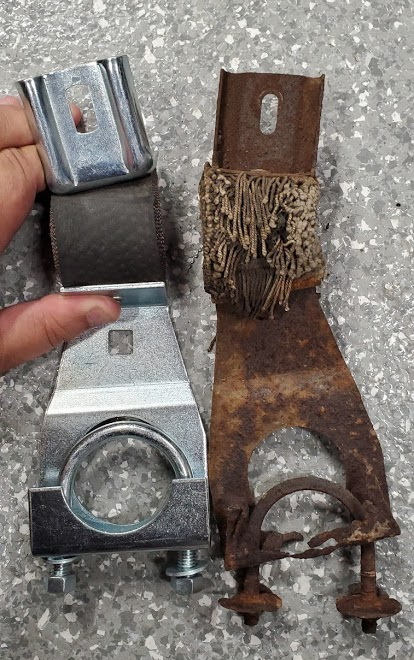
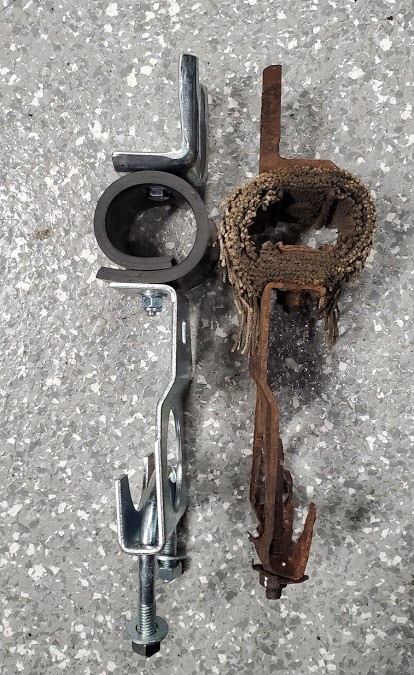
Location: Ramona, CA | While the other hangers are the same as other body styles, the tail pipe hangers are specific to the wagon since the pipes exit out the sides of the car. The frame bracket is the same on each side but the hooks are left and right.
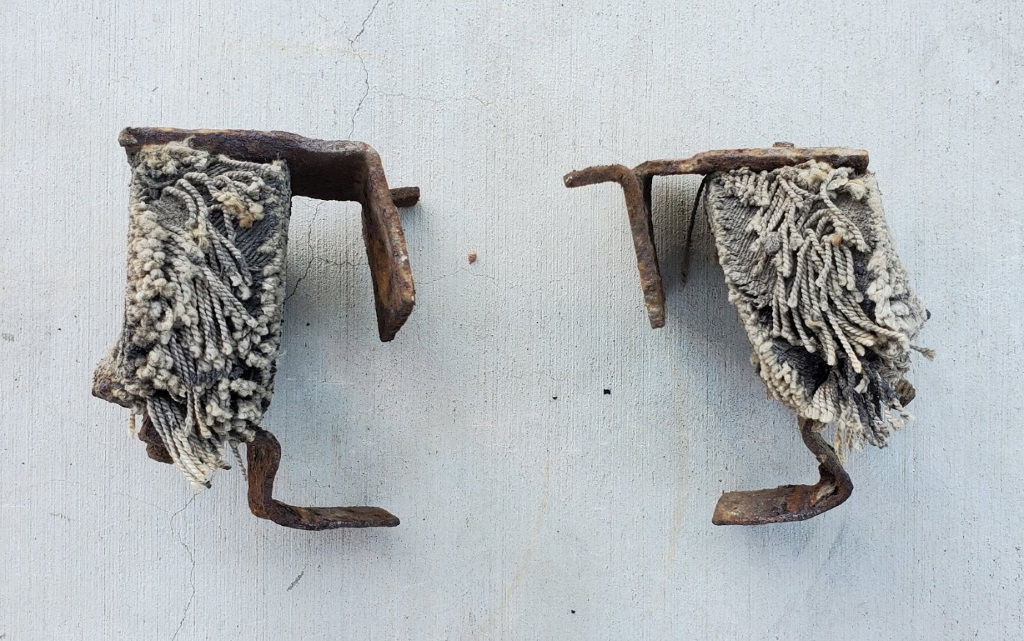 (tailpipe_hanger_01.jpg) (tailpipe_hanger_01.jpg)
 (tailpipe_hanger_02.jpg) (tailpipe_hanger_02.jpg)
Attachments
----------------
tailpipe_hanger_01.jpg (303KB - 383 downloads)
tailpipe_hanger_02.jpg (125KB - 394 downloads)
|
|
| |
|
Veteran
Posts: 212
Location: Suwanee, GA | Nick,
Thanks for the info and photos. When I inquired a couple of years ago the lady at Waldrons couldn't give me additional info on the tailpipes, but said they should be as original. Good to see yours appear to be correct. I imagine our wagons use the same setup. My single pipe exits straight back, and I get a lot of fumes with the tailgate window down. Hoping when I do replace it, more fumes exist to the sides.
Robert |
|
| |
|
Expert
Posts: 1234
Location: Ramona, CA | Ev's62Chrysler - 2020-09-08 8:46 PM
Nick,
Thanks for the info and photos. When I inquired a couple of years ago the lady at Waldrons couldn't give me additional info on the tailpipes, but said they should be as original. Good to see yours appear to be correct. I imagine our wagons use the same setup. My single pipe exits straight back, and I get a lot of fumes with the tailgate window down. Hoping when I do replace it, more fumes exist to the sides.
Robert
Ruth at Waldron's can be a little lacking in the customer service skills. And yes, the exhaust needs to exit out the side or it will get sucked into the back of the car. These wagons don't seal will at the bottom of the gate. Especially if the gate gets bent on the inside at the bottom from people climbing over it.
Does yours use resonators and mufflers?
Edited by NicksGarage 2020-09-09 11:28 AM
|
|
| |
|
Veteran
Posts: 212
Location: Suwanee, GA | Yes, it originally had resonators and mufflers. Most, if not all, of the original hangers are still in place. It currently has a single muffler, but it's nice and quiet. |
|
| |
|
Expert
Posts: 1234
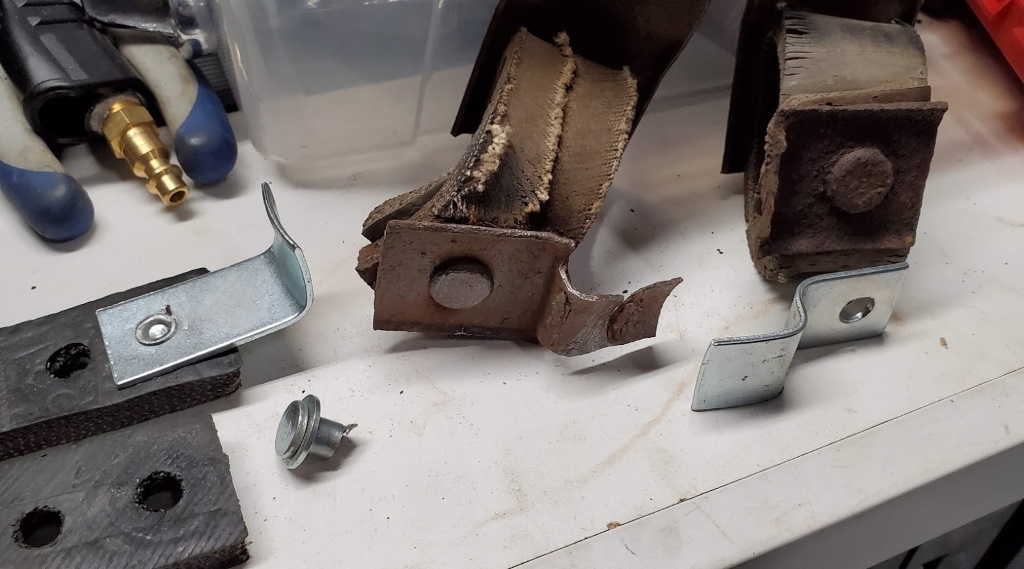
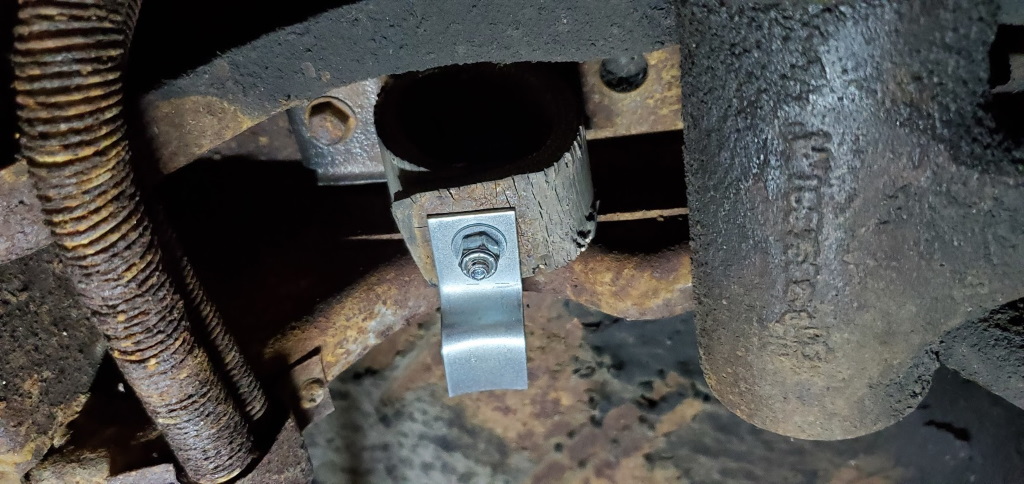
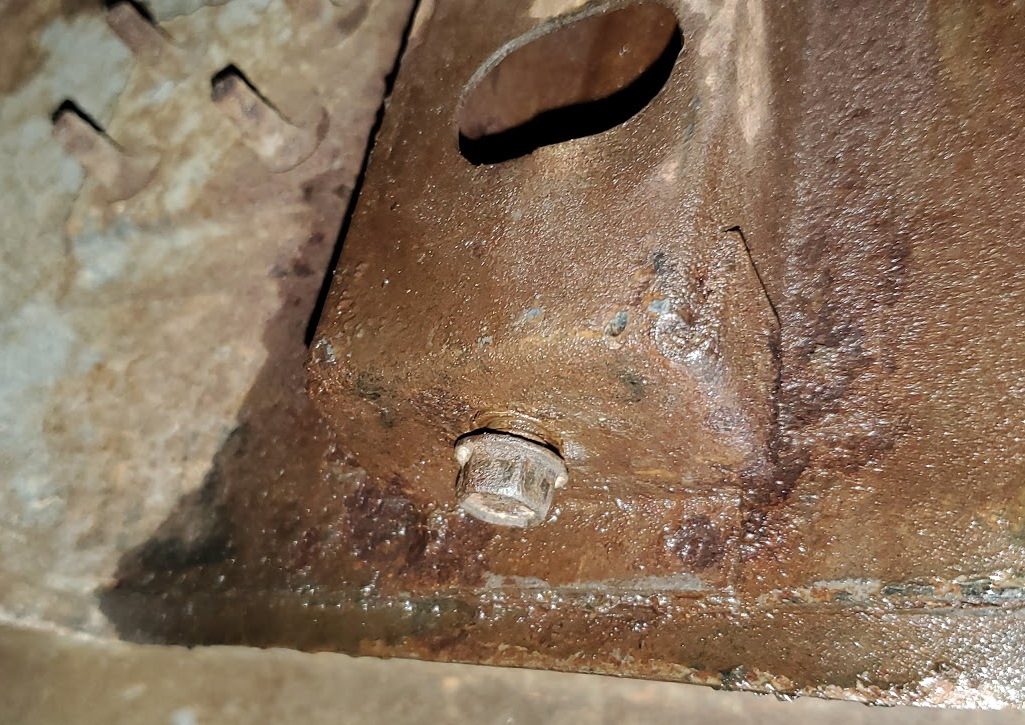
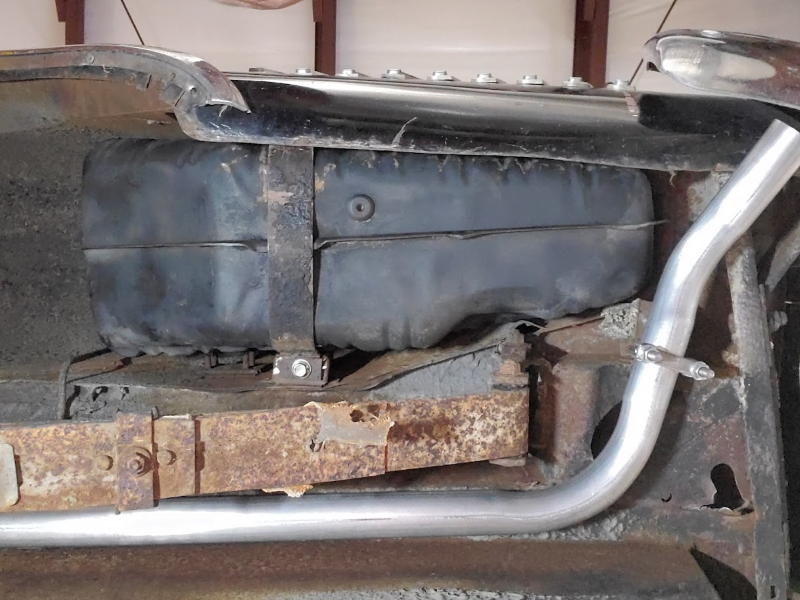
Location: Ramona, CA | Got my fuel tank installed. Had an issue with the mount for the tank strap. The captured nut in the bracket on the body broke loose. Had to cut the bolt head off to get it out. That left me with a hole. Was going to put a rivnut in it but the hole was too big so made an insert to drop down in the bracket. Had to use a long bolt to get it started but it worked out well. Still need to put the stone guard in but will wait until I get the car started.
 (fuel_tank_strap_bracket01.jpg) (fuel_tank_strap_bracket01.jpg)
 (fuel_tank_strap_bracket02.jpg) (fuel_tank_strap_bracket02.jpg)
 (fuel_tank_strap_bracket03.jpg) (fuel_tank_strap_bracket03.jpg)
 (fuel_tank_strap_bracket04.jpg) (fuel_tank_strap_bracket04.jpg)
 (fuel_tank01.jpg) (fuel_tank01.jpg)
 (fuel_tank02.jpg) (fuel_tank02.jpg)
 (fuel_tank03.jpg) (fuel_tank03.jpg)
Attachments
----------------
fuel_tank_strap_bracket01.jpg (296KB - 385 downloads)
fuel_tank_strap_bracket02.jpg (166KB - 378 downloads)
fuel_tank_strap_bracket03.jpg (71KB - 374 downloads)
fuel_tank_strap_bracket04.jpg (85KB - 383 downloads)
fuel_tank01.jpg (140KB - 384 downloads)
fuel_tank02.jpg (87KB - 376 downloads)
fuel_tank03.jpg (96KB - 372 downloads)
|
|
| |
|
Expert
Posts: 1234
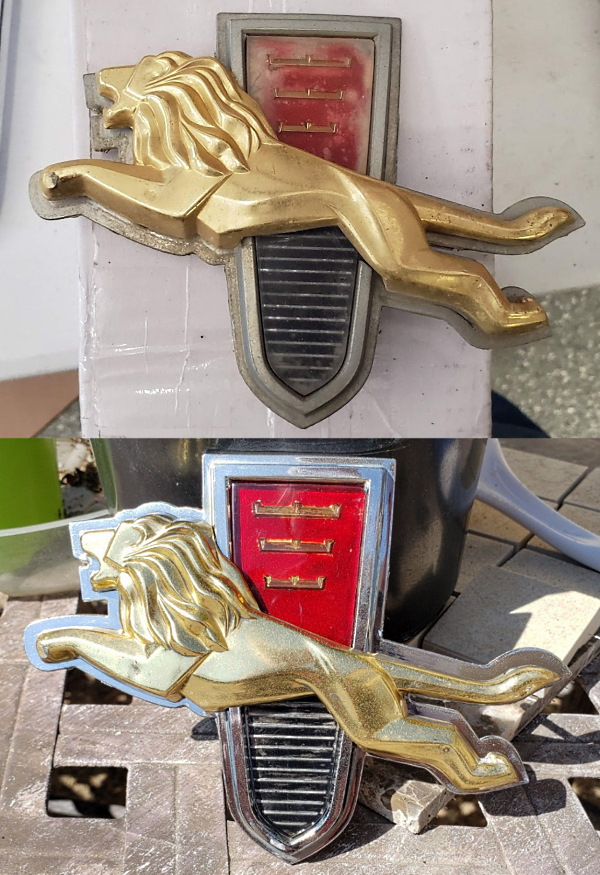
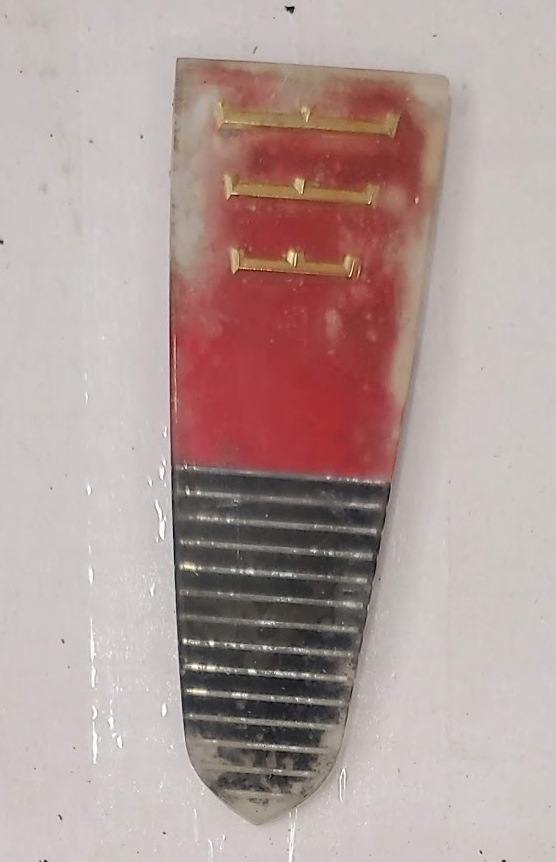
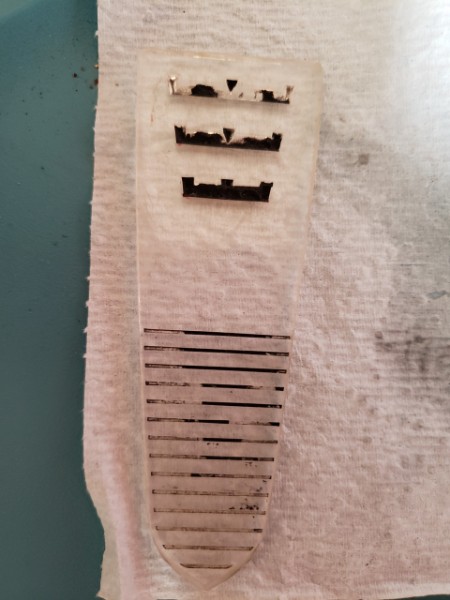
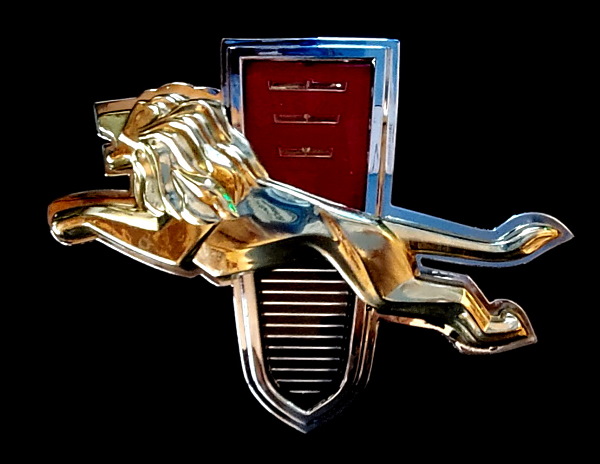
Location: Ramona, CA | When I got the wagon, it was missing the grille emblem. I had bought a broken grille that had to get an emblem as these are hard to find in any usable condition. My friend fixed the emblem up for me. The plastic has a crack and was scratched up and the glue they use on them is pretty strong. Trying to redo the chrome and gold on the plastic is not easy but I think he did a great job with what he had to work with and it's going to look great on the car. I would still like to find an NOS one one day.
 (grille_21.jpg) (grille_21.jpg)
 (grille_03.jpg) (grille_03.jpg)
 (grille_04.jpg) (grille_04.jpg)
 (grille_05.jpg) (grille_05.jpg)
 (grille_10.jpg) (grille_10.jpg)
 (grille_11.jpg) (grille_11.jpg)
Attachments
----------------
grille_21.jpg (208KB - 340 downloads)
grille_03.jpg (109KB - 325 downloads)
grille_04.jpg (77KB - 337 downloads)
grille_05.jpg (93KB - 334 downloads)
grille_10.jpg (79KB - 341 downloads)
grille_11.jpg (53KB - 336 downloads)
|
|
| |
|
Expert
Posts: 1234
Location: Ramona, CA | After posting pictures of my emblem on Facebook. Someone let me know that they had an NOS one. Almost too nice to put on the car. I'm going to run with my old one for now and put this one further down the road.
 (grille_nos04a.jpg) (grille_nos04a.jpg)
 (grille_nos01a.jpg) (grille_nos01a.jpg)
Attachments
----------------
grille_nos04a.jpg (67KB - 316 downloads)
grille_nos01a.jpg (100KB - 326 downloads)
|
|
| |
|
Expert
Posts: 1234
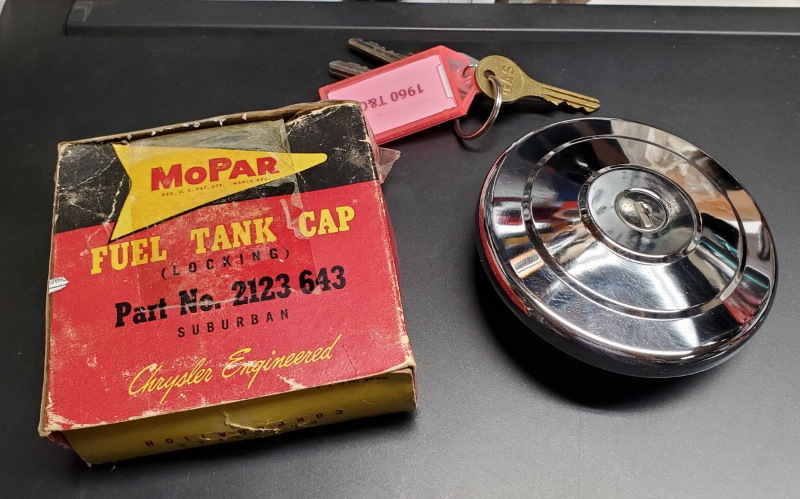
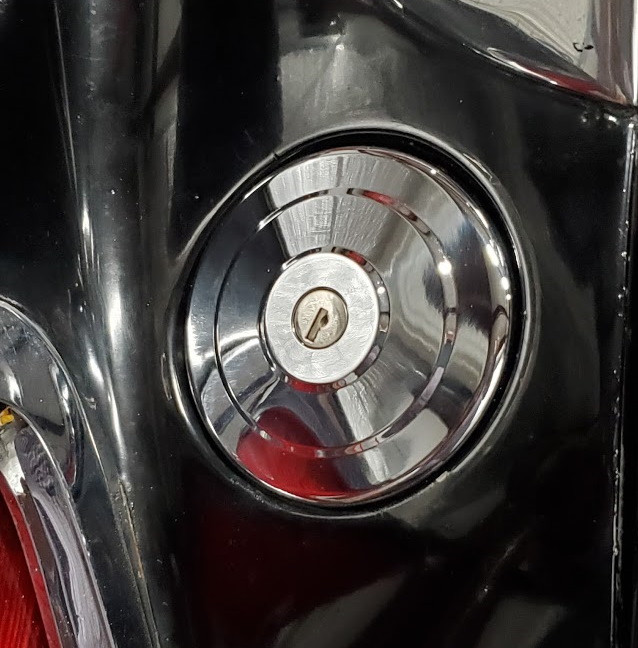
Location: Ramona, CA | My wagon didn't come with it's original gas cap. Had a clunky chrome one with a black handle. Fit the filler but stuck up quite a bit. I bought a vintage Stant locking cap that was supposed to fit it but I couldn't get it to latch onto the filler. Was afraid if I got it on, I wouldn't be able to get it off again. I did find NOS original types. The dealer counter versions were all chrome to match any paint color even though the originals would have been body color with a chrome handle.
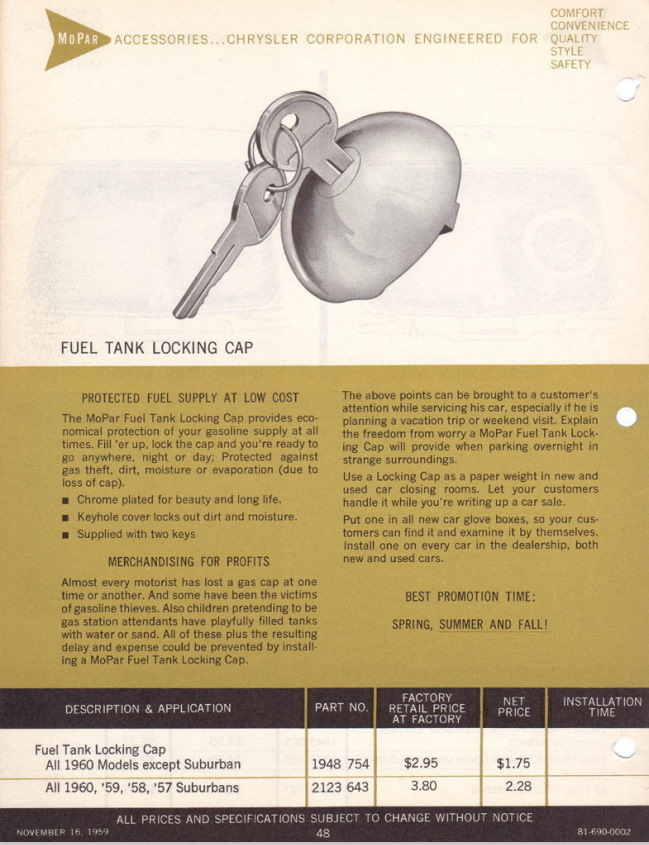
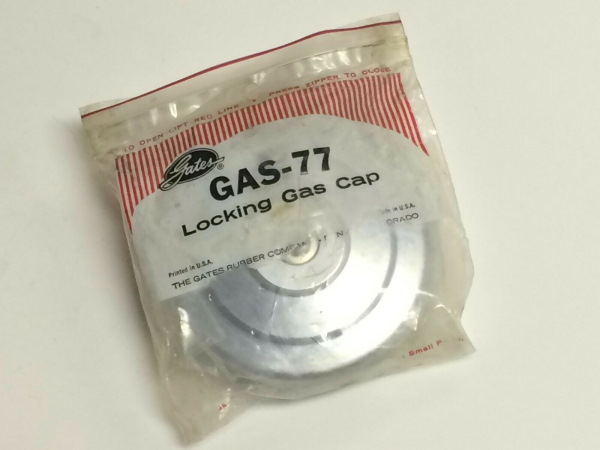
The other day I found this NOS factory locking accessory cap online. They were listed in the parts book but no picture so I wasn't sure what it looked like before. It fits the car perfectly. Nice and flush with the body and looks good. I've since seen other ones on eBay without the part number or box and bought another one for a friend. Then I found a Gates cap that looks like the same thing but uses different style of keys.
 (gascap_2123643_04a.jpg) (gascap_2123643_04a.jpg)
 (gascap_2123643_05.jpg) (gascap_2123643_05.jpg)
 (gascap_2123643_06.jpg) (gascap_2123643_06.jpg)
 (gascap_2123643_07.jpg) (gascap_2123643_07.jpg)
 (gascap_accessory.jpg) (gascap_accessory.jpg)
 (gascap_gates_gas-77_02.jpg) (gascap_gates_gas-77_02.jpg)
Attachments
----------------
gascap_2123643_04a.jpg (145KB - 331 downloads)
gascap_2123643_05.jpg (136KB - 320 downloads)
gascap_2123643_06.jpg (172KB - 328 downloads)
gascap_2123643_07.jpg (117KB - 310 downloads)
gascap_accessory.jpg (171KB - 310 downloads)
gascap_gates_gas-77_02.jpg (47KB - 299 downloads)
|
|
| |
|
Expert
Posts: 2216
Location: Muskego, WI | Great thread, I really appreciate all the details on the exhaust as I will be doing the same work on my '60 Plymouth wagon soon. As you already know, I recently installed my repaired fuel tank. My original strap was rusted pretty thin, so I drew a flat one in SolidWorks and had it laser cut out of stainless (the material cost on a small part was negligible, you're just paying for laser time). I had two cutout since I knew I'd have to bend it up to work and I was worried I might not get it right in one try, but I did. Any way, if you need/want a stainless tank strap, let me know. |
|
| |
|
Extreme Veteran
Posts: 471
Location: Ohio | NicksGarage - could you post picture showing the backside of the Chrysler NOS gas cap (part 2123643) ?
When installing the cap does it require to really push down in order to have the locking tabs engage into the filler tube flange ?
Since I couldn’t locate an NOS one, ended up purchasing that Gates 77 version. It fits the filler tube but the locking tabs don’t want to catch.
|
|
| |
|
Expert
Posts: 1234
Location: Ramona, CA | Space Trukin Wagon - 2020-12-05 6:59 AM
NicksGarage - could you post picture showing the backside of the Chrysler NOS gas cap (part 2123643) ?
When installing the cap does it require to really push down in order to have the locking tabs engage into the filler tube flange ?
Since I couldn’t locate an NOS one, ended up purchasing that Gates 77 version. It fits the filler tube but the locking tabs don’t want to catch.
Here you go. The Gates one is on the right. The gasket on the Gates one is thicker, but softer, so you have to exert more pressure to get it to latch on. Even on the factory cap, you need to make sure both engage. If they aren't it's pretty noticeable since it won't be flush on both sides. Basically I just listen for two clicks when installing it.
 (gascap_oem_vs_gates77_03.jpg) (gascap_oem_vs_gates77_03.jpg)
Attachments
----------------
gascap_oem_vs_gates77_03.jpg (441KB - 269 downloads)
|
|
| |
|
Extreme Veteran
Posts: 471
Location: Ohio | Thanks for the pictures. That Gates cap on the right is the exact same one that I have.
Just didn't want to mess it up by pressing down with too much force when installing. |
|
| |
|
Expert
Posts: 1234
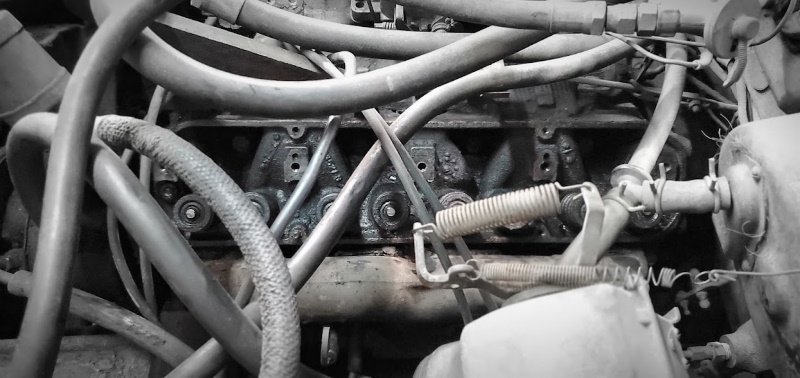
Location: Ramona, CA | It's been a while since I posted about my wagon. I've been trying to get it running off and on for the past year plus. This past week I got to talk to the mechanic that got it running in 2015 for the long-term owner who got it out of storage. It had never been started since being parked in a garage in Indiana in 1978. He said it took some doing to get it going as the fuel tank was rotten and fuel pump was bad. He removed the mechanical fuel pump and used an electric pump and a gas can and got it going. They couldn't find a gas tank for it and someone came along and wanted to buy the car so it was sold to the guy I got it from. I'm not sure he ever ran it.
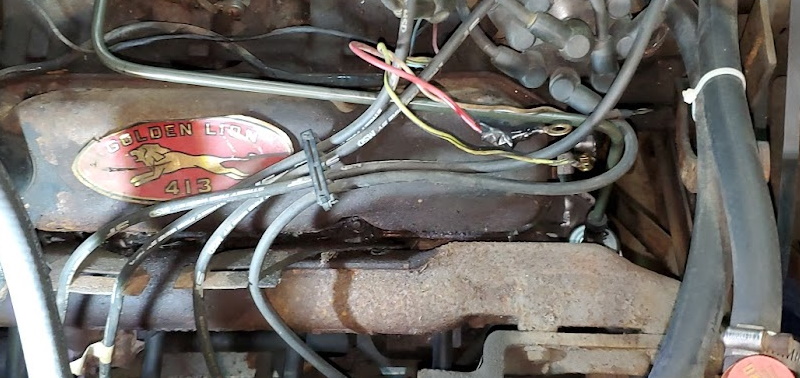
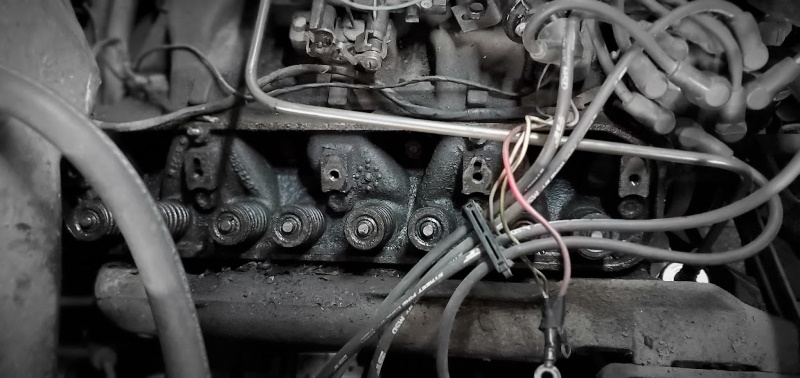
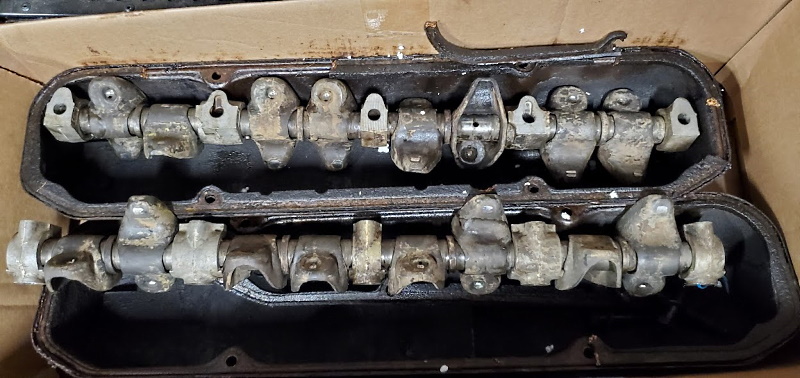
The engine doesn't have the greatest compression after sitting since 1978. We put some marvel's mystery oil in the cylinders and let it sit for a few months cranking it over from time to time. I really need to do a leak down test on it but today I decided to pull the valve covers, rockers and pushrods to have a look at the valvetrain and check to see if I had any stuck valves or bent pushrods. Nothing bent.
It's a real pain to get the valve covers off as there is so much stuff in the way. It actually wasn't as bad as I thought it was going to be. Did have to pull the heater core box and generator off to get the passenger valve cover off. This car has the giant 40 amp generator required with dual a/c. That thing must weigh 50 pounds. It didn't help that the belts were too short so I couldn't just pivot the generator out of the way.
Next step is a leak down test but it's looking more and more like I should just pull the heads and have them redone. I was hoping to do that at a later time as I was just trying to get the car running so I could move it around under its own power.
 (heads001.jpg) (heads001.jpg)
 (heads002.jpg) (heads002.jpg)
 (heads003.jpg) (heads003.jpg)
 (heads004.jpg) (heads004.jpg)
 (heads005.jpg) (heads005.jpg)
 (heads006.jpg) (heads006.jpg)
Attachments
----------------
heads001.jpg (140KB - 184 downloads)
heads002.jpg (134KB - 177 downloads)
heads003.jpg (124KB - 179 downloads)
heads004.jpg (145KB - 190 downloads)
heads005.jpg (115KB - 190 downloads)
heads006.jpg (118KB - 180 downloads)
|
|
| |
|
Expert
Posts: 1234
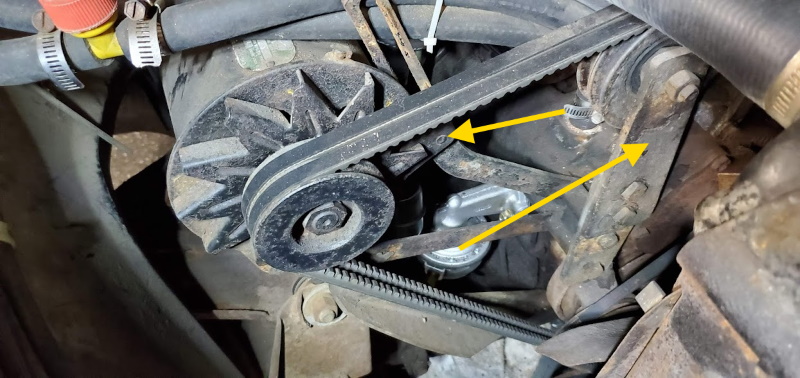
Location: Ramona, CA | I need to find some longer belts for the A/C and generator. The current belts are 70 inches but there is no adjustment room with the big generator and the added on idler. Even removing the idler, I had to remove the mounting bolts for the generator to get the belts off. And yes, the adjuster bracket does mount that way on the big generator.
Also it seems to be hard to buy matched belts anymore. A friend did the belts on his '64 New Yorker and he had to order a bunch of belts to find two that were close to the same. In the old days, you'd buy a matched pair that were cut from the same master so that they would be identical.
Parts places don't list different belts for the big generator. The parts book does list different belts for the 40amp generator, part number 1947025. I was able to cross that through napa and D&D. I ordered a pair of the D&D ones from Amazon and I'll see how they match. At least it's easy to return them and they were a lot cheaper than the Napa belts.
Edited by NicksGarage 2021-08-21 7:13 PM
 (heads007.jpg) (heads007.jpg)
Attachments
----------------
heads007.jpg (140KB - 180 downloads)
|
|
| |
|
Exner Expert 10K+
Posts: 10251
Location: So. Cal | Typically, if it doesn't run at all, doing a valve job isn't going to fix it unless something is bent. It's really best to do a leak down to figure out what's going on with the compression. Otherwise you could go through all the trouble only to find out that your rings are completely shot. But typically, a motor will still run with lousy compression. It just won't have a lot of power. It could be that your lifters are garbage and don't currently move the valves enough to get it running. Or it may just be an ignition problem. |
|
| |
|
Expert
Posts: 1234
Location: Ramona, CA | Powerflite - 2021-08-21 5:47 PM
Typically, if it doesn't run at all, doing a valve job isn't going to fix it unless something is bent. It's really best to do a leak down to figure out what's going on with the compression. Otherwise you could go through all the trouble only to find out that your rings are completely shot. But typically, a motor will still run with lousy compression. It just won't have a lot of power. It could be that your lifters are garbage and don't currently move the valves enough to get it running. Or it may just be an ignition problem.
Doing a leak down test tomorrow and then will put the rockers and pushrods back in and make sure everything is operating properly. After digging around in there today I see I need a better ground for the engine. We haven't had the greatest spark with it. |
|
| |
|
Expert
Posts: 1234
Location: Ramona, CA | When I talked to the mechanic that last worked on the car, he gave me a tidbit of information that led me to finding out who the original owner of the wagon probably was. It was ordered from Max Barish, Inc. Chrysler Plymouth in Los Angeles. I knew the car probably lived in Pasadena based on matchbooks and receipts I found stuck in the front seat and other places. Robert M. Flarsheim lived in Pasadena at the time and also had a lake house in Culver, Indiana on Lake Maxinkuckee. There isn't a lot of information on him available but from what I've found is that he was born in 1898, which would have made him 62 when he bought the car. He and his first wife Myrtle didn't seem to have any children and this was confirmed after talking to his great grand nephew. Why an older couple with no children or even grandchildren needed a 9 passenger luxury wagon, I'm not sure. He was a golfer so maybe he needed something to carry his clubs to the country club. He was in the hearing aid business so not sure it makes sense as a company car, and just a year later he was filing for Social Security benefits. Of course the wagon would have made a great car to cruise across the country to visit the lake house.
He sold or traded the car in in 1973 in Plymouth, Indiana where the longest term owner bought it when he was in high school. The great grand nephew never met him and said his dad had only met him a few times. The rest of the family stayed in the Louisville, Kentucky area. My own parents moved to California while the rest of the family stayed in Texas and Oklahoma. We didn't grow up with our extended family so we were never that close. The Internet has brought us back together though. I've probably learned all I'll be able to about the first owner so there is still a lot of mystery about that. I know for some people this kind of stuff isn't that important but I'm always curious about the previous owners of my old cars. |
|
| |
|
Expert
Posts: 2216
Location: Muskego, WI | Nick, any luck getting this car running? |
|
| |
|
Expert
Posts: 1234
Location: Ramona, CA | jboymechanic - 2021-08-31 7:28 AM
Nick, any luck getting this car running?
Not yet, pulled the valve covers and rockers to make sure there were no stuck valves and/or bent pushrods. All good there. Did a leakdown test and the results weren't great but not catastrophic. We're going to battle the weak spark and slow cranking speed and try again. Got a new group 27 battery and will be correcting the undersized replacement battery cables. Will be a couple weeks before I can get to it again. Going back to working on the '61 Belvedere. Waiting for parts so I can put the tank back in that one and then it should be running off the tank. |
|
| |
|
Expert
Posts: 1234
Location: Ramona, CA | I got lucky this week and confirmed the original owner of the car. Talking to his son, who is now around 75, they lived in Pasadena and had the lake house and would go there every summer. He said his dad loved cars and had several. They moved to the lake house in 1975 and then came back to California in 1980. He's going to see if he has any pictures of the car from back in the day. The son was adopted and didn't take their last name so that made it trickier to find him. He said it was a great car to ride in across country on those trips. He also said his dad was an avid golfer and would go golfing all over with a friend.
Still no luck on getting it running. Put a blue streak coil on it so have plenty of spark. Got a few backfires from the fuel building up. Squirted a little oil in each cylinder and that helped a bit. Quite a bit of smoke in the crankcase. Left the valve covers off while trying to start it. |
|
| |
|
Exner Expert 10K+
Posts: 10251
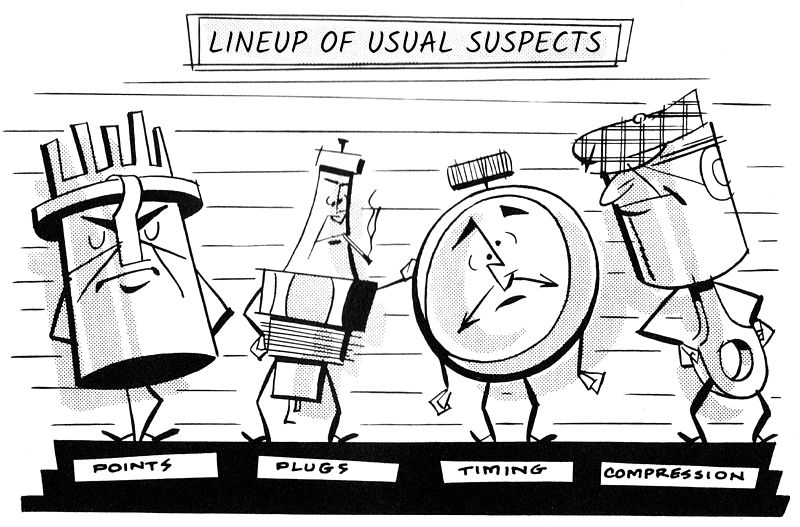
Location: So. Cal | Round up the usual suspects! Sounds like timing. Check the distributor and the advance springs at the bottom. I was using a later distributor with 2 springs in it, and had similar results you are describing, but it would fire sporadically. I swapped out the distributor for one with only 1 spring in it, and it fired right up and ran well after that. I'm not sure why it wouldn't work on the other one as it was set up exactly the same other than the springs, but that was my experience.
Edited by Powerflite 2021-09-10 9:02 PM
 (Usual Suspects_s.jpg) (Usual Suspects_s.jpg)
Attachments
----------------
Usual Suspects_s.jpg (102KB - 170 downloads)
|
|
| |
|
Extreme Veteran
Posts: 310
Location: Kalispell, MT USA | The reason the my 64 361 was a no start way back when was cam timing that had jumped in 1975. But it wouldn't start then or recently after my repair until I primed the oil system with a priming tool, (a hex shaped rod I got from Summit) I couldn't get enough lift out of the valve train. It also has a couple of valve sticking from sitting so long. Some GM rust penetrant cured that. Now it runs fine with no further internal repairs.
 (20171119_152715.jpg) (20171119_152715.jpg)
 (oil primer.jpg) (oil primer.jpg)
Attachments
----------------
20171119_152715.jpg (192KB - 174 downloads)
oil primer.jpg (5KB - 181 downloads)
|
|
| |
|
Elite Veteran
Posts: 737
Location: Finland | I couldn`t sleep if I had all that crud inside my engine. Only way to get a reliable engine without noises from lifters and rocker arms or cooling issues is simply a total
disassembly and overhaul. Sorry I just had to say it... |
|
| |
|

Expert 5K+
Posts: 7592
Location: northern germany | 22mafeja - 2021-09-15 12:55 AM
I couldn`t sleep if I had all that crud inside my engine. Only way to get a reliable engine without noises from lifters and rocker arms or cooling issues is simply a total
disassembly and overhaul. Sorry I just had to say it...
Not my experience with these (B) engines. 1 inch of sludge in the oil pan of my 383, rockers covered with carbon crud.... that was 1988. Run it almost daily ever since, daily driver in the 90s, sees 140+ mph almost every week in summers, still runs like new with no unusual noises and perfect oil pressure. About 350K miles on the clock.
Same experience with my other B-engines. They all were abused, high mileage and are still untouched (heads never been off) and they all still run like new. |
|
| |
|
Extreme Veteran
Posts: 310
Location: Kalispell, MT USA | Oh, I plan on building a 383 for it. But this engine only has 112K on it. I cleaned and flushed everything out the best I could before reassembly. The worst crud was in the water jackets. I cleaned those areas out when I replaced the soft plugs. I didn't mean to hijack this thread, I just wanted to offer a possible area to check to help Nick get his car running..
 (20180429_142718.jpg) (20180429_142718.jpg)
Attachments
----------------
20180429_142718.jpg (89KB - 166 downloads)
|
|
| |
|
Expert
Posts: 1234
Location: Ramona, CA | normsclassicradio - 2021-09-15 8:29 AM
Oh, I plan on building a 383 for it. But this engine only has 112K on it. I cleaned and flushed everything out the best I could before reassembly. The worst crud was in the water jackets. I cleaned those areas out when I replaced the soft plugs. I didn't mean to hijack this thread, I just wanted to offer a possible area to check to help Nick get his car running..
No worries, it's all helpful. I did clean the rockers, shafts and pushrods. Nothing bent and all valves opening and closing and oil is pumping like it should. The results from the leakdown test were not great. 90psi in and only holding 30. Rings are worn or stuck. Put a little oil in each cylinder and that helped but the slow cranking isn't helpful. Ordered a mini starter for it and will do a couple other things before resigning to pulling the motor.
Keep in mind the goal of getting it running wasn't to start driving it. It needs a lot more work than that go get it road ready. I just need to be able to move it around under its own power. Pushing a 4700 pound car around is no fun and it's up hill to my house garage where it needs to go for a while.
Edited by NicksGarage 2021-09-15 1:46 PM
 (rockers.jpg) (rockers.jpg)
Attachments
----------------
rockers.jpg (143KB - 190 downloads)
|
|
| |
|
Extreme Veteran
Posts: 310
Location: Kalispell, MT USA | One thing you can check. To see if the timing chain has excessive slack, remove the distributor cap. Watch the rotor and turn the crank back and forth with a wrench. If you get a lot of rotation before the distributor rotor turns, you should probably have a look at the timing chain.
Norm |
|
| |
|
Expert
Posts: 1234
Location: Ramona, CA | normsclassicradio - 2021-09-15 3:34 PM
One thing you can check. To see if the timing chain has excessive slack, remove the distributor cap. Watch the rotor and turn the crank back and forth with a wrench. If you get a lot of rotation before the distributor rotor turns, you should probably have a look at the timing chain.
Norm
We don't have that problem. The distributor itself is worn and has a bit of slop in the shaft. We are getting good spark now that I put a blue streak coil on it. Only spare I have is a 300F dual point needs setting up. |
|
| |
|
Expert
Posts: 3490
Location: Montreal, Canada | If you need model specific parts for this car, there is one local to me that was a restoration project for a kid, and he lost patience/money/interest, and sold it to a junkyard. It was a bit rough, but complete and running with many new mchanical components.. The kid really blew it. Anyway, that yard specializes in classic cars, so at least it will be properly salvaged, if that's a thing. Car was identical to yours, but dark red and dark red and black interior. Power everything, as far as I know. |
|
| |
|
Expert
Posts: 1234
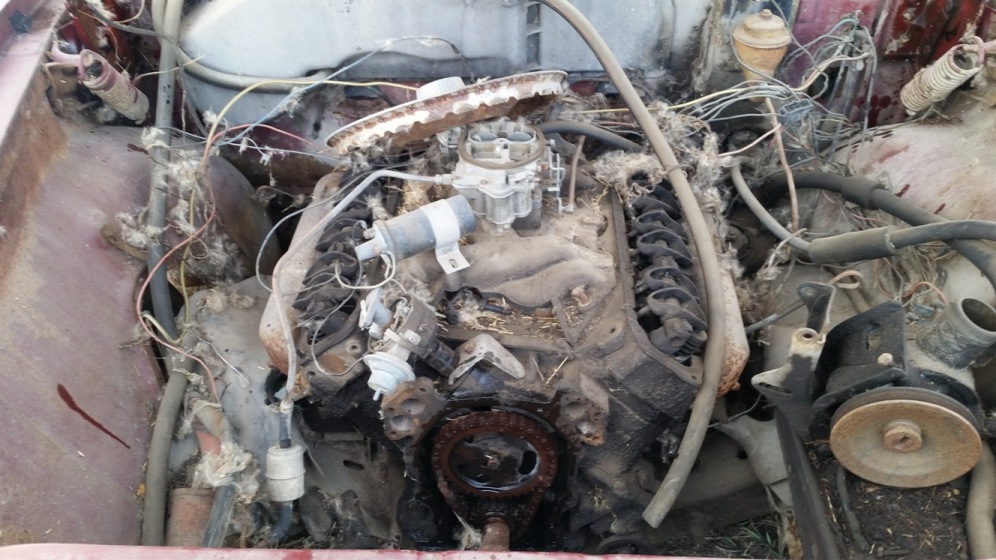
Location: Ramona, CA | soiouz - 2021-09-20 11:07 AM
If you need model specific parts for this car, there is one local to me that was a restoration project for a kid, and he lost patience/money/interest, and sold it to a junkyard. It was a bit rough, but complete and running with many new mchanical components.. The kid really blew it. Anyway, that yard specializes in classic cars, so at least it will be properly salvaged, if that's a thing. Car was identical to yours, but dark red and dark red and black interior. Power everything, as far as I know.
I assume you're talking about this car. If so, yes, an over ambitious project with little upside.
 (kevin.jpg) (kevin.jpg)
Attachments
----------------
kevin.jpg (212KB - 169 downloads)
|
|
| |
|
Expert
Posts: 3490
Location: Montreal, Canada | That's the one.
Poor kid sank a lot of money into it, but did everything backwards. Brand new brakes on a half rot-eaten body shell, etc, etc..
Anyway, let me know if you need, I will give you the contact info to the yard, or get the parts myself for you, as I go to that yard a couple of times a year usually.
Edited by soiouz 2021-09-20 2:31 PM
|
|
| |
|
Expert
Posts: 1234
Location: Ramona, CA | soiouz - 2021-09-20 11:28 AM
That's the one.
Poor kid sank a lot of money into it, but did everything backwards. Brand new brakes on a half rot-eaten body shell, etc, etc..
Anyway, let me know if you need, I will give you the contact info to the yard, or get the parts myself for you, as I go to that yard a couple of times a year usually.
Thanks. I'll send you a private message.
Nick |
|
| |
|
Expert
Posts: 1234
Location: Ramona, CA | Not much progress on the wagon. Haven't gotten it running due to the low compression. The first gas tank I put in leaked so bought a reproduction one from Moparpro but trying to return it since it's made wrong. Now have one from a '61 NY wagon in there that I had to clean up but not leaking so far. Also used the working sending unit from the demolition derby car tank I got.
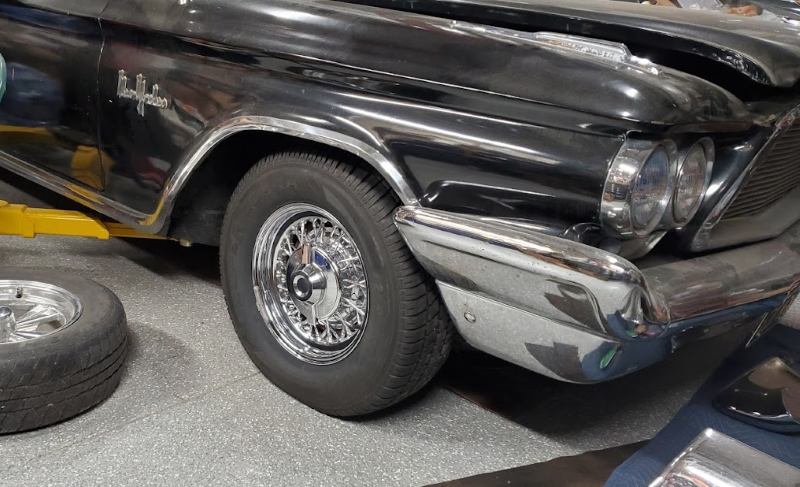
Been playing with the wheels and tires. Didn't like the batmobile wheels that came on it and had a set of wire wheels on the shelf that I wanted to use. They look great but leak. So now I've put the tires on some Magnum GT wheels I had around. They'll work for rolling it around for now. Need to move the car to my house garage so that I can work on other cars in my shop. Not an easy car to push around.
 (wire_wheel.jpg) (wire_wheel.jpg)
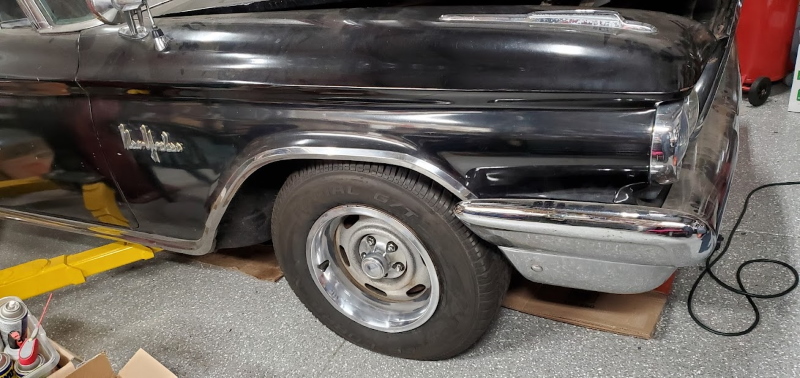 (magnum_gt_wheel.jpg) (magnum_gt_wheel.jpg)
 (fuel_tank.jpg) (fuel_tank.jpg)
Attachments
----------------
wire_wheel.jpg (231KB - 142 downloads)
magnum_gt_wheel.jpg (196KB - 132 downloads)
fuel_tank.jpg (249KB - 137 downloads)
|
|
| |
|
Expert
Posts: 1234
Location: Ramona, CA | Here's one of the discussions on the Moparpro gas tank issues.
http://www.forwardlook.net/forums/forums/thread-view.asp?tid=76788 |
|
| |
|

Veteran
Posts: 293
Location: WA/USA | Good luck on the tank return Nick. Mopar Poo rejected my first request for return, then accepted it two weeks later, ..... and then as I awaited, and waited some more for the return shipping label....... rescinded the return offer.
|
|
| |
|
Expert
Posts: 1234
Location: Ramona, CA | AceS - 2022-02-09 8:27 PM
Good luck on the tank return Nick. Mopar Poo rejected my first request for return, then accepted it two weeks later, ..... and then as I awaited, and waited some more for the return shipping label....... rescinded the return offer.
That sucks. He's ignoring me now. He had offered me a partial refund if I kept the tank and modified it but I said no. I'll never buy anything from him again. |
|
| |
|
Expert
Posts: 1234
Location: Ramona, CA | NicksGarage - 2022-02-09 8:29 PM
AceS - 2022-02-09 8:27 PM
Good luck on the tank return Nick. Mopar Poo rejected my first request for return, then accepted it two weeks later, ..... and then as I awaited, and waited some more for the return shipping label....... rescinded the return offer.
That sucks. He's ignoring me now. He had offered me a partial refund if I kept the tank and modified it but I said no. I'll never buy anything from him again.
I finally got him to take the tank back and give me a refund, including the return shipping. It took a few comments on his facebook posts to get him to pay attention to me.
|
|
| |
|
Expert
Posts: 1234
Location: Ramona, CA | I had to give up trying to get the wagon to run. Just can't get past the low compression. So time to move it to my house garage so I can work on other things in my shop. Looks like it will wait until I can pull the engine. I normally keep my 300F in the house garage but it's now in the shop so I can install the rechromed bumpers, new tires and a starter. At least I can drive it out when I need to use the lift.
 (1960_x2_04a.jpg) (1960_x2_04a.jpg)
 (Untitled.jpg) (Untitled.jpg)
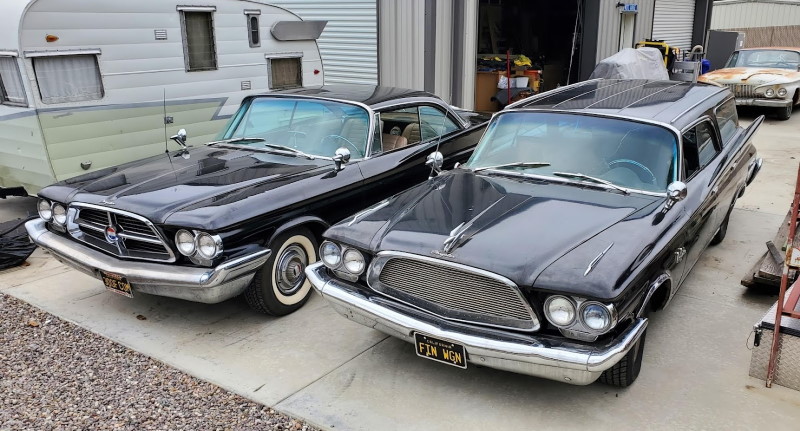 (1960_x2_02a.jpg) (1960_x2_02a.jpg)
Attachments
----------------
1960_x2_04a.jpg (318KB - 147 downloads)
Untitled.jpg (199KB - 149 downloads)
1960_x2_02a.jpg (129KB - 153 downloads)
|
|
| |
|
Expert
Posts: 1234
Location: Ramona, CA | Got the 1959 Imperial wheel covers I bought for the wagon today. One of my favorite wheel covers and they look great on it.
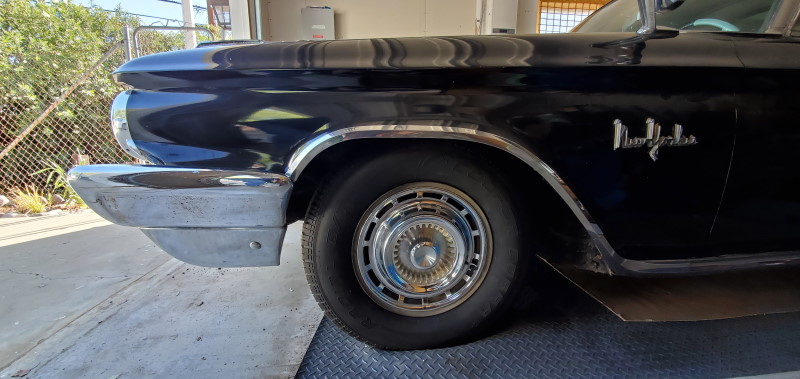 (59_wheelcover_02.jpg) (59_wheelcover_02.jpg)
Attachments
----------------
59_wheelcover_02.jpg (87KB - 152 downloads)
|
|
| |