|
|

Expert 5K+
Posts: 9650
    
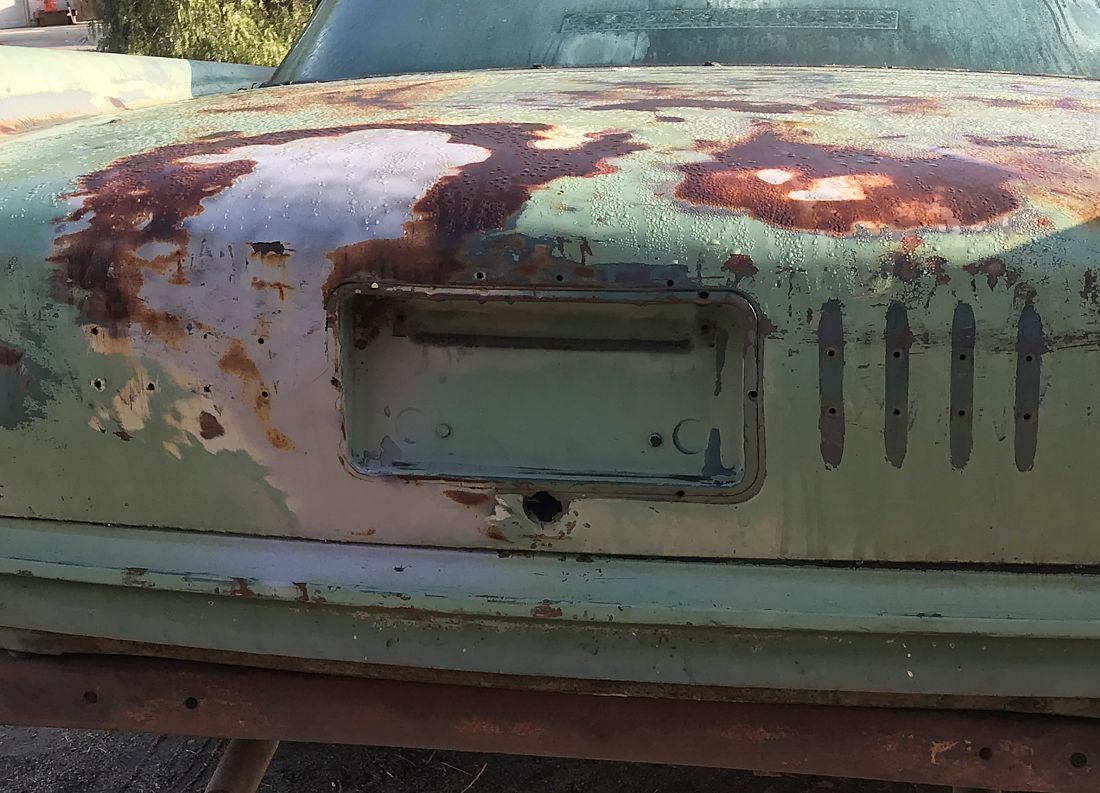
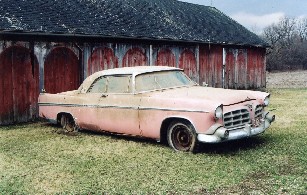
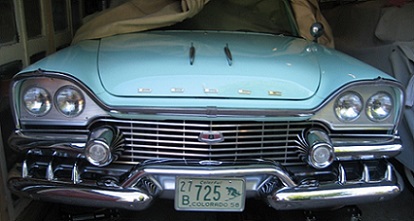
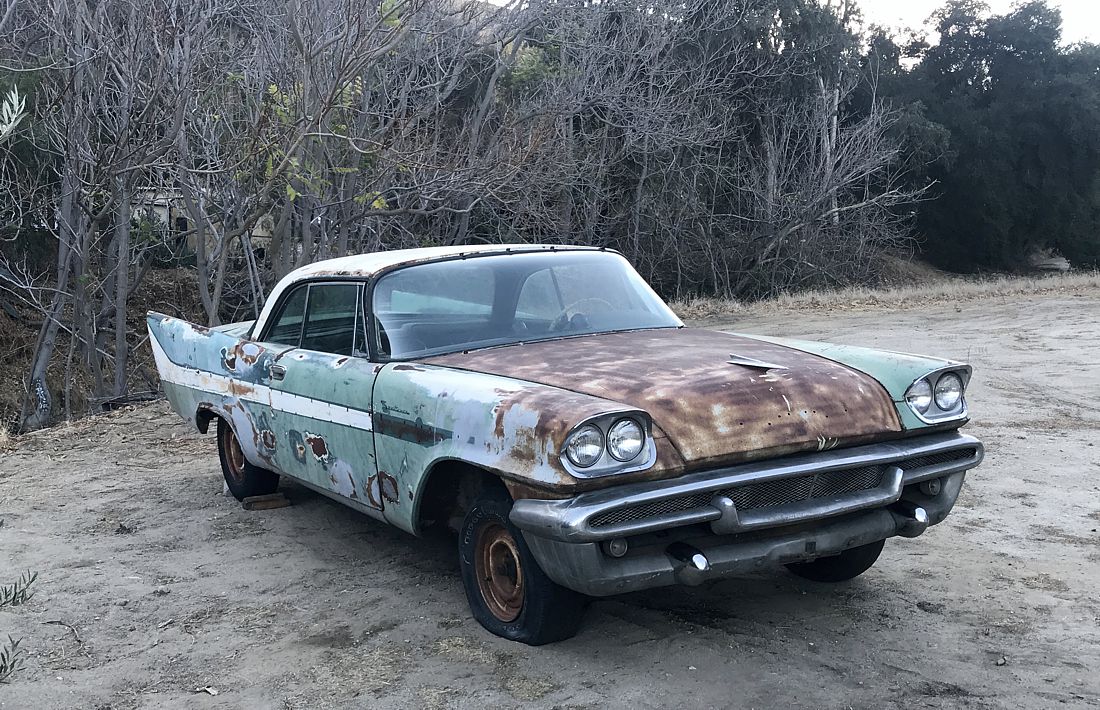
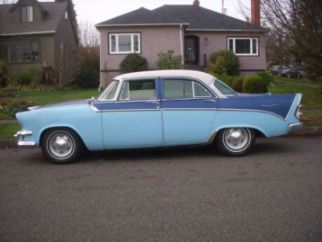
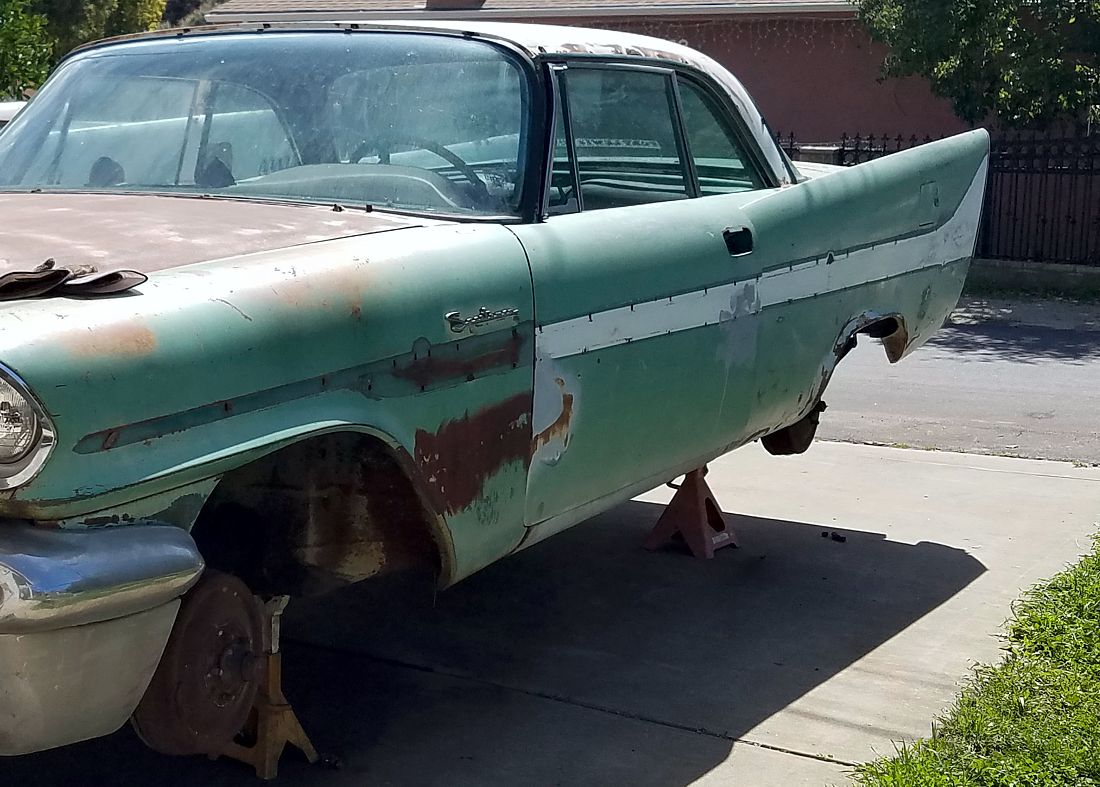
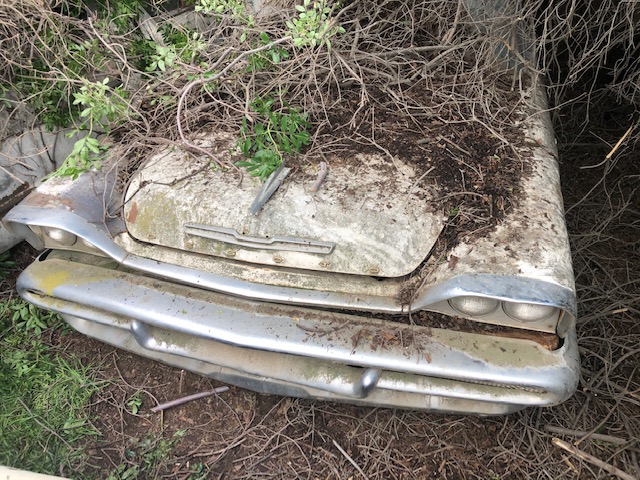
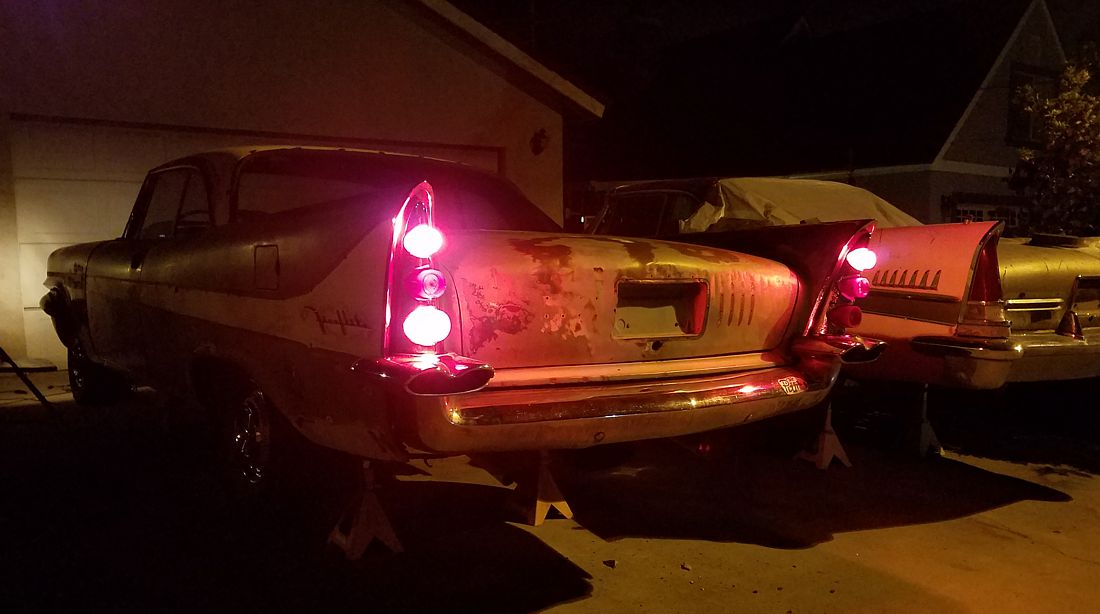
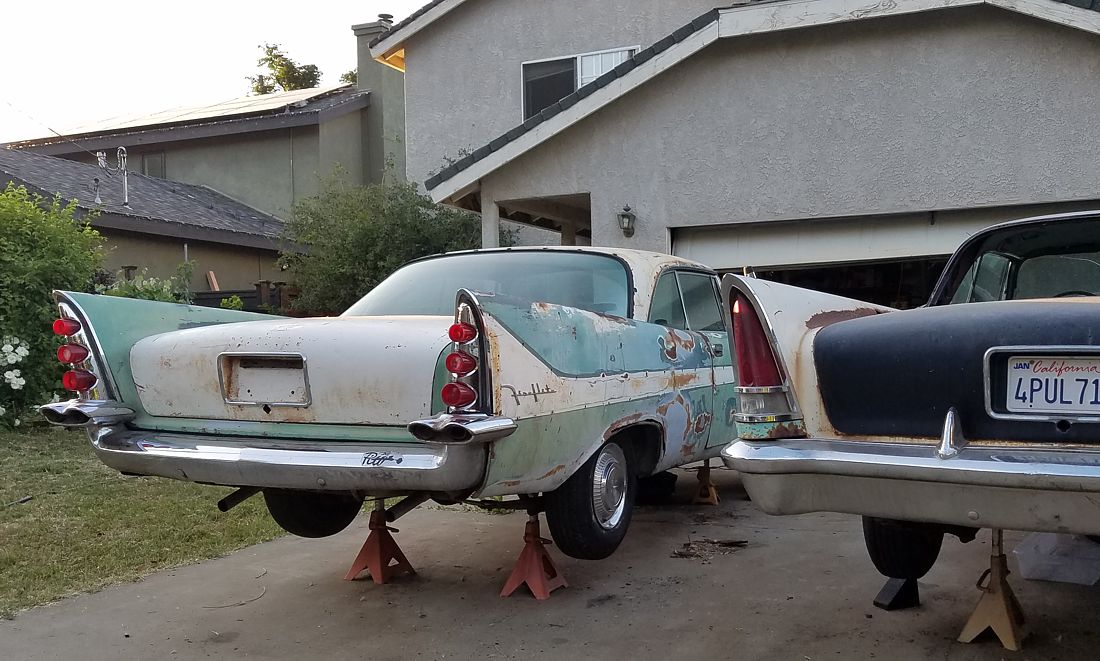
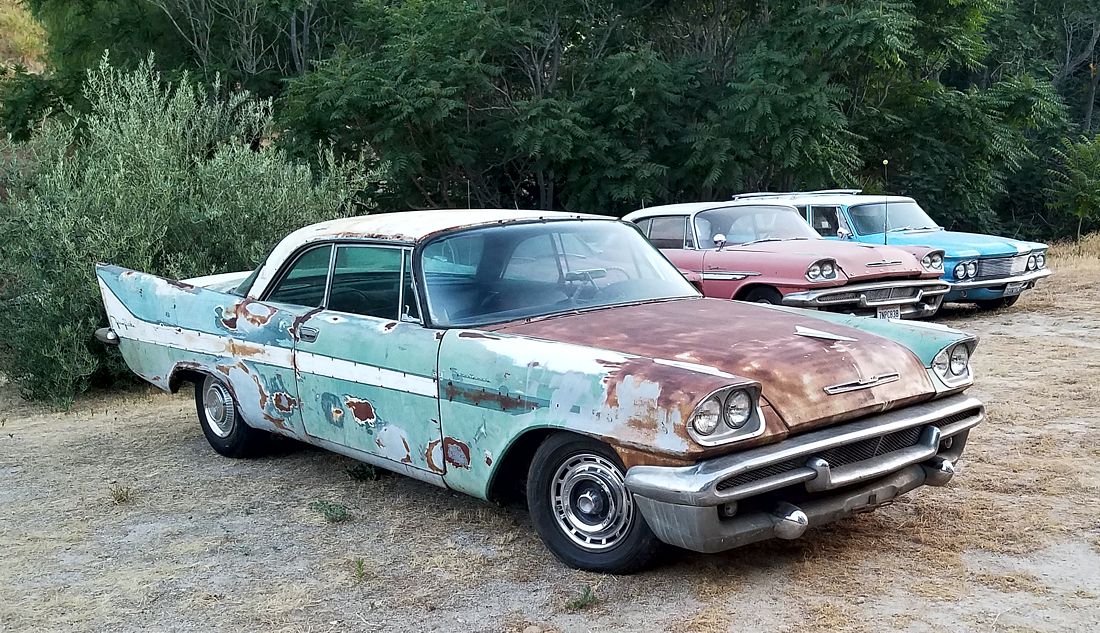
Location: So. Cal | I purchased another DeSoto recently. This one was getting ready to be painted in North Hollywood, close to me. The owner either died or lost interest so the body shop sold it off to the previous owner. Unfortunately, because of how it was acquired, it has been completely stripped on the outside. The only part left on the outside of the car is the right door handle so they could still open one door.But the body is in pretty good shape for one of these cars. It's not as good as it first seems though. There is quite a bit of rust on the roof that needs to be addressed, as well as rust on the front right part of the quarter panel & wheel lip. There is also a littlle bit of rust here and there, but the floors and trunk are almost rust free as far as I can tell. The inner rockers are also rust free, but the outers have a cover over them, so not sure how bad it will look once I remove those, but they will likely need to be replaced properly. It looks to have been a spring special because it has the mounting holes and outline of the trim on the dented up trunk lid. I have most of the parts to put this back together except the rear bumper, the spring special trim, and the fireflite specific stuff, but the interior is mostly complete so that's good.
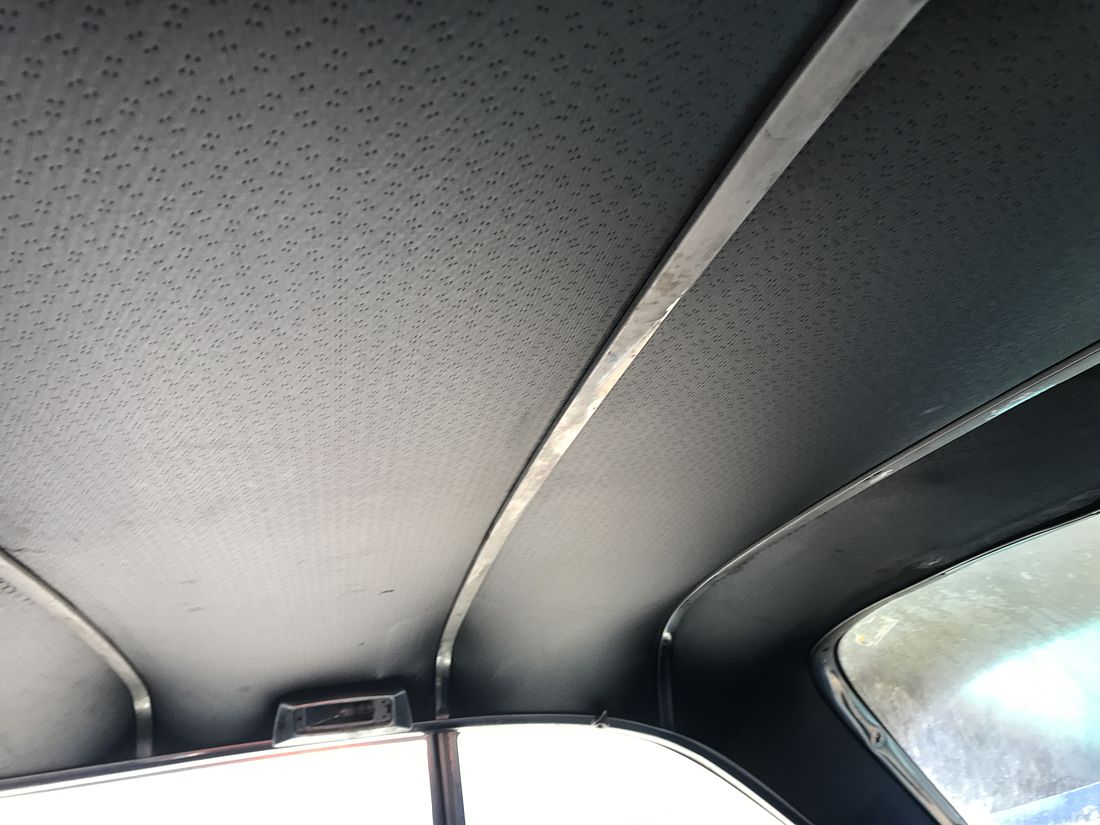
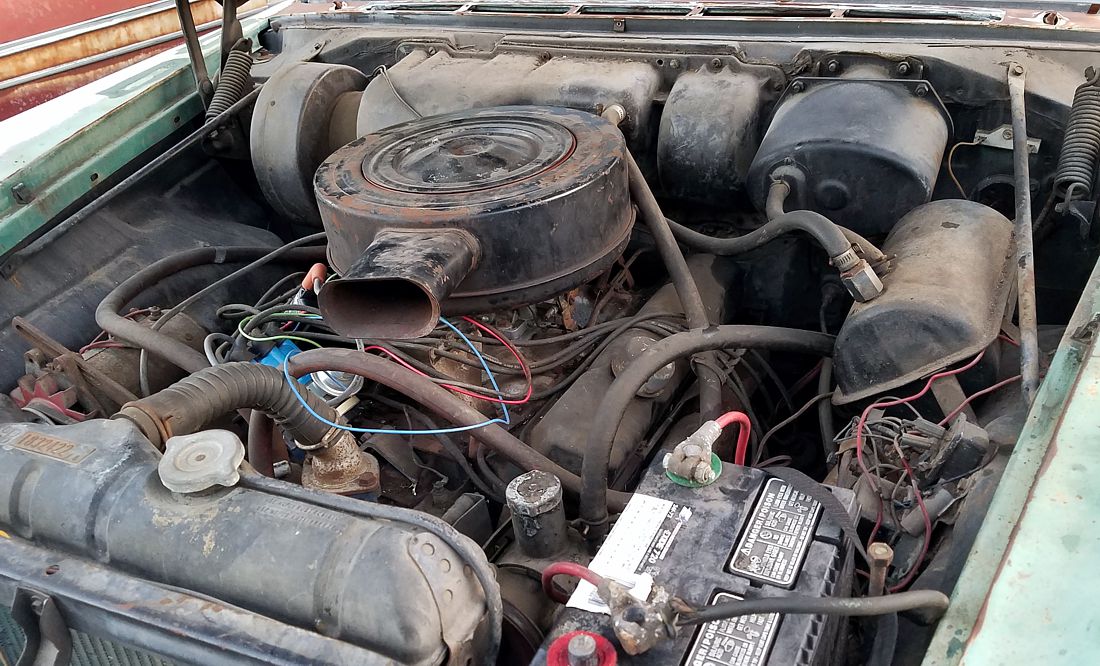
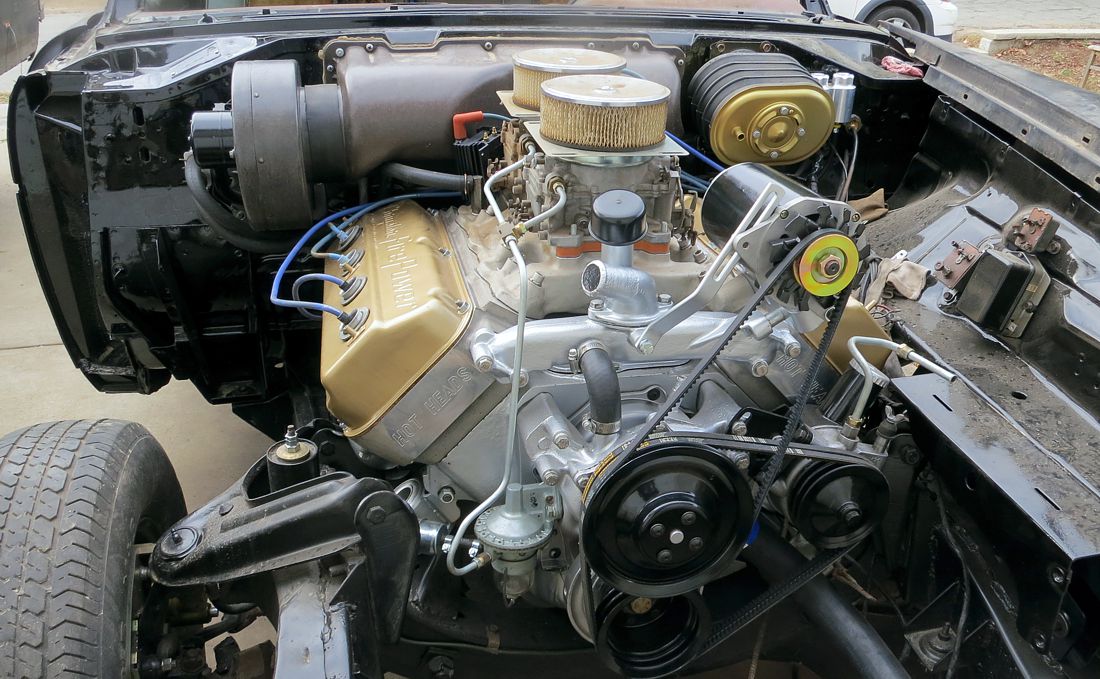
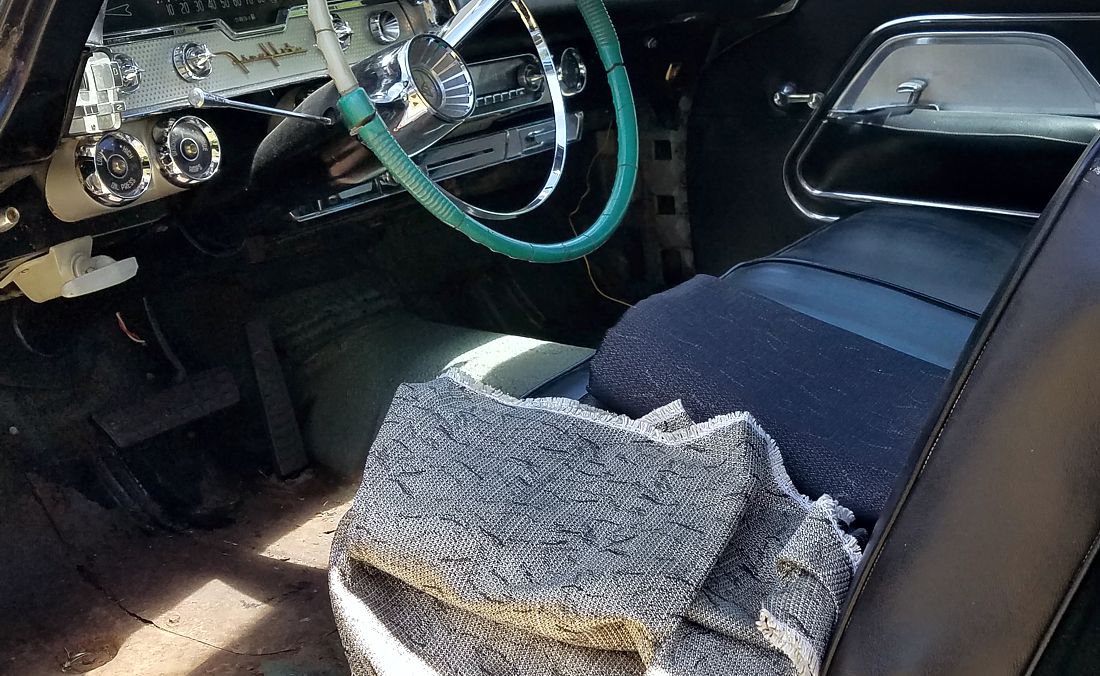
The original color was French Turquoise, not the lighter green re-paint that's currently showing. However, I can't verify it because the body tag is missing. I'll have to get an IBM printout so I can get a repro made. Fortunately, the VIN tag is still there and in good shape! The interior has been redone with new black vinyl everywhere, including the dash & door panels. I am not thrilled about the color choice, but am glad it is at least usable. The motor turns so there is a very good chance that I can get it running. It seems to be the original motor with a L-360 code, but is painted blue so it has likely been rebuilt before. I'm not sure what all those dots on the head are supposed to indicate. The dual exhaust system is also relatively new and in good shape. If I can get the motor running, I will spend my time finishing all the body work that needs to be done and then paint it before I put it back together. One good thing is I can't lose the parts during the paint process because there aren't any! 
 (58Fireflite LF.jpg) (58Fireflite LF.jpg)
 (58Fireflite RF.jpg) (58Fireflite RF.jpg)
 (58Fft Motor.jpg) (58Fft Motor.jpg)
 (58Fft Dash.jpg) (58Fft Dash.jpg)
 (58Fft Headliner.jpg) (58Fft Headliner.jpg)
 (58Fft Seats.jpg) (58Fft Seats.jpg)
 (58Fft Trunk.jpg) (58Fft Trunk.jpg)
 (58Fft Engine No..jpg) (58Fft Engine No..jpg)
Attachments
----------------
 58Fireflite LF.jpg (273KB - 453 downloads) 58Fireflite LF.jpg (273KB - 453 downloads)
58Fireflite RF.jpg (287KB - 468 downloads)
58Fft Motor.jpg (225KB - 466 downloads)
58Fft Dash.jpg (137KB - 467 downloads)
58Fft Headliner.jpg (127KB - 476 downloads)
58Fft Seats.jpg (171KB - 475 downloads)
58Fft Trunk.jpg (162KB - 451 downloads)
58Fft Engine No..jpg (190KB - 461 downloads)
|
|
| |
|
Expert 5K+
Posts: 9650
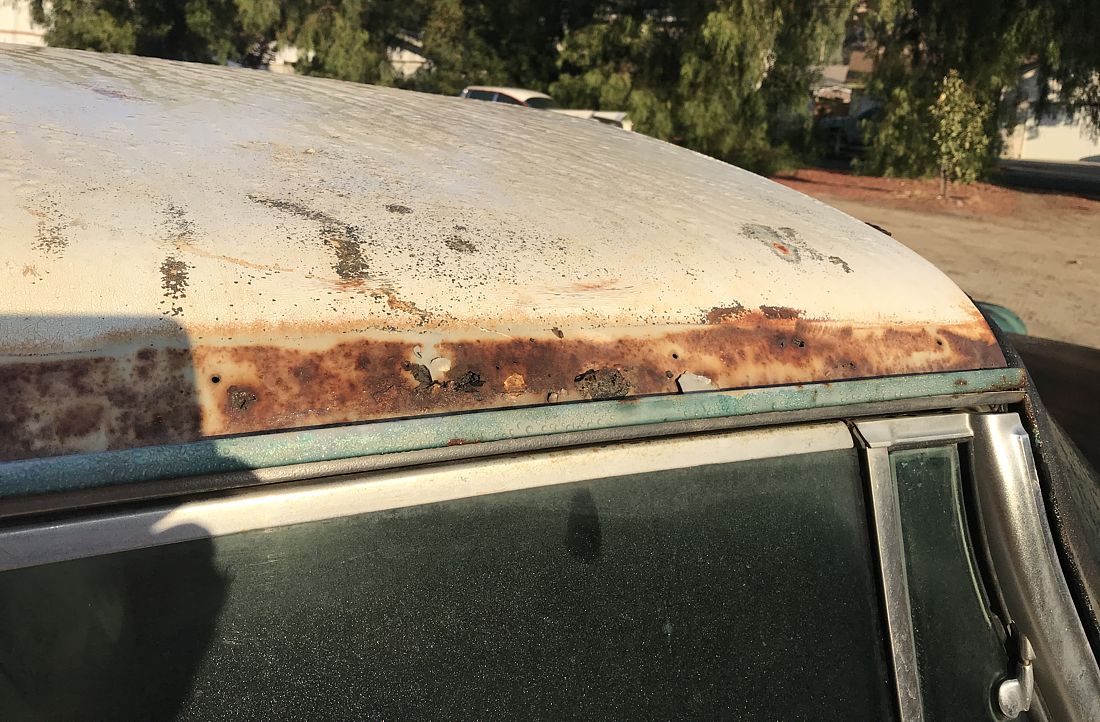
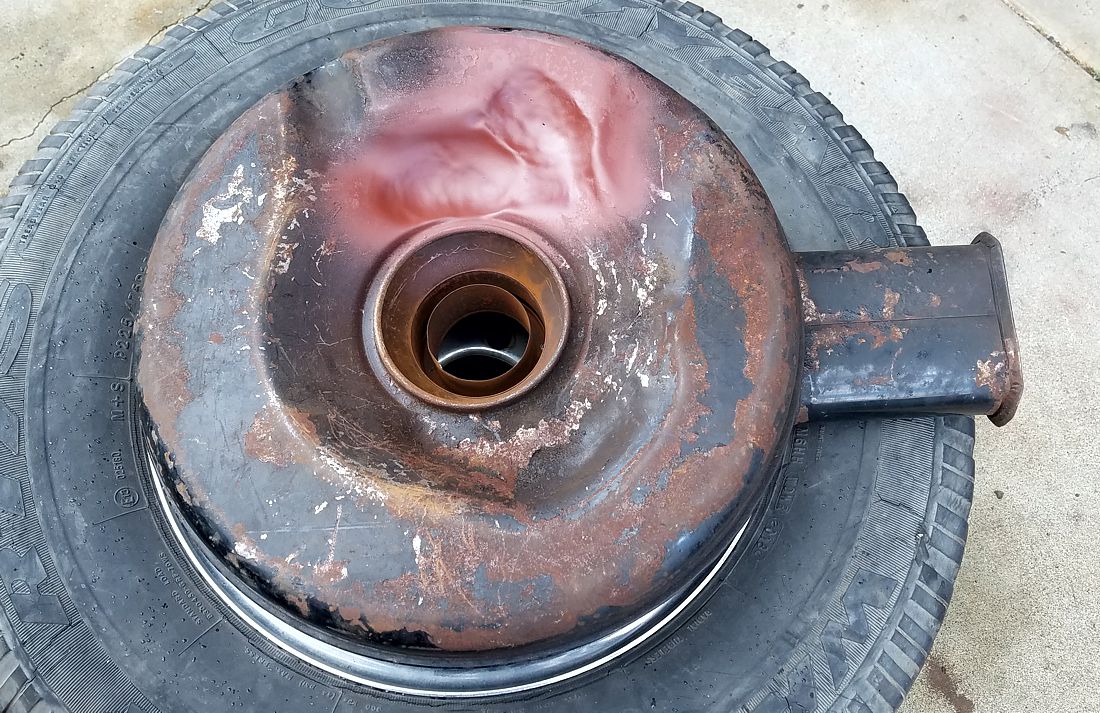
Location: So. Cal | Nice radial tire! There is some bondo here but not bad. Most likely there is a little rust hiding under there, but probably not terrible. The right side is another story and will require quite a bit of work to remake that wheel lip properly. There is also a lot more rust on the sides of the roof than I would have expected there to be, probably caused by the wide roof trim. Since I don't have that trim, maybe I should delete it?
Edited by Powerflite 2019-11-22 4:10 PM
 (58Ft Tire.jpg) (58Ft Tire.jpg)
 (58Fft RtR Quarter.jpg) (58Fft RtR Quarter.jpg)
 (58Fft Rt Roof.jpg) (58Fft Rt Roof.jpg)
Attachments
----------------
58Ft Tire.jpg (160KB - 461 downloads)
58Fft RtR Quarter.jpg (213KB - 456 downloads)
58Fft Rt Roof.jpg (189KB - 480 downloads)
|
|
| |
|
Expert 5K+
Posts: 9650
Location: So. Cal | The trunk floor is practically in perfect shape with the original paint still showing on much of it. There are the remains of a very brittle original black speckled DeSoto trunk mat too.
Edited by Powerflite 2019-11-22 1:37 PM
 (58Fft Trunk Mat.jpg) (58Fft Trunk Mat.jpg)
Attachments
----------------
58Fft Trunk Mat.jpg (226KB - 480 downloads)
|
|
| |
|
Expert
Posts: 2196
Location: Muskego, WI | How many vehicles are you up to now Nathan? |
|
| |
|
Expert 5K+
Posts: 9650
Location: So. Cal | I find it's best not to count. But I am selling a '33 Chevy coupe and the '57 black/white Windsor coupe if anyone is interested. |
|
| |
|
Location: The Mile High City | Nice, Nathan! Even all stripped out, it still looks good! |
|
| |
|
Expert 5K+
Posts: 7393
Location: northern germany | Just GREAT. You can't have enough FL's. I guess I'm alone with this, but I prefer cars in this honest, unrestored condition over overrestored clinical-clean wire wheeled trailer queens. |
|
| |
|
Expert 5K+
Posts: 9650
Location: So. Cal | Thanks Mike, I agree.  Yeah Sid, I see no use for trailer queens, but I should probably start painting something now. Yeah Sid, I see no use for trailer queens, but I should probably start painting something now.
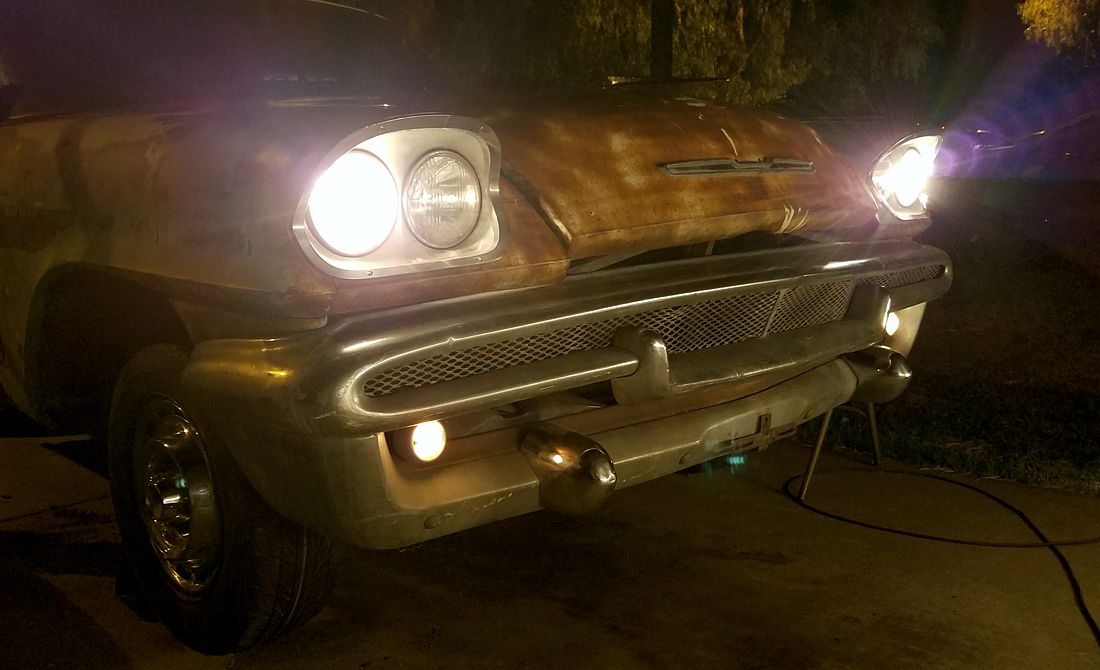
My son helped me un-bury the front bumper to mount onto the car as well as the headlight bezels. I painted the bezels silver to go with the '58 DeSoto theme. Putting the front end together keeps the zoning police at bay and it also moves that bumper out of my backyard, which is great. We also mounted the extra set of bumper guards I had to it and installed a couple of missing parts in the interior, including the horn ring, turn signal stalk, some '59 A/C vents, a rear-view mirror and a glove box door. The glove box has a Chrysler emblem on it, but it is painted black to match and looks better than having the two holes there. I didn't install the mirror yet because I will paint it black first to match the dash pad.
I spent the rest of the day getting the motor ready to fire. I tried it out with the original points first. The starter worked, which was really nice and built up good oil pressure, but there wasn't any spark and the water pump started to leak out it's weep hole. That's about as much patience as I have for the original points setup so I pulled it out and started getting an electronic ignition distributor & coil ready for it. The oil in the motor looked brand new. Not sure what that means. Maybe it hasn't been run much since it was rebuilt?
Edited by Powerflite 2019-11-24 1:00 AM
 (58Fft Front Bumper.jpg) (58Fft Front Bumper.jpg)
Attachments
----------------
58Fft Front Bumper.jpg (251KB - 460 downloads)
|
|
| |
|
Elite Veteran
Posts: 1157

Location: D-70199 Heslach | Powerflite - 2019-11-22 6:26 PM
I purchased another DeSoto recently.
Congratulation Nathan ! my envy be with you
Powerflite - 2019-11-22 6:26 PM]
One good thing is I can't lose the parts during the paint process because there aren't any!
good Joke ! |
|
| |
|
Expert 5K+
Posts: 9899
Location: Lower Mainland BC | .
Why am I confused about the hood?

VERSUS:
 |
|
| |
|
Expert
Posts: 3155
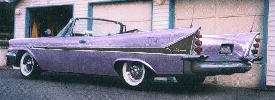
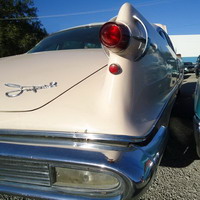
Location: NY & VT | Nice find! My red & white '58 coupe was originally French Turquoise, and I wish it still had been original, it's a beautiful color, I would have painted it back to that color if I'd have kept it. There was a pic of a '58 in that color combo here sometime in the last year... gorgeous. |
|
| |
|
Elite Veteran
Posts: 705
Location: California | Details on the black and white 57 Windsor coupe please! |
|
| |
|
Expert 5K+
Posts: 9650
Location: So. Cal | Tom: You have nothing to be envious of! Your cars are awesome!
Dave: Not sure, only difference between them is more parts installed on it and paint.
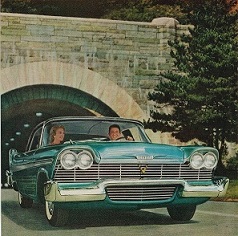
Roger, yeah, I agree. That car is my inspiration. Jaw dropping gorgeous!
Paul: I sent you a PM, and the thread on the car can be found here: http://forwardlook.net/forums/forums/thread-view.asp?tid=49893
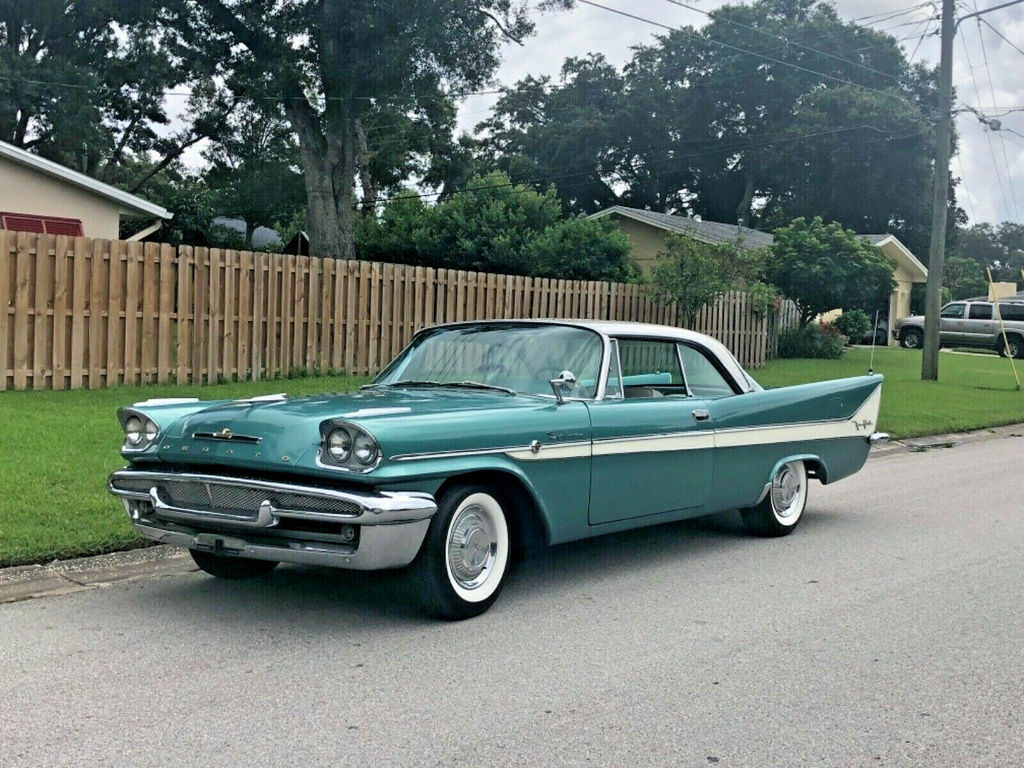 (French Turquoise 58 Fireflite.jpg) (French Turquoise 58 Fireflite.jpg)
Attachments
----------------
French Turquoise 58 Fireflite.jpg (199KB - 465 downloads)
|
|
| |
|
Location: Parts Unknown | So, the car goes in for paint, .... who took the trim off, and where did it go ?
Fireflite 2 doors are pure unobtainium. Great find, great car ... I look forward
to following along on this one ! |
|
| |
|
Expert 5K+
Posts: 9650
Location: So. Cal | Thanks Doc. I assume that the body shop would have included the trim with the sale of the car, so maybe it remained at the original owner's place? Who knows what happened to it, but it is gone now.
|
|
| |
|

Expert
Posts: 3967
Location: DFW, TX | A new mare in the stable!! Lots of good bones in this car, but it's a real shame the trim is missing. Maybe you can find a rusty coupe with all the trim for a good price?
Or you could just make a custom out of it.  You're halfway there with that black interior... You're halfway there with that black interior... |
|
| |
|
Expert 5K+
Posts: 9650
Location: So. Cal | The custom part of it will be all the missing trim - especially the wide roof trim. but I don't see that as a big loss. That trim doesn't add to the design all that much. The side trim I will eventually get by welding 4dr trim together. It's a pain, and time consuming, but it works. Until, I can find the Fireflite fender medallions, I am considering machining some '55 DeSoto horn buttons to fit there. Might look OK if I paint them in a similar fashion.
I got the electronic ignition installed, swapped a good carb onto it and gave it another go. After fiddling with the timing a bit, I got it to a point that it would fire a full revolution or more, and then suddenly stop, like it hit a wall. It did this over and over. Very strange. I had the fuel line feeding out of a gas can, but the fuel pump didn't do anything as if it wasn't connected. So I had to prime the carb every time. I was messing with the timing more, and then the starter completely died. No movement at all, and no current draw out of it. Maybe the reason it would only run 1 revolution had something to do with the starter stopping it once it picked up some speed. So I'll need to fix that before moving forward. I don't want to do this in the dirt, so I'll set it aside until I get the work on the Savoy finished and free up some driveway space for it. |
|
| |
|
Location: North Australia | Nathan, have you considered cloning your Wife??
You would get a good price for them I recon!
Nice looking DeSoto you got there.
Steve. |
|
| |
|
Expert 5K+
Posts: 7393
Location: northern germany | Doctor DeSoto - 2019-11-25 1:57 AM
So, the car goes in for paint, .... who took the trim off, and where did it go ?
Fireflite 2 doors are pure unobtainium. Great find, great car ... I look forward
to following along on this one !
I'd go with the 57 trim anyway. The 57 lower sweep was perfect and much nicer looking.
The side trim was just altered because they had to change something for 58 and the result was,
like with Plymouth, not an improvement of the original design.
Edited by 1960fury 2019-11-27 6:34 AM
|
|
| |
|
Expert 5K+
Posts: 9650
Location: So. Cal | I like the '58 sweep and will keep it that way since it's better to keep it stock anyway. To me, the side trim is 1/3 of the car, so that if I wanted '57 side trim, I would just buy a '57 instead. And getting 2dr trim for a '57 may not be any easier than for a '58. The only thing I am contemplating is if I should swap the roof trim from the red one onto this one. I kinda like it better without it. But I have plenty of time to decide later.
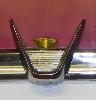
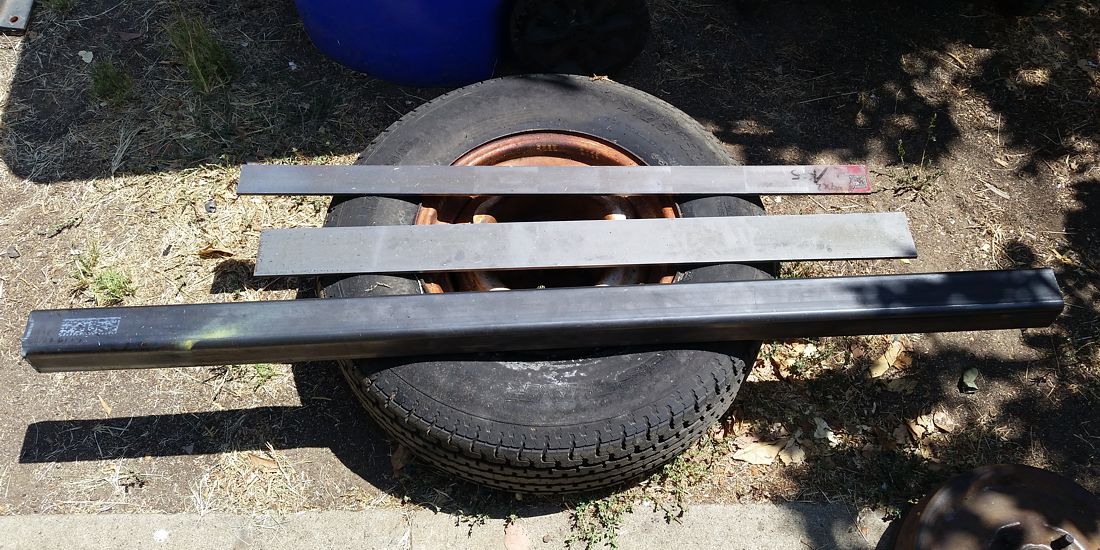
I didn't get much done on my cars this weekend, but I did spend a couple of hours straightening the two spring special trunk trim pieces that I got from Kurt. Thanks Kurt! The one on top is ready for sanding & polishing (the pattern you see on it are just reflections from my keyboard), but the one on the bottom still needs more work. I might have to get a pro take a shot at that one to finish it off. I still need more of these things so if anyone has them to sell, I would be grateful.
 (58FF SS Trunk Trim.jpg) (58FF SS Trunk Trim.jpg)
Attachments
----------------
58FF SS Trunk Trim.jpg (67KB - 448 downloads)
|
|
| |
|
Expert 5K+
Posts: 9650
Location: So. Cal | I'm trying to make a model of the Fireflite emblem in case I can't find any to purchase. Does anyone have the plastic emblem separated from it that can measure the diameter & thickness (near the edge) for me? Thanks in advance.
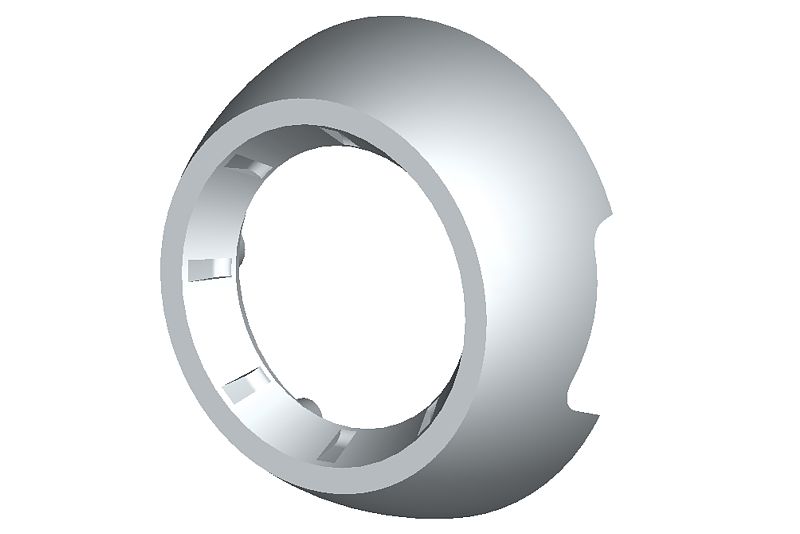 (58FF Emblem.jpg) (58FF Emblem.jpg)
Attachments
----------------
58FF Emblem.jpg (28KB - 445 downloads)
|
|
| |
|
Location: The Mile High City | Hi, Nathan: I have three of the Fireflite emblems (I hope none from your cars). Two I use and one is a spare. Any tips on how do you safely remove the plastic emblem? If I can get it out of there, I can take some measurements. Mike |
|
| |
|
Expert 5K+
Posts: 9650
Location: So. Cal | I think the back plate that holds the plastic emblem in, is spot welded in place. So you would have to drill that spot out, and then probably epoxy it back together. I didn't want to do that since I don't have a replacement plastic emblem so that's why I am asking. If you would like to sell your spare, I would be grateful. |
|
| |
|
Elite Veteran,, James Passed away March 2021, He will be Missed
Posts: 1028
Location: Melbourne, Australia | Annoyingly Goerge Laurie used to make them beautifully , but that wont be happening |
|
| |
|
Expert 5K+
Posts: 9650
Location: So. Cal | I finished swapping the starter out of the car. It took me a while because once I disconnected it, I couldn't figure out how to get it past the torsion bar or exhaust. Both options were quite
painful for a typical R&R of a starter, in a field of dirt. Instead, I removed the master cylinder & throttle linkage. Then I was able to pull it out from the top. It had shorted itself out for
some reason, so I swapped it out with the '60 Chrysler starter I had. But I had to remove some material around the lower mount in order to get it to fit. Then I replaced the fuel pump &
plugged the oil pressure port because it started leaking. After some further timing adjustments, I got the motor to run. And I put it in drive & reverse, and moved the car around a little
(about 15 feet). Yay! Unfortunately, the brakes almost thought about working, but decided not to, and the motor would die almost immediately when I put it into gear. Not sure why it
was doing that, except it could be that it needs further adjustments on the carb & timing. The power steering was bone dry, and I had to fill it twice. Hopefully that is OK, but the generator
didn't even think about working so either that or the regulator needs to be replaced. Overall, a good day to get moving on this car again. Next, I'll move it over to my driveway to get it
really driveable by going through these issues.
Edited by Powerflite 2020-03-01 2:09 AM
 (Turquoise 58FF Engine.jpg) (Turquoise 58FF Engine.jpg)
Attachments
----------------
Turquoise 58FF Engine.jpg (218KB - 427 downloads)
|
|
| |
|
Elite Veteran
Posts: 649
Location: Finland | I noticed also that the starter has to be removed upwards and first you have to remove at least the master cylinder and the
linkage. Since I put a mini starter it had room to be fitted from the underside. The ministarter battery post came very close to the engine block. |
|
| |
|
Expert 5K+
Posts: 9650
Location: So. Cal | Yeah, I noticed that if the starter were slightly smaller diameter, that I could fit it between the torsion bar & the frame. If this starter gives me any trouble, I will definitely purchase a mini starter for it to avoid the trouble later. I'm just more broke than usual, so I am hesitant to spend very much money right now. |
|
| |
|
Expert 5K+
Posts: 9650
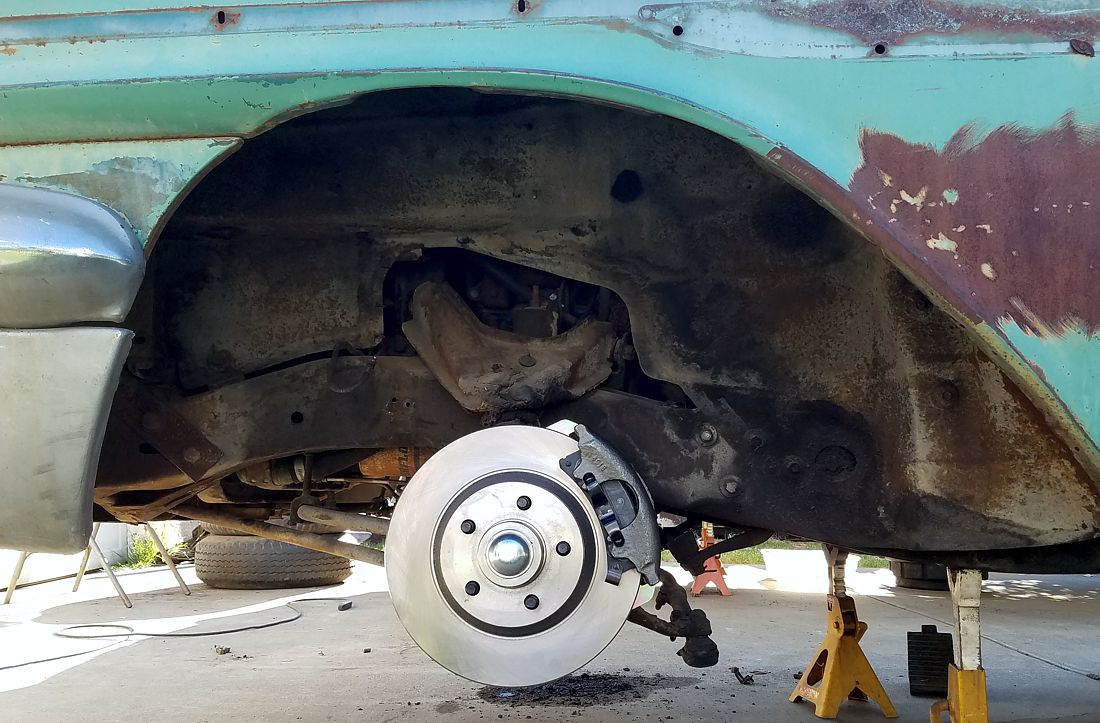
Location: So. Cal | I got the motor running better by rebuilding a different carburetor and installing it; as well as by retarding the timing a little. I took a chance and drove it from my lot over to my driveway without any brakes except the e-brake. It worked, but was a little scary because the e-brake didn't work as well as I thought it would. I kept it safer by often switching it into neutral to keep the speed down. Now I am working on going through the brake system to get it working properly. I would like to use the new disc brake system from Scarebird on the front that uses a 12" rotor, yet will still fit within 14" wheels, but I already have the old disc kit, and I am broke so I will just use that. I may swap it out to use on my '60 New Yorker when I have time to do it because I would like to continue to use the original hubcaps on this car.
 (Turquoise 58FF Brakes Started.jpg) (Turquoise 58FF Brakes Started.jpg)
Attachments
----------------
Turquoise 58FF Brakes Started.jpg (186KB - 435 downloads)
|
|
| |
|
Expert
Posts: 2490
Location: Kansas City, KS | Speaking of the Scarebird disc conversion, what do you think about it now using the smaller Chevy Celebrity calipers instead of the old kit that used larger Dodge Ram calipers?
I know the point is to now fit 14in wheels, but do you think that caliper is big enough to handle a full size car?
I've used their old kit before and was getting ready to do it again a few months ago until I found out the change. Kinda hoping to hear someone else's opinion or experience about the new, smaller parts. |
|
| |
|
Expert
Posts: 2196
Location: Muskego, WI | That is why I've been using AAJ brake kits, big GM caliper for the full size cars. |
|
| |
|
Expert 5K+
Posts: 5006
| the dodge ram calipers are big and I got powder coated nice ones, the new kit uses HD 1990 celebrity huh? eh its a similar big single piston as big as the AAJ kit... I am happy with scarebird. looks like they both raised their prices? AAJ is 250$ and Scarebird is 205$
Edited by mikes2nd 2020-03-07 1:46 AM
|
|
| |
|
Expert 5K+
Posts: 9650
Location: So. Cal | The annoying thing about the Ram calipers is they stuck out too much on the ends. I had to trim them down a bit to even get them to work with 15" wheels. But they are nice and big, and work well with a large master that's pretty much required if you want to keep the original rear brakes. The large 2.935" piston worked well to apply lots of force to the 12" rotors. The Celebrity calipers are only 2.5" diameter which equates to a 38% reduction in force with an equal amount of line pressure. I would like to know how well it works too, and thought I would give it a shot, but probably not on a large Chrysler with a hemi motor. |
|
| |
|
Expert
Posts: 2490
Location: Kansas City, KS | Thanks for the info. I think we're both on the same page about the smaller calipers.
Hope I didn't hijack your page too much, definitely enjoy seeing all the work you do on your cars |
|
| |
|
Expert 5K+
Posts: 9650
Location: So. Cal | No problem. Since this car is more visible now and I have intentions of being able to drive it before I get the body work done, I swapped the rear bumper & tail light bezels from the red Fireflite over to this car. I also stole the good lenses from my gold Firedome. It wasn't very easy to do because of the excessive rust on the back end of the red car, and the fact that they had welded the exhaust to those connectors that go up into the bumper. So I had to extend electricity over there to get it done, but it's looking more like a real car now.
 (58FF Rear Bumper.jpg) (58FF Rear Bumper.jpg)
Attachments
----------------
58FF Rear Bumper.jpg (171KB - 434 downloads)
|
|
| |
|
Expert 5K+
Posts: 9650
Location: So. Cal | This steering arm lower bolt fought me all the way and won. I give up on it. I've tried everything on it and can't get it out with heat, a 20 ton press, smacking with a large hammer etc. Also, I think the bolt is broken inside it because I could turn the bolt (with a ton of force) on one side and it wouldn't move on the other side. With it finally removed from the car, I can't get it to budge one way or the other. I may have to get a different steering arm or take this down to get it wire EDM machined out of there.
 (Steering Arm Stuck Bolt.jpg) (Steering Arm Stuck Bolt.jpg)
Attachments
----------------
Steering Arm Stuck Bolt.jpg (329KB - 417 downloads)
|
|
| |
|
Expert 5K+
Posts: 9899
Location: Lower Mainland BC | .
Nathan: I have a neighbour with a Dodge Caravan wheel bolt that refused to budge during his front brake replacement. In the process he rounded off the "hex" head of the bolt. My recommended solution (which I was surprised he followed) was to center punch the head of the bolt and then start drilling it out, starting with a small diameter bit and then going progressively larger until the threads finally gave up clinging to the hub. It didn't take very long and he had the bolt out.
You could try something like that, especially if you have drill press to guide the bit (my neighbour did it on the car with a portable drill).
Maybe?
Edited by 56D500boy 2020-03-07 6:37 PM
|
|
| |
|
Expert 5K+
Posts: 9650
Location: So. Cal | I think I have sufficiently destroyed the temper (hardness) of the bolt now with the heat, that I might be able to drill it, but I don't know that I am willing to go through that. I would almost rather pay the $35 to get it EDM'ed out of there instead. But I'm too impatient, so I'll probably just dig out another one from my parts stash. |
|
| |
|
Expert 5K+
Posts: 9650
Location: So. Cal | That steering arm delayed my progress a while, but I pulled a new one from the original suspension of the white New Yorker sitting on my driveway. That steering arm didn't give me any trouble at all, and I was able to get the parts assembled yesterday. Next, I'll work on making up new lines & installing the new master. I will use one of the Mitsubishi Fuso remote masters that I had previously machined for these power brake cars.
 (58FF Disc Brakes.jpg) (58FF Disc Brakes.jpg)
Attachments
----------------
58FF Disc Brakes.jpg (178KB - 438 downloads)
|
|
| |
|
Veteran
Posts: 166
| The Chevy caliper used in the Scarebird kit is also used by GM on the 85-89 Cadillac Deville. If it can stop that it should stop our cars as well. |
|
| |
|
Expert
Posts: 2196
Location: Muskego, WI | Nathan, do you have your brake pads installed properly? It appears your "worn pad warning spring" is on the outside pad, this should be installed on the inside pad as the pad pushed on directly by the caliper piston will always wear out faster. |
|
| |
|
Expert 5K+
Posts: 9650
Location: So. Cal | Inside and outside pads cannot be swapped with each other, so that part is correct as it is shown. It would probably be better if it were on the inside pad, but that's not how they made them. But you can swap the outside pad from left to right which will put the squealer on the dragging or leading edge of the rotor. I have it on the leading edge to hopefully make more noise when it gets low. |
|
| |
|
Elite Veteran
Posts: 1157
Location: D-70199 Heslach | the visible car compels you to act Make a brake on the NY and spend the energy to another treasure. |
|
| |
|
Expert 5K+
Posts: 9650
Location: So. Cal | Yeah, my priorities are somewhat convoluted. In about a month, I have gone from the Savoy engine to Coronet exhaust to New Yorker frame swap to Fireflite motor, brakes, etc. But there is a method behind all this madness, I think. I may be moving before the end of the year and I need to get as many of my vehicles driving well as I can, so I have to tow as few of them as possible. The rain here today isn't helping me much though, but I managed to get the hood on this car to latch yesterday. I can't drive it with a hood that can fly open. It was missing the latch on the hood, and the crossbar had every bolt broken off in the fenders. The lower mount for the crossbar is also mangled and disconnected. Not fun, but I grabbed a hood latch from the 4dr New Yorker I parted out and welded one of the captured nuts back into it as it had rusted it's way out. Then I removed all the broken bolts by heating the remains from inside the fender with a torch, and unscrewing them with vice grips. Then I adjusted the latch post higher because the fenders are mounted too low in the front. Re-adjusting the fenders and fixing the mangled lower mount are repairs that can wait for another day. But at least now I can latch the hood well.
I also mounted the new fender spears I purchased for the car to add a little bling. I'm not going to re-assemble everything on the car yet, even though I have it all, but these were easy and I wanted to see them on there.
 (58FF Broken Bolts Removed.jpg) (58FF Broken Bolts Removed.jpg)
 (58FF Fender Top Bling.jpg) (58FF Fender Top Bling.jpg)
Attachments
----------------
58FF Broken Bolts Removed.jpg (138KB - 418 downloads)
58FF Fender Top Bling.jpg (238KB - 450 downloads)
|
|
| |
|
Expert 5K+
Posts: 9650
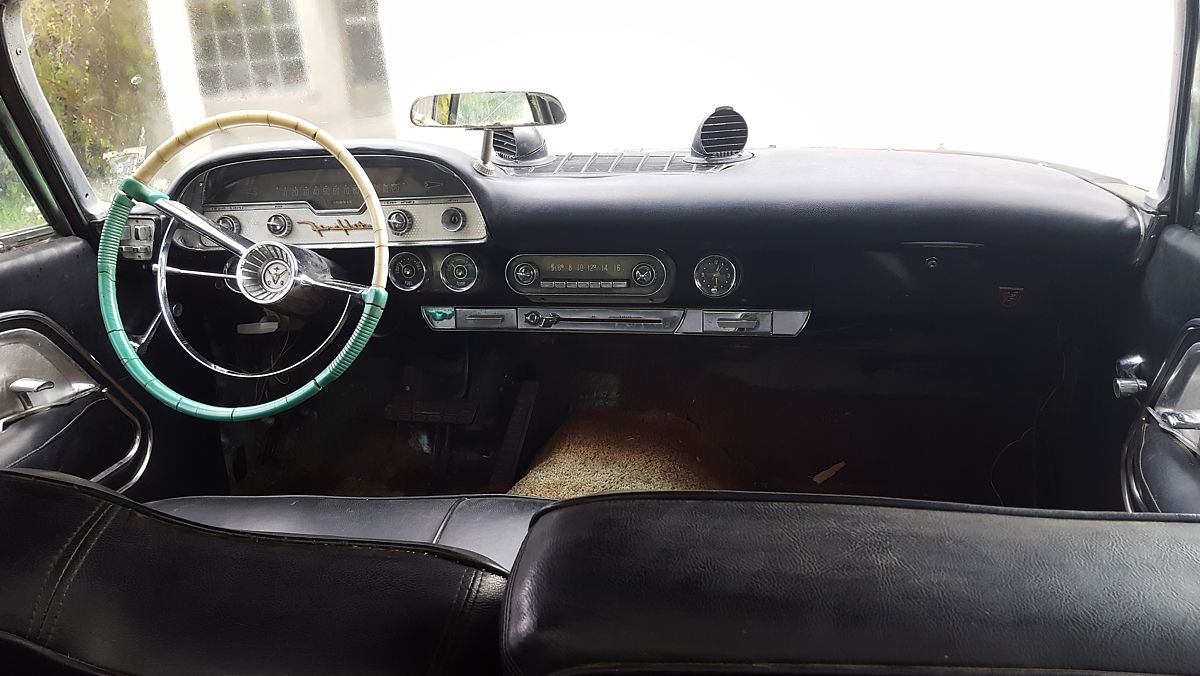
Location: So. Cal | The rain gave me an opportunity to work on the interior. I stole a day/night mirror from the gold Firedome (the red Fireflite didn't have any mirror) and installed it along with the second ash tray and cleaned it up quite a bit. It looks much better now, but the carpet needs to be thrown out and I can't find out if anything works without a key....
 (58FF Dash.jpg) (58FF Dash.jpg)
Attachments
----------------
58FF Dash.jpg (138KB - 466 downloads)
|
|
| |
|
Expert 5K+
Posts: 9650
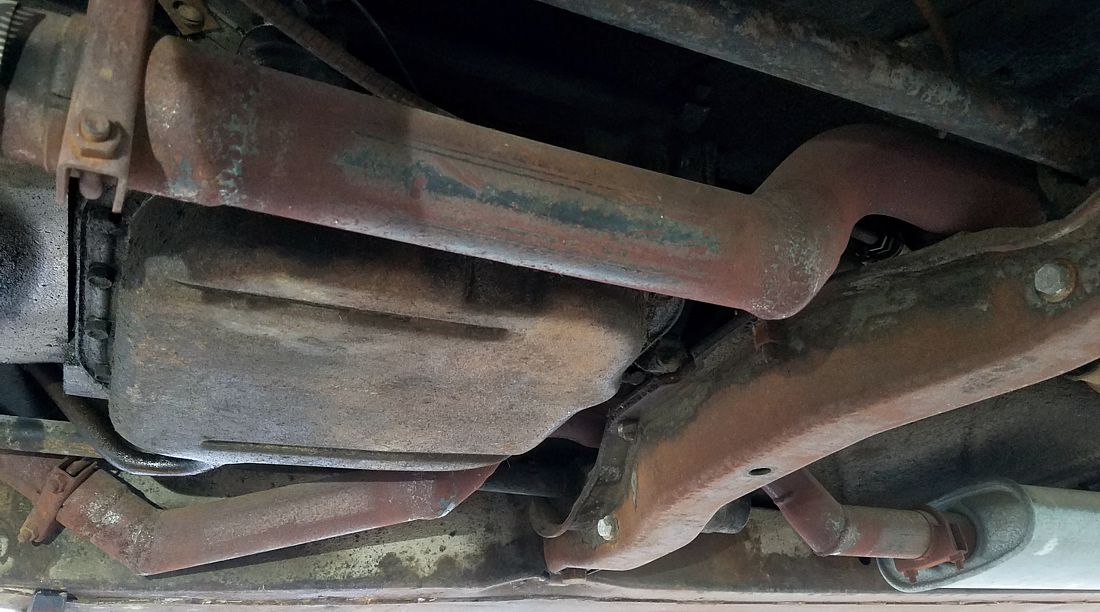
Location: So. Cal | Can't say that I'm impressed with the exhaust system on this car.  I'd be tearing this out if I hadn't just redone the exhaust on 2 cars previous to this. I guess I'll leave it until I am ready to make more major changes to it. I'd be tearing this out if I hadn't just redone the exhaust on 2 cars previous to this. I guess I'll leave it until I am ready to make more major changes to it.
 (58FF What The Smeg.jpg) (58FF What The Smeg.jpg)
Attachments
----------------
58FF What The Smeg.jpg (145KB - 414 downloads)
|
|
| |
|
Expert 5K+
Posts: 5006
| hah get er done with the welder! doesn't look like it leaks? |
|
| |
|
Elite Veteran
Posts: 1157
Location: D-70199 Heslach | Yes, the exhaust tubing under the transmission support and torsion bars is a challenge for all hobbyists and even official garages. I hate to "repair" this ever and ever again, too |
|
| |
|
Expert 5K+
Posts: 9650
Location: So. Cal | It doesn't leak so it does 'work', sortof. That gives me the excuse to deal with it later.
It's nice to have the motor out of my New Yorker so I can use it to mock up my brake lines before transferring them over to the Fireflite. I was expecting to have to use a 10lb residual pressure valve for the rear brakes so I made the line a little too short. But then I realized that this master was used with rear drums. so I pulled the loop lower on the end to make it work without having to redo it. This master may have issues working well with a hemi motor in there because of the downward direction of the lines. That outer line may collide with the valve cover. To use it with a hemi, I may need to angle the master upward or make some other adjustment. But for the Fireflite, it is fine.
Edited by Powerflite 2020-03-14 1:15 PM
 (Brake Line Mock Up.jpg) (Brake Line Mock Up.jpg)
Attachments
----------------
Brake Line Mock Up.jpg (228KB - 433 downloads)
|
|
| |
|
Expert 5K+
Posts: 9650
Location: So. Cal | I finished making all the new lines for the car and installed them, except the ones to the master. I am stuck for a while on this because I am waiting for parts to come in. I didn't realize that the Mitsubishi master had larger connections to the reservoir until I went to hook it up. So I am waiting for some 10mm hose barbs to come from China & 6ft of 10mm brake hose to arrive before I can "bench bleed" the master. I find that bench bleeding one of these remote master setups is best done while mounted on the car. While I am waiting, I need to shorten the push rod to the master and add an electrical brake light switch to the pedal. The stock push rod is adjustable so hopefully I just have to twist it in to get it to work - but I doubt it. It's rare for things like this to be that easy.
 (58FF Remote Master Mounted.jpg) (58FF Remote Master Mounted.jpg)
Attachments
----------------
58FF Remote Master Mounted.jpg (205KB - 431 downloads)
|
|
| |
|
Expert
Posts: 3967
Location: DFW, TX | It's never that easy. |
|
| |
|
Expert 5K+
Posts: 9650
Location: So. Cal | I was completely astounded to find out that it really was that easy. I was able to adjust it out with about 1/4" of adjustment to spare. Luck must be on my side today.
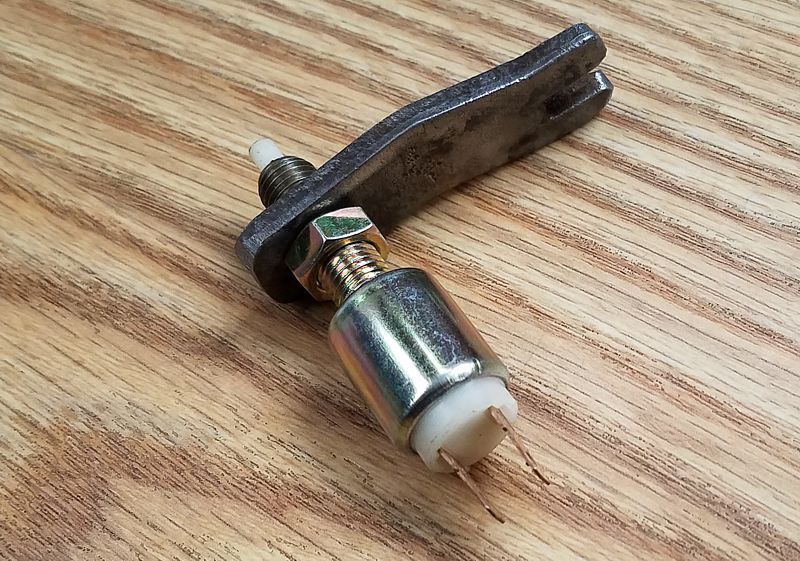
I couldn't find the piece of angle iron that I used the last time to make the brake light switch mount, so I decided to make it simpler with a thick, flat section from an old piece of brake hardware. I will weld this to the pedal frame to position the switch on the pedal. I used a Duralast JA411 stop light switch from an early to mid '80's Nissan because it is all steel construction and was a whole lot cheaper at Rockauto than the plastic GM versions. The only drawback to it is you have to tap the bracket to a 10mm size, but that's not a big deal. I will install it on the car once this blasted rain stops.....
Edited by Powerflite 2020-03-16 6:10 PM
 (58FF Brake Light Switch.jpg) (58FF Brake Light Switch.jpg)
Attachments
----------------
58FF Brake Light Switch.jpg (166KB - 433 downloads)
|
|
| |
|
Veteran
Posts: 146
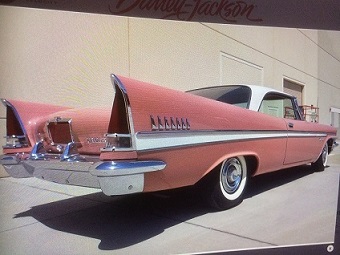
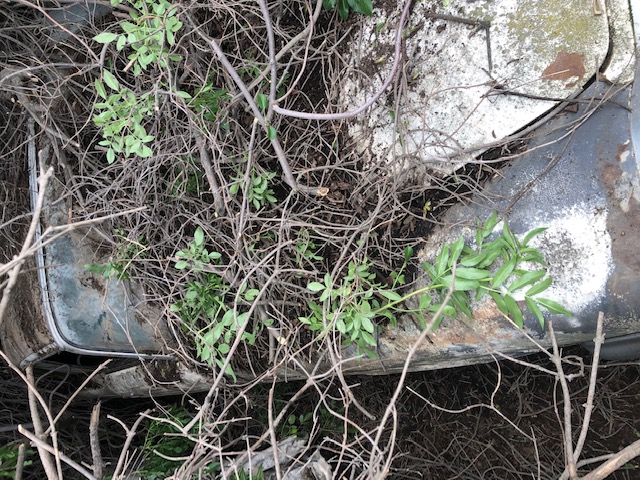
Location: California | Nathan... Just bought another 58 Desoto. It's a Firesweep 2 door hardtop. White car with red spear and top. Excited to get it out from the tangle of trees that had the car completely covered after 40 years of sitting.
Edited by netparts 2020-03-16 10:07 PM
 (1958 Des 2 Dr HT.jpg) (1958 Des 2 Dr HT.jpg)
 (1958 Des 2 Dr HT4.jpg) (1958 Des 2 Dr HT4.jpg)
Attachments
----------------
1958 Des 2 Dr HT.jpg (187KB - 414 downloads)
1958 Des 2 Dr HT4.jpg (172KB - 436 downloads)
|
|
| |
|
Expert 5K+
Posts: 9650
Location: So. Cal | Wow, that's quite buried in there! Hopefully the rust monster hasn't gotten to it yet. |
|
| |
|
Expert 5K+
Posts: 9650
Location: So. Cal | I got the brake switch setup installed and took the seats out to take out the nasty carpet and clean up the floor. I inspected the floor more fully with everything out and it looks remarkably good, but not as good as I had first thought. For some reason, there was a lot of dirt packed into the front-most floor brace that rotted it out on both sides of the car, along with the floor above it. The floor above the seat mount is bulging from rust underneath it, as is typical, and there are a couple of small rust holes by the removable floor panel. Overall, really good and I didn't see any other issues on it. The round dips in the floors that are almost always rusted out are perfectly fine so it's odd that the braces were packed with so much dirt & rusted out so badly.
I also clearanced the bottom of the air cleaner to make it work with the '60-'67 carburetors that have the choke valve on them. That setup interferes with the bottom of the air cleaner quite badly and it's painful to swap out the entire choke setup to use an older style on it. So I decided to make the air cleaner work with either style. The later carbs flow better with larger throttle valves, so that's another reason to make it work.
 (58FF Floor Rust.jpg) (58FF Floor Rust.jpg)
 (58FF Air Cleaner Clearancing.jpg) (58FF Air Cleaner Clearancing.jpg)
Attachments
----------------
58FF Floor Rust.jpg (240KB - 421 downloads)
58FF Air Cleaner Clearancing.jpg (251KB - 416 downloads)
|
|
| |
|
Expert 5K+
Posts: 9650
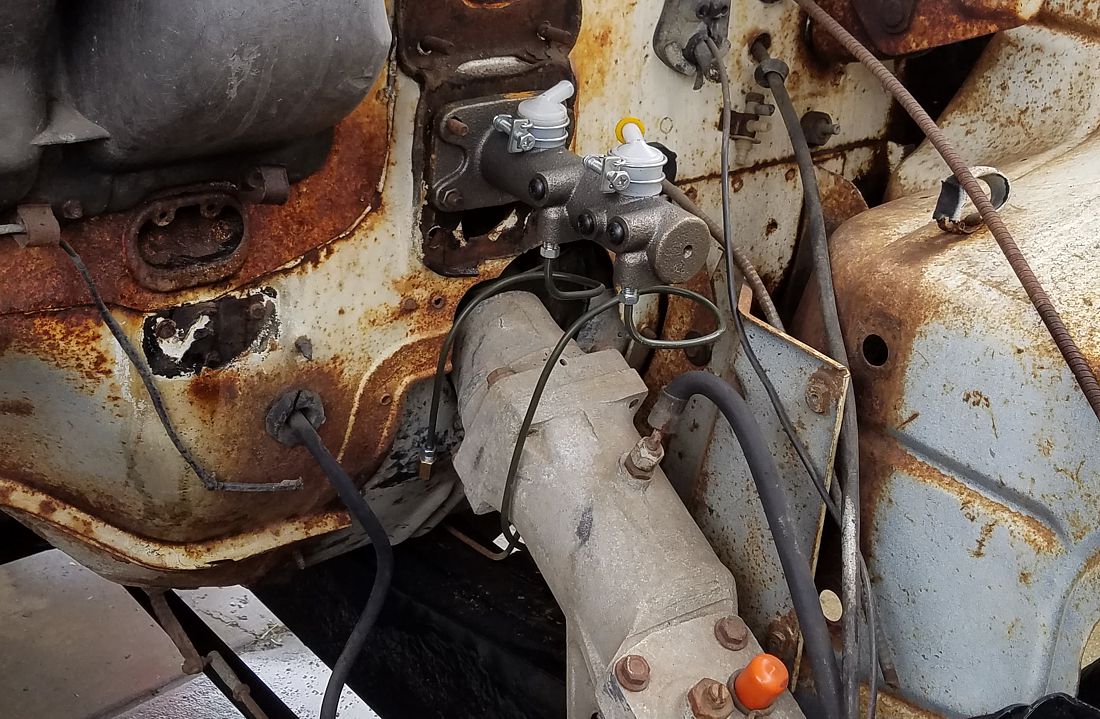
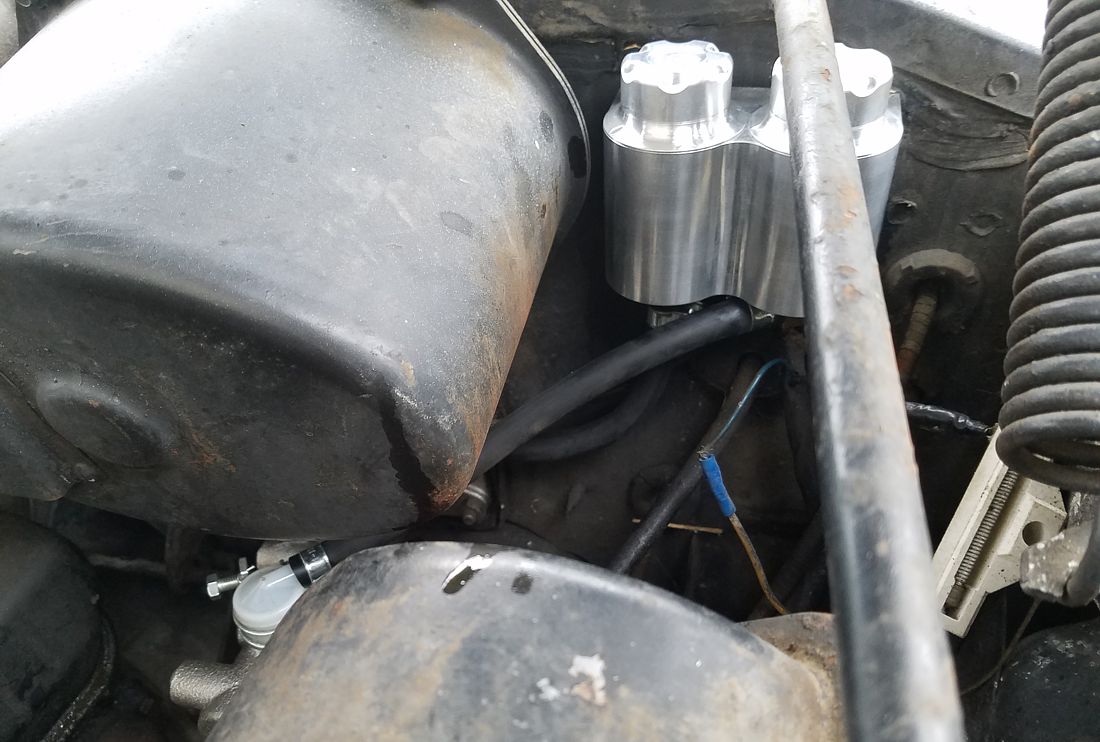
Location: So. Cal | The brake master has 10mm connections to the remote reservoir so I originally ordered 10mm hose to mate up to it. But once I received it, I found that it slid off the ports quite easily and it was difficult to get it to seal on there. So I ordered another 3/8" hose instead. That one fit much better and I was able to use more common English size connectors as well. I painted the master with brake fluid safe cast iron gray paint from Eastwood so that it won't rust and look nasty over time. Make sure you use shielded clamps on this hose as it is very pliable and I think that regular clamps would damage it.
I finally received the new hose on Saturday so I put it together today. I bench bled the master on the car and then connected it all up. The outer line on the reservoir was wanting to collide with the wires coming out of the firewall so I used a 90 degree connector on that side to avoid issues. The ballast resistor was originally mounted in this location, but that is going away soon so I won't miss it. I found that the '58 iron steering box is a lot smaller than the '57 aluminum box that I had used for my mockup. I should have anticipated that, but it slipped my attention. So I had to bend the line in closer to the steering box after mounting it. That made my front loop a little more loopy than it should have been. Oh well, not as pretty as I had hoped, but it works. After bleeding the brakes, I have a very solid pedal! It should be good to go, although I noticed that the rears were holding the tires a little even after releasing the brakes. Hopefully they loosen up with a little bit of driving....we'll see.
Edited by Powerflite 2020-03-24 1:19 AM
 (58FF Remote Brake Master.jpg) (58FF Remote Brake Master.jpg)
 (58FF Remote Reservoir.jpg) (58FF Remote Reservoir.jpg)
Attachments
----------------
58FF Remote Brake Master.jpg (169KB - 409 downloads)
58FF Remote Reservoir.jpg (145KB - 401 downloads)
|
|
| |
|
Expert 5K+
Posts: 5006
| isnt that brake setup llike 500$? thats a wilwood remote setup? |
|
| |
|
Expert 5K+
Posts: 9650
Location: So. Cal | No, not even close. The master is from a '87-'04 Mitsubishi Fuso "FE" truck with front discs & rear drums and is cast iron. It cost me $65 at the time. Part number is Dorman M630742 and sells for $56 on Ebay. I had to machine the mounting holes to a slightly larger opening to fit a mopar, but it is made with 4 mounting holes that almost fit on the old mount so no adapter is required. The reservoir is the most expensive part, but is necessary because you need one that will fit in the available space. It is from Classic Industries and cost about $150. I didn't even have to mess with the adjustable pushrod. Just adjust it a little shorter and it works great with it.
Edited by Powerflite 2020-03-24 12:37 PM
|
|
| |
|
Expert 5K+
Posts: 5006
| hah wow that's a weird find. I just bought the adjustable pushrod(40$) and the hemi offset brake mounting bracket 80$... I thought my reservoir fit? Ill do a quick video of test fitting. I may have to do what you did with the remote. I don't like that shiny machined brake reservoir though looks too modern I tried to avoid it but obviously couldn't... now i have a chrome alternator and all kinds of polished crap  maybe i can scuff it... maybe i can scuff it... Oh i better paint my "Chrysler Firepower" black lettering also... i just noticed it looks wierd without it... like I "forgot" something...
Edited by mikes2nd 2020-03-24 1:30 PM
 (enginehinges.jpg) (enginehinges.jpg)
Attachments
----------------
enginehinges.jpg (246KB - 438 downloads)
|
|
| |
|
Expert 5K+
Posts: 9650
Location: So. Cal | I thought the same way, and figured I would anodize all of them with black color. But installing it on my black New Yorker, it wouldn't look as good in black so I became accustomed to the aluminum. I figure it will dull with time on its own. But I may annodize a couple of them for certain cars. I guess I could paint it cast iron gray like the master....
Edited by Powerflite 2020-03-24 1:33 PM
|
|
| |
|
Expert
Posts: 3967
Location: DFW, TX | It's no big deal, but you might try disguising that brushed aluminum with gray or black paint. It draws your eye instantly.
I really like your master cylinder and fill solution. Dealing with the stock Mopar power brake arrangement in this era is such a pain in the butt. Personally I don't care much for the enormous factory vacuum canisters they hung on the inner fenders. Has anyone tried to fit an aftermarket vacuum reservoir inside the fender? Seems like that space could be used to hide one - and then hope it never rusts out. |
|
| |
|
Expert 5K+
Posts: 9650
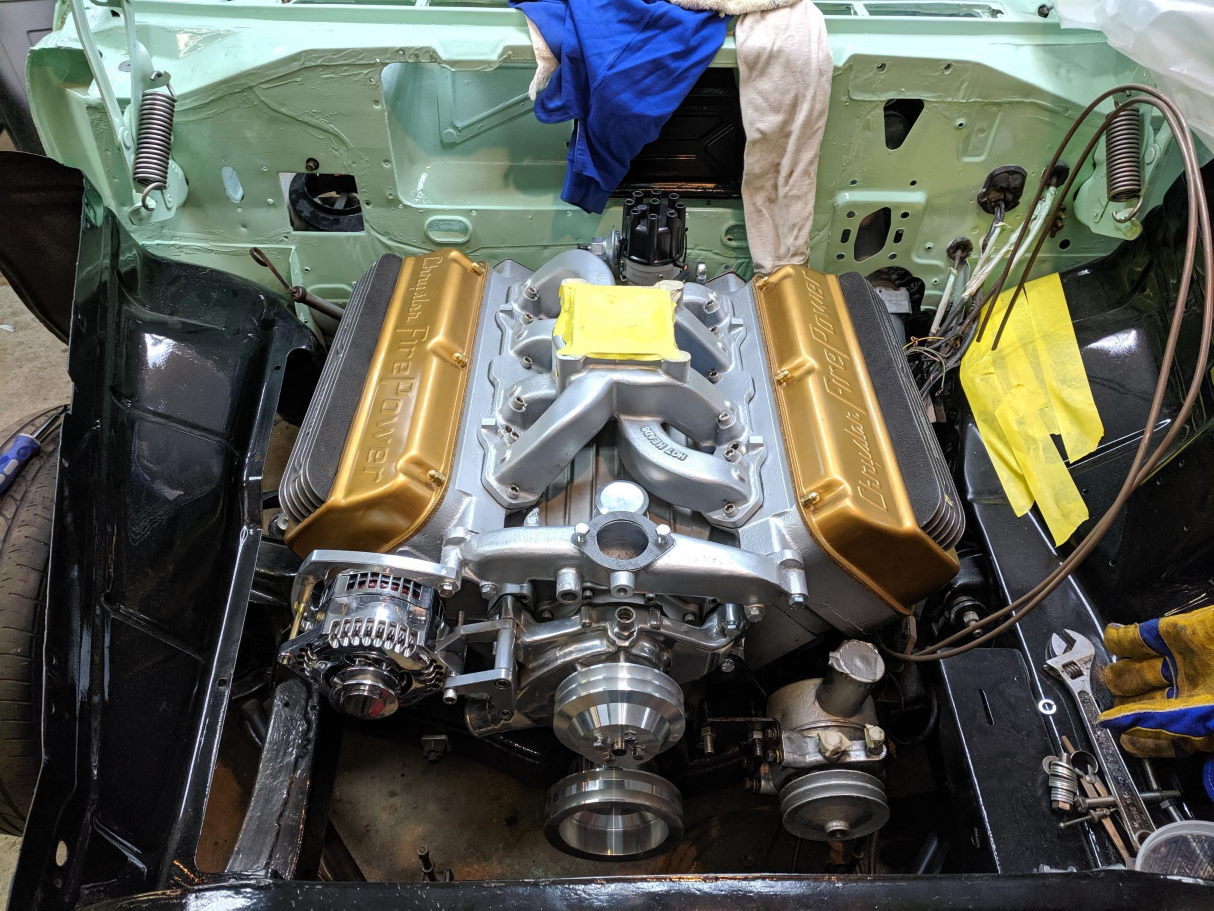
Location: So. Cal | Once you put a silver motor in there, it doesn't look so out of place. The main reason it does now is because the previous, previous owner of this car loved to make EVERYTHING black. That, and everything else is filthy except for these new parts. The problem with this master is the downward pointing brake line on the front port. That could be a pain to deal with on a hemi motor. I haven't scoped it out completely, but it'll be pretty tight with those wide valve covers under it. You could hide the vacuum reservoir under the battery tray like they did in 1960. Maybe get one from a '60 and see if you can fit it under there. I don't really mind them on the inner fenders except when you have auto pilot as well. Then things get obnoxiously crowded. So on my '58 New Yorker, I am tempted to try it too.
 (57NY 392 Hemi Installed.jpg) (57NY 392 Hemi Installed.jpg)
Attachments
----------------
57NY 392 Hemi Installed.jpg (183KB - 411 downloads)
|
|
| |
|
Elite Veteran
Posts: 1157
Location: D-70199 Heslach | Nathan, sometimes I can not follow on which car you work at the moment,- and in which thread I am at the moment....
Is this 392 in the turquoise '58 Fireflite in whose thread I am into at the moment? |
|
| |
|
Expert 5K+
Posts: 5006
| He has FWL attention deficit disorder... Im showing signs... |
|
| |
|
Expert 5K+
Posts: 9650
Location: So. Cal | This picture is from my black & white '57 New Yorker. |
|
| |
|
Expert 5K+
Posts: 9650
Location: So. Cal | I drilled out the ignition lock and got the switch to be able to turn, then I started testing all the electrical parts. Almost nothing worked except the ignition & the headlights. I spent a day rewiring the generator to undo some of the unreliable connections in its harness and extended the front park light wiring to the junction block because they had been cut off previously. I also polarized the generator and the pulley turned so that tells me it is working as it should. The front left park light gave me a lot of trouble because the bulb housing wasn't making a ground connection to the lamp housing that it was connected to. I tried crimping it and cleaning it, and it works now. But if it gives me any more trouble, I will solder a wire directly to the bulb housing and ground it directly.
Now all the exterior lights work including the brake lights, but for some reason, the turn signals won't turn on at all. When I send power on the front post and turn the signal lever in the proper direction, the rear will come on, but they won't flash. I'll have to see if there is something wrong with the flasher unit. But without manually adding power, they don't do anything, even with the key on.
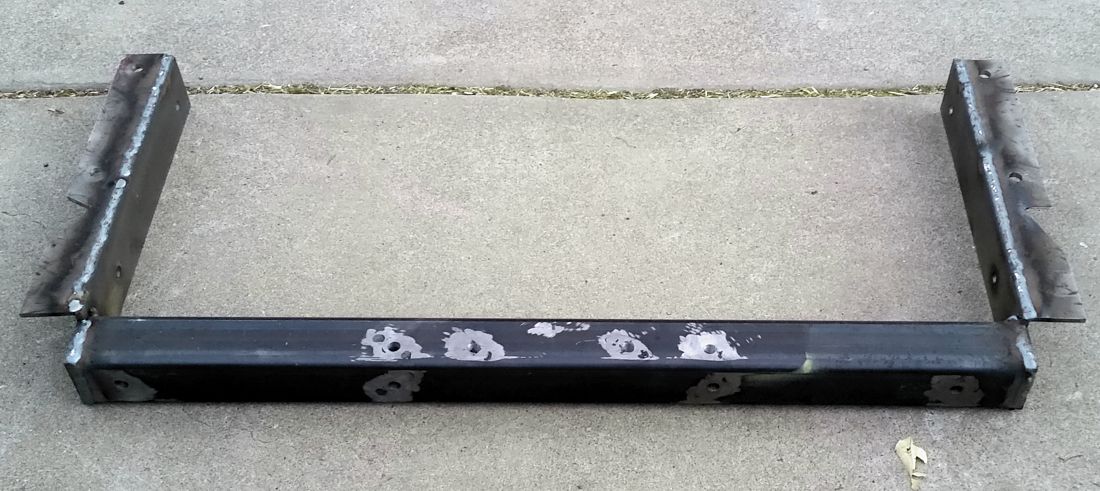
I also changed out the mangled cross-bar support in the front. I'm very glad I have a replacement and don't have to restore this one. That would be quite a chore!
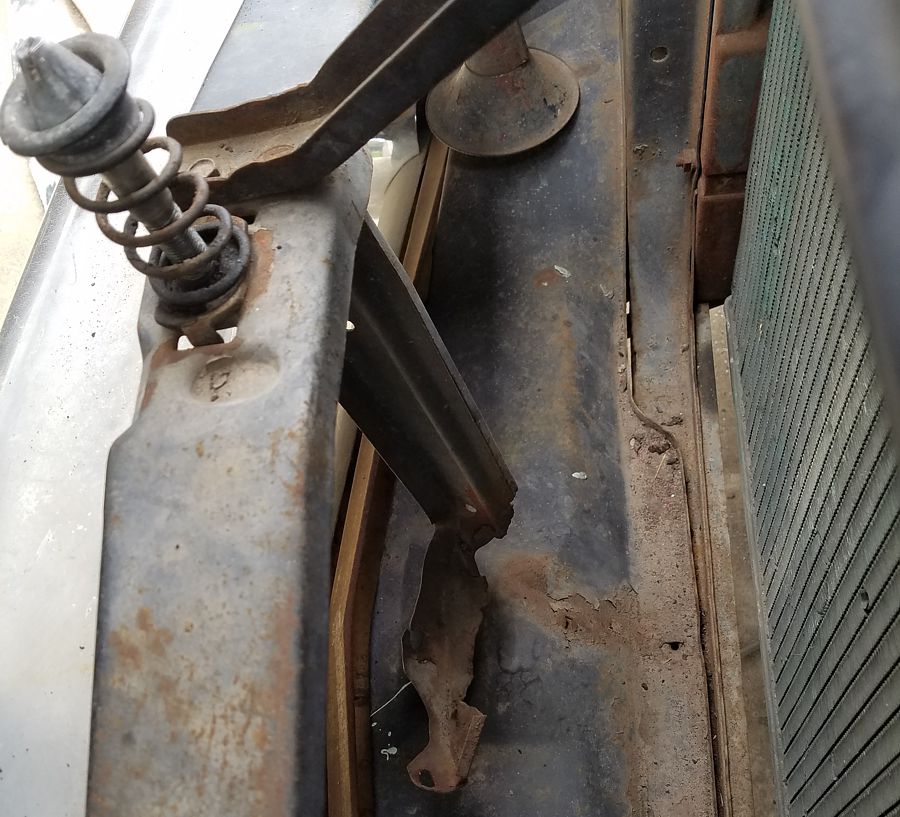 (58FF Bent Support.jpg) (58FF Bent Support.jpg)
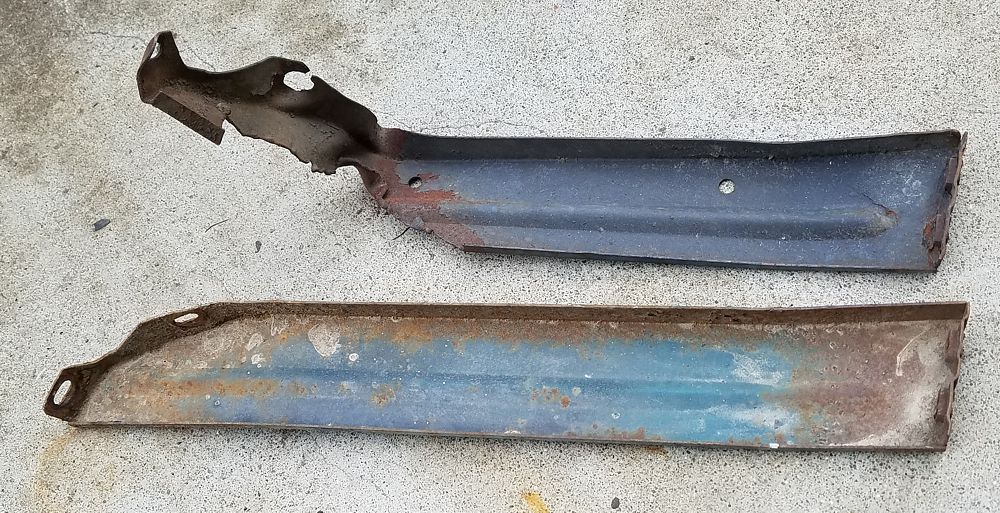 (58FF Bent Support Comparison.jpg) (58FF Bent Support Comparison.jpg)
Attachments
----------------
58FF Bent Support.jpg (165KB - 438 downloads)
58FF Bent Support Comparison.jpg (222KB - 410 downloads)
|
|
| |
|
Expert 5K+
Posts: 9650
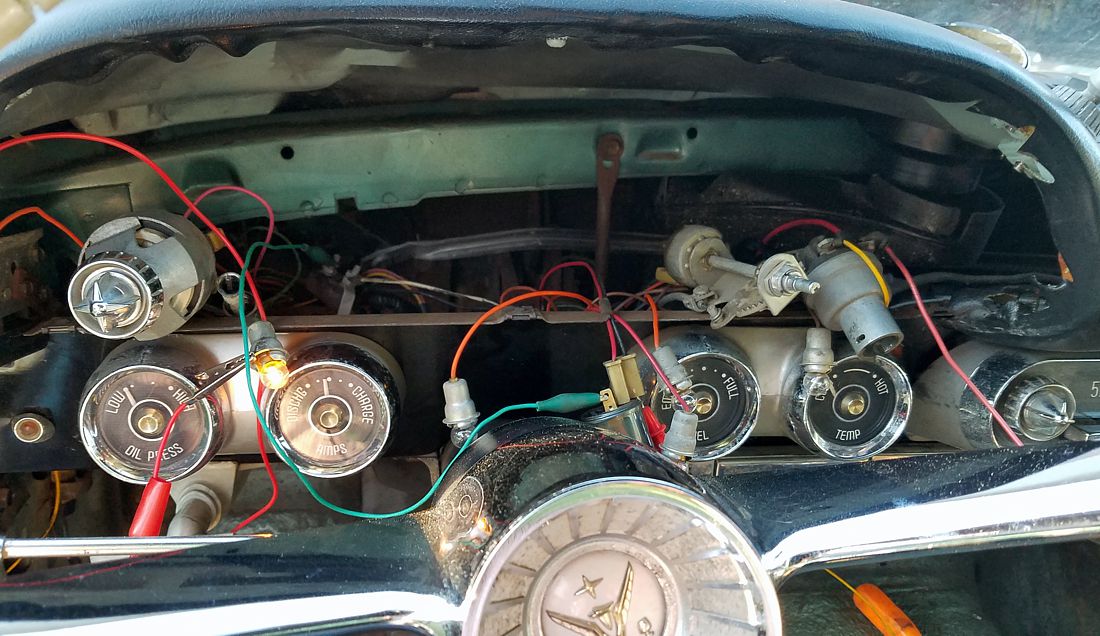
Location: So. Cal | I pulled the speedometer cluster today to work on the wiring issues and removed the old ignition lock. The dash lights weren't working and the turn signals weren't working either. All the bulbs were good, but the flasher wasn't getting any power. I tested the flasher and it worked, but was really slow so I replaced it with an electronic version in anticipation of using LED bulbs in the taillights.
According to the wiring diagram, the black wire on the flasher should get its power from the ignition switch, and it's shared between the fuel & temperature gauges. Those wires have power at the ignition switch, but don't have power at the flasher. Supposedly there is a junction point somewhere in the harness, but I can't find where it is unless it combines on the back of one of the gauges, but it didn't look like that's how it worked. But, by manually connecting power to one side of the flasher with the green jumper in the picture, I was able to get all the turn signals working with the new flasher. I will spend a little more time trying to trace down the bad connection, but if I can't figure it out, I will cut the wire and connect it directly to the ignition switch.
 (58FF Turn Signal Disconnect Bypass.jpg) (58FF Turn Signal Disconnect Bypass.jpg)
Attachments
----------------
58FF Turn Signal Disconnect Bypass.jpg (181KB - 404 downloads)
|
|
| |
|
Expert 5K+
Posts: 9650
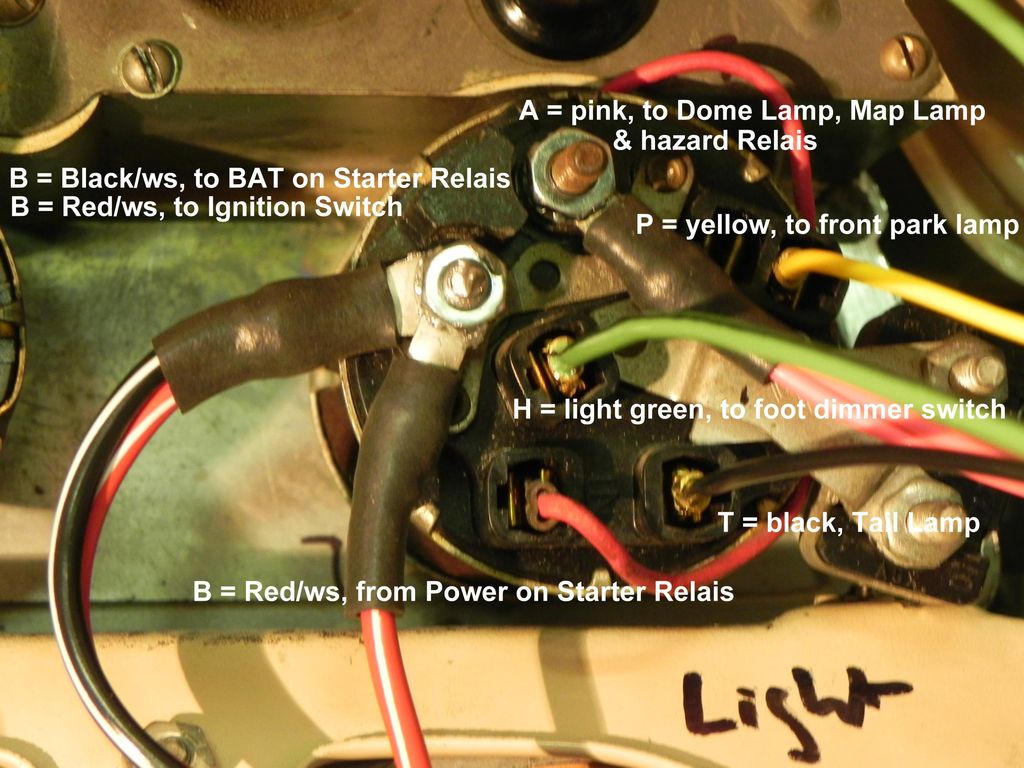
Location: So. Cal | The dash lights weren't working because of the typical problem: a corroded dimmer contact in the headlight switch. While I was pilfering through my garage, looking for a set of locks I may have purchased, I stumbled on this brand new headlight switch I had. I had forgotten that I purchased it. That will save me from having to open up my old one right away. This one looks to be a newer manufacture of the old switch as it has a plastic connection for the dimmer wheel. I'm also posting pictures of the wiring connection on the back of it for future reference.
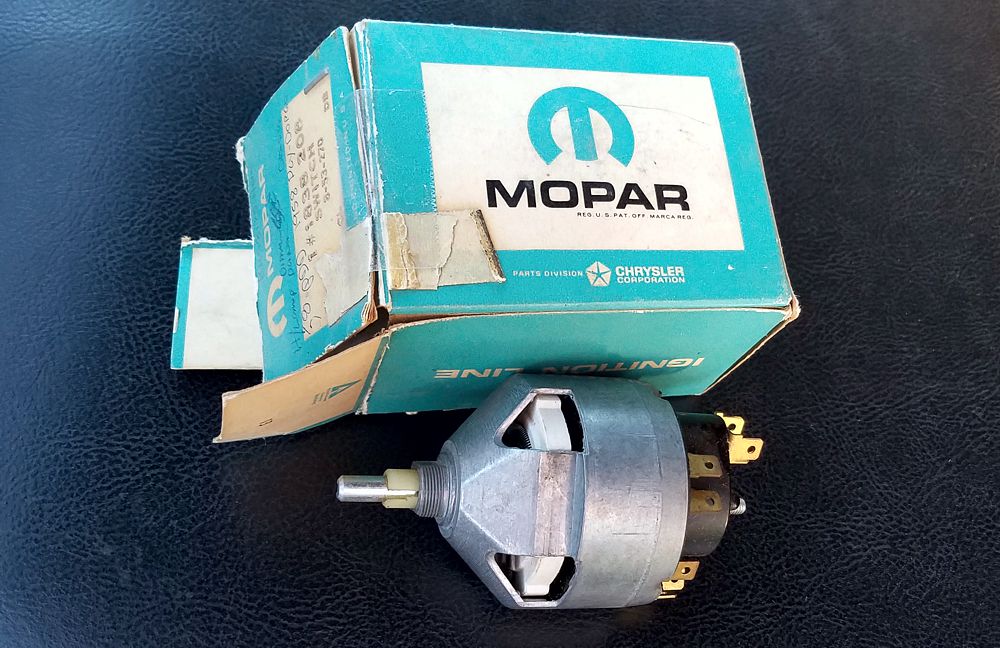 (58 Dodge-DeSoto-Plym Headlight Switch.jpg) (58 Dodge-DeSoto-Plym Headlight Switch.jpg)
 (58FF Headlight Switch Wiring Side.jpg) (58FF Headlight Switch Wiring Side.jpg)
 (58FF Headlight Switch Wiring.jpg) (58FF Headlight Switch Wiring.jpg)
Attachments
----------------
58 Dodge-DeSoto-Plym Headlight Switch.jpg (150KB - 409 downloads)
58FF Headlight Switch Wiring Side.jpg (156KB - 422 downloads)
58FF Headlight Switch Wiring.jpg (143KB - 405 downloads)
|
|
| |
|
Elite Veteran
Posts: 1157
Location: D-70199 Heslach | Hello Nathan
here are some pictures of my 57 headlight switch,- maybe it helps
 (Wire Internal Switch Light 2697b.jpg) (Wire Internal Switch Light 2697b.jpg)
 (Wire Internal Switch Light.jpg) (Wire Internal Switch Light.jpg)
Attachments
----------------
Wire Internal Switch Light 2697b.jpg (114KB - 412 downloads)
Wire Internal Switch Light.jpg (128KB - 396 downloads)
|
|
| |
|
Expert 5K+
Posts: 9650
Location: So. Cal | Thanks, I'm surprised your switch is completely different. It's more like the Chrysler switch, but not even the same as that one. My '58 DeSoto switch is the same as the '58 Dodge & Plymouth, and that is one of only two to be used across brands ('57 Dodge & Plymouth is the other one). Most of the headlamp switches are specific to the brand and year. For instance, the '55-'59 Chrysler all use their own specific switch. Not very smart of them, especially when '57-'59 Chrysler fit in the same space and shape. But it looks like your wiring color code is very similar to mine. |
|
| |
|
Elite Veteran
Posts: 1157
Location: D-70199 Heslach | I am sorry Nathan, that my picture doesn't help. I've seen that too, that the switch is different, but I post it anyway..... |
|
| |
|
Expert 5K+
Posts: 9650
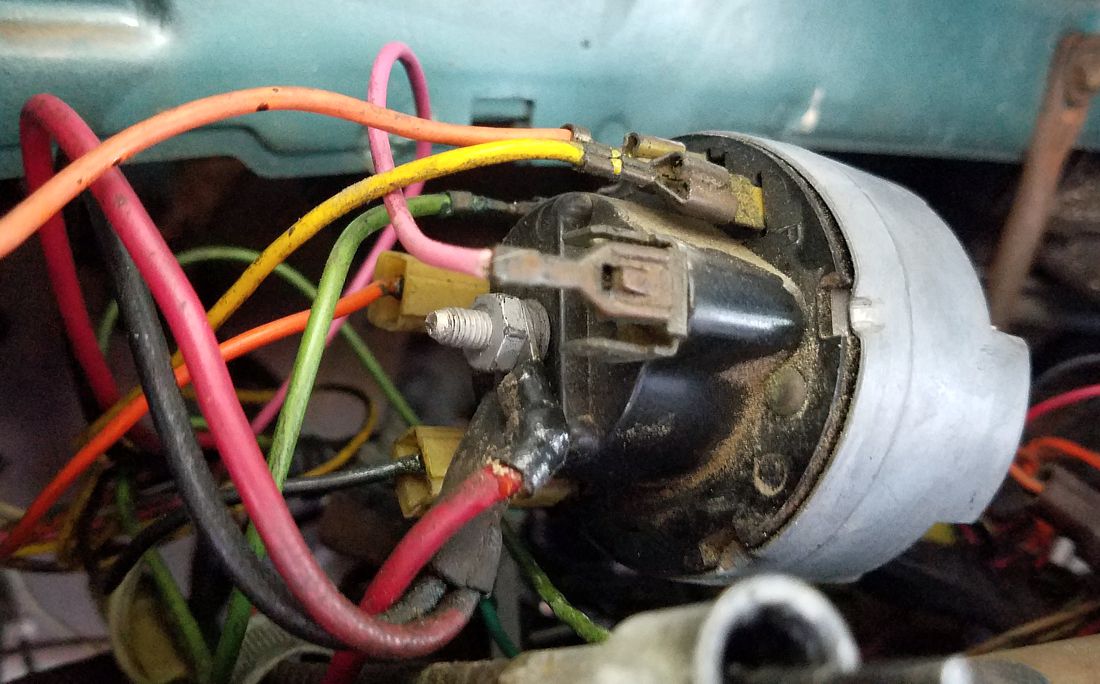
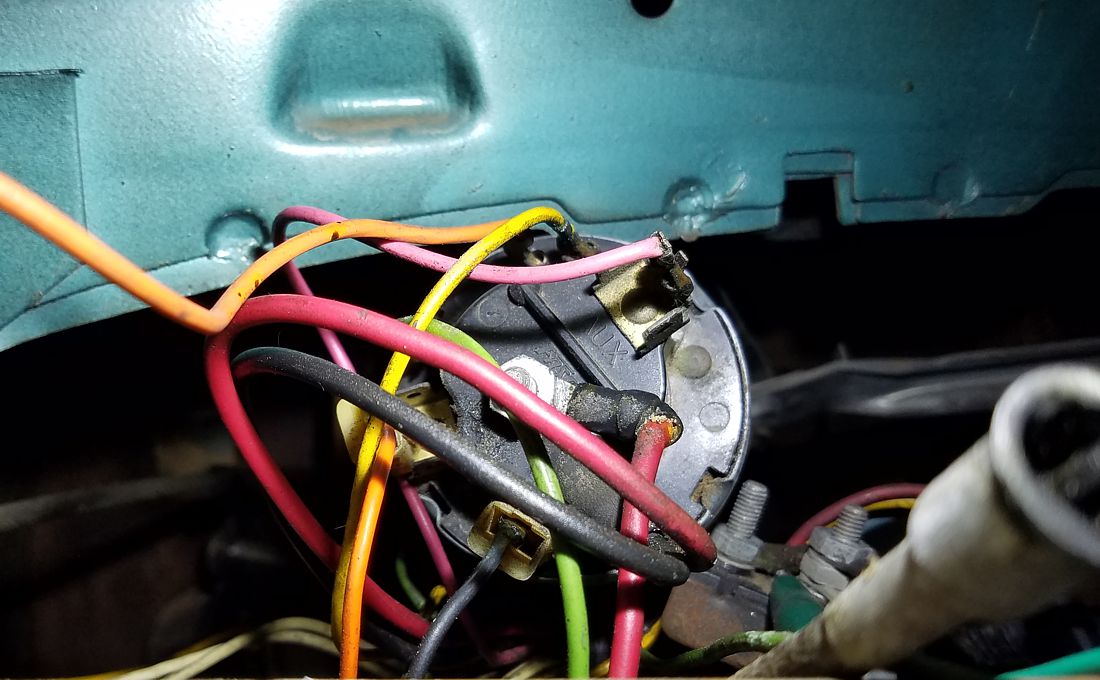
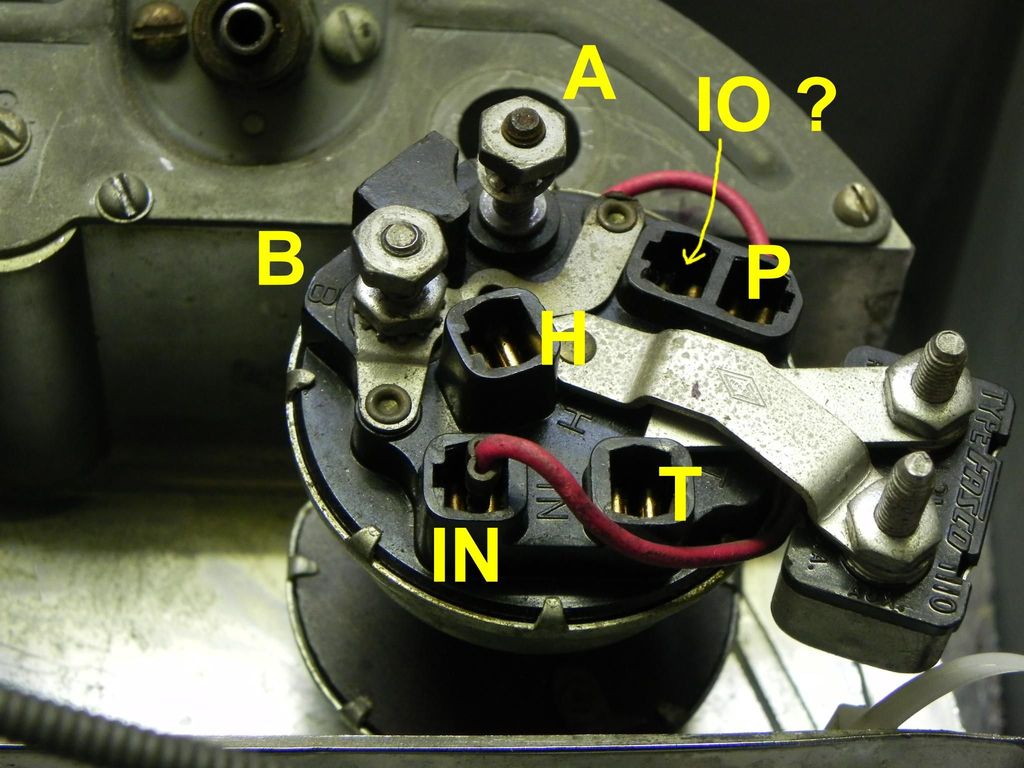
Location: So. Cal | It's interesting that my switch is labeled similar to yours, namely that the dimmer switch line is labeled as IN. The port that you have labeled IO is labeled IG on my switch and is basically another park lamp post that goes on only with park lights and turns off when the headlights are on - maybe for the light on the ignition switch?
I finally found the problem with the turn signal power. The power line had broken off the connector from the fuel gauge and was dangling. But the connector was no where to be found, so that was odd. I soldered another connector onto it, and plugged it into the back of the fuel gauge and solved the problem. My new headlight switch has a lot of issues apparently. The tail lights are connected to the constant pink line, and the pink line is disconnected from the power. Additionally, the dimmer doesn't work. What a piece of junk. So to fix it, I would have to tear it apart and see what's going on with it. So I just used my old one. But I decided that I didn't care about dimming the dash lights, so it wasn't worth it to tear it apart to fix it. I just connected the orange dash lights to the tail lights and used the multiple connector on it to plug everything in. I also connected the front park lights to the tail lights so now they are on when the headlights are on too. Works great, and with the standard bulbs in the dash, it is the perfect brightness. I may have to fix the dimmer when or if I change to brighter LED's, but right now, this works well.
Edited by Powerflite 2020-04-17 11:46 AM
|
|
| |
|
Expert
Posts: 2490
Location: Kansas City, KS | That's a great idea to bypass the dimmer instead of tearing the switch apart and rebuilding it. Don't know why I never thought of that? Going to do it on one of mine now, thanks!
The Imperials are just as crazy with the headlight switches. on the 57-58's they basically changed from female connectors to male connectors. The main stem is slightly different too. That stem alone requires each year to have a completely different dash frame that would otherwise be interchangeable |
|
| |
|
Extreme Veteran
Posts: 403
Location: California | You’re lucky “Powerflite”,I too am envious. I’ve wanted a 57-58 DeSoto coupe for years and have never seen one come up for sale locally. That’s a great color combination too. How come I get neighbors with modern plastic crap cars in their driveway? Lol. |
|
| |
|
Expert 5K+
Posts: 9650
Location: So. Cal | Yeah, I'm surprised that the engineers were allowed to make custom 1 year/model only parts like that. I really like the color on this car too, it's kinda similar to Chrysler's parade green, but a little different shade.
I checked out the speedometer while I have it removed and noticed that I couldn't turn it at all. I took it apart and cleaned out all the dried up grease and still couldn't budge it. So I removed the whole thing and had to take a hefty wrench to it after soaking it in oil and was barely able to get it to move. I didn't think that dried grease could become that hard! After working it and soaking it in sewing machine oil for 2 days, I finally have it freed up, but I fear that I may have stripped the transmission gear because of how immovable this thing was. Hopefully, I can get it working again.
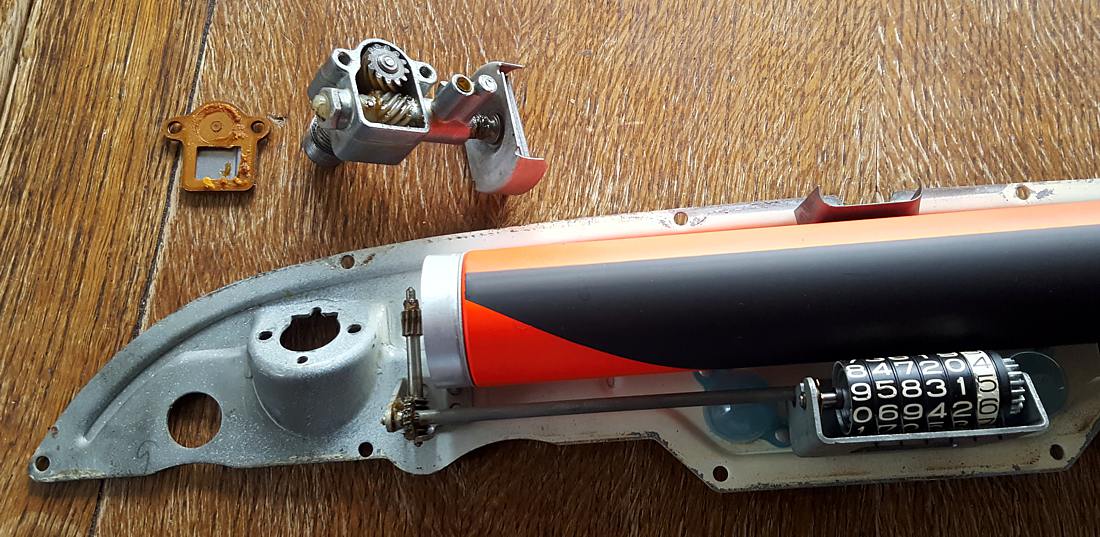 (58FF Speedo Repair.jpg) (58FF Speedo Repair.jpg)
Attachments
----------------
58FF Speedo Repair.jpg (160KB - 396 downloads)
|
|
| |
|
Expert 5K+
Posts: 9650
Location: So. Cal | The speedometer seemed to work well on the bench after I got it cleaned up and re-lubed so I put it all back together and took some pictures. I didn't hook up the radio because the wiring to it looked scary, so I left it off. I also disconnected the clock power line so it might not drain the battery just sitting there. I got the ignition lock to turn freely, ground off the pin and put it back in so I could use it with a screw driver until I swap it out. I also got the dome lights working but left them disconnected so I could leave the doors open without draining the power. I left the tail light wiring as stock because I didn't have any 1156 style LED's to connect them all together. I'm debating if I should have all three go off during brake & turn or just the upper & lower like on my other '58 DeSoto. I've never understood why car companies turn off the front park lights when the headlights are on. It looks better if you leave them on, to me, and it isn't hurting anything to leave them on.
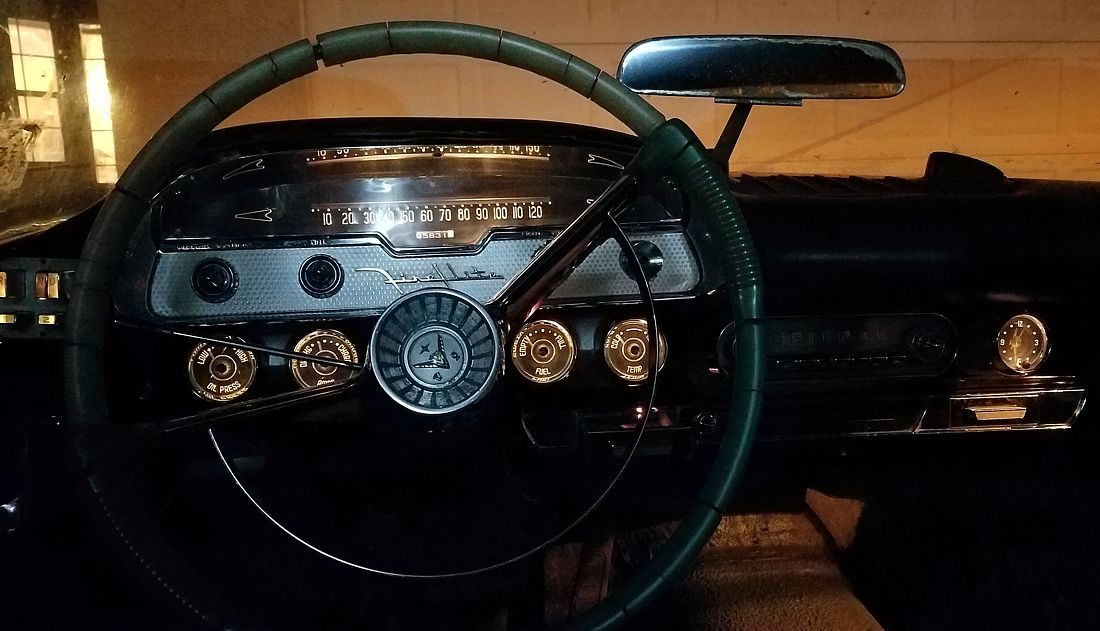 (58FF Dash at Night.jpg) (58FF Dash at Night.jpg)
 (58FF Taillights.jpg) (58FF Taillights.jpg)
 (58FF Park Lights.jpg) (58FF Park Lights.jpg)
Attachments
----------------
58FF Dash at Night.jpg (133KB - 414 downloads)
58FF Taillights.jpg (100KB - 403 downloads)
58FF Park Lights.jpg (113KB - 434 downloads)
|
|
| |
|
Elite Veteran
Posts: 649
Location: Finland | I had a similar case with my 58 firedome speedo. I was surprised that it works perfectly now. Got to have patience..
Could you keep your fingers from resetting the odometer? My fingers never stays away from that...I never remember how to do it but the fingers know... |
|
| |
|
Elite Veteran
Posts: 1157
Location: D-70199 Heslach | Powerflite
I'm debating if I should have all three go off during brake & turn or just the upper & lower like on my other '58 DeSoto.
I like to see how it looks with all three, please share the electric scheme in case you do it.
I've never understood why car companies turn off the front park lights when the headlights are on. It looks better if you leave them on, to me, and it isn't hurting anything to leave them on.
Me, too. but I wonder because on my 69 Polara the park lights does't switch off when you switch on the headlights. |
|
| |
|
Expert
Posts: 3967
Location: DFW, TX | The purpose of parking lamps was to be able to allow other motorists to see the vehicle in situations where a car was in a dangerous place and could not be moved, but without having the headlights on, which would kill the battery quickly. They basically serve the same purpose as "hazard" lights on more modern cars. Remember that most roads and parking lots were DARK back then!
Your dash is looking really terrific, Nathan!
Edited by 57burb 2020-04-21 12:02 PM
|
|
| |
|
Elite Veteran,, James Passed away March 2021, He will be Missed
Posts: 1028
Location: Melbourne, Australia | Very excited seeing you get this car sorted out slowly ! Keep up the good work ! You are doing what I was dreaming of doing and can’t anymore ! Good work |
|
| |
|
Expert 5K+
Posts: 9650
Location: So. Cal | Ralf: No, I just left the odometer alone. but I can see the temptation in changing it.
Tom: I will use some power diodes so I don't have to change to dual filament bulbs. I am even considering hooking up a sequential lighting module that lights from bottom to top. Kinda like a Jacob's Ladder spark machine!
Danny & James: Thanks, hopefully the gauges work too. At least I know that the ammeter works, and the oil pressure doesn't (because I disconnected it).
This car was driving me nuts because it ran really well at higher rpm, but had almost no power at low speed. It didn't miss, it just had no power. It ran so poorly at low rpm that I couldn't really get the rpm down low enough to adjust the timing on it. I got the inclination to check the intake bolts and found that half the ones on the passenger side were quite loose. I tightened them, and it seemed to want to start easier, and then I pulled the vacuum line off the distributor and it suddenly ran really well. Now it will idle nice and I can put it in gear with the brake on and not have it die on me. I'm not sure why it didn't like the vacuum advance on it. However, now there seems to be something in the torque converter/bell housing area that's occasionally making a cyclical scraping noise that doesn't sound healthy, so not sure what that will end up being. After I had polarized the generator as I previously described, now it charges the battery perfectly fine so that's nice. Not sure why it needed to be polarized, but it was an easy fix. I put the car in drive with the wheels up, and the speedometer didn't work. It's making a clicking noise down at the transmission end. Maybe the cable broke from when the car was moved before, or the gear stripped on it? I tried to time the ignition, but my timing light was too weak to see it in the daylight so I have to do it at night. The car's getting closer now and I feel better about it now that I can move it around easier, despite it's issues. |
|
| |
|
Expert
Posts: 3967
Location: DFW, TX | Maybe the vacuum diaphragm in your distributor is ruptured, causing a leak? Just a thought.
Glad to see all the progress on this one!
|
|
| |
|
Expert 5K+
Posts: 9650
Location: So. Cal | I didn't even plug the line when I pulled it off, so it wasn't because of a vacuum leak. It probably just had too much timing, and fixing the leak at the intake was likely the thing that fixed it. Either that, or the mechanism inside the distributor was doing something funky. |
|
| |
|
Expert 5K+
Posts: 9650
Location: So. Cal | The motor started giving me a lot of trouble again. I couldn't get it started, it would just keep sputtering at me. Finally I checked on the starter and noticed that it was sparking. The main wire is tight, but internally, it somehow became very loose. That's probably the main cause of my trouble. When it shorts, it probably eliminates the voltage at the ignition too, preventing it from starting. Because of how much trouble this starter is to get in and out, I vowed that I would replace it with a mini-starter if I had to do it again, so I ordered a new one for it.
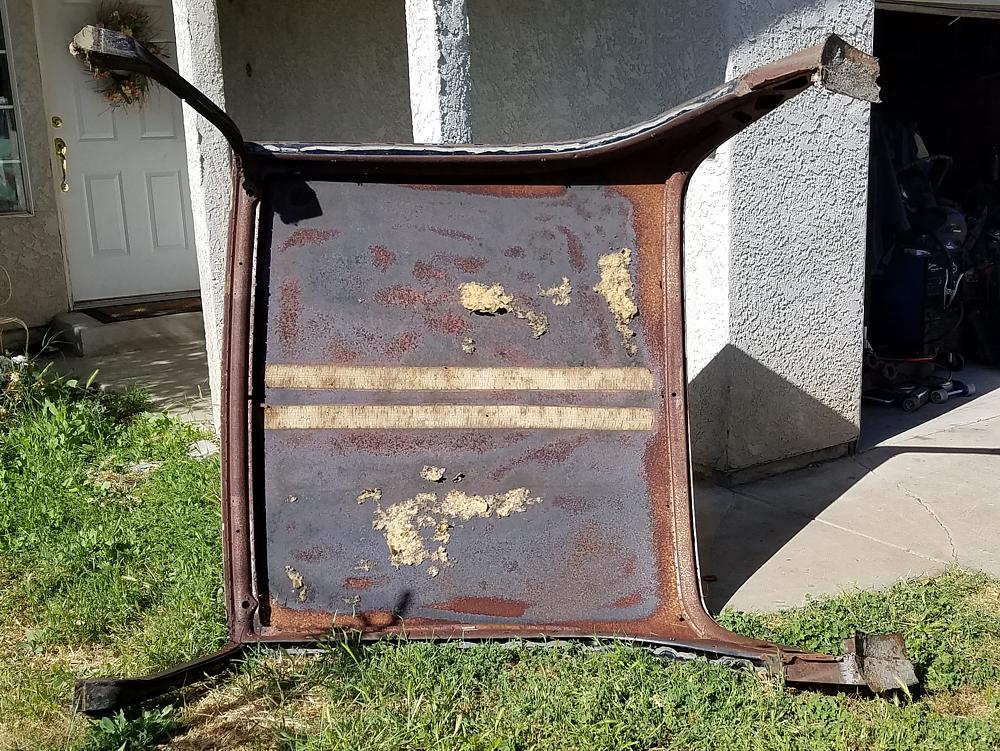
I have also been contemplating if I should replace the whole roof or just patch it along most of the sides. I have this replacement roof from a 300D that would work on it, but it sounds like a lot of work to replace it with how much inner structure is required to be dealt with. Also, I'm not sure how strong it would be afterward compared to the factory install. So I am leaning more towards using this roof to patch mine rather than replacing the whole thing. What do you think?
 (300D Roof For Parts.jpg) (300D Roof For Parts.jpg)
Attachments
----------------
300D Roof For Parts.jpg (259KB - 385 downloads)
|
|
| |
|
Expert 5K+
Posts: 9899
Location: Lower Mainland BC | .
Nathan: Tough choice on the roof. The existing one has lots of rust for sure (photo below from Pg. 1 of this thread):
As for the starter, you might recall that my 56 Dodge starter had an issue where one (or more) of spacers that kept the armature from banging into stuff had disintegrated, causing all sorts of hard starting grief. Once that got sorted, it starts like a dream (instead of a nightmare).
This thread (pertinent photo below): http://www.forwardlook.net/forums/forums/thread-view.asp?tid=70560&...

Good luck
Stay safe
Edited by 56D500boy 2020-05-02 9:01 PM
|
|
| |
|
Elite Veteran
Posts: 649
Location: Finland | At least I would patch up the old roof. Because of that the roof is curved in that area I think it will succeed well with a lot of patience.
I would prefab the patches so it would be just one long patch per side.
Good luck! |
|
| |
|
Expert 5K+
Posts: 9650
Location: So. Cal | I received my new mini starter today so that will be going in as soon as I can get to it. The trunk lid on this car is completely rust free, but had been beat with an ugly stick all along the back end of it. It also had part of the inner structure cut and poorly welded back together, as well as a suspicious bondo section next to the license opening. After looking it over, I decided that it would take far more work to try and fix this thing than it was worth, so I played a game of musical trunk lids today. I removed 3 '58 Chrysler lids from other locations and swapped them around. I originally wanted the black one on the Fireflite, but it was too small for the opening! I couldn't make it work. So I swapped the white one that I purchased from Gary Grossich onto it. After removing a broken bolt from it, it bolted onto the car without issue. The black one also fits well on my '57 New Yorker so that was good, but I was surprised that they were so different from each other. The lid I had on the '57 went to my '58 New Yorker because it's a spring special Chysler lid with the horizontal bars that really belongs to the '58. I will now cut up the green Fireflite lid to create repair panels for others, and use the sheet metal from it.
Edited by Powerflite 2020-05-09 11:00 PM
 (58FF New Trunk Lid.jpg) (58FF New Trunk Lid.jpg)
Attachments
----------------
58FF New Trunk Lid.jpg (171KB - 392 downloads)
|
|
| |
|
Expert 5K+
Posts: 9650
Location: So. Cal | I have almost 4 yards of '56 Fury fabric that I don't have a use for. The camera can't capture how beautiful this fabric is, as it really gleams with gold in the light. Should be enough to use on 2 cars. I am considering sewing it over the top of this black vinyl in the original Fireflite pattern to make the seats look better, but not sure it would be worth the trouble. Might be better to sell it to someone else who could use it on a couple of Furys.
 (56Fury Fabric.jpg) (56Fury Fabric.jpg)
Attachments
----------------
56Fury Fabric.jpg (210KB - 393 downloads)
|
|
| |
|
Expert 5K+
Posts: 5006
| patch the roof... nightmare replacing the whole thing... |
|
| |
|
Elite Veteran
Posts: 1157
Location: D-70199 Heslach | Powerflite - 2020-05-14 9:21 PM
but not sure it would be worth the trouble. .
Thats the daily question with our hobby |
|
| |
|
Expert 5K+
Posts: 9650
Location: So. Cal | Yeah Mike, I decided the same thing. I cut up the spare roof, so I can't change my mind anymore. It'll be used to fix a number of vehicles that need repair sections on them. As for the fabric, my wife and I decided to just leave the black vinyl as it is. There would be limited benefit to sew new fabric to old vinyl, and the work involved would't be much different than re-doing it all.
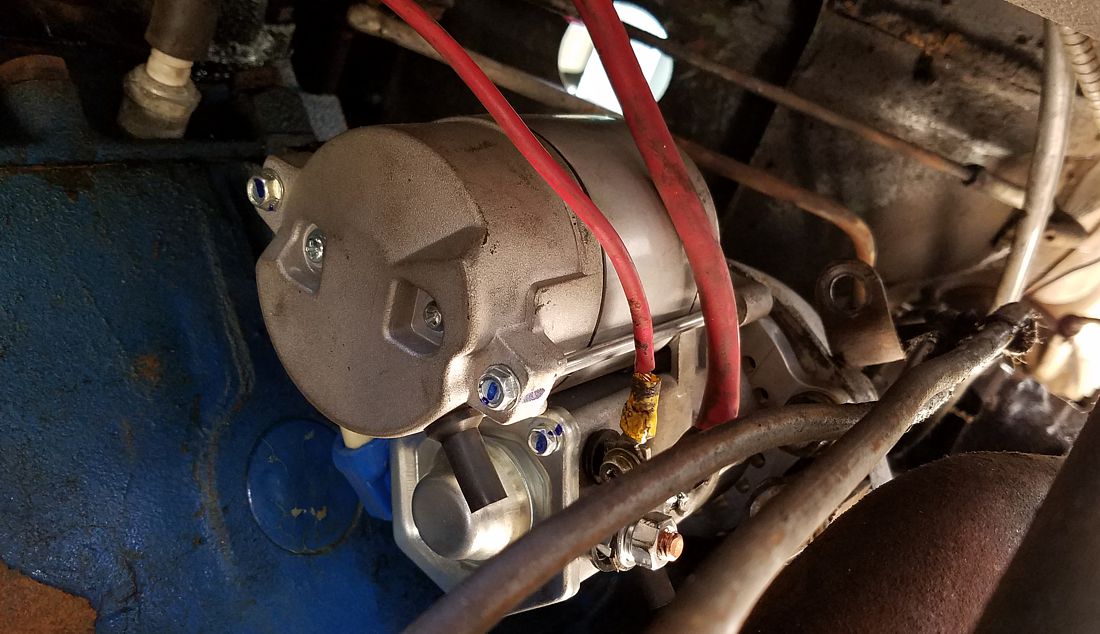
I spent the last part of the day yesterday removing the old starter & installing the new mini starter. My days of removing the throttle linkage & master cylinder to pull the starter up out of there are over. I had to grind the side of the round adapter on the new one to match the profile of the original starter, but even then it wouldn't seat properly for some reason. Eventually, I got it to seat, but never figured out what the problem with it was. I removed the adapter from the motor and that helped make grinding it easier to do, and I tried re-clocking the starter to make it fit better, but ended up at the same location that it started with. To mount it, you have to use a longer bolt with a nut on the top mount - a little harder to assemble than the original, but not bad. I had to reconfigure the wires in order to get them to reach down there, and after it was finished, the starter relay stuck on for some reason. A little whack on it freed it up, but by the time I got the car ready to go, it was quite late in the evening so I didn't get a chance to try to start the engine yet.
Edited by Powerflite 2020-05-17 1:51 PM
 (58FF Mini Starter.jpg) (58FF Mini Starter.jpg)
Attachments
----------------
58FF Mini Starter.jpg (150KB - 378 downloads)
|
|
| |
|
Expert 5K+
Posts: 9650
Location: So. Cal | The new mini starter I put in lasted about 30-40 seconds of cranking trying to start this motor before it smoked and died. It's a different design than the one I put into the '60 New Yorker, and apparently not as robust. I was cranking it so long because this motor just has a lot of issues trying to run right. That experience put me in a such a good mood that I didn't touch the car for another 3 weeks. But I eventually put the old starter back in after changing out the bad solenoid on it for a new one, and I began to suspect that there was something not quite right with the internals in the distributor to give me the intermittently crappy results I was getting.
So I pulled the known good running distributor out of my '58 Firedome to swap into this car. Inspection revealed that my current Fireflite distributor had both rotational springs installed (purple & orange) and everything looked new. Whereas my good old Firedome distributor had one spring missing and was quite greasy. What the? Anyway, I put the old Firedome distributor in anyway and the car fired up immediately without any hesitation and runs great. What's going on with it? Are these things supposed to be missing a spring on them or is the newer electronic timing settings a whole lot different than what is required on the old motors? Anyway, missing a spring or not, I am just glad that it consistently works now.
Soon afterward though, my starter relay suddenly stuck in the on position and insisted on cranking the motor over even when I didn't want it to. So I disconnected it and will need to purchase a new one or tear it apart to try to fix it. |
|
| |
|
Expert 5K+
Posts: 9650
Location: So. Cal | With the new distributor, I drove the car for the first time with brakes. It went well until I applied the brakes hard, when the left rear locked up on me. I never even touched the rear brakes so it's not a big surprise. Probably missing or broken hardware in there, but I'll find out how it looks tomorrow. My puller pulled the drum off in literally 10 seconds once I had it attached. Great tool.
 (58FF LRear Brake Pull.jpg) (58FF LRear Brake Pull.jpg)
Attachments
----------------
58FF LRear Brake Pull.jpg (119KB - 361 downloads)
|
|
| |
|
Expert 5K+
Posts: 7393
Location: northern germany | Powerflite - 2020-06-13 7:12 PM
So I pulled the known good running distributor out of my '58 Firedome to swap into this car. Inspection revealed that my current Fireflite distributor had both rotational springs installed (purple & orange) and everything looked new. Whereas my good old Firedome distributor had one spring missing and was quite greasy. What the? Anyway, I put the old Firedome distributor in anyway and the car fired up immediately without any hesitation and runs great. What's going on with it? Are these things supposed to be missing a spring on them
I don't know but all HP Mopar Performance Big Block distributors with vacuum advance have only one spring. |
|
| |
|
Expert 5K+
Posts: 9650
Location: So. Cal | Thanks for the info. Big blocks are relatively new to me so I don't have a lot of experience with them. I'll have to look into it further to make this other distributor work, but I was surprised that it wouldn't even really run with it.
When I removed the left rear drum, I found that the brakes had no hold-down springs on them. Why am I not surprised? I dug through my parts stash and found an extra set and installed them. I also replaced the broken speedometer cable and adjusted the right side T-bar up higher. It was sagging on the right quite a bit for some reason, even when the rear axle was on even jack stands. The left rear tire is a little bigger right now, so it will cause it to sink on the right front anyway, but the front was definitely adjusted too low on that side too.
Then I took it for another spin. The new brakes worked amazingly well, and the motor has plenty of power. Very impressive. But the power steering pump wasn't quite working anymore, and it isn't due to the belt. The pump looks to be a newer replacement and seems to have just died on me. The transmission was about a quart low when I went out, but it started belching trans fluid out of the dipstick all up and down the road for some reason. No, no! Bad DeSoto! I don't know what it's issue was. I stopped the car and measured the fluid level and it was way overfull. I ran it through the gears without moving the car and measured it again, and it was quite low now. So I filled it back up to the proper level and went for another spin. This time the trans worked perfectly. I even did a spirited burnout in the dirt without any belching. Maybe it had an air bubble in it or something? I hope it fixed itself so it doesn't do this again, but I need to replace the power steering pump next.
 (58FF Driving.jpg) (58FF Driving.jpg)
 (58FF Spewing.jpg) (58FF Spewing.jpg)
Attachments
----------------
58FF Driving.jpg (272KB - 361 downloads)
58FF Spewing.jpg (203KB - 351 downloads)
|
|
| |
|
Expert 5K+
Posts: 9650
Location: So. Cal | The power steering pump from my gold Firedome looked like it should work (unlike the red one, that looked like it was cooked), so I cleaned it out, swapped it into the Fireflite and filled it up. I also installed a pair of fender mirrors, repaired the starter relay & replaced the oddball left rear bias ply tire with a new radial from the front of my gold Firedome (thanks Kurt!) that happened to be the same size as the other rear tire.
I went to take it for a drive, and had brake fluid dripping from the same left rear wheel. I saw it weeping before, and I should have addressed it then, but thought it might be OK. Wrong. So I took it back apart, replaced the wheel cylinder & the line to it, and cleaned it all up. I also replaced the brake shoes with good used ones because these were soaked & filthy. Maybe baking in the hot sun for a year will fix them Afterward, I took the car for a spin and everything worked great! No belching, no brake problems, good power steering & I can start & stop the motor from inside the car! The only thing now not up to cruising spec is the fuel tank. So far I have been running it from a fuel can in front of the radiator. I don't want to mess with the tank until I am sure I am going to be driving it regularly. I could do that now, but I don't really drive anywhere right now so I'll probably wait on it and work on other stuff for a while. |
|
| |
|
Expert 5K+
Posts: 9650
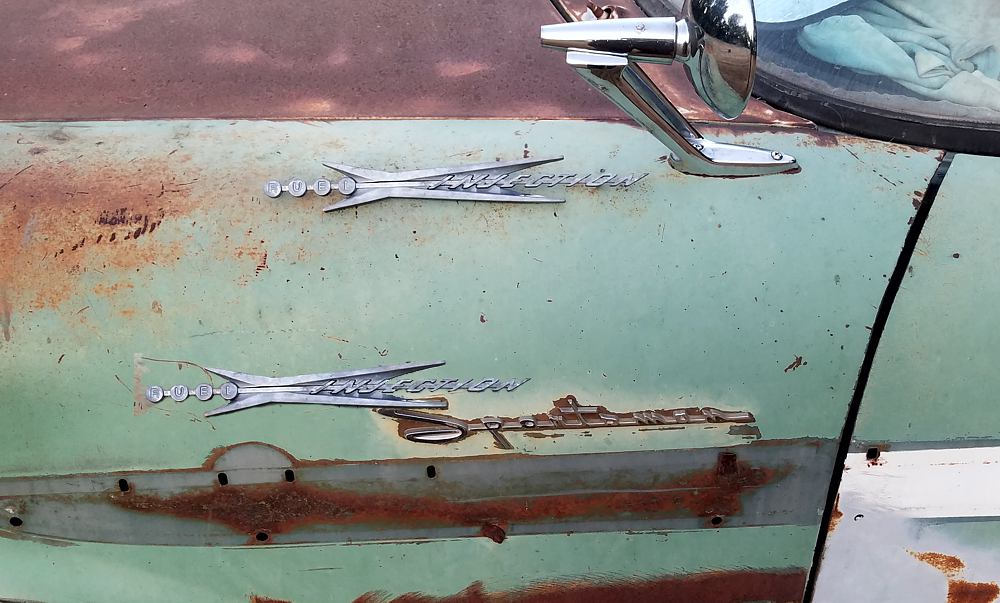
Location: So. Cal | I had to give back the fuel injection emblems that I borrowed quite a while ago, but I recently purchased my own set. When these were mounted on the car, I assume they also remove the "Sportsman" emblem? It looks like it will collide with it, unless I have it in the wrong spot. But I think that's where it was on the Adventurer...
 (58FF Fuel Injection.jpg) (58FF Fuel Injection.jpg)
 (28397398496_0a0501e521_b.jpg) (28397398496_0a0501e521_b.jpg)
Attachments
----------------
58FF Fuel Injection.jpg (116KB - 368 downloads)
28397398496_0a0501e521_b.jpg (102KB - 359 downloads)
|
|
| |
|
Expert
Posts: 3967
Location: DFW, TX | The only EFI Desotos were Adventurers, which don't have the Sportsman emblem. |
|
| |
|
Expert 5K+
Posts: 9650
Location: So. Cal | Interesting. I never realized that they left them off of there. Even the '57's didn't have the Sportsman emblem so it wasn't just to provide room for the EFI option. |
|
| |
|
Expert 5K+
Posts: 9650
Location: So. Cal | I took a chance and purchased a fender emblem from Mopar Mel. Where else can I get one? Luckily, I actually received it and now I have two for the car. I just need two more for the red car. ...and new plastic emblems....
Edited by Powerflite 2021-04-20 11:04 AM
 (58FF Fender Emblems.jpg) (58FF Fender Emblems.jpg)
Attachments
----------------
58FF Fender Emblems.jpg (120KB - 235 downloads)
|
|
| |
|
Expert 5K+
Posts: 9650
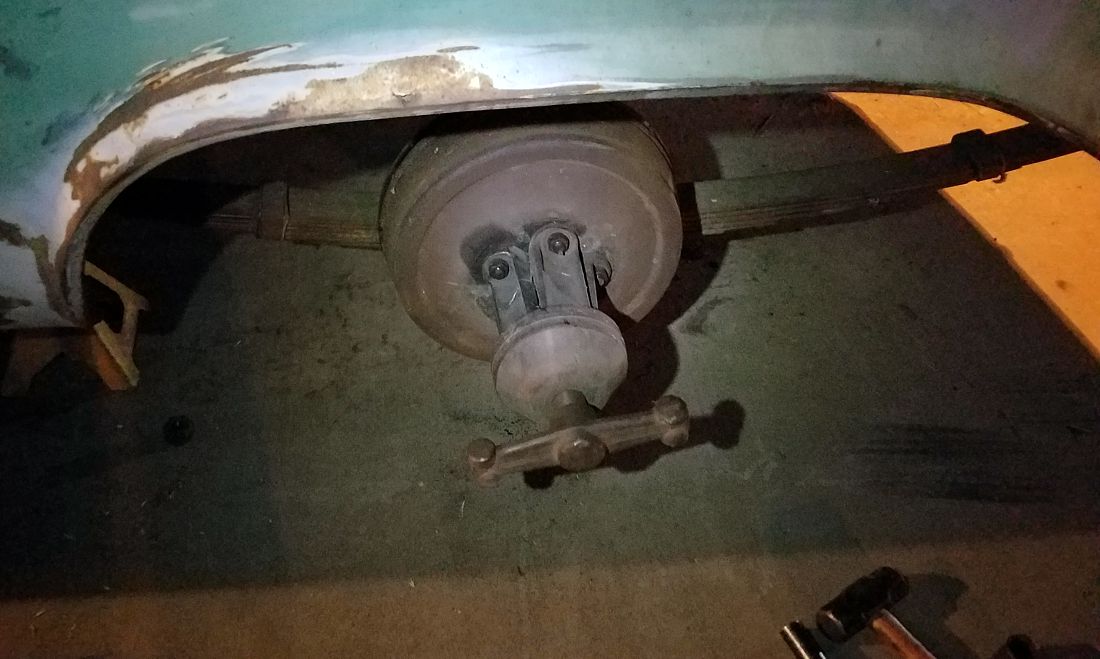
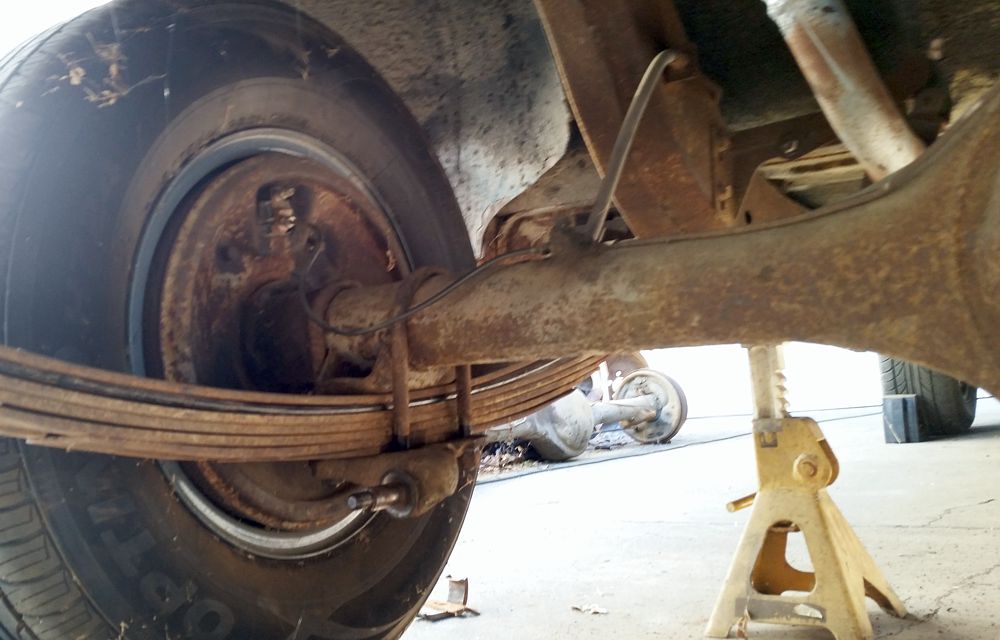
Location: So. Cal | The rear springs are a little too soft for my liking so I added a new 2nd leaf that I pulled out of the spring pak of my '58 Firedome a couple of years ago. It seems like it will probably be too stiff this way, but I'll give it a go first. If it ends up being too stiff, I'll take out the old 2nd leaf and try that. I'm also replacing the rear shocks and fuel tank to get it driving on the road. I also measured the gear ratio and found it to be 3.31:1. A little too low for my liking, so I will try to shorten the axles & swap in a set of 2.76 gears into it.
Edited by Powerflite 2021-08-28 11:20 AM
 (Tuquoise 58Fireflite Added Spring.jpg) (Tuquoise 58Fireflite Added Spring.jpg)
Attachments
----------------
Tuquoise 58Fireflite Added Spring.jpg (113KB - 178 downloads)
|
|
| |
|
Expert 5K+
Posts: 9650
Location: So. Cal | I got tired of looking at the rust under the trim on the right front fender. It bugged me because I didn't know how bad it really was under there. So I took it apart and checked it out. Turns out that it isn't very bad at all. There was a small section of rust through at the front face as well, but that was it. The vast majority of the fender is very rust free. So I decided to fix it so I didn't have to look at it anymore. I used small strips of scrap metal to fill into the voids and it came out quite well. It will require a little filler to smooth out the weld & grinding marks, but should be very thin. The front edge is straight now too, though my bent piece of trim does a lousy job of showing it off.
 (58FF Rusted Right Fender Hood.jpg) (58FF Rusted Right Fender Hood.jpg)
 (58FF Primed Right Fender Hood.jpg) (58FF Primed Right Fender Hood.jpg)
Attachments
----------------
58FF Rusted Right Fender Hood.jpg (127KB - 227 downloads)
58FF Primed Right Fender Hood.jpg (103KB - 227 downloads)
|
|
| |
|
Expert 5K+
Posts: 9899
Location: Lower Mainland BC | .
Nathan: Do you use Rust Converter on the back (hidden) side of the repair to slow down the rust "creep"?
Just curious.
|
|
| |
|
Expert 5K+
Posts: 9650
Location: So. Cal | I just sprayed some red primer/sealer into the backside after I finished welding. This isn't the final coat of primer for this fender and none of the backside is cleaned or prepped yet. I will likely sandblast the whole thing before it gets done for good.
The original fuel tank in this car has a rip in the bottom and lots of loose crap in it that looks to be a mixture of old gas, rust & dirt. Not very impressive, and the more you mess with it, the more comes out of it. I cleaned up another old tank I had and it looked quite good inside and on the bottom, but the top side was rusted out on it in at least 12 places over a large part of the top surface. Ugh. Too much work to mess with it. With that many holes over a large surface area, I would have to cut it all out, weld in a large new piece, and then braze over all my welds. I don't want to do that so I put it into the scrap bin.
The only other one I have that's the same style, is a new one that came out of my '57 Windsor. On that car, I had used a cap that was supposed to be vented, but apparently wasn't vented enough. It caused the tank to collapse and expand, causing a hole to develop at the sharp crease. I fixed that and used it again, but it happened again and I swapped it out. I hate to lose my $300 tank for good so I brazed over the hole to use on this car and it's now fully sealed. But I can see another sharp crease that I should braze over, just in case it has issues in the future. Once I do that, I'll primer & paint it again and install it to see how it goes. Hopefully, with a well-vented cap, I shouldn't have any further issues with it.
 (58FF Old Fuel Tank.jpg) (58FF Old Fuel Tank.jpg)
 (58FF New-Bent Tank.jpg) (58FF New-Bent Tank.jpg)
Attachments
----------------
58FF Old Fuel Tank.jpg (251KB - 224 downloads)
58FF New-Bent Tank.jpg (125KB - 225 downloads)
|
|
| |
|
Expert 5K+
Posts: 9650
Location: So. Cal | Now that I have the tank out, I am putting in a hitch to pull our camping trailer at the same time. This will give us a backup for using the Savoy. I was going to modify a hitch from a '99 Ford Windstar as it has the perfect width to work, but unfortunately, it places the reciever a little too high, and you have to insert it into the frame to get it out far enough, so it requires chopping up the frame rail. So I decided to make my own instead. I purchased about $45 worth of 1/4" thick plate & tube from a metal supply store. The tube will be inserted into the rear part of the frame and a receiver will bolt to it from below the frame. The rails will be welded to the tube and bolted further forward on the frame like a typical hitch. I hope it works out as well as I am planning.
 (58FF Hitch Frame Support.jpg) (58FF Hitch Frame Support.jpg)
Attachments
----------------
58FF Hitch Frame Support.jpg (213KB - 226 downloads)
|
|
| |
|
Expert 5K+
Posts: 9899
Location: Lower Mainland BC | Powerflite - 2021-09-02 12:45 PM I hope it works out as well as I am planning.
I presume that you have sketched this out in "3D" (isometric view). Always helps me to visualize what needs to be done.
That and going to bed (at night) and falling asleep thinking about it.
|
|
| |
|
Expert 5K+
Posts: 9650
Location: So. Cal | No, I'm just wingin' it on this one. It's pretty simple, I just have to determine where and how I am going to weld nuts to the structure. I'm not moving very fast on it, but I have the side braces done now.
I had decided to swap a 2.93 gear in a 983 case, so that it would be really easy get get highway gears; but I eventually decided that I really did want the 2.76 ratio after all. So I shortened the axles, installed the 2.76 gears, & set the preload properly. I will have to swap out the u-joint to a conversion joint because my driveshaft has the larger size on it, and the 741 case gears have the small size. I ended up needing to replace 2 studs that hold the backing plate on because, I determined that the small nuts they use can't take the load on them very well. So I replaced all the nuts with taller nuts from a later 8 3/4 housing. I was surprised to find out that the right side brakes were missing the brake shoe mounting pins, and yet, the brakes didn't have any noticeable issues on that side. I'm sure as I begin to use the car more though, that issues would have shown up, once I got at least 20 miles from home. I installed the proper hardware onto them to limit my future roadside adventures.
 (58FF Highway Gears.jpg) (58FF Highway Gears.jpg)
Attachments
----------------
58FF Highway Gears.jpg (178KB - 214 downloads)
|
|
| |
|
Expert 5K+
Posts: 9650
Location: So. Cal | I finally finished welding the hitch together and drilling & installing all the captured nuts in the tube. The 2 outside attachments on the rear face mount to the frame on the factory holes and the other two provide vertical supports for the receiver since it mounts further back than as designed; and these supports will make it much stronger. The cutouts on the braces are there to clear the brackets welded to the frame for the rear leaf spring attachment. Hopefully the welding hasn't caused it to shift much. We'll see tomorrow after I test fit it in the frame.
Edited by Powerflite 2021-09-18 12:37 AM
 (58FF Frame Inserted Hitch.jpg) (58FF Frame Inserted Hitch.jpg)
Attachments
----------------
58FF Frame Inserted Hitch.jpg (121KB - 219 downloads)
|
|
| |
|
Expert 5K+
Posts: 9650
Location: So. Cal | This is how it fits in the frame. Because of how it sits in there, it gives it a lot more strength than it would otherwise have. The bumper-mount style receiver will bolt to the bar using those 4 bolts, but also, to 2 bolts in the rear of the bar to give it additional support. I also installed the tank, but haven't cinched it up tight or wired up the new sender in it yet.
 (58FF Hitch Installed.jpg) (58FF Hitch Installed.jpg)
Attachments
----------------
58FF Hitch Installed.jpg (154KB - 216 downloads)
|
|
| |
|
Expert 5K+
Posts: 9650
Location: So. Cal | I replaced the pitman arm seal on the power steering box and replaced the driveshaft boot and put it all back together. I was wrong about needing a conversion joint. I had forgotten that the large pinion gears used the same size u-joint as the small pinion gears in the 50's era. So I just packed new grease into the u-joint and installed it. I also unstuck the fast idle cam with some carb cleaner, connected the fuel line to the gas tank, and put 5 gallons into the tank so I could go for a ride.
After I came back, I noticed my power steering still leaking. Not as bad as before, but not good. At first, I thought it was coming from the pitman arm again, but upon closer inspection, I see it is coming from the upper seal by the column connection! It doesn't usually leak from there. I'm not going to tear it apart just to replace that seal, as I would rather just get it rebuilt instead. But hopefully it doesn't leak bad so I can drive it a little before I have to do that. I liked how it handled with the additional leafs & new shocks. It's just a little too stiff, but should be perfect for towing my trailer. So I decided to install the leaf spring clamps back onto the springs. I didn't want to use the original bolt to hold it as it isn't captured, and just spins, and it would be difficult to get it back on with the additional thickness. So I just welded them together. Probably no more work to get them back apart than to deal with that bolt again anyway.
I am hoping to take this car to John's party at BigM on Friday-Sunday, but I'm not sure I can get the registration done & work out any new bugs in that short amount of time....
 (58FF Spring Clamps Welded.jpg) (58FF Spring Clamps Welded.jpg)
Attachments
----------------
58FF Spring Clamps Welded.jpg (106KB - 219 downloads)
|
|
| |
|
Expert 5K+
Posts: 9650
Location: So. Cal | I drove the car down for VIN inspection & registration. The DMV inspector lady was very clueless. After she had looked over the car, including the engine compartment, I mentioned to her that these old cars don't require a 2nd VIN inspection. She told me that I didn't even have a 1st VIN on it! So I pointed it out to her, as she was staring right at it. She said that it's missing too many digits. Then she told me that the half-ripped off sticker on the rear door jam would need to be replaced, and was required. I said, really? So I looked at it, and it was a spark plug sticker noting when they were last changed. I told her that she didn't have any idea what she was talking about, as those official stickers weren't used until 1970 - and to go look it up. That must have worked because she transferred me to another person and I got it done. You never know what kind of hassle you're going to have to go through due to absolute cluelessness. The government really needs to train these people if they are going to do this job. It's not like this car is a 1934 Auburn or something.
On the way back from the DMV, I noticed my timing was too far advanced, or that I need to run a better grade of fuel. So I'll probably try retarding it a little. Also, at one point I smelled brake lining burning and afterward, my brake pedal dropped significantly. Not sure what happened with them so I'll need to check it out. The power steering is still leaking, but it isn't too bad now. I just have to keep an eye on it every now and then. The e-brake holds really well in the forward direction, but pretty lousy in the rearward direction. Anyone know what would cause that?
I took the car to it's first car show this morning. It's funny to see people's reaction. Most people have no idea these cars even exist and have never seen one before. They also tend to think that the roof rust can't be fixed.
 (58FF Licensed.jpg) (58FF Licensed.jpg)
Attachments
----------------
58FF Licensed.jpg (182KB - 211 downloads)
|
|
| |
|
Location: The Mile High City | Congratulations, Nathan! Registration is a big step forward for this car. I wish I could help with that weird e-brake issue, but I have no clue what might be the cause. I usually try to have patience with those DMV folks - they train them to deal with about 95% - the rest they have to learn on the job. All's well that ends well, right? Cheers and congratulations again! It has been a treat to see all your amazing work pay off. I bet the brakes could be readjusted. Sometimes the first drive can kick the springs in funny ways. Maybe a spring broke? One more back on the road!
Edited by Lancer Mike 2021-10-09 10:22 PM
|
|
| |
|
Member
Posts: 31
Location: South Australia | Yes congratulations Nathan, the rate at which you resurrect these vehicles is amazing! Great stance on this vehicle too, thumbs up. |
|
| |
|
Expert 5K+
Posts: 5006
| yeah parking brake has pull(the little nut on the cable and spread adjustments), the adjustment for throw is probably okay, maybe just widen it a bit?
I had to put the rear end up off the ground to test mine. you can feel/hear the pads working with engine off(i turn tire with my foot have someone pull and release. if you take the cover off you can carefully put you hand up in there and see how he pad moves out and in. |
|
| |
|
Expert 5K+
Posts: 9650
Location: So. Cal | Thanks Mike & Ian, I'm really happy about being able to use it. I think this is my first '57-'58 big body car that I can actually drive around, more than around my yards.
I checked out the brakes and found that the rear reservoir was completely empty! Good thing I have a dual master on there. I was braking on borrowed time. Checking it out, I found that the right rear wheel cylinder decided to blow. When will I learn to just replace all the hydraulics whether it works or not? It would probably save me a lot of trouble that way. I replaced the wheel cylinder and got it bled again. While it's up on stands I decided to do a bunch of stuff that I want done before I take it back down again. I have also installed a PCV to it now. It should run without as much engine smell coming into the cab now. Another good reason to run the later style carb on there. It has the port on it for the PCV connection. Nice. This carburetor looks terrible, but it runs really well. Next, I'll pull the driveshaft back off & check out the e-brake to see if there is anything obviously wrong with it.
Edited by Powerflite 2021-10-11 3:50 PM
 (58FF PCV Install.jpg) (58FF PCV Install.jpg)
Attachments
----------------
58FF PCV Install.jpg (210KB - 216 downloads)
|
|
| |
|
Expert 5K+
Posts: 9650
Location: So. Cal | I didn't see an issue with the park brake, but when I went to put the drum back on, that inner spring popped off pretty easily. I'm looking to see if I can get it to fit on more securely, and try adjusting the dial to see if that helps. After trying to get it back together, I realized that the spring wasn't fully seated on one side. And the reason was because there was interference from the brake support spacer sleeve. I tried to push that down around the inside of the rubber "brake support spacer", but for some reason, I couldn't get it to go down all the way. The only way I can make it work is to remove that sleeve from the assembly. I don't know what is causing the interference, but I suspect that the rubber on the support spacer is too hard and jamming it up. Would it be OK to run it without the sleeve?
Edited by Powerflite 2021-10-11 9:17 PM
 (58FF Park Brake.jpg) (58FF Park Brake.jpg)
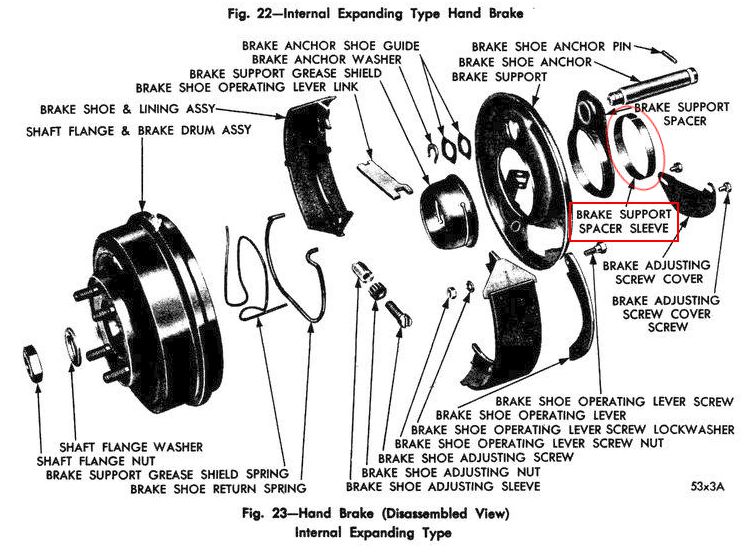 (eBrakeDiagramFrom58ChryslerFSM.jpg) (eBrakeDiagramFrom58ChryslerFSM.jpg)
Attachments
----------------
58FF Park Brake.jpg (129KB - 251 downloads)
eBrakeDiagramFrom58ChryslerFSM.jpg (99KB - 237 downloads)
|
|
| |
|
Expert 5K+
Posts: 9650
Location: So. Cal | I tried multiple times with various methods, but I can't get that sleeve to sit far enough down to make it work. I would have to tear the whole thing apart to do it, and probably end up having to replace the rubber support as well. So I just took the sleeve out and put it back together. It seems really tight & solid now, unlike before, and seems to have fixed the problem. I hope it doesn't wear into the trans without the sleeve in there. We'll see. I'll have to keep an eye on it for any changes in how it works. I also replaced the front shocks with some much better KYB's and retarded the timing a little to prevent the pinging I experienced before. I'll give it another test run tomorrow and see how it goes.
The fuel gauge isn't currently working, even though I have power out at the sender and the sender is working great with the proper resistance. Looks like I'll probably have to swap out the gauge, but in the mean time, I am bringing along an ohm meter to measure how much fuel is in the tank when I need to know. |
|
| |
|
Expert 5K+
Posts: 9650
Location: So. Cal | I test drove it that day for less than a mile from my house, the night before fall fling, and all disaster broke loose. Every time I stepped on the brake, trans fluid would puke out of the dipstick - lots of it. But I didn't know about it until after I turned around to come back home and saw the long trail in front of me. As I was turning around, the rear tire side-swiped a broken cinder block and ripped the side wall. Part of the tire also came apart and snapped off the brake line to the wheel cylinder. So I had no rear brakes, a bad tire and very little transmission fluid in the car, all from a short 1 mile run. The engine bay & front bumper were also drenched in trans fluid. I managed to get it home and figured out that the vent hole at the top rear of the trans was probably plugged. I foolishly decided to separate the rear-most plate from the trans so I could get to whatever was plugging it up. Big mistake, because once those rear bolts are removed, nothing keeps the trans internals from falling out everywhere because the internal C-clips aren't strong enough. I heard some bearings fall out into the trans pan and knew it was game-over.
So I swapped the transmission from the '57 New Yorker 4drht into it, which was a very low mileage car (albeit, very rusty!). The steering box was also leaking more and more from the top of it now, so I decided to take it out and get it rebuilt at the same time. I took it to a local rebuild shop and they seem to have done a good job with it, but I haven't driven it yet. I have just tested the trans & gear box with the whole car sitting on jack stands, and everything seems to be working well so far. But for some reason, my speedometer stopped working now. Not sure why yet. The power steering hose also starting leaking once I messed with it, so I replaced it, but it doesn't seem to fit very well for some reason. I'm not sure how it was supposed to be routed. I'm just glad it isn't hitting the exhaust like my heater hose was. I used some plastic ties to tie it to the other hoses and keep it away from there.
 (Transmission Vent.jpg) (Transmission Vent.jpg)
 (58FF Rebuilt Gear Box.jpg) (58FF Rebuilt Gear Box.jpg)
Attachments
----------------
Transmission Vent.jpg (227KB - 185 downloads)
58FF Rebuilt Gear Box.jpg (137KB - 181 downloads)
|
|
| |
|
Expert 5K+
Posts: 9650
Location: So. Cal | While it is up on jack stands, I decided to tackle the wheel well rust. I took a grinder to remove the bondo on the right rear and found an expected dent in the quarter and very little metal left around the outer structure. The outer rim was also bent in from the bondo and de-bondo process so it was hard to figure out where everything belonged without a good replacement panel. So I cut a section from the wheelwell of the 300D I parted out. I had to fix a couple of small rust spots in it first, but nothing extensive. It also isn't long enough to do the entire area, as it was rusted at the bottom, but at least it put it back to the proper shape & position. I also compared the final width of the lip to my other cars before I welded it in place.
At the left side, I found a single small rust hole in it. So I hit it with a wire wheel and another small portion of the panel below it caved in from rust as well. There are likely more issues at the very bottom too, but I didn't want to dig into them yet. I made some simple patch pieces for that side and welded those in as well. I still have to weld in patches on the inner panels, but that will likely have to wait for another time.
Edited by Powerflite 2022-01-19 7:07 PM
 (58FF Right Quarter Rust Exposed.jpg) (58FF Right Quarter Rust Exposed.jpg)
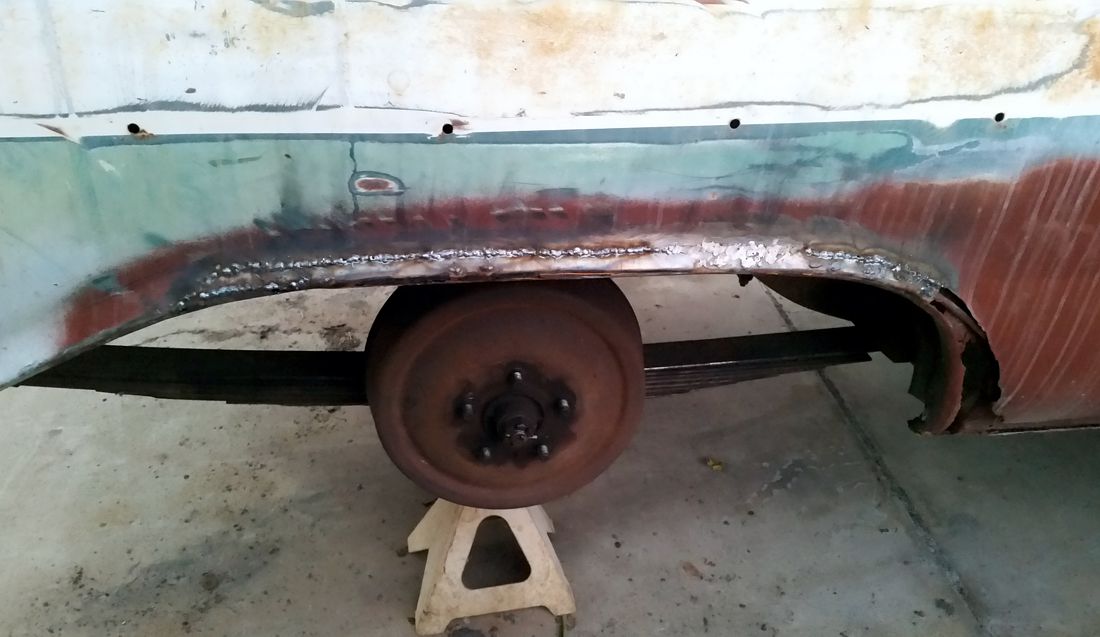 (58FF Right Wheelwell Welded.jpg) (58FF Right Wheelwell Welded.jpg)
 (58FF Left Wheelwell Welded.jpg) (58FF Left Wheelwell Welded.jpg)
Attachments
----------------
58FF Right Quarter Rust Exposed.jpg (139KB - 180 downloads)
58FF Right Wheelwell Welded.jpg (90KB - 172 downloads)
58FF Left Wheelwell Welded.jpg (124KB - 168 downloads)
|
|
| |
|
Expert 5K+
Posts: 5006
| My trans was puking also, and it wasnt plugged.. My new trans so far is working good and I used a brand new torque converter.
I havent busted into the trans yet. You can actually remove that vent plug from the trans, just pry it out. I doubt its clogged... its the reverse servo or something locked up, causing it to puke. |
|
| |
|
Expert 5K+
Posts: 9650
Location: So. Cal | I pulled the vent cap on all 3 of my transmissions. The '59 Sport Fury trans was plugged with a gasket that went over the hole on the inside. The '57 New Yorker 4drht trans (which I doubt has ever been touched) that I am using now was perfectly clear. And it turns out that my '58 Fireflite trans was also covered by the tailshaft gasket. So I'm not sure what to think, but it's odd that two of these transmissions have a gasket that's covering the outlet. I'm not sure if that was the problem on the Fireflite trans or not, as you say, it could have been caused from something else. But I'll be sure to check for it in the future, just in case.
I had just enough time today to clean up the welds on the wheelwells. They came out pretty well, but I can feel a low spot on the left side that I need to fill with more metal, as well as going back over both sides to eliminate all the little holes you can see by shining a light up through it. I'll tackle that tomorrow. After I clean up the welds again, then I'll give it a layer of sealer to more easily detect any high spots that I missed, and cut them down.
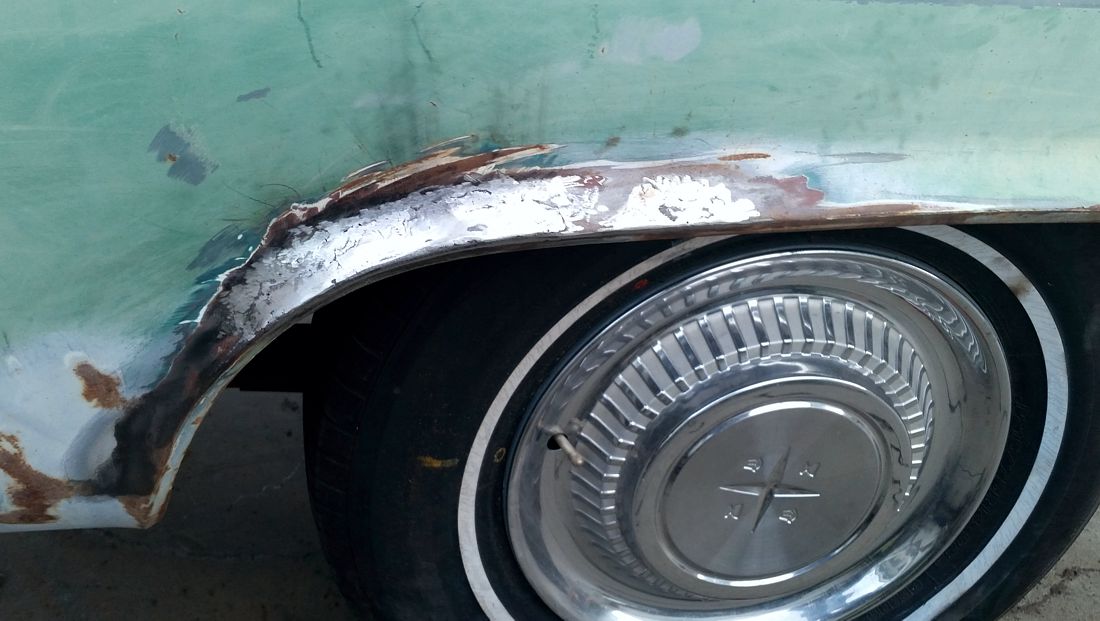 (58FF Left Wheelwell Welds Cleaned.jpg) (58FF Left Wheelwell Welds Cleaned.jpg)
 (58FF Right Wheelwell Welds Cleaned.jpg) (58FF Right Wheelwell Welds Cleaned.jpg)
Attachments
----------------
58FF Left Wheelwell Welds Cleaned.jpg (122KB - 176 downloads)
58FF Right Wheelwell Welds Cleaned.jpg (83KB - 182 downloads)
|
|
| |
|
Elite Veteran
Posts: 1157
Location: D-70199 Heslach | Nathan,- it looks that the wheelwell fix quickly |
|
| |
|
Expert 5K+
Posts: 9650
Location: So. Cal | Thanks Tom, it's nice to have quick progress after working on the trans & steering box for a while. The left side was pretty easy, but the right is going to require quite a bit more work still.
I forgot to mention that whenever the quarter panel loses the connection to the wheelwell like mine did, that the weight of the body will sag and cause an outward bow in the quarter panel. And this car was no exception. The bow is slight, and hardly noticeable until you look down the panel or put a straight edge to it. So to fix it properly, you have to press a long, straight board to the side of the panel to straighten it, and then weld the wheelwell lip to it. The bottom part of the lip that runs horizontally gives it the most structural strength in that direction, so it's critical that that part gets welded while the panel is straight. If not, you will permanently weld that bow into the panel. After finishing the welding and removing the 2 x 8" board that was pressed against the panel, the quarter panel is now straight again. |
|
| |
|
Expert 5K+
Posts: 9650
Location: So. Cal | I managed to pick up a set of NORS fender emblems for the car. I'm not sure who made these, George Laurie maybe, or maybe Emblem Magic. But I got a good price on them so I was happy about it. They will replace the nasty looking ones that I currently have.
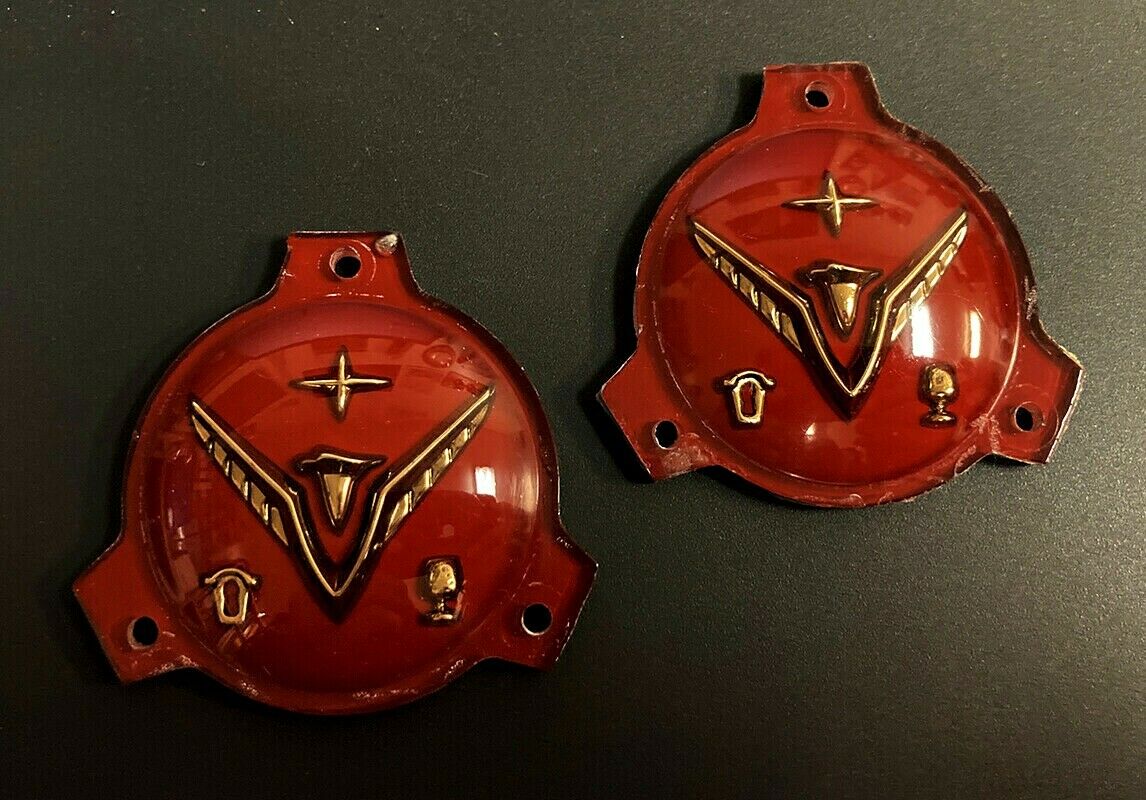 (58Fireflite Emblems.jpg) (58Fireflite Emblems.jpg)
Attachments
----------------
58Fireflite Emblems.jpg (158KB - 183 downloads)
|
|
| |
|
Expert 5K+
Posts: 9650
Location: So. Cal | I am very happy to pick up a full set of roof trim for this car, along with the bottom rear window trim. It hides all the roof rust quite nicely. Now I don't have to cannibalize the parts from my red Fireflite. I'll have to put all the trim screws back in place now, after I fix the rusted sections.
 (58Fireflite Roof Trim.jpg) (58Fireflite Roof Trim.jpg)
Attachments
----------------
58Fireflite Roof Trim.jpg (147KB - 162 downloads)
|
|
| |
|
Location: The Mile High City | Hi, Nathan - that is a great price on those emblems! The seller, Ed is a really cool dude too. Did you get that $49 button emblem on eBay in December too? That was a steal-yo! |
|
| |
|
Expert 5K+
Posts: 9650
Location: So. Cal | Yeah, I purchased 4 of the plastic emblems for both cars, and I found out they were made by Pati here near Long Beach, California. That's good news because I believe she is making more of them and she has her gold plating on plastic worked out really well now, so they look really good. But no, I didn't get the $49 emblem. Must have been someone else. I purchase one from Mopar Mel, of all people, and actually received it, but I still need more for my other car.
Mike, if you can get her an original '58 Adventurer hubcap emblem, I'm sure she could make them for us. I would like a bunch of them as well, but I don't have one to copy.
Edited by Powerflite 2022-02-25 11:27 AM
|
|
| |
|
Elite Veteran
Posts: 649
Location: Finland | That`s a sharp finned parking lot you got there Nathan...awesome.. |
|
| |
|
Location: The Mile High City | Powerflite - 2022-02-24 6:38 PM if you can get her an original '58 Adventurer hubcap emblem, I'm sure she could make them for us. I would like a bunch of them as well, but I don't have one to copy. I'm working on it! Finding one of those is tough! I didn't realize Ed had more than one set of those emblems. Glad you picked them up. This one will make you green button emblem |
|
| |
|
Expert 5K+
Posts: 9650
Location: So. Cal | Thanks Ralf. I purchased four '56 Plymouth coupes recently so I could make a fun lineup if I put them all together. 
Mike, oh, I did purchase that! My mind had hazed it over for some reason. So I only need one more now. I guess my mind is aging faster than my body. |
|
| |
|
Expert
Posts: 3967
Location: DFW, TX | Powerflite - 2022-01-19 5:37 PM
The power steering hose also starting leaking once I messed with it, so I replaced it, but it doesn't seem to fit very well for some reason. I'm not sure how it was supposed to be routed.
Is it the same for '57? I think the '58 power steering bits are different, but can't remember what is changed. Comparing your photo to my car, maybe the hose is routed backwards. Not sure.
 (20180308_211934.jpg) (20180308_211934.jpg)
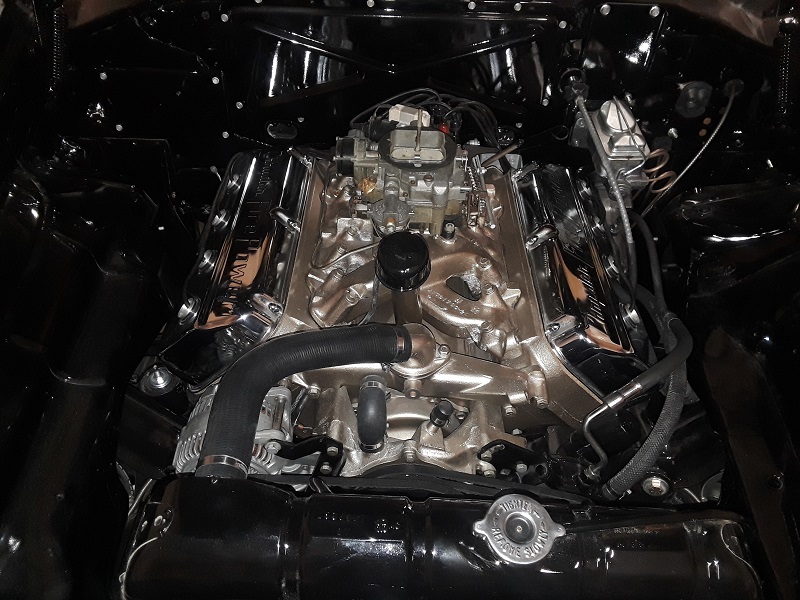 (20180308_212000.jpg) (20180308_212000.jpg)
Attachments
----------------
20180308_211934.jpg (233KB - 159 downloads)
20180308_212000.jpg (203KB - 156 downloads)
|
|
| |
|
Expert 5K+
Posts: 9650
Location: So. Cal | Thanks Danny, the fittings are completely different on either end so I can't swap it around. I made a custom hose on my '57, so it fit awesomely. But I think this one is designed more for later applications as they said it worked from '57-'68. I'll take a look at my old one and see how I can modify it to make it route better. |
|
| |
|
Expert 5K+
Posts: 9650
Location: So. Cal | I purchased some new wheels for this car from the fling and put new whitewall tires & '56 Chrysler spinner wheelcovers onto it. The DeSoto just looks right with these covers. I really like them on there. The front has a '55 base cover, while the back is using the '56. Trying to decide which one I like better, but I am leaning toward the smooth '56. While it is up, I'm going to replace the speedometer cable. I had tried to mend the broken end on it before, but it didn't hold. Now I have a replacement for it, so that should solve the problem.
Edited by Powerflite 2022-05-21 12:36 AM
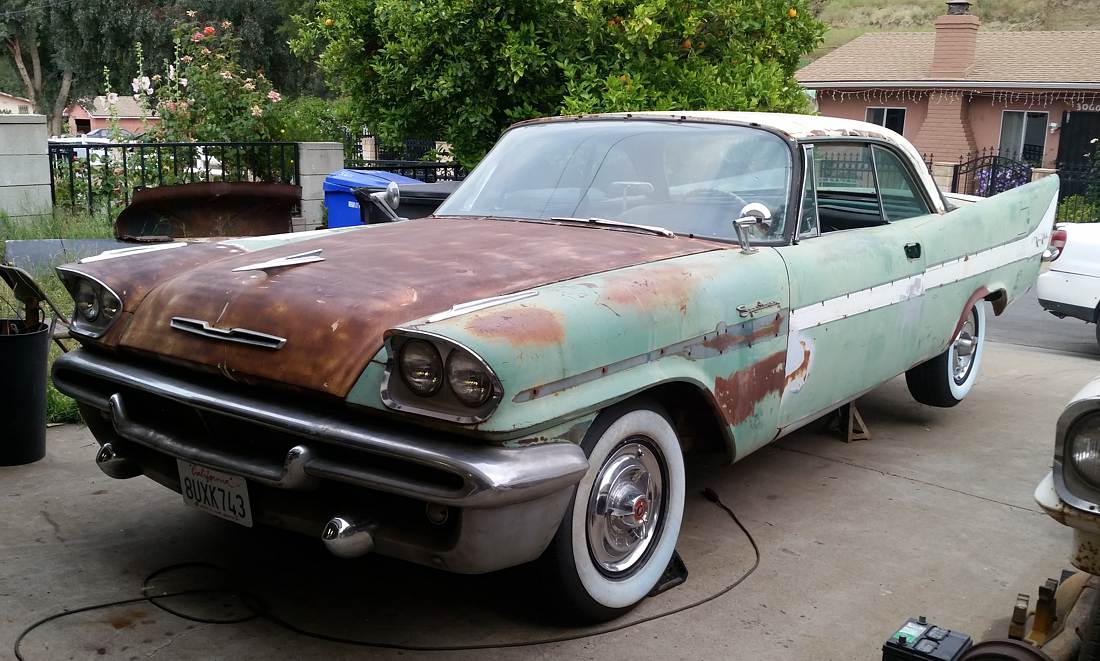 (Turquoise 58FF Whitewalls.jpg) (Turquoise 58FF Whitewalls.jpg)
Attachments
----------------
Turquoise 58FF Whitewalls.jpg (157KB - 133 downloads)
|
|
| |
|
Location: The Mile High City | No doubt, Nathan! Once you have the spinners, the pie plates lose any luster they may have had (which twern't much). You should try pairing one with the 57 wheel covers. They look good and you can say that really is a 58 De Soto wheel cover. Cheers! Mike |
|
| |
|
Expert 5K+
Posts: 9650
Location: So. Cal | Yeah, I prefer the look with the '57 DeSoto covers, but I hate 14" wheels. So that means I have to use the Chrysler covers instead. The smooth '56 Chrysler cover does looks surprisingly good with them though, so I'm not complaining.
 (58FF Chrysler Wheelcover.jpg) (58FF Chrysler Wheelcover.jpg)
Attachments
----------------
58FF Chrysler Wheelcover.jpg (118KB - 133 downloads)
|
|
| |
|
Expert 5K+
Posts: 9650
Location: So. Cal | I was wrong about the speedometer. My repair to the cable held up fine. The gear in the transmission was stripped for some reason and it was difficult to turn. I swapped it out for the gear from the original trans and now it works again.
The door latch stopped working on the car, getting jammed everytime you try to close the door. So I took it out and replaced it with one from the '57 Windsor I parted out. I lubed it up really well before I installed it. While I had the door panel off, I installed an outside door handle into the driver's side as well. As usual, I had to modify the attachment point to the latch in order to get it to work flawlessly. Now I can open and close the door properly again. It's the little things that count
 (58FF Munched Speedo Gear.jpg) (58FF Munched Speedo Gear.jpg)
Attachments
----------------
58FF Munched Speedo Gear.jpg (50KB - 134 downloads)
|
|
| |
|
Location: The Mile High City | Hi, Nathan - I have a full set of those smoothies for the '56 (minus the spinners now) that are in really nice shape. Do you want 'em? |
|
| |
|
Expert 5K+
Posts: 9650
Location: So. Cal | I have the smoothies from these spinner caps as well. But if you don't want them, I'll take them. I think 1 or 2 of mine are dented. Let me know the shipping and I'll pay you for them.
The left valve cover on this car had been swapped out for a later '59-'64 4 bolt version at one point. The right side is the original, but is dented in near the down draft tube area. It's fixable, but it's easier to just replace it. I was able to find a set of replacements on Ebay for a good price as it seems he didn't know what he had. Looks like someone installed their '58 361 into a charger or other muscle car at some point. I'm going to clean them up, paint them silver and install them on this car to make it correct again.
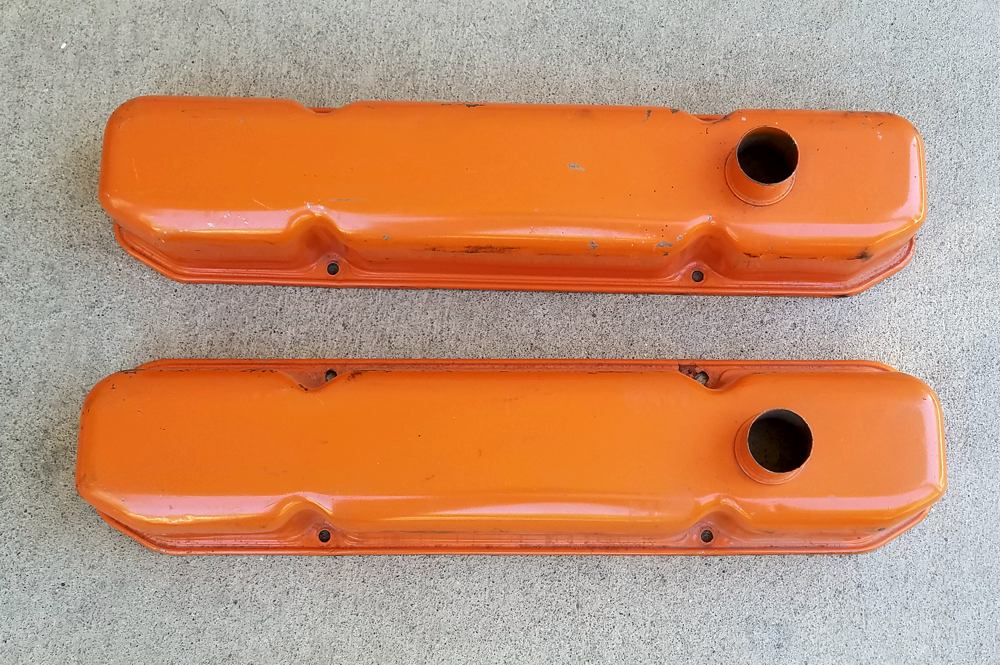 (58DeSoto Valve Covers.jpg) (58DeSoto Valve Covers.jpg)
Attachments
----------------
58DeSoto Valve Covers.jpg (172KB - 129 downloads)
|
|
| |
|
Expert 5K+
Posts: 9650
Location: So. Cal | The covers weren't as straight as I thought they were. There were a number small dents in it that required fixing. I didn't need to use any filler afterward, but I did need a good layer of primer to sand down into the fixed areas. They're now straight enough to paint and I'll install them once my new gaskets arrive in the mail.
 (58FF Valve Covers Sanded.jpg) (58FF Valve Covers Sanded.jpg)
Attachments
----------------
58FF Valve Covers Sanded.jpg (129KB - 127 downloads)
|
|
| |
|
Expert 5K+
Posts: 9650
Location: So. Cal | The engine bay looks slightly better now. But it's gonna take more than a nice pair of valve covers to make it good. At least I have the right covers on there now.
Edited by Powerflite 2022-06-16 1:39 AM
 (58FF Valve Covers.jpg) (58FF Valve Covers.jpg)
Attachments
----------------
58FF Valve Covers.jpg (172KB - 133 downloads)
|
|
| |
|
Expert 5K+
Posts: 9650
Location: So. Cal | I tried to take the car to a car show last night, but it completely died on the freeway on the way there. At first, it seemed like I had run out of fuel, but after giving it fuel, it still wouldn't start. I had to call a tow truck to take it back home. Turned out that the ignition module died on me. That's the first one to give me any trouble from all my vehicles, and this one wasn't very old, with very few miles on it. Weird. It might be that my generator is putting out some voltage spikes that killed it. I'll have to get an oscilloscope to check it out. But it seems that I need to carry an extra module on me now, whereas, I have never worried about it before. I put a combined 120K miles on my '56 Plymouth, '67 Cuda, '63 Nova with the same module and all of them are still working. But this wasn't a very fun experience.
Also after I replaced the ignition module, I had to give a little more clearance to the brake pushrod. It worked great when it was cold, but as the temperature of the car increased during the heat of the day, the pushrod & pedal assembly would expand with the heat and push on the brakes, causing a drag. Figured it out when I came back from a trip and the car started to bog down in the middle of driving. I smelled brakes so that gave me the clue for what the problem was.
Edited by Powerflite 2022-06-19 1:23 AM
 (58FF Dead on Freeway.jpg) (58FF Dead on Freeway.jpg)
Attachments
----------------
58FF Dead on Freeway.jpg (130KB - 131 downloads)
|
|
| |
|
Regular
Posts: 59
| I've enjoyed catching up on your thread, Powerflite.
Your efforts are an inspiration!
Thank you for sharing -- what's the latest? |
|
| |
|
Location: The Mile High City | Ugh! I had some trouble with mine too - just really hard to start. I didn't leave me stranded on the highway though. It is good you were able to get it well off to the side - that is always scary. It seems like the exact replacement is super crazy expensive. However, you can get a decent replacement for about $14. I always keep a spare!
Edited by Lancer Mike 2022-08-23 11:06 PM
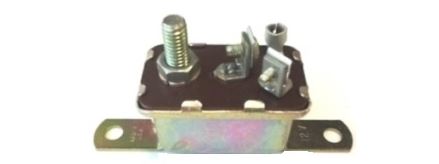 (Starter Relay.JPG) (Starter Relay.JPG)
 (starter relay.JPG) (starter relay.JPG)
Attachments
----------------
Starter Relay.JPG (13KB - 103 downloads)
starter relay.JPG (76KB - 109 downloads)
|
|
| |
|
Expert 5K+
Posts: 9650
Location: So. Cal | 57Fireflite - I am in a never ending cycle of moving and not moving so my priorities have been to get as many of my vehicles as mobile as possible. This one is very mobile now, so I am not doing much with it anymore. Unfortunately, I have been working 300 miles from home so I haven't been doing much to anything else either.
Mike - Yeah, that picture on the freeway looks pretty safe and tame, but those cars & trucks are moving at 80+ mph and pretty scary being parked even where it is. I waited for the tow truck far away from there, just in case someone happened to be texting at the wrong time. The device you are talking about is the starter relay. That's not what caused my problems. It was the electronic ignition module that replaces the points. I've since rigged up an easy replacement that could be attached quickly on the side of the road without unscrewing the old one from the distributor. It just requires creating a good ground wire and a little heat sinking to make it work.
The most recent update on this car is that the whitewalls that I purchased from Cali Tires have been separating from the tires. There are large bulges in the whitewalls now and need to be warrantied. They said they had an issue with the attachment process. Not fun after everything is mounted up already.
Edited by Powerflite 2022-08-26 12:24 AM
|
|
| |
|
Location: The Mile High City | Aha! Petronix! I've wondered about converting to that system. That stinks about the tires! As long as they make it right though.
Edited by Lancer Mike 2022-08-29 8:52 PM
|
|
| |
|
Expert 5K+
Posts: 9650
Location: So. Cal | I found a probable cause for the electronic ignition failure. On all my other cars, I use different coils with various primary resistances from .6 to .3 ohms. My favorite coil is the Pertronix 60103 with a 0.32 ohm primary resistance. That's what I've been using in my '56 Savoy, '58 Coronet and '70 Satellite, with many collected miles between them. My '67 Cuda uses an older aftermarket coil that came with the car and still works well so I've never changed it.
I've never really known what limit on primary resistance that an HEI module can realistically go down to. This Fireflite is the only car that I have run with a Pertronix 60100 coil with a primary resistance down to 0.02 ohms. Really small! It's been working, but I suspect that over time, this low resistance eventually cooked the ignition module, especially as hot as it had been during the time I was running it. It might work better if I were to run it on a good, separate heat sink, but it's probably not worth the effort. Since I have other coils, I'll just swap it out for the 60103 and hopefully that should solve the problem.
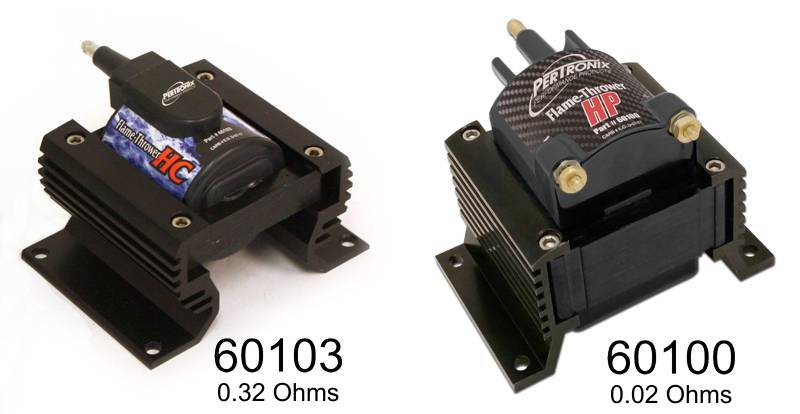 (PNX-60103-60100.jpg) (PNX-60103-60100.jpg)
Attachments
----------------
PNX-60103-60100.jpg (40KB - 94 downloads)
|
|
| |
|
Expert 5K+
Posts: 9650
Location: So. Cal | After I get the floor work done on the New Yorker, I'm going to work on this one again.
 (1958 DeSoto Waiting.jpg) (1958 DeSoto Waiting.jpg)
Attachments
----------------
1958 DeSoto Waiting.jpg (124KB - 71 downloads)
|
|
| |
|
Expert 5K+
Posts: 9650
Location: So. Cal | This car has been running OK, but it never ran well enough for me to really trust taking it long distances. It seems to struggle to get to speed more than it should, but I'm not really sure what the problem may be, if it's ignition, carb, or compression. I've decided to figure it out and fix it so I can begin to drive it more regularly. I pulled the plugs (for the first time!) and they looked OK, other than the small .035" gap. Unfortunately, I broke 2 of them trying to get them out, so I'll just replace all of them. I found two plug wires that were still working, but the boots were fried on the exhaust heat shield, so I'll get a new set of those too, since they are all quite old.
I ran a compression test and found #6 & #8 were a little lower than the others.
1: 97 _______ 2: 100
3: 100 ______ 4: 102
5: 95 _______ 6: 85
7: 95 _______ 8: 92
Those two cylinders also took longer to come up to full compression, by one rotation. I'm not sure a 15% drop on one cylinder is worth the trouble of rebuilding the head though. What do you think? Will it make a huge difference or should I just live with it?
I'm really tempted to install a FiTech fuel injection unit on it instead of messing with the carburetor. The only trouble will be installing a compatible efi pump and return line, but I'm tempted to go for it. I'd also have to weld a larger opening into the air cleaner to make it work. Still mulling it over.
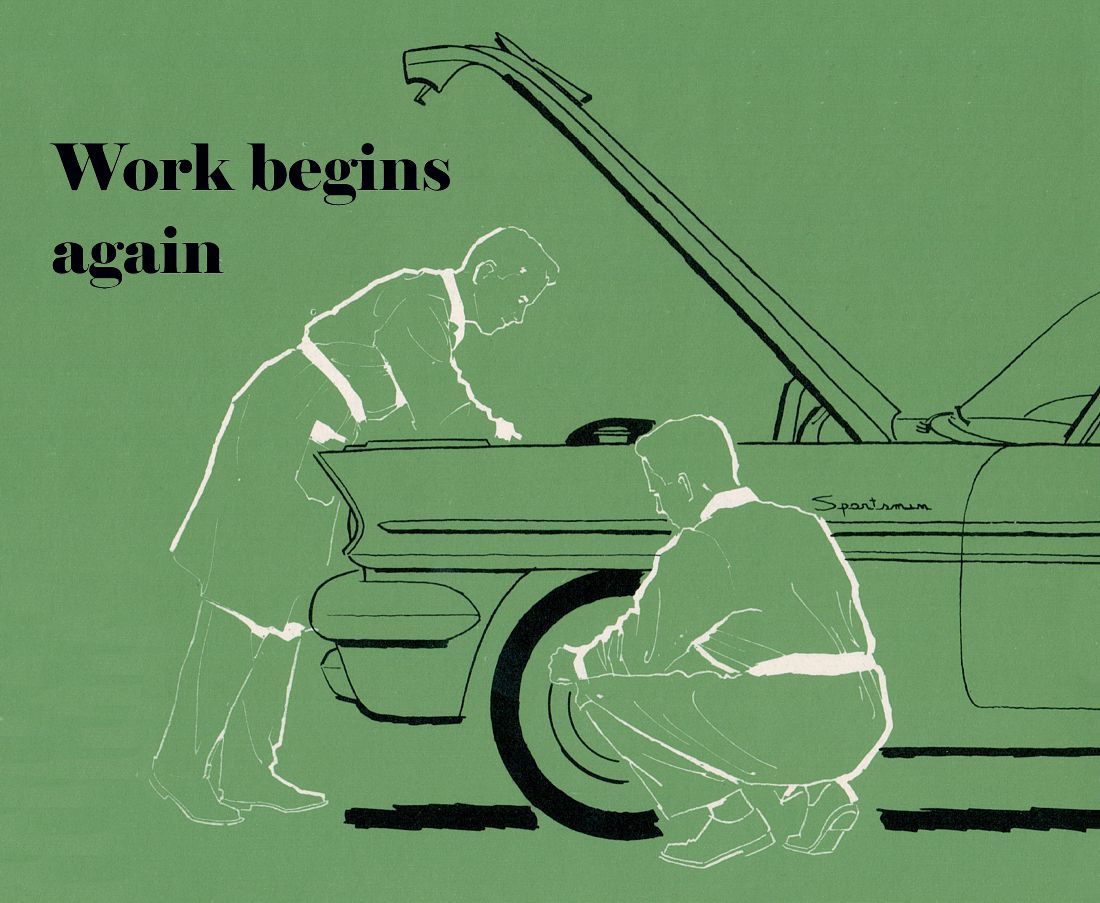 (1958 DeSoto Work Begins.jpg) (1958 DeSoto Work Begins.jpg)
Attachments
----------------
1958 DeSoto Work Begins.jpg (137KB - 68 downloads)
|
|
| |
|
Elite Veteran
Posts: 1157
Location: D-70199 Heslach | I would leave the heads on it - as long as the compression is still "reasonably" okay
Nathan,- I like "your" illustrations |
|
| |
|

Board Moderator & Exner Expert 10K+
Posts: 13045
Location: Southern Sweden - Sturkö island | Run the engine to operative temperature. Do a new compression test. Pump in a couple of squirts of engine oil in the cylinders with lower values. If you get higher values, it's the piston rings. If the values are the same, its the valves.
Run all compression test with WOT.
If it's the rings, then Rislone compression repair additive might help. This one https://www.amazon.com/Rislone-4447-Compression-Repair-Ring/dp/B00CG...
|
|
| |
|
Expert
Posts: 3967
Location: DFW, TX | Powerflite - 2023-02-17 1:01 AM
I ran a compression test and found #6 & #8 were a little lower than the others.
1: 97 _______ 2: 100
3: 100 ______ 4: 102
5: 95 _______ 6: 85
7: 95 _______ 8: 92
I would probably just leave it alone, but those numbers are definitely weak. Perhaps the timing chain is a little sloppy, causing a drop across all cylinders? My untouched 9:1 '57 392 was 120-130 in every hole the last time I checked it. |
|
| |
|
Expert 5K+
Posts: 9650
Location: So. Cal | Thanks for the advice guys. Interesting that your 9:25:1 hemi is that high. This engine is supposed to be 10:1, but it looks to have been rebuilt before, so who knows what is in it now. I went to Autozone and asked for plugs & wires, and they couldn't even order platinum plugs for it and no longer make the wires for the big block Chrysler. I don't know why I even bother going to these places anymore. I always end up having to buy the stuff online anyway. But I took your advice and tried to fix it without tearing it apart. I put some used Autolite plugs I had that were decent into it, after cleaning & re-gapping them bigger to .049", and I replaced that Pertronix 60100 coil with a Pertronix 60103 coil. Then I filled the carb vents with carb cleaner and ran it through the motor.
After it warmed up a little bit, and the idle speed dropped, it started to miss. I re-adjusted the idle speed mixture screws and found they were a little uneven and opened them up a little as well. After that, it idled much better, without noticeably missing, and I took it for a spin. MUCH better now! That made a huge difference. Instead of feeling anemic, it has decent power as it should. I am betting that the really high power coil I had in there didn't like the small plug gaps, causing things to overheat with too much current. So it may have been a contributing factor to how it ran, and the self destruction of the HEI ignition module. There is probably more that could be tweaked out of it, but I'll hold off converting to EFI for the time being and start driving it around more to work out any hidden bugs.
I felt a little transmission slippage when it shifted to 2nd, but it didn't do it twice, so I'll see how it goes. Maybe it was just cold. It does have a full amount of fluid in it, and there are NO drips from the entire car now, which is amazing. Next up is to fix the fuel gauge, which doesn't work for some reason. The sender & tank are new, so it's a problem at the gauge end. |
|
| |
|
Expert 5K+
Posts: 9650
Location: So. Cal | I was going to do some rust repair on the roof yesterday and today, but it was raining all day yesterday, and I woke up to snow on the car this morning. I really need to move to a better place with a bigger garage.
 (Driveway Snow.jpg) (Driveway Snow.jpg)
Attachments
----------------
Driveway Snow.jpg (151KB - 67 downloads)
|
|
| |
|
Elite Veteran
Posts: 649
Location: Finland | Well I guess Albert Hammonds words "It never rains in California" aren`t true these days..but snow really..
|
|
| |
|
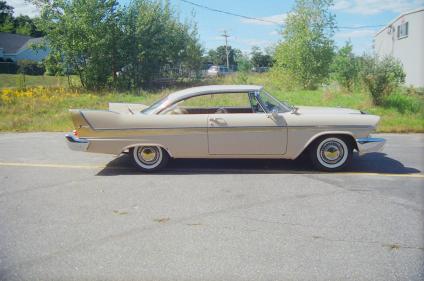
Expert
Posts: 1740
Location: Alaska | Do your neighbors like these "treasures" in your driveway? One of my daughters used to live in the Seattle area and they wouldn't even let you park a trailer overnight in your driveway. |
|
| |
|
Expert 5K+
Posts: 9650
Location: So. Cal | It has snowed here 3 times in 24 years, but always just a light dusting like this time. 58coupe, my neighbors are pretty reasonable so I don't get any trouble from them. But if I did, there would be nothing they can say about the Fireflite. And with a large amount of effort, the New Yorker could be made to comply if necessary. Practically every city has these stupid rules about stuff, but the trick is to immediately comply, and then just do what you were doing before, once they leave you alone. I'll never sign an HOA. People that do, deserve to live under the communist dictatorship that they signed up for.
I had a spare 300D roof that I decided to cut up and patch the roof on this '58 Fireflite & one of my '57 New Yorkers. The curve here isn't particularly hard to obtain, but these patches make it more of a no-brainer to get done. I was originally going to patch it with 2 parts per side, but decided to be more safe and patch it in 3 parts instead. This way the roof retains it's structure better during the welding. I've got it all cut and ready to weld in now, but just waiting for spare time with no rain to get it done. I've painted the inside of the panel and will paint the inside of the roof as well, after I clean it up and dry it off well. I may have to use a propane torch to dry it with as wet as it has been lately.
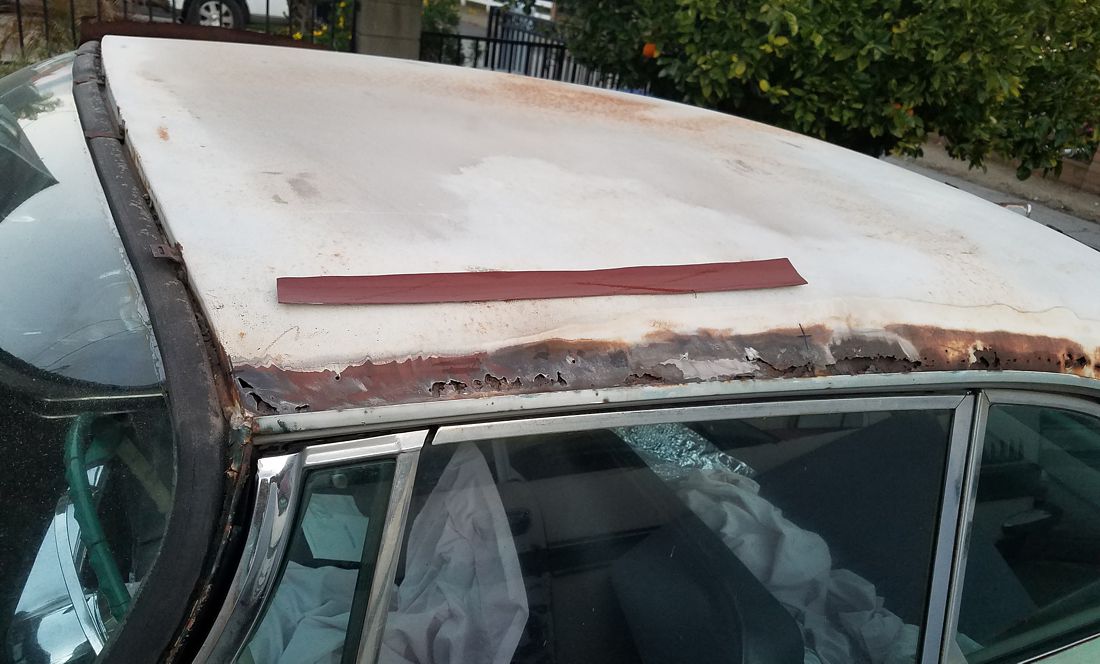 (58FF Roof Patch.jpg) (58FF Roof Patch.jpg)
 (58FF 300D Spare Roof.jpg) (58FF 300D Spare Roof.jpg)
Attachments
----------------
58FF Roof Patch.jpg (148KB - 71 downloads)
58FF 300D Spare Roof.jpg (134KB - 67 downloads)
|
|
| |
|
Elite Veteran
Posts: 649
Location: Finland | That job will be requiring some patience. One way to do it would be to make the long strip in three parts and form them as good as possible.
Then put them on the roof without cutting the roof . Then weld the parts together and grind and form the whole patch.
But before doing anything the roof has to be locked to the inner reinforcement by tackweldiing it .If the roof isn`t held steady it might be a nightmare.
This is how I would probably do it ,I don`t say it is the best way. |
|
| |
|
Expert 5K+
Posts: 9650
Location: So. Cal | These are already formed because I cut them from another roof. Welding it in sections keeps the roof reasonably locked in place without worrying about it moving around. Of course, you still have to check for flatness before & after tack welding, but it works out well. Rust likes to eat away at the bottom of the lip, so it's tempting to cut it down very low, but you need to keep enough of the lower lip to ensure you get the patch welded to the proper position, unless you are willing to drill out spot welds and fix it that way.
I got the first patch welded in place and all looks great so far. I had a small amount of lead in my patch that I had to grind off for some reason. I guess the factory partially filled the track with lead on the 300D to make it look better. I also found a little spot of rust at the front section, above the windshield that I filled in. Always make sure to protect your windows when welding & grinding next to them. I had forgotten why I always dampen the rags on them, only to have them catch fire twice to remind me. Only 5 more patches to go.
 (58FF First Roof Patch Welded.jpg) (58FF First Roof Patch Welded.jpg)
Attachments
----------------
58FF First Roof Patch Welded.jpg (199KB - 74 downloads)
|
|
| |
|
Expert 5K+
Posts: 9650
Location: So. Cal | I was able to get the other two patches done yesterday. Unfortunately, I didn't think to paint the area before it rained on it last night. At least it's well sealed now. I'll dry it off well and paint it before grinding the welds. These super strong magnets come in handy for work like this. I could use more of them. I'm using the really big ones to hold down the tarp on my convertible and they work perfectly for that. Even strong wind is unable to move them.
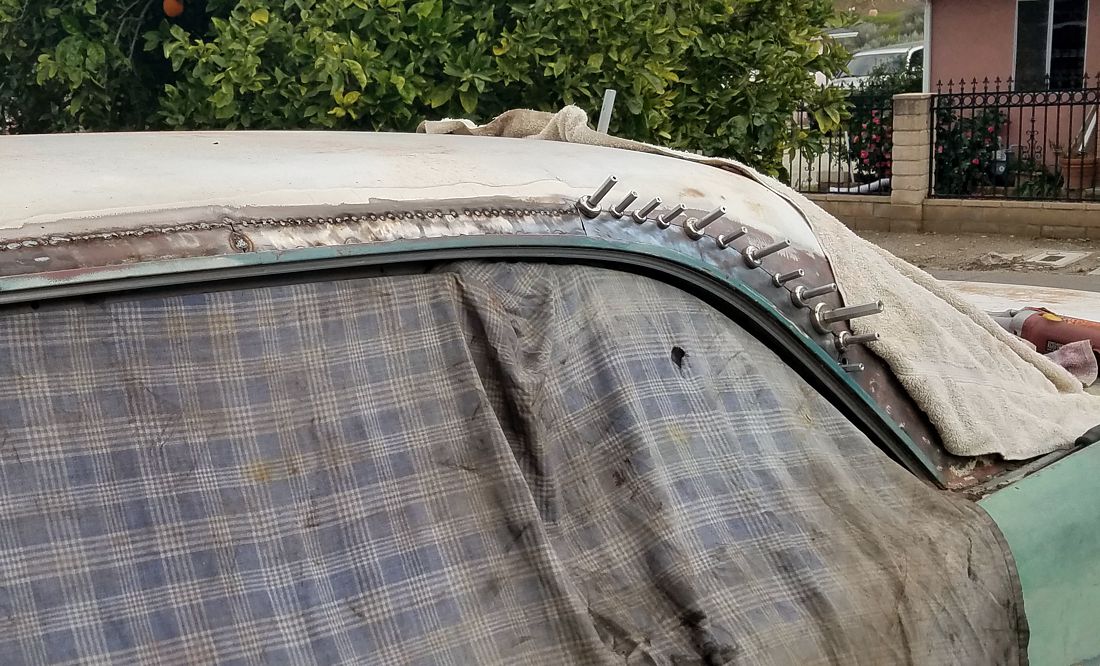 (58FF 3rd Patch Set.jpg) (58FF 3rd Patch Set.jpg)
 (58FF Left Roof Welded.jpg) (58FF Left Roof Welded.jpg)
Attachments
----------------
58FF 3rd Patch Set.jpg (222KB - 72 downloads)
58FF Left Roof Welded.jpg (204KB - 81 downloads)
|
|
| |
|
Elite Veteran
Posts: 649
Location: Finland | Those are handy magnets! Good work. |
|
| |
|
Regular
Posts: 76
Location: Okielahoma | Looking great! That magnet idea for a car cover is fantastic, better than messing with bungee cords, where’d you get them? |
|
| |
|
Expert 5K+
Posts: 9650
Location: So. Cal | I got them from McMaster.com. 1" to 1.65" diameter or bigger are good for that purpose, although the bigger you go, the harder it is to remove them. They also sell the threaded rods to screw onto them.
https://www.mcmaster.com/products/magnets/encased-neodymium-magnets-...
|
|
| |
|
Elite Veteran
Posts: 1157
Location: D-70199 Heslach | @Nathan,- great work
mcmaster is my favorite shop,- but difficult to order from overseas because of shipping (weight) and customs |
|
| |
|
Expert 5K+
Posts: 9650
Location: So. Cal | Thanks Tom. I ground the welds down and welded the pinholes back up. I did it in between the rain so I had to paint it right afterward. I had a high spot at the first intersection of the patches that a body spoon took down very easily. But I also have a low spot closer to the c-pillar that I'm going to need to address before I paint it. It's shallow enough that I could just fill it, but I don't like to take those kinds of shortcuts, so I'll fix it when it's the right time to do it. There was also a small rust section in the drip rail that I didn't notice before. So I ground it out and welded it back in. The roof looks much better with the rust replaced and I'm happy to make progress on it.
 (58FF Roof Ground.jpg) (58FF Roof Ground.jpg)
Attachments
----------------
58FF Roof Ground.jpg (210KB - 64 downloads)
|
|
| |
|
Location: The Mile High City | Great work, Nathan! Very impressive - that Firedome is going to be done right! |
|
| |
|
Regular
Posts: 76
Location: Okielahoma | Yes! great work! especially dodging the rain in your driveway doing surgery |
|
| |
|
Elite Veteran
Posts: 1157
Location: D-70199 Heslach | Powerflite - 2023-03-12 8:35 PM
............ The roof looks much better with the rust replaced ........................
Thats the reason to working on  |
|
| |
|
Expert 5K+
Posts: 9650
Location: So. Cal | I decided to be a little more conservative and do the right side in four parts instead of three. Unfortunately, that puts the cut right in the middle of a large rust out area. So I welded a brace to the roof before I cut it. This made it much more rigid than it would have been otherwise. The first patch went in without a hitch so far.
 (58FF Right Roof Support Spotted.jpg) (58FF Right Roof Support Spotted.jpg)
Attachments
----------------
58FF Right Roof Support Spotted.jpg (241KB - 79 downloads)
|
|
| |
|
Expert 5K+
Posts: 9650
Location: So. Cal | I got it all done before the rain hit again. You have to remember to blow off all the metal dust before it rains too, or else it will cause little rust pits everywhere they sit - including on your glass. Unfortunately, I forgot to protect my side view mirror glass on the driver's side. I had quite a few tiny metal blobs stuck to it. But they came off quite easily and didn't seem to affect the clarity, so that was nice. This has been an unusually wet year.
 (58FF Right Roof Welded n Watered.jpg) (58FF Right Roof Welded n Watered.jpg)
Attachments
----------------
58FF Right Roof Welded n Watered.jpg (241KB - 66 downloads)
|
|
| |
|
Elite Veteran
Posts: 649
Location: Finland | Good work Nathan!
Well you won`t cause any wild fires right now as it seems.. |
|
| |
|

Elite Veteran
Posts: 1110
Location: Tulare Ca | Awesome job Nathan!
What did you seal that with, Im assuming its something from a rattle can and not an HLVP and i need to do something similar on my wifes Comet thats also fighting this CA rain!
Edited by Myke 2023-03-21 10:03 PM
|
|
| |
|
Expert 5K+
Posts: 9650
Location: So. Cal | Mike, I used a good epoxy primer from Rustoleum. It comes in the extra-large can & says "Professional" on it. They sell a bunch of different ones that look very similar so you need to get this exact one. You can buy it at Home Depot. It's dumb that they don't say that it's an epoxy primer anywhere on the can and make no distinction between any of the many others that they sell. I had to figure it out, partially through trial and error.
 (rustoleum-professional-red-primer.jpg) (rustoleum-professional-red-primer.jpg)
Attachments
----------------
rustoleum-professional-red-primer.jpg (47KB - 64 downloads)
|
|
| |
|
Veteran
Posts: 164
Location: Alvin, Texas | Good to know what paint it is. I was thinking it was the Rustoleum Rusty Metal Primer spray can. |
|
| |
|
Expert 5K+
Posts: 9650
Location: So. Cal | I cleaned up all the welds and found two small spots that require panel beating. To finish the job properly and paint the roof for real, I need to remove both windshields and weld some areas around the gasket interfaces, and remove the headliner to be able to straighten these areas that require it. I don't want to tear the car down that far, so I just painted over the area with off-white from a cheap spray can to make it look a little better in the mean time. The final body work will have to wait until later. I might install the wide roof trim over this, just to get the clips & positions finalized, but it's a low priority so I'll work on other stuff first.
 (58FF Right Roof Sprayed.jpg) (58FF Right Roof Sprayed.jpg)
Attachments
----------------
58FF Right Roof Sprayed.jpg (199KB - 71 downloads)
|
|
| |
|
Elite Veteran
Posts: 649
Location: Finland | Looks like magic Nathan.. |
|
| |
|
Expert 5K+
Posts: 9650
Location: So. Cal | Thanks Ralf. It does look a lot better than it did.
I decided to convert the '58 Chrysler trunk lid that I got from Gary Grossich to look like a '58 DeSoto lid. I can't put the DeSoto emblem on there for good though because the pins are really small and I don't have the nuts that small to put onto it. Hopefully I can get them on Ebay.
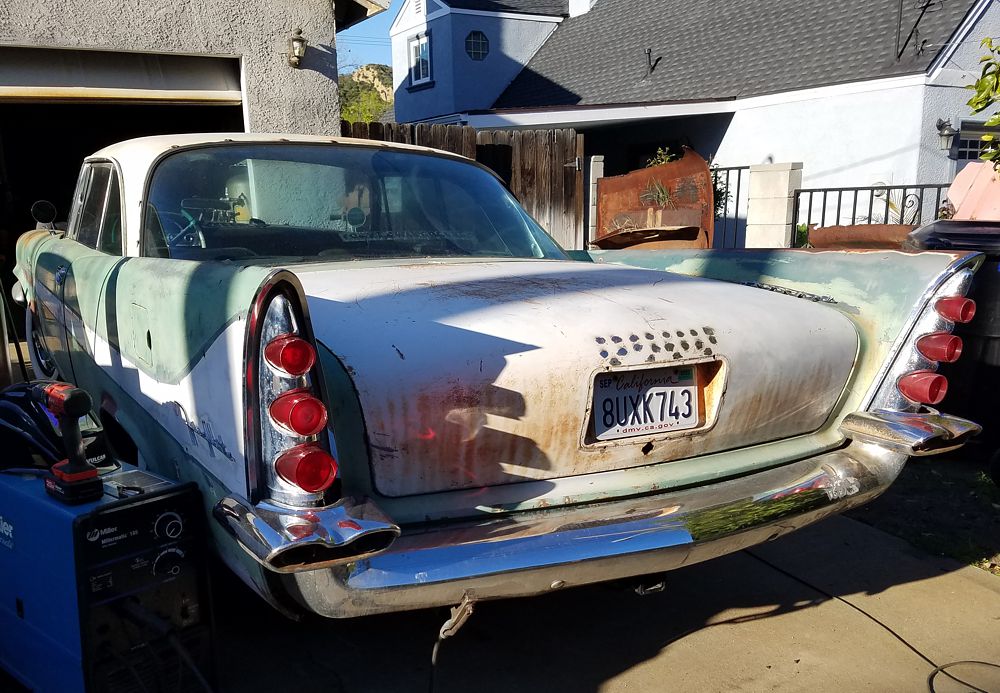 (58FF Trunk Lid Holes Welded.jpg) (58FF Trunk Lid Holes Welded.jpg)
 (58FF Trunk Lid Holes Painted.jpg) (58FF Trunk Lid Holes Painted.jpg)
Attachments
----------------
58FF Trunk Lid Holes Welded.jpg (175KB - 68 downloads)
58FF Trunk Lid Holes Painted.jpg (173KB - 68 downloads)
|
|
| |
|
Expert 5K+
Posts: 9650
Location: So. Cal | I took the car for a test drive around the block and noticed that I was smelling a lot of gasoline in the car. So I popped the hood and found the fuel pump spewing gas out from it's seams.  That new style pump is only about 2yrs old and has very little miles on it to be doing that. Not only that, but this is the 3rd new style big block pump to do this while still working. What the heck? Such shoddy quality parts! I'm not going to play that game anymore so I installed an NOS Carter pump that I can rebuild if it ever goes bad on me. That's all I'll use on a big block from now on, and maybe on other engines too, if I start to get similar results from the others. That new style pump is only about 2yrs old and has very little miles on it to be doing that. Not only that, but this is the 3rd new style big block pump to do this while still working. What the heck? Such shoddy quality parts! I'm not going to play that game anymore so I installed an NOS Carter pump that I can rebuild if it ever goes bad on me. That's all I'll use on a big block from now on, and maybe on other engines too, if I start to get similar results from the others.
But the smells in the car reminded me that I have 3 large holes cut into the floor from an aftermarket A/C unit that was installed at one time, that need to be plugged up. I also have a couple of rust holes that need to be repaired as well, so that's what I'll work on next.
Edit: I just noticed from this picture, what looks like the rubber insulator coming out from my harmonic balancer!  Good thing I noticed it. That can't be good when it comes out completely. Good thing I noticed it. That can't be good when it comes out completely.
Edited by Powerflite 2023-06-02 8:46 PM
 (New-Old Big Block Fuel Pump.jpg) (New-Old Big Block Fuel Pump.jpg)
Attachments
----------------
New-Old Big Block Fuel Pump.jpg (158KB - 55 downloads)
|
|
| |
|
Expert 5K+
Posts: 9650
Location: So. Cal | I cut a large circular disc to fill the hole in the floor and used 2 washers to fill the other 2 holes. It was difficult welding that far behind the pedals, and I may postpone cleaning them up until it's more convenient to work on them up there. Hopefully, this will keep some of the smells from getting into the cabin of the car. I've also cut out a small section of rust in the passenger side to fix that area. I'm going to be fixing and sealing up the floor as much as possible.
Edited by Powerflite 2023-06-11 10:09 AM
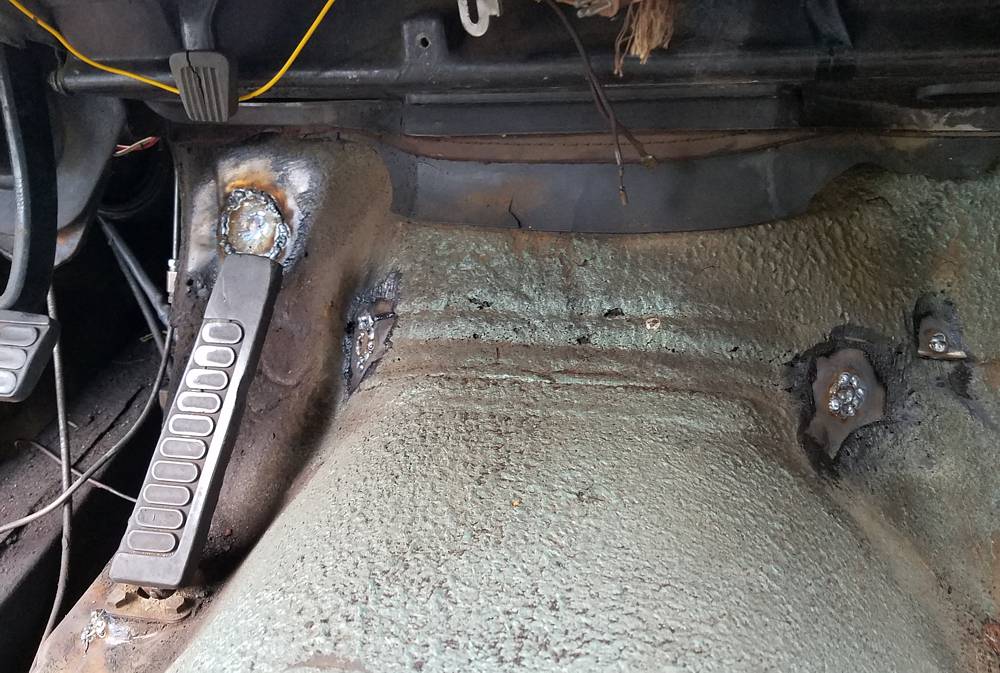 (58FF Floor holes welded.jpg) (58FF Floor holes welded.jpg)
Attachments
----------------
58FF Floor holes welded.jpg (163KB - 51 downloads)
|
|
| |
|
Expert 5K+
Posts: 9650
Location: So. Cal | My son is working away from home for the summer so my lovely daughter helped me remove the seats and held a dolly against the body to remove the long horizontal dent in the right quarter panel. I was able to get reasonable access to the backside of the panel from inside the car. That part came out nearly perfectly, so it's ready to start more rust repair in that section.
I also removed 2 sections of bondo at the top of the fin and at the lower end, just behind the door. Fortunately, the lower one was very thin, and it didn't need any repair work there. But there was a sizeable dent in the fin that needed to be addressed properly instead of just filling it with a gob of bondo. I was able to pound out the majority of it using a long piece of hardwood from inside the quarter, but it needs a little more work in two small spots, that I will continue to work on.
Next, I began to repair the first section of floor rust on the passenger side. I first welded in an 1/8" thick patch to the inner floor structure that was rusted out and will weld a new panel over the top of that. I also fixed the fuel gauge and mounted it back onto the dash. I think the main problem that it had was a lack of a good ground connection to the dash. That's good to keep in mind, to possibly save me some trouble if it stops working again in the future.
 (58FF RQuarter Dents Fixed.jpg) (58FF RQuarter Dents Fixed.jpg)
 (58FF RFloor Inner Structure Weld.jpg) (58FF RFloor Inner Structure Weld.jpg)
Attachments
----------------
58FF RQuarter Dents Fixed.jpg (134KB - 53 downloads)
58FF RFloor Inner Structure Weld.jpg (104KB - 49 downloads)
|
|
| |
|
Expert 5K+
Posts: 9899
Location: Lower Mainland BC | Powerflite - 2023-04-01 10:52 PM. I can't put the DeSoto emblem on there for good though because the pins are really small and
I don't have the nuts that small to put onto it. Hopefully I can get them on Ebay.
Nathan: Don't forget about Auveco. They have the type of thread cutting nut that you need for the DESOTO letter studs.
Pg. 155 in their current digital catalog.
https://onlinecatalog.auveco.com/Auveco-Catalog/155/#
Up here in Canuckistan we can get smaller quantities through GENO Industries (I think they just repackage Auveco products):
https://www.geno-inc.org/img/tiroir.pdf
Edited by 56D500boy 2023-06-18 2:11 PM
|
|
| |
|
Expert 5K+
Posts: 9650
Location: So. Cal | Funny that you mention that. Yesterday, I noticed that my weak old clips weren't holding the emblems on very well. So I took it off and tried to use a #8 thread cutting nut on it, but it was too big. So I tried a #6 nut and it was too small to go on. I tried bending the tangs on the nut but it went too far and wouldn't hold. I tried tapping with an 8-32 die, then with a 6-32 die at the end. That worked to get the nut started, but the die broke one of the studs because of how tight it was and how weak the stud was from corrosion. I may go for a standard push-on clip from now on, as much as I don't like those.
My plan to fix those broken studs is to drill & tap a hole in it for a stainless 2-56 stud and epoxy it in, using a tiny 2-56 nut to hold it on. |
|
| |
|
Expert 5K+
Posts: 9650
Location: So. Cal | I noticed in the post above that the harmonic dampener is coming apart. So I purchased a new, wider one from 440source that is SFI approved. They call this the hemi style. I'm hoping that it will be very effective and last. It's not clear if this needs a coating of paint on it or not. I think it may be covered with a clear-coat. I'm going to try leaving it as-is so that I can read the numbers off of it easily. I also purchased an 1/8" pulley spacer, just in case I needed it. I'm hoping I can install this without removing the radiator, and I going to try to replace the fan with a thermal clutch version, if I can fit it in there.
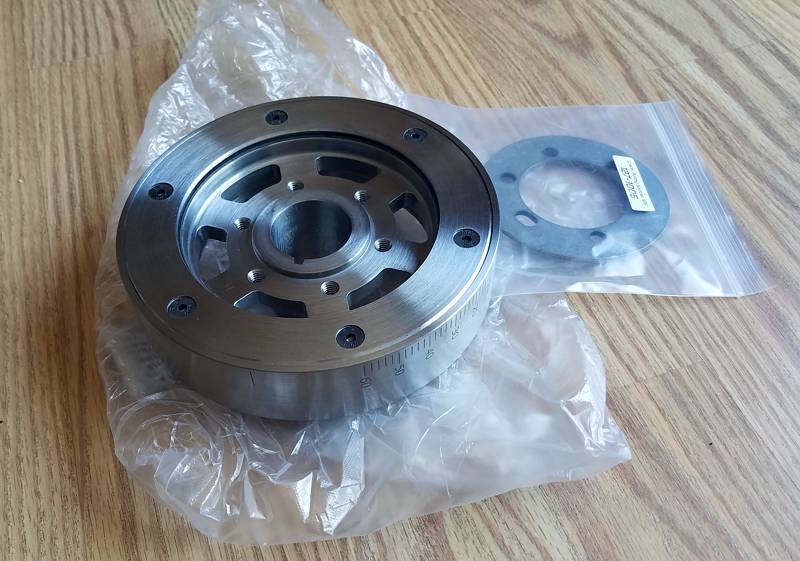 (Big Block Dampener.jpg) (Big Block Dampener.jpg)
Attachments
----------------
Big Block Dampener.jpg (105KB - 49 downloads)
|
|
| |
|
Expert 5K+
Posts: 9650
Location: So. Cal | I had hoped to get more done than I did, but I guess that's always the case. I finished popping out the dent from the upper fin. I was able to feel the dent from the outside with my left had and hit it with a body hammer with a shortened head on the inside. That way I could feel exactly where I was hitting. People with even longer arms have some great advantages! I then cut the rusted areas from the right side floor, made patch panels, and welded them in. The lower patch was more difficult because it includes a depressed area that I had to form to match. I also cut out the rusted panel on top of the left seat mount to replace it as well.
This car is odd in the way it has rusted. Almost no rust in the common areas, and gobs of rust in other areas. It seems that the rockers were filled with dirt from riding on dirt roads at one point in its life. At least that's what I attribute this rust to. The inner rockers look good on it, but the outers have been covered with a new panel. Once I remove that panel, I"m sure to see a whole new world of rust to attack.
 (58FF Right Floor Welded.jpg) (58FF Right Floor Welded.jpg)
Attachments
----------------
58FF Right Floor Welded.jpg (160KB - 51 downloads)
|
|
| |
|
Elite Veteran
Posts: 649
Location: Finland | Yes you seem to have your own Jurassic World of rust...I am convinced that the evolution will give car restorers longer arms by time and maybe also two pairs of them..
Keep up the good work! |
|
| |
|
Expert 5K+
Posts: 9650
Location: So. Cal | If that happens we'll all look like apes!
I made a little more progress. I cut the rusted sections above the seat mounts out and welded a new patch, cut from a 300D roof, over the right side. I started the weld cleanup, but it has more work to go on it. The middle patch needs a second round of welding before it will be done. I also made a patch for the left side seat mount, welded a small triangular patch above the floor brace that was packed with dirt, cut out the main section of rust and made a patch for it as well. I also welded a lone rust hole that formed below the accelerator pedal and cleaned it up. Since the chance of rain here is zero right now, I can afford to do these all at once and take my time before spraying with epoxy primer. But I want to get this done soon so I can put the seats back into the car.
Edited by Powerflite 2023-07-06 8:56 PM
 (58FF Right Floor Patched.jpg) (58FF Right Floor Patched.jpg)
 (58FF Left Floor Cut n Welded.jpg) (58FF Left Floor Cut n Welded.jpg)
Attachments
----------------
58FF Right Floor Patched.jpg (220KB - 47 downloads)
58FF Left Floor Cut n Welded.jpg (244KB - 46 downloads)
|
|
| |
|

Expert
Posts: 3393
Location: Chestertown, NY ( near Lake George) | I'D check out whether that balancer is ok on that old style Hemi. Looks like the balancer on my 426 Hemi. I am referring to how it is balanced, or not.
Edited by Shep 2023-07-06 12:40 PM
|
|
| |
|
Expert 5K+
Posts: 9650
Location: So. Cal | This isn't an old style hemi. It's a big block 361, and you are correct that the dampener is the 426 hemi style. It's made for internal balance so no issues there, as long as it fits and doesn't screw up the pulley placement. I believe that I will have to oblong one bolt hole in the pulley to get it to mount, but hopefully no other changes required. |
|
| |
|
Expert
Posts: 3393
Location: Chestertown, NY ( near Lake George) | My old 426 Hemi Belvedere race car had Hemi specific pulleys for the reasons you noted, don't remember but I think the shallower crank pulley may be needed here.
Edited by Shep 2023-07-06 2:07 PM
|
|
| |
|
Expert 5K+
Posts: 9650
Location: So. Cal | I finished welding the small holes I had missed on the right side, cleaned it all up and painted it. The step above the seat mount came out OK, so that makes me happy. I didn't notice the oval dent above it before I got it in paint, and I have no idea how it could have been made like that. But it was good clean metal there, so I'm not touching it. It might have been made there at the factory with how pronounced it looks, but who knows.
I also welded in the floor mount area on the left side, finished cleaning up the triangular middle section, and spot welded in the upper large repair section. I had to weld the under-structure on the large section before I spot welded it in because I had accidentally cut into it when I was cutting the section out. But it was pretty straightforward and easily finished. Hopefully I can get the left side finished this week.
Edited by Powerflite 2023-07-09 12:05 PM
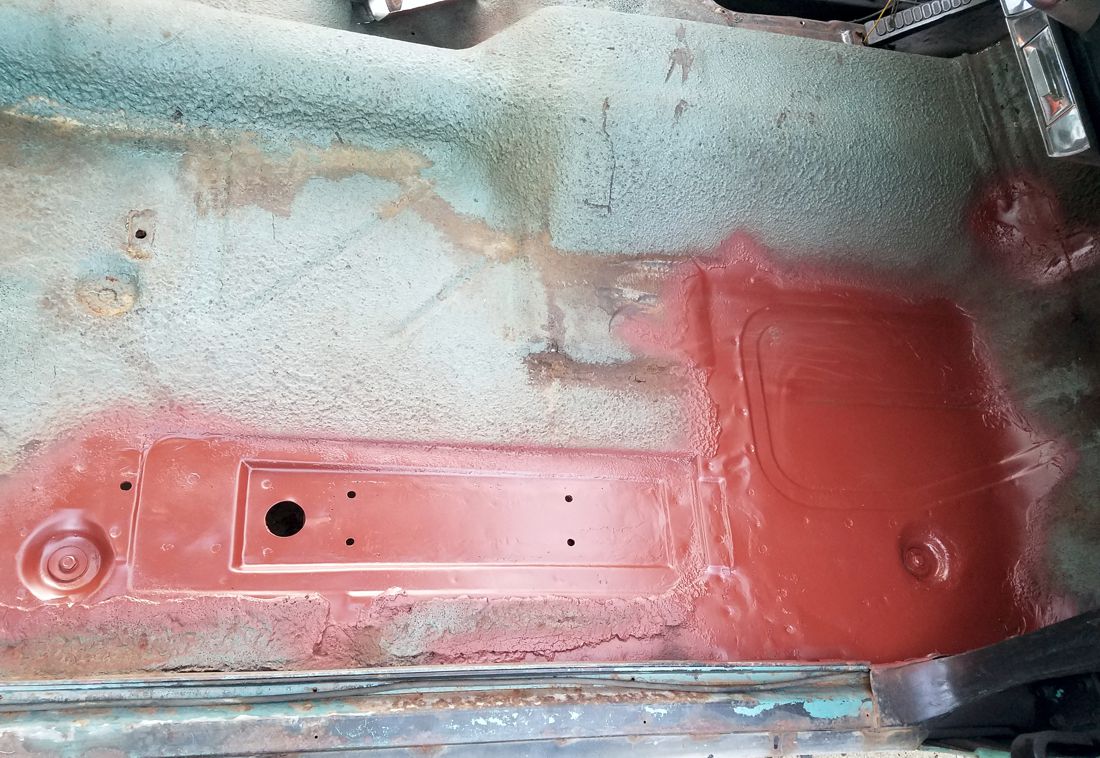 (58FF Right Floor Primed.jpg) (58FF Right Floor Primed.jpg)
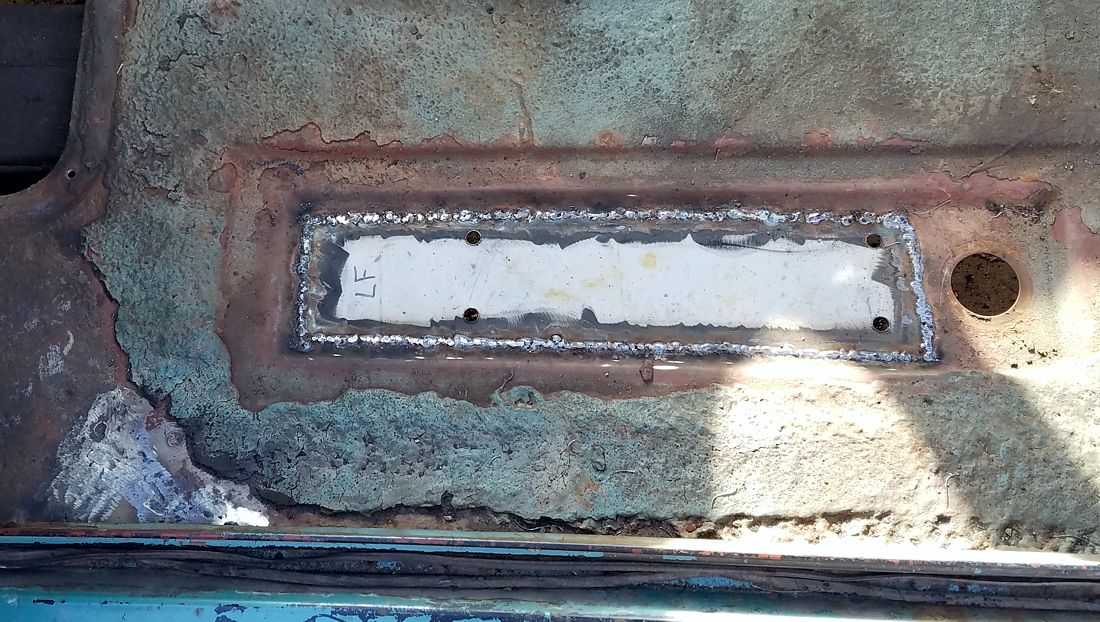 (58FF Left Floor Repair Welded.jpg) (58FF Left Floor Repair Welded.jpg)
Attachments
----------------
58FF Right Floor Primed.jpg (211KB - 48 downloads)
58FF Left Floor Repair Welded.jpg (227KB - 48 downloads)
|
|
| |
|
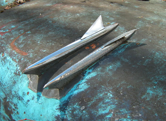
Regular
Posts: 60
Location: Canada | Impressive work. Congratulations. I will have to do similar floor patching on mine, so it is helpful to look at your pictures |
|
| |
|
Regular
Posts: 60
Location: Canada | Powerflite - 2020-06-14 1:21 AM
With the new distributor, I drove the car for the first time with brakes. It went well until I applied the brakes hard, when the left rear locked up on me. I never even touched the rear brakes so it's not a big surprise. Probably missing or broken hardware in there, but I'll find out how it looks tomorrow. My puller pulled the drum off in literally 10 seconds once I had it attached. Great tool.
That's a nice puller. I have the exact same one that came from an old Dodge/Plymouth service garage. |
|
| |
|
Expert 5K+
Posts: 9650
Location: So. Cal | Thanks. Yeah, that puller makes removing the drums a breeze.
I did a second round of welding on the left side to fill the holes and got the lower part in primer. Then I went for a third round of welding on the upper part. Hopefully, I can finish it up tomorrow morning so I can put the seats back in and get going on other things. The floor cover under the steering column isn't in great shape at the left-most edge, but I'm inclined to leave it for the time being. I may just purchase a replacement, but not sure if I would be better off fixing this one. But I want a break from floor repairs so I won't do anything with it for a while.
 (58FF Upper Left Floor 2nd Weld.jpg) (58FF Upper Left Floor 2nd Weld.jpg)
Attachments
----------------
58FF Upper Left Floor 2nd Weld.jpg (129KB - 48 downloads)
|
|
| |
|
Expert
Posts: 3967
Location: DFW, TX | That's some great progress, Nathan! |
|
| |
|
Expert 5K+
Posts: 9650
Location: So. Cal | Thanks Danny. I'm itching to get this floor done so I can start working on the right quarter rust that's currently the biggest eyesore on the car. This floor pan from my chopped '57 Windsor parts car is slated to save the rusted pans in the red '58 Fireflite, but that car has a good outer quarter on the right side, so it doesn't need this outer section. This dog-leg section should come in handy for this car, as all the inner structure is really good on it as well.
 (58FF Windsor Repair Panel.jpg) (58FF Windsor Repair Panel.jpg)
Attachments
----------------
58FF Windsor Repair Panel.jpg (222KB - 47 downloads)
|
|
| |
|
Expert 5K+
Posts: 9650
Location: So. Cal | I got the floor work done after the 4th welding pass, but welding & grinding under the dash, behind the pedals in 100 degree weather was causing me to question my will to live. I'm glad it's done.
After removing the bondo & paint on the repair panel, the metal underneath isn't as inspiring. Looks like it's going to require a repair section at the bottom to eliminate the rust, and I'll probably have to separate the outer panel in order to fully remove the multiple dents in the lip. The upper edges of this panel are all jagged with welding flag because he had welded the rear doors shut to the lower rockers and I had to cut it all apart to remove the doors. The good part is that I can do all this work to the panel before I weld it onto the car, which gives me access to the backside, and makes it so I can work on it in the shade.
 (58FF Left Floor Primed.jpg) (58FF Left Floor Primed.jpg)
 (58FF Dog Leg Repair Panel Issues.jpg) (58FF Dog Leg Repair Panel Issues.jpg)
Attachments
----------------
58FF Left Floor Primed.jpg (196KB - 48 downloads)
58FF Dog Leg Repair Panel Issues.jpg (231KB - 50 downloads)
|
|
| |
|
Expert 5K+
Posts: 9899
Location: Lower Mainland BC | .
I might have missed something but if your driver's side inspection panel is toast, and you don't want to make one, they are available:
https://www.ebay.com/itm/144512362514
 |
|
| |
|
Elite Veteran
Posts: 649
Location: Finland | Yes the grinding of seams in a corner under the dash is really not meant for a human being...you can`t see what you do and everything you grind off bounces in your face.
What you have done looks solid. The patch panel looks like a disappointment though.. |
|
| |
|
Expert 5K+
Posts: 9650
Location: So. Cal | Dave, I put my old panel in, and the rusted out edges look awful and makes the repairs to the floor kind-of pointless. So I'll probably buy a replacement panel so I don't have to do it. But wow, they've really increased the prices on those things. They used to only cost $80 not long ago.
Ralf, yeah, the upper joint gave me more trouble than expected. It could be cleaned up more than it is, and sometimes I need to get it in a uniform color first to see what it needs. But I probably won't bother on this. I just want to get it good enough to drive, and the hot weather right now makes my desire to mess with it even less. |
|
| |
|
Expert 5K+
Posts: 9650
Location: So. Cal | My wife refuses to ride in the car without seatbelts. Someone had previously put holes into the floor for them, though I'm not thrilled with where they are located. But I haven't decided how I want to do it permanently either, so I'll just put them there without welding the mounts to the floor like I would usually do. I saved these brackets from an old washing machine or dryer and welded 7/16-20 nuts to them.
I also separated the repair panel and took out the dents in the lip pretty well. The corner isn't as well defined as the original, so I will eventually lay a weld bead along it to bring it back. But it's obvious that these repair panels are going to require quite a bit of repair before I can use them. Still, it's much easier to do when it still has it's original structure, unlike what is currently on the car.
Edited by Powerflite 2023-07-17 2:18 PM
 (58FF Seatbelt Mounts.jpg) (58FF Seatbelt Mounts.jpg)
 (58FF RR Quarter Repair Panels.jpg) (58FF RR Quarter Repair Panels.jpg)
Attachments
----------------
58FF Seatbelt Mounts.jpg (114KB - 51 downloads)
58FF RR Quarter Repair Panels.jpg (183KB - 46 downloads)
|
|
| |
|
Expert 5K+
Posts: 9650
Location: So. Cal | The first step in fixing these is to strengthen them at the most critical point - the lip. So I cut out the rust in that section and cut & bent a repair strip to go into it. Making sure it is perfectly flush before welding is key to getting good results and these heavy duty magnets help to ensure that happens. It came out quite well and was good enough to move to the next step of replacing the wider section. Welding in sections is not only easier, but also ensures that the panel doesn't change shape as you go. I cut only the part out that was visibly pitted on the backside. Welding in smaller patches makes it easier to bend and get the right form on it. Having access to the backside is really nice too, as I was able to clean up the welds back there, and add to any locations that looked a little thin. After cleaning up the larger patch, it will be on to repair the inner panel.
Edited by Powerflite 2023-07-18 5:56 PM
 (58FF RR Quarter First Repair Strip.jpg) (58FF RR Quarter First Repair Strip.jpg)
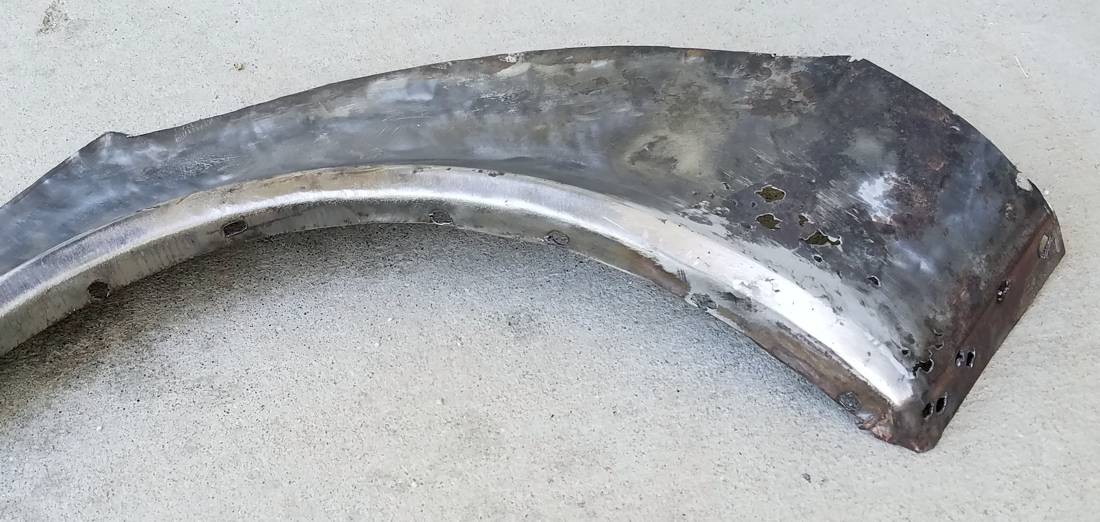 (58FF RR Quarter First Repair Strip Finished.jpg) (58FF RR Quarter First Repair Strip Finished.jpg)
 (58FF RR Quarter 2nd Repair Welded.jpg) (58FF RR Quarter 2nd Repair Welded.jpg)
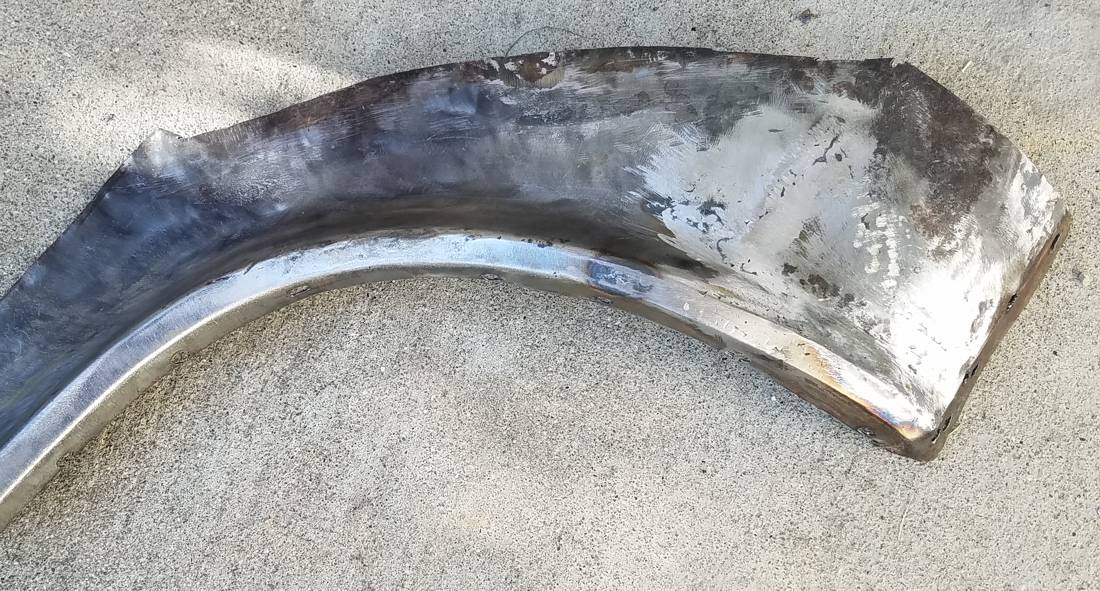 (58FF RR Quarter 2nd Repair Finished.jpg) (58FF RR Quarter 2nd Repair Finished.jpg)
Attachments
----------------
58FF RR Quarter First Repair Strip.jpg (161KB - 54 downloads)
58FF RR Quarter First Repair Strip Finished.jpg (119KB - 51 downloads)
58FF RR Quarter 2nd Repair Welded.jpg (167KB - 48 downloads)
58FF RR Quarter 2nd Repair Finished.jpg (209KB - 44 downloads)
|
|
| |
|
Elite Veteran
Posts: 649
Location: Finland | Very nicely done Nathan! |
|
| |
|
Expert 5K+
Posts: 9650
Location: So. Cal | Thanks Ralf, I was pleased with how it came out. Hopefully I can get it welded on without too much trouble. I'm still trying to decide exactly where I want to cut it.
I finished the repairs to the inner repair panel today too, using essentially the same process. Except this time I had to replace most of the lower section. I still have a couple of pin holes to fill and I still need to clean up the inside of it - which will be the only part that you will be able to see when it is installed. I'm sure that I won't be able to clean up the inside to a perfect finish, but I should be able to make it look presentable anyway.
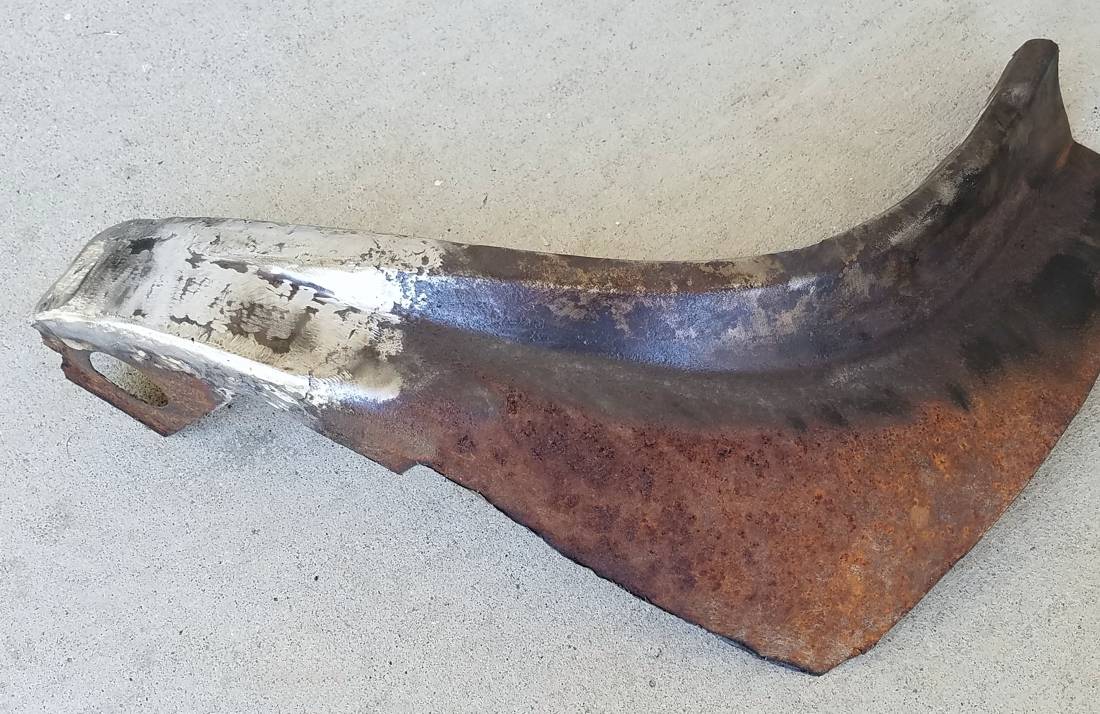 (58FF RR Quarter Inner Repair Repaired.jpg) (58FF RR Quarter Inner Repair Repaired.jpg)
Attachments
----------------
58FF RR Quarter Inner Repair Repaired.jpg (173KB - 67 downloads)
|
|
| |
|
Expert 5K+
Posts: 9650
Location: So. Cal | I've been working on getting my repair panels installed onto the car. As soon as I roughly cut the outer section off, the quarter panel let go and is no longer straight. That's a problem when I am trying to figure out where everything needs to go. So I am planning to purchase a 6 foot long piece of angle iron and mount that behind the quarter panel, using the lower trim holes to screw into it. That should keep it mostly straight while I get the outer repair panel in place. The rusted section in the rocker was bent inward by the guy that applied all the bondo into the hole. You can see how the upper part of the rocker is too far inward in the first picture below. I pried that section outward with a 6" wide body spoon and hit the bend with a hammer to straighten it out. It came out really well and feels pretty straight now. I'm planning to weld that section last, after the dog leg is done, though I'm not certain if that's a good or bad idea yet.
The inner panel had been bent a little as well, but I was able to figure out where it needed to be placed by carefully tracing the outline of the part that I cut off to trim the new part to exactly the same pattern. So far, so good. I'm only going to spot weld the inner panel until I can verify that I like the placement and overall position of the outer panel on the car - after I get the outside panel straight again. By the way, that lone magnet at the trim hole location has a flathead screw stuck to it, and is being used to keep the antennae wire from dangling into my work area.
Edited by Powerflite 2023-08-01 11:44 AM
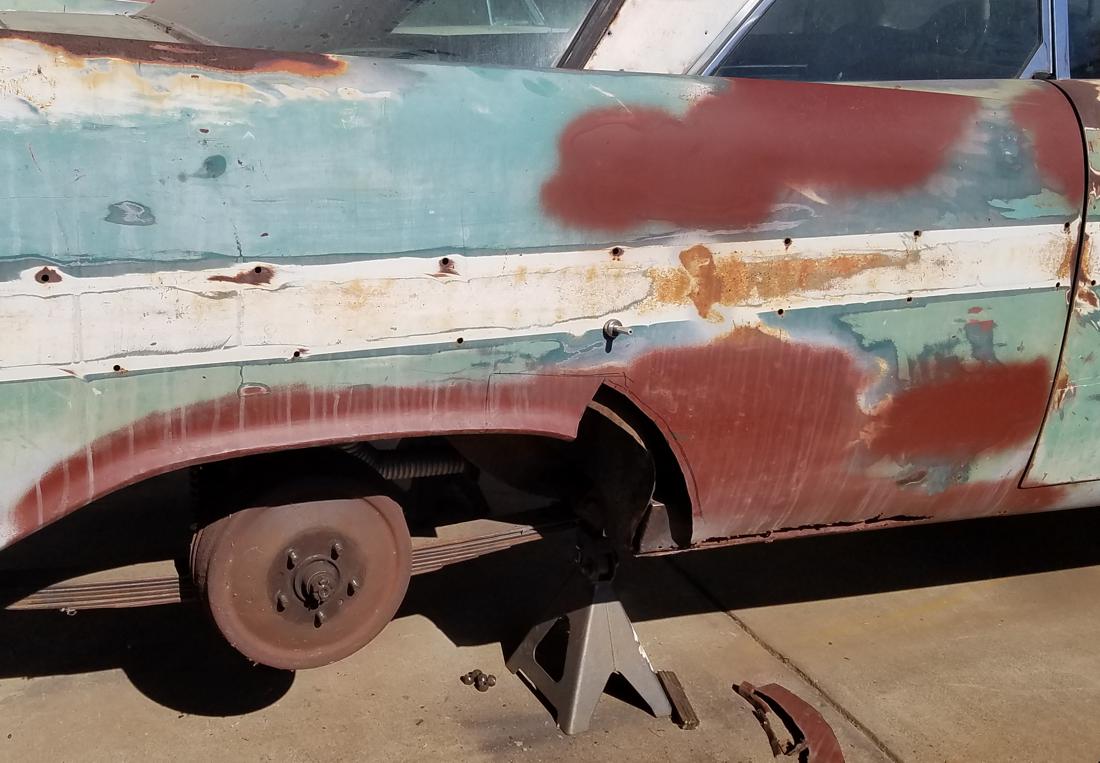 (58FF RR Quarter Rust Cutout.jpg) (58FF RR Quarter Rust Cutout.jpg)
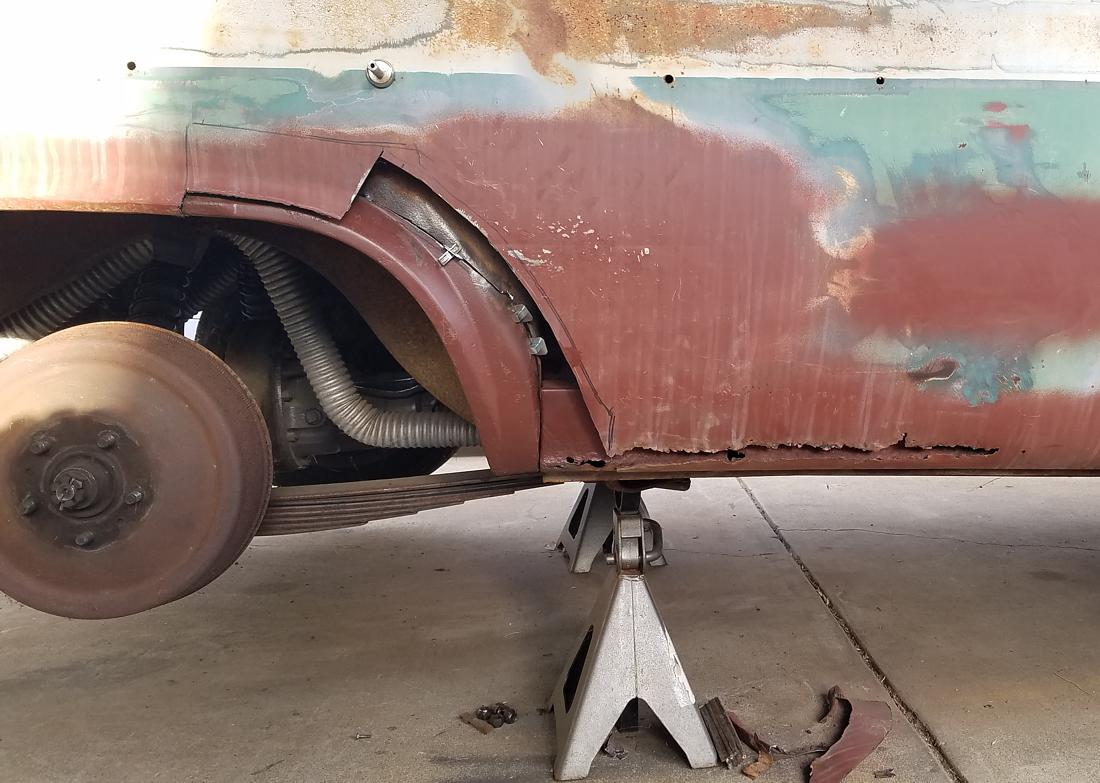 (58FF RR Quarter Inner Panel Tacked.jpg) (58FF RR Quarter Inner Panel Tacked.jpg)
Attachments
----------------
58FF RR Quarter Rust Cutout.jpg (141KB - 61 downloads)
58FF RR Quarter Inner Panel Tacked.jpg (143KB - 57 downloads)
|
|
| |
|
Expert 5K+
Posts: 9650
Location: So. Cal | I got everything positioned where I planned to weld, with a 6 ft long piece of angle iron screwed behind the quarter to force it straight. You can see the screws & washers for it on the lower trim holes. It was important to screw it in evenly while applying pressure in between the screws to prevent them from causing distortions in the panel. It would have been better to use another piece of angle iron on the outside to clamp it down, but this setup is working fine. Once straightened, I went over it with a straight edge and noticed that the quarter was stretched at the location of the dent that I took out of the panel. So I took some time to shrink that part with a shrinking disc. It worked to make it better, but it isn't completely flat yet, mostly because the edge of the panel is loose, so it doesn't react the same. I will address it further once I get it welded.
Everything looked decent, so I welded the inner panel up. Unfortunately, I ran out of welding gas so I con't continue until I get it refilled. Until then, I will clean up the welds I have on there and get everything ready for welding on the outer panel.
 (58FF Inner RR Quarter Welded.jpg) (58FF Inner RR Quarter Welded.jpg)
Attachments
----------------
58FF Inner RR Quarter Welded.jpg (152KB - 68 downloads)
|
|
| |
|
Expert 5K+
Posts: 9650
Location: So. Cal | I patched up the small rust section in the inner rocker that the dog leg will cover. There is more rust going forward from there, but I needed to patch it before welding in the dog leg panel and I wanted to keep some of the outer rocker structure to use for placement reference. I also cut a small relief in the worst part of the stretched panel. That makes it stress free when I weld to the dog leg, and hopefully the welding will shrink it a little.
After a lot of effort I positioned the panel in place and got it cut to where it needs to be. There is a larger gap at the front edge than I would like to have, but I am thinking that once it is tacked in place, I can cut a larger hole in the rocker area and stick my hand up there with a copper plate to back up the gap for better welding. Once it is tacked in place along the large flat area, I am planning to release all of the clamps and weld the upper front-most section first, hoping that by doing so, a minimal amount of warping will occur, going very slowly, keeping the heat to a minimum, and progressing downward with the panel mostly free-floating. Then I will weld the more rigid, curved sections, and finally, the plug welds at the outer edges. That's the plan, and hopefully this will allow me to get it done with a minimal amount of warping. I am not naive to the fact that welding in this area can be problematic - especially with the effects of the dent that was there. This is the most difficult repair section that I have done to date, so I am thinking it through and taking my time on it.
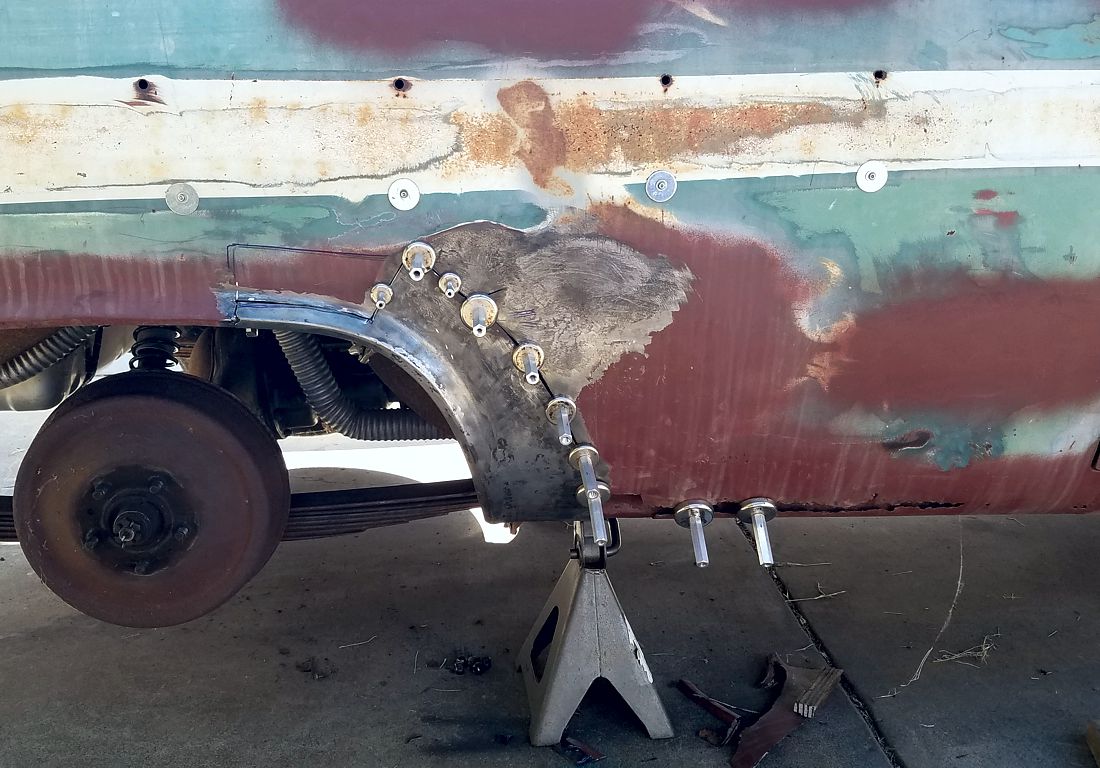 (58FF Right Dog Leg Repair Fitted.jpg) (58FF Right Dog Leg Repair Fitted.jpg)
Attachments
----------------
58FF Right Dog Leg Repair Fitted.jpg (177KB - 57 downloads)
|
|
| |
|
Elite Veteran
Posts: 649
Location: Finland | I am sure this is going to be good. Have you considered to make the lower section of the rear quarter first and then tack weld the prefab wheel arch part on. Then cut open about 4 inches
with a 1mm cutting disc and and then tack weld with a perfect gap. Go on like this until it is done . This way you will have minimum warping although you will get some since this
a painful task. |
|
| |
|
Expert
Posts: 4036
Location: Connecticut | Nathan - When I section a panel, I use a product called Heat-Fence. It's like a damp clay. It's designed to absorb the heat that would normally be transferred to adjacent metal, causing warping. Works great. It's made by American Chemical and Flux Products in Pomona, CA. Ron |
|
| |
|
Expert 5K+
Posts: 9650
Location: So. Cal | Ralf, I wasn't sure if I should do the rocker area first or last, but I decided that putting the dog leg/wheel lip in first would be better so that it would provide a good reference for the slope of the whole panel first before any other welding is done. The main problem I have here is that the dent I took out has caused a lot of stress in the panel that wants to make it move outward. Without the quarter being mounted to that iron channel, the whole thing would bend outward while trying to weld. Even with the bar, the lower section wants to naturally bow out as well, so controlling it and ensuring that it goes where it is all supposed to go is the challenge with this. To make it even worse, the rust of the inner & outer section made it difficult to know where the lip was supposed to be placed as well. But I have that all figured out and done now. Rusted inner & outer sections, with dented, bowing panels is the hardest to work with because you lose most of your reference points. It just takes a lot of time to make sure you are putting things where they belong, and how to accomplish it well.
Ron, I've used that heat fence before and it does work to keep the heat down. But excess heat isn't really what causes warpage in large panels like this, as long as you weld very slowly, doing successive spot welds, rather than trying to weld in a continuous line. It's pretty easy to keep the overall heat low if you go slow, spot welding like this. But large gaps create bigger problems because there is a larger amount of molten metal in the gap that gets hotter than it would if it were smaller, making it expand more. And that large amount cools off and contracts more than it would in a smaller gap - pulling the panel around as you go. That, by itself creates warp problems regardless of the amount of heat around it. So that's why it's important to control the gaps very well on large panels that are subject to warping. To address this problem, I decided to remove my repair panel, and add metal to the edges ahead of time, using a copper backing plate. Then I ground it down to where it needed to be, so that I have much better gaps on it now. That should prevent any of this from causing me problems.
I didn't get as much done yesterday as I had hoped. But I was able to reduce all the gaps like I described above, and got it spot welded in the large, more flat areas. I had to push the lower front section in as I welded to get it aligned properly, but it didn't require a lot of force, so it should remain well-controlled. I checked everything out with a straight edge, looking from as many angles and places as I could, and it all looks great where it is. So as long as it all stays where it currently is during the rest of the welding, I'll be very happy.
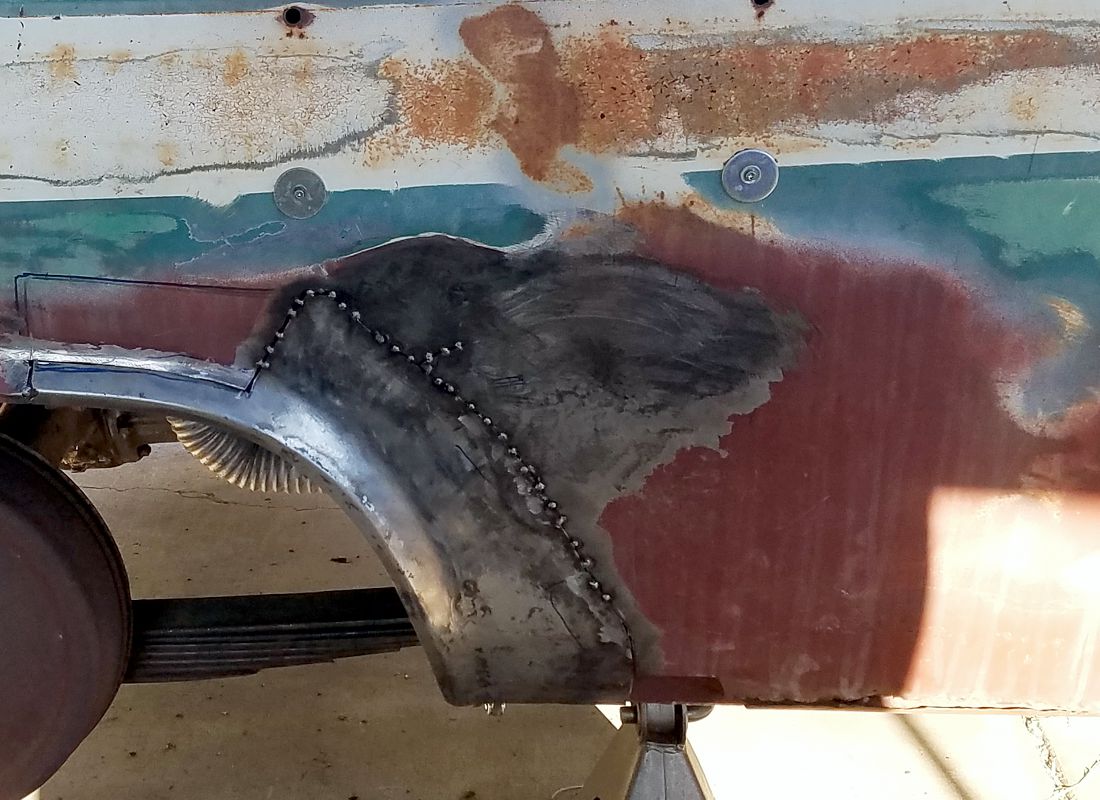 (58FF Right Dog Leg Repair Spotted.jpg) (58FF Right Dog Leg Repair Spotted.jpg)
Attachments
----------------
58FF Right Dog Leg Repair Spotted.jpg (161KB - 56 downloads)
|
|
| |
|
Expert 5K+
Posts: 9650
Location: So. Cal | I took a break from body work for a bit and replaced the harmonic dampener that was coming apart. There is a paint mark on it from the previous owner and it had moved 1/4" more from that mark, so it was slowly working it's way off. The timing cover may have stopped that from happening, but I didn't want to leave it on there to find out.
For some reason, the water pump pulley was completely stuck to the water pump. Prying or hitting wasn't getting anywhere with it. I could have applied heat to the aluminum spacer to separate it, but I decided not to mess with it, and just leave it there, but unfortunately, I couldn't get my new dampener on with the pulley on the pump. The new dampener is quite a bit wider and I couldn't angle it up under the pulley. So I pulled the dampener from the '67 383 I have in my garage for my Barracuda to use on it instead. The new dampener will probably suit the Barracuda better anyway. To my surprise, the '67 dampener also has one odd spaced bolt, so that my old DeSoto pulley mounted onto it without modification. When did they switch to evenly spaced bolts?
I also painted all the pulleys & fan to get rid of the red paint color that the previous owner had put on them. Not that I like a lot of black everywhere, but the faded red with the blue engine made it look like a cheap circus show.
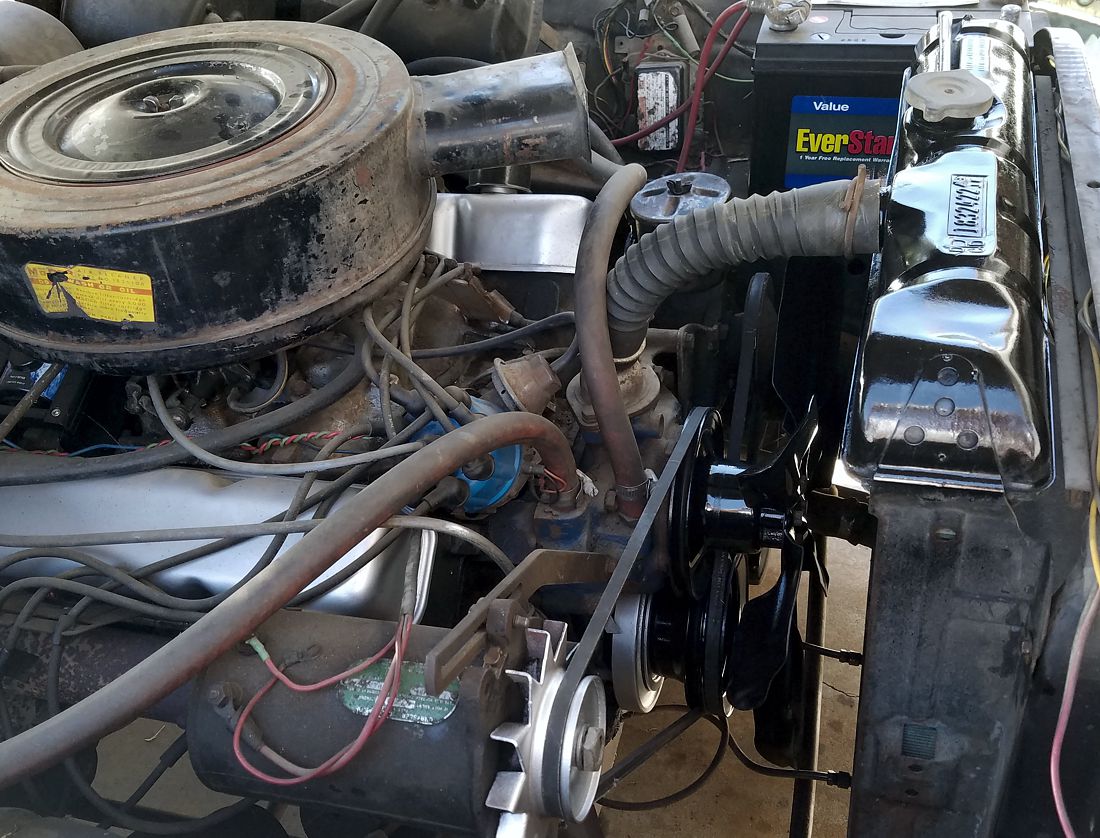 (58FF Replacement Dampener.jpg) (58FF Replacement Dampener.jpg)
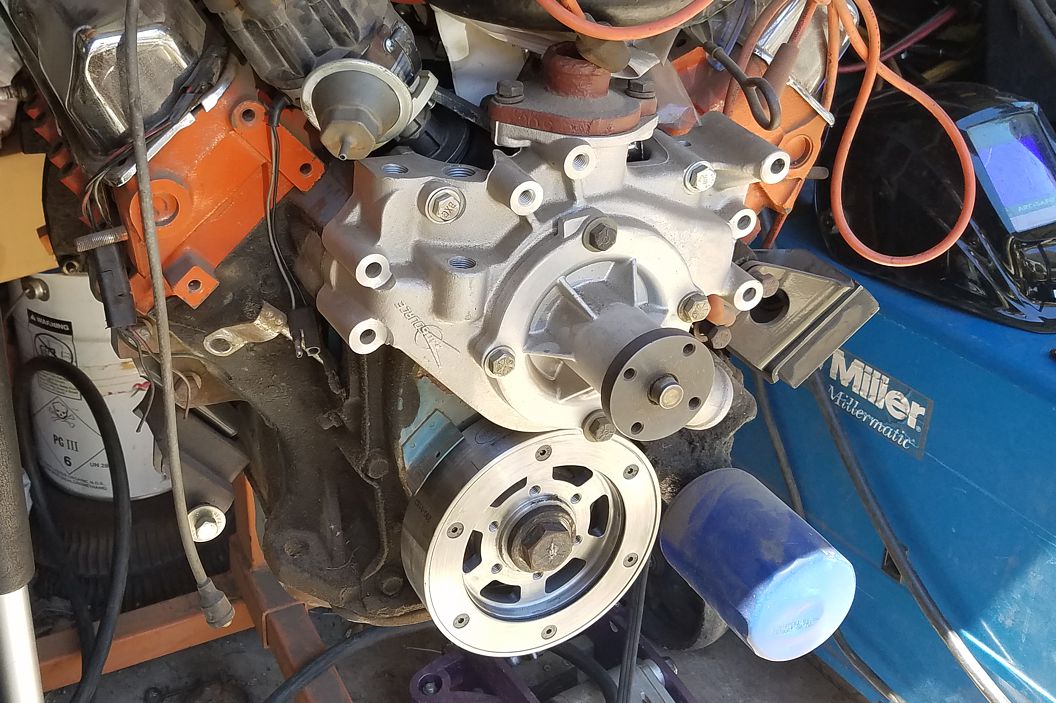 (New Dampener on 1968 383S.jpg) (New Dampener on 1968 383S.jpg)
Attachments
----------------
58FF Replacement Dampener.jpg (230KB - 61 downloads)
New Dampener on 1968 383S.jpg (207KB - 57 downloads)
|
|
| |
|
Elite Veteran
Posts: 1157
Location: D-70199 Heslach | Powerflite - 2023-08-16 11:29 PM
.... like a cheap circus show.
yes,- in previous times, the owners of those cars like me too, has a different taste |
|
| |
|
Expert 5K+
Posts: 9650
Location: So. Cal | True, Tom. I used to paint every bolt head 2 different colors when I was 14. Welding on the panel went well. There ended up being 2 high spots afterward, but not too significant. They are marked on the photo. One of them is associated with the relief that I made in the section that I couldn't get to sit flat. I may not have cut far enough on it, but I'll hit both spots with a shrinking disc and slap the lower spot with a spoon to see how it goes. It's much easier to deal with high spots than low spots, so in that sense, I got lucky. I noticed that the lip didn't have the full width like it should from my previous repair in this area, so I added a little bit of metal to it and blended it in to the dog leg section. It likely needs more work there, but I need to get some color on it to really see what it needs.
 (58FF RR Dog Leg Ground.jpg) (58FF RR Dog Leg Ground.jpg)
Attachments
----------------
58FF RR Dog Leg Ground.jpg (126KB - 60 downloads)
|
|
| |
|
Expert 5K+
Posts: 9650
Location: So. Cal | I was having lots of trouble getting the driver's door latch to work properly. I had already replaced the latch a while ago, but it still wasn't consistent in how well it latched. It wouldn't open on it's own, but often, it wouldn't hold the door tight like it should. The grab handles on a Fireflite are not very user friendly, so that made the problem worse. So I adjusted it and adjusted it to no avail. I saw that the top of the catch was worn, but I couldn't see how that would affect it. I decided to replace it anyway because I didn't like how it looked. I grabbed one I saved from the '57 New Yorker that I parted out and put it on there. Now the door finally latches correctly! Once removed, I noticed that the lower edge of the old one was indeed quite worn, and likely the cause of most of my troubles.
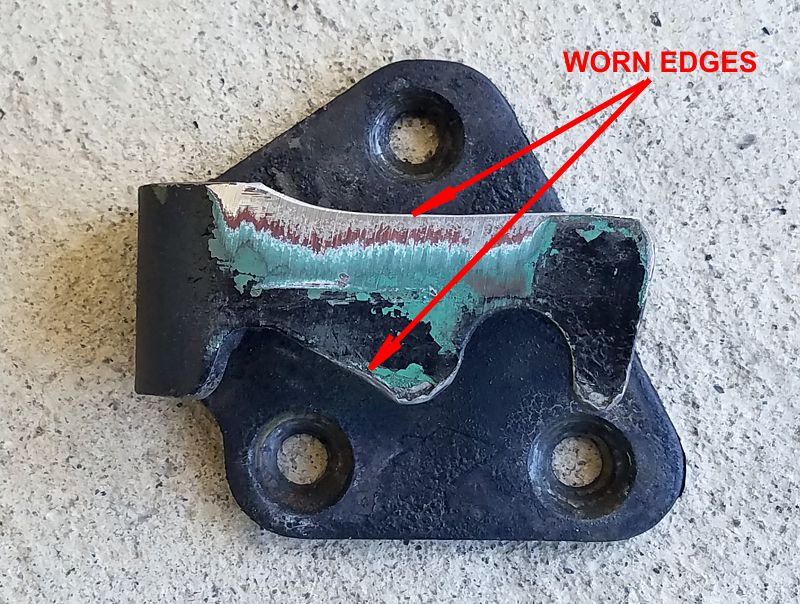 (58FF Worn Drivers Door Latch.jpg) (58FF Worn Drivers Door Latch.jpg)
Attachments
----------------
58FF Worn Drivers Door Latch.jpg (181KB - 24 downloads)
|
|
| |
|
Elite Veteran
Posts: 649
Location: Finland | It is good to see you doing your thing with these cars Nathan. I think there is not much happening on the forum these days....isn`t there any new restorations or are they shy? |
|
| |
|
Expert 5K+
Posts: 9650
Location: So. Cal | Yeah, I don't know Ralf. Some people don't like showing progress pictures. I took a long break from it during the winter. I think I just got burned out for a while. But I'm back at it again. I really need the exercise it provides!
I took a lower rocker panel from the Windsor that I parted. It was pretty clean, but had a couple of pits in the backside that I didn't like. So I welded those and cleaned them up before painting the backside. I got it welded in place yesterday and did the second round of filling the pinholes before it got too dark to continue. I just need to clean this up better and prime it now.
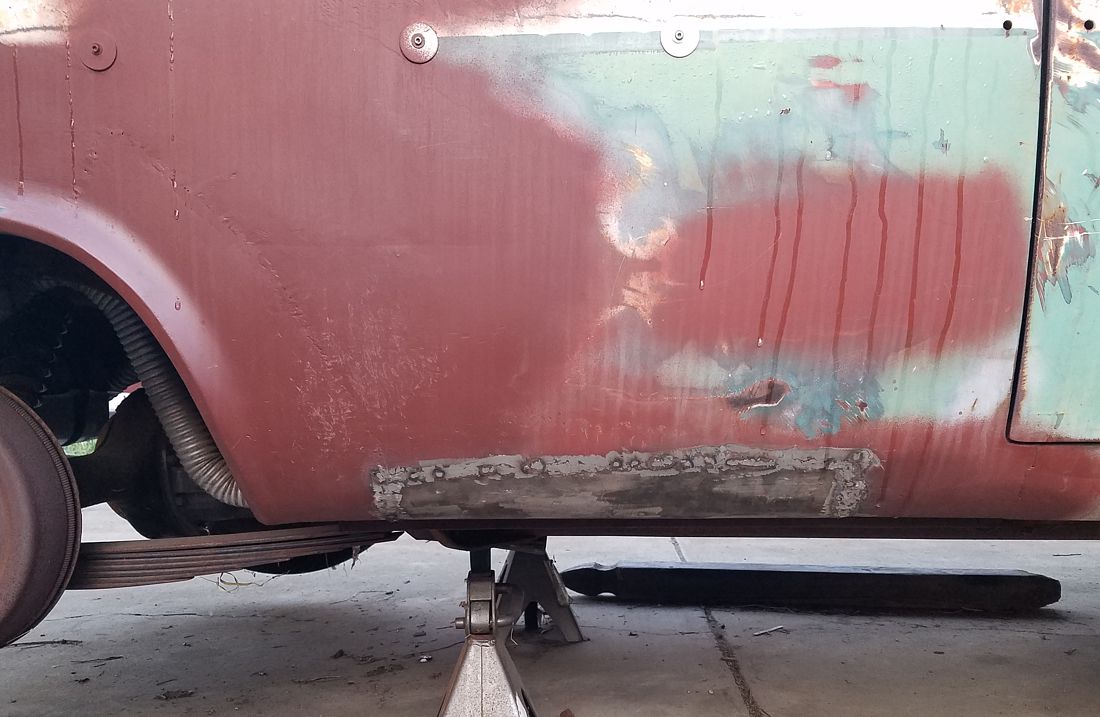 (58FF Lower Front Quarter Weld.jpg) (58FF Lower Front Quarter Weld.jpg)
Attachments
----------------
58FF Lower Front Quarter Weld.jpg (141KB - 21 downloads)
|
|
| |
|
Expert 5K+
Posts: 9650
Location: So. Cal | I cleaned up the welds better and primed it. There is one low spot that will need to be pulled out a little, and one high spot. I easily slapped the high spot down, but I will wait to get a better stud puller before I tackle the low spot.
The left front fender had been heavily dented in the past, and someone made an attempt to straighten it, but it left the metal bulging out from being stretched. I attempted to straighten it a little better, but couldn't proceed until I shrunk the metal to stop my efforts from just bouncing from the oil can effect. It took 3 passes with the shrinking disc, but now it's where it should be. Shrinking actually works better with a thin layer of rust on the metal, but doesn't work at all with any paint. In this case, I didn't have to strip the fender at all. It'll take a lot more straightening to finish it, but I will probably wait until I eventually remove the fender to get it done.
 (58FF Fender Bulge Shrink.jpg) (58FF Fender Bulge Shrink.jpg)
Attachments
----------------
58FF Fender Bulge Shrink.jpg (93KB - 18 downloads)
|
|
| |
|
Elite Veteran
Posts: 649
Location: Finland | Oil canning is sometimes very hard to get rid of. It is almost flat and nice but when you address the last little dent it start oil canning again...not amusing at all.. |
|
| |
|
Expert 5K+
Posts: 9650
Location: So. Cal | I received 3 sets of new sill plates from Jan in Sweden today. Very impressive quality! I may spray them with clear to preserve the shine on them and use a sealer on the backsides. I won't use the 300 or New Yorker versions for quite some time, but I'm going to use the DeSoto plates right away on my Fireflite. This Fireflite & my 300C were missing them, and they were very corroded on one New Yorker, so it's very nice to be able to get replacements.
Edited by Powerflite 2024-04-09 1:05 AM
 (New Fwrdlk Sill Plates.jpg) (New Fwrdlk Sill Plates.jpg)
Attachments
----------------
New Fwrdlk Sill Plates.jpg (212KB - 16 downloads)
|
|
| |
|
Elite Veteran
Posts: 1157
Location: D-70199 Heslach | Lets mount them |
|
| |
|
Expert 5K+
Posts: 9650
Location: So. Cal | I certainly will Tom!
When I welded the dog leg section, it didn't quite line up to the wheel lip properly, and I welded it with the body relaxed, that solidified a bend in the quarter above the wheel. Not good. So I took it back apart and made a new piece to replace that section. This time, I removed the rear body mount and loosened the other three in the trunk so I could push up on the body with my jack and straighten the quarter panel while I weld up that lip. It came out much better, and I'm quite happy with it now. I cleaned up the welds and painted it primer, but it still needs gobs of body work on that section before it'll be ready for paint. The lower rear quarter behind the wheel is also rusted, and currently filled with bondo, so lots more work there too. But I want to work on something else for a while, so I can drive this car and get some enjoyment out of it first. Time to go cruising!
 (58FF Right Wheel Lip Rev2.jpg) (58FF Right Wheel Lip Rev2.jpg)
 (1958 DeSoto Ready to Cruise.jpg) (1958 DeSoto Ready to Cruise.jpg)
Attachments
----------------
58FF Right Wheel Lip Rev2.jpg (141KB - 5 downloads)
1958 DeSoto Ready to Cruise.jpg (174KB - 4 downloads)
|
|
| |
|
Elite Veteran
Posts: 649
Location: Finland | Looks good! That`s the spirit! |
|
| |