
 | ||
| The Forward Look Network | ||
| ||
 My Dual Quad Project My Dual Quad ProjectJump to page : 1 Now viewing page 1 [50 messages per page] | View previous thread :: View next thread |
| Forward Look Technical Discussions -> Engine, Exhaust, Fuel and Ignition | Message format |
| sermey |
| ||
Expert Posts: 1208    Location: SWITZERLAND | There have been already many posts on this subject. In a few steps I will describe why and how I realized, now one year ago, a Dual Quad Project on my 1959 DODGE Custom Royal Lancer Convertible. It may motivate and support some of you, owning a FWL-Car, considering as well a similar project. Before I never thought on a switch from Single to Dual Quad. Since the restoration my 361 Engine was always running nice, smooth and very powerfull. At Car Shows, my car was among the most “pictured” ones and mostly the winner in its class. Although the engine department was “glamorous” restored, Dual Quad Engines always attracted me as other visitors, even when rusty and scruffy. I looked at many Dual Quads to estimate, how a Setup could become a "looker" – or not. Then I checked eBay for Original Dual Quad Sets, found them too scrappy and as well too expensive.
Edited by sermey 2009-11-30 1:51 PM (A-01 2008 Various Dual Quads.jpg) (A-02 2008-08-20 eBay Dual Quad Set.JPG) (A-03 2008-08-22 eBay Dual Quad Carbs.jpg) Attachments ----------------  A-01 2008 Various Dual Quads.jpg (141KB - 445 downloads) A-01 2008 Various Dual Quads.jpg (141KB - 445 downloads) A-02 2008-08-20 eBay Dual Quad Set.JPG (40KB - 462 downloads) A-02 2008-08-20 eBay Dual Quad Set.JPG (40KB - 462 downloads) A-03 2008-08-22 eBay Dual Quad Carbs.jpg (46KB - 556 downloads) A-03 2008-08-22 eBay Dual Quad Carbs.jpg (46KB - 556 downloads) | ||
| |||
| 59CRL |
| ||
Expert Posts: 2679       | Yep, im going to be running dual 4's on my 383.... but im not paying $600 for those 2 gold air filters.... I will go with anything chrome.... the dual 4 setup does get more attention when dressed up nice. | ||
| |||
| sermey |
| ||
Expert Posts: 1208    Location: SWITZERLAND | Just for “Show” reasons, and also motivated by the impressive Top-Job our member Larry (RoyalGate) is doing on his project, I decided finally to start this project (Pics by courtesy of Larry). I remembered the unsatisfactory restoration of the Original Quad Carb ending in replacing it by a new Carburetor Edelbrock 1406. Now, the easiest way would be obviously to purchase a Dual Quad Manifold, a second new Edelbrock with its Linkage, and a Set of new Oval Airfilter. This should be a simple and at all a not extensive work.
Edited by sermey 2009-12-01 10:12 AM (B-01 2008-08-15 Larrys TopJob 01.jpg) (B-02 2008-08-15 Larrys TopJob 02 .jpg) (B-03 2008-08-18 Larrys IgnitionCoil.jpg) Attachments ----------------  B-01 2008-08-15 Larrys TopJob 01.jpg (100KB - 444 downloads) B-01 2008-08-15 Larrys TopJob 01.jpg (100KB - 444 downloads) B-02 2008-08-15 Larrys TopJob 02 .jpg (113KB - 413 downloads) B-02 2008-08-15 Larrys TopJob 02 .jpg (113KB - 413 downloads) B-03 2008-08-18 Larrys IgnitionCoil.jpg (84KB - 478 downloads) B-03 2008-08-18 Larrys IgnitionCoil.jpg (84KB - 478 downloads) | ||
| |||
| dukeboy |
| ||
Expert 5K+ Posts: 6203     Location: Big pimpin' | Sermey, those Reproduction ovals will NOT fit the Edelbrock carb's air horn, as it's a larger neck size. You would have to modify the original bases in order to get 'em top work with Eddy carb's... Here's a set of AFB's (2652S and 2653S respectfully) I did for a customer's NOS 350 Golden Commando... 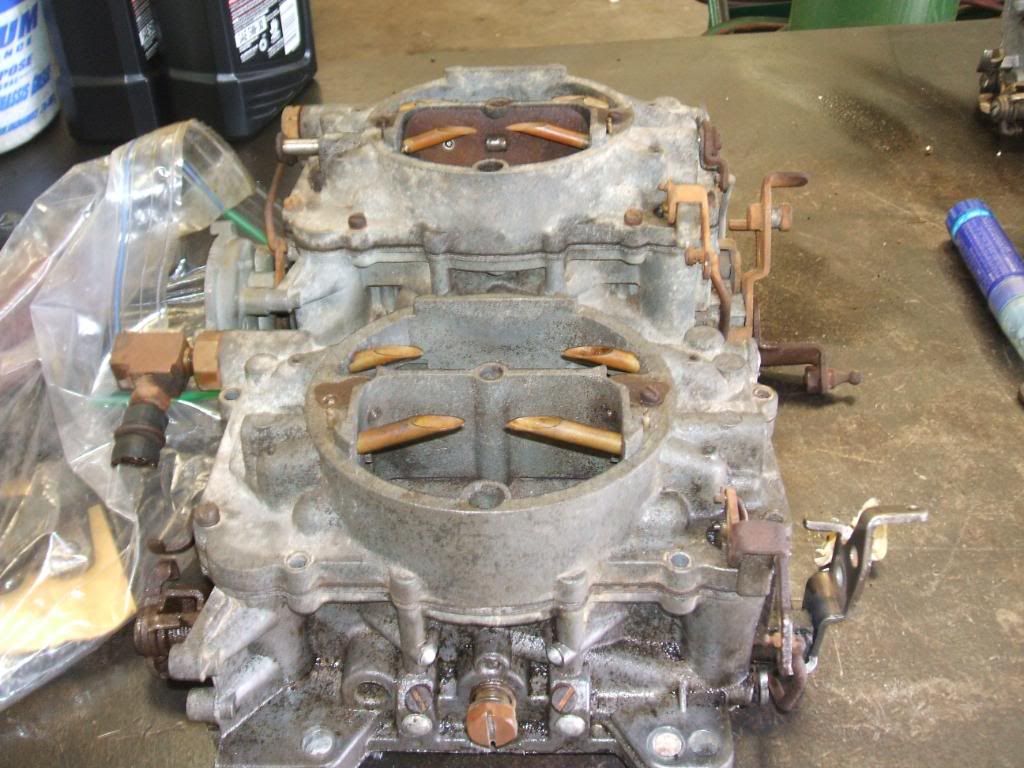 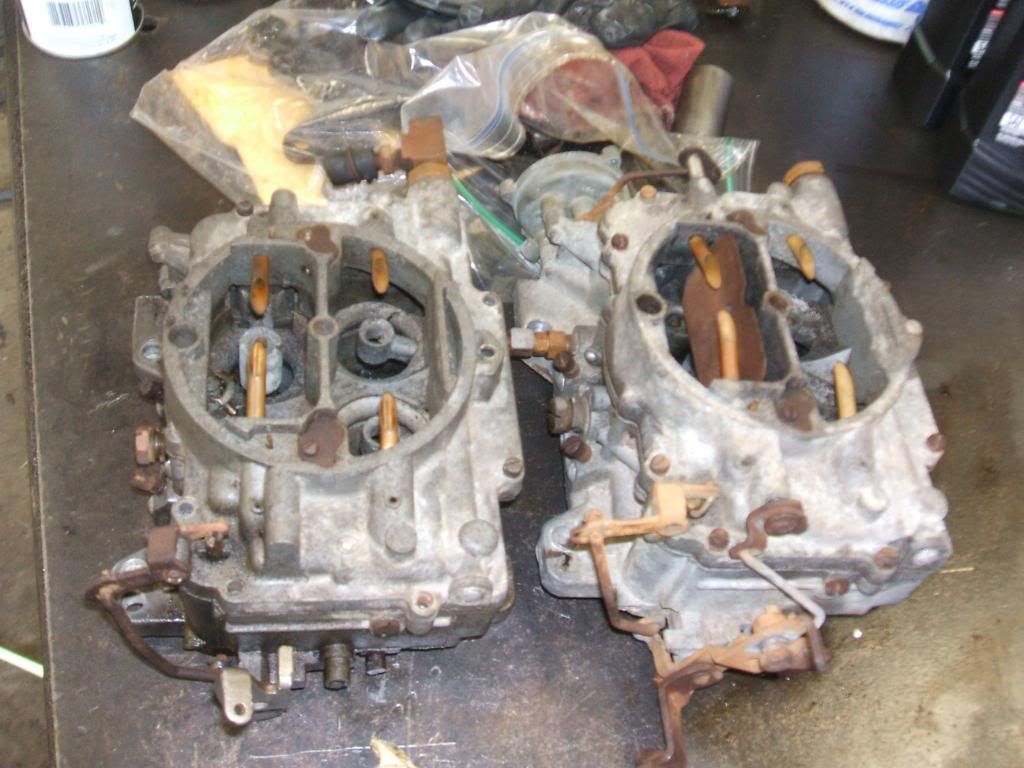 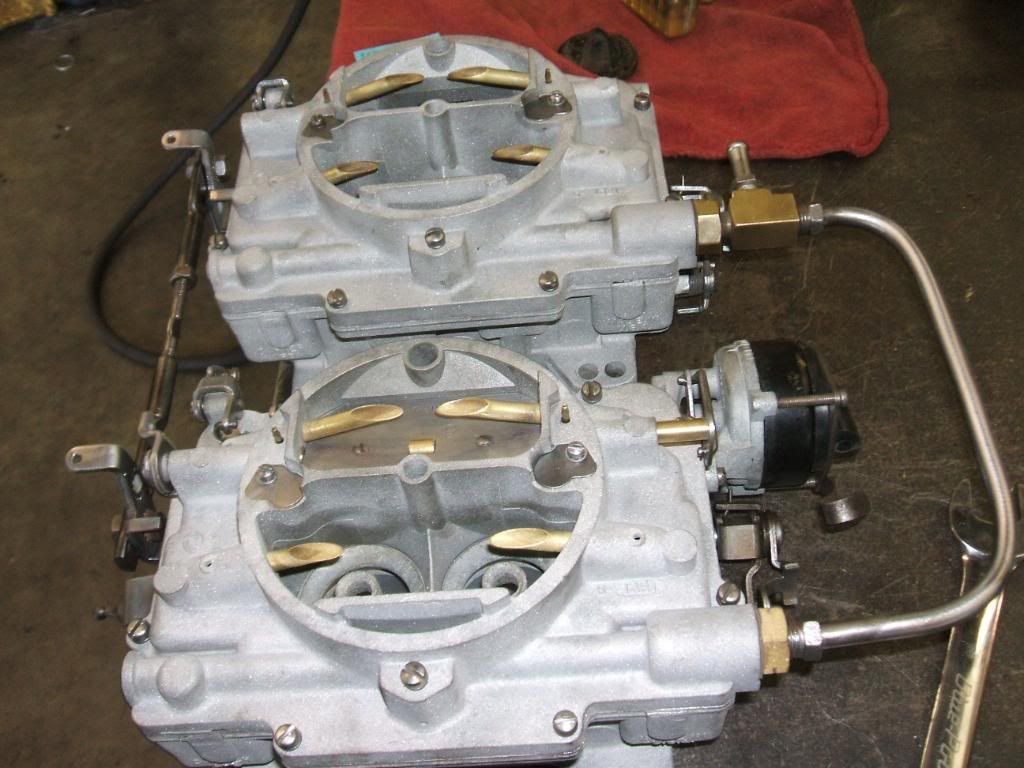 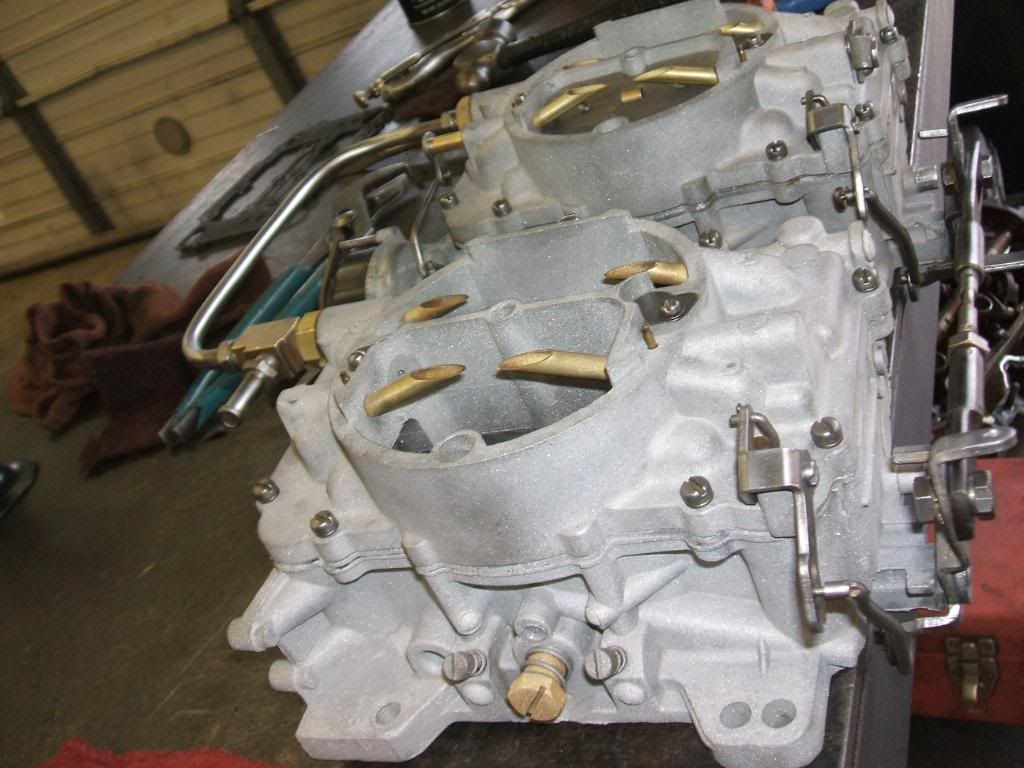 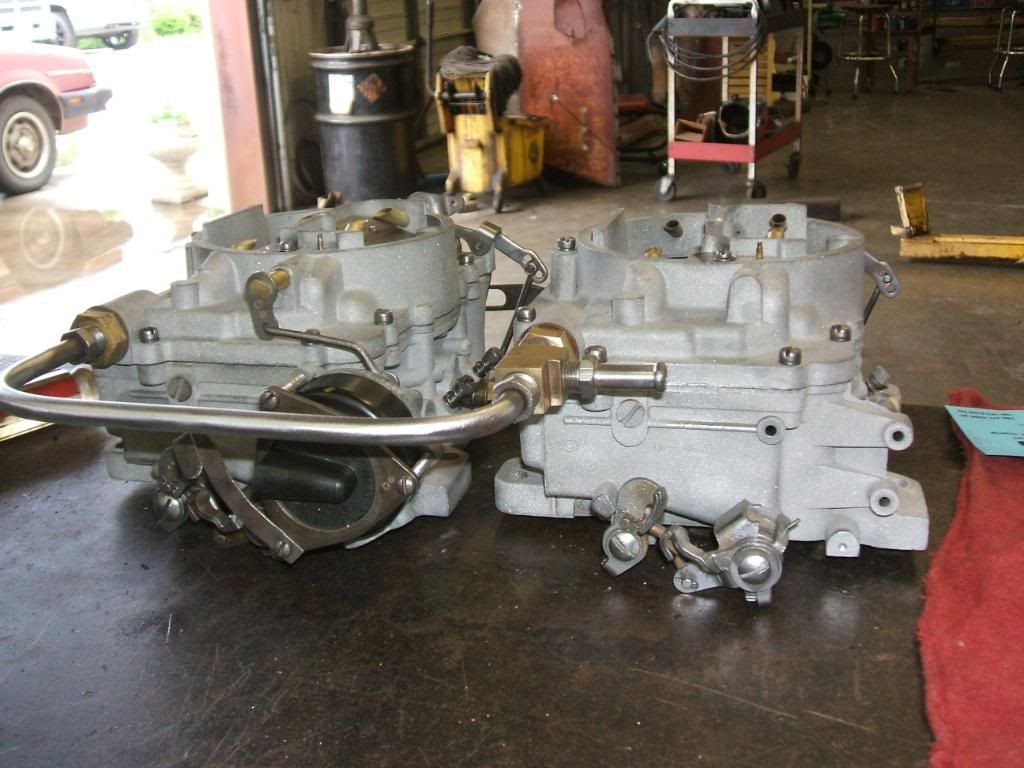 | ||
| |||
| sermey |
| ||
Expert Posts: 1208    Location: SWITZERLAND | dukeboy: Sermey, those Reproduction ovals will NOT fit the Edelbrock carb's air horn, as it's a larger neck size. You would have to modify the original bases in order to get 'em top work with Eddy carb's... You are right, dukeboy. Not only the Reproduction Oval will not fit, the Originals too. That's exactly why I post this thread, to show how I did it - my way. - SERGE - | ||
| |||
| sermey |
| ||
Expert Posts: 1208    Location: SWITZERLAND | 59CRL: .... but im not paying $600 for those 2 gold air filters.... May-be with your car, Greg, I would take the samse decision and invest in other items first. For a higher quoted Car as my Convertible the price becomes less important. The costs for all items (will show) are about USD 2000. The added value of a nice Dual Quad Set will be more than this amount. On the other side: Respect to Jan Fridberg taking the risk of investment for tooling the Oval Air Filter. I know by experience the effort needed to get such a device reproduced. On the engine there is no visible difference to the Originals. There are many other Parts, many of us are waiting for, should be reproduced, but only a few are willing to pay the higher costs. I agree, there are many other nice Dual Air Filters on the market, cheaper and they will do the Job as well. Post us your final solution! - SERGE - | ||
| |||
| sermey |
| ||
Expert Posts: 1208    Location: SWITZERLAND | I ordered all needed items at Summit Racing, as illustrated. A new Set of Oval AirFilter I got from Jan in Sweden (janfridberg@hotmail.com). (E-01 Edelbrock Carburetor1406-600CFM.jpg) (E-02 Edelbrock Dual Quad Fuel Line 8091.jpg) (E-03 Edelbrock Linkage Kit 7094.jpg) (E-04 Edelbrock Heat Insulator Gaskets 9267.jpg) (E-05 ARP Carburetor Studs 200-2401.jpg) (E-06 Mopar Performance Intake Gasket P4286825.jpg) Attachments ----------------  E-01 Edelbrock Carburetor1406-600CFM.jpg (56KB - 518 downloads) E-01 Edelbrock Carburetor1406-600CFM.jpg (56KB - 518 downloads) E-02 Edelbrock Dual Quad Fuel Line 8091.jpg (21KB - 564 downloads) E-02 Edelbrock Dual Quad Fuel Line 8091.jpg (21KB - 564 downloads) E-03 Edelbrock Linkage Kit 7094.jpg (40KB - 389 downloads) E-03 Edelbrock Linkage Kit 7094.jpg (40KB - 389 downloads) E-04 Edelbrock Heat Insulator Gaskets 9267.jpg (59KB - 492 downloads) E-04 Edelbrock Heat Insulator Gaskets 9267.jpg (59KB - 492 downloads) E-05 ARP Carburetor Studs 200-2401.jpg (40KB - 407 downloads) E-05 ARP Carburetor Studs 200-2401.jpg (40KB - 407 downloads) E-06 Mopar Performance Intake Gasket P4286825.jpg (29KB - 398 downloads) E-06 Mopar Performance Intake Gasket P4286825.jpg (29KB - 398 downloads) | ||
| |||
| sermey |
| ||
Expert Posts: 1208    Location: SWITZERLAND | The Dual Quad Intake Manifold I found in eBay. I removed all casting edges, glass-pearl blasted it inside and outside, painted with High Temperature Silver, one night burned in in the kitchens oven at 150deg, and mounted 8 new bolts. The Vacuum Connection I used as on the Single Quad Manifold, the remaining connection for the Vacuum Advance to the first Carburetor.
Edited by sermey 2009-12-01 4:00 PM (C-01 2008-09-14 eBay Dual Quad Intake.JPG) (C-02 2008-08-28 DSC00502 Owen.jpg) Attachments ----------------  C-01 2008-09-14 eBay Dual Quad Intake.JPG (34KB - 409 downloads) C-01 2008-09-14 eBay Dual Quad Intake.JPG (34KB - 409 downloads) C-02 2008-08-28 DSC00502 Owen.jpg (84KB - 391 downloads) C-02 2008-08-28 DSC00502 Owen.jpg (84KB - 391 downloads) | ||
| |||
| sermey |
| ||
Expert Posts: 1208    Location: SWITZERLAND | Then I had to move the Induction Coil sitting on the Intake Manifold. According the Picture of Larry I designed a support for mounting with the Fuel Pump Bolts.. I built this part using a plate of stainless Steel and used the existing bracket. These are CAD Pics. Edited by sermey 2009-12-01 4:50 PM (D-01 2008-10-20 CAD CoilSupport flat.jpg) (D-02 2008-10-20 CAD CoilSupport.jpg) (D-03 2008-10-20 CAD CoilSupport Assembly.jpg) Attachments ----------------  D-01 2008-10-20 CAD CoilSupport flat.jpg (45KB - 416 downloads) D-01 2008-10-20 CAD CoilSupport flat.jpg (45KB - 416 downloads) D-02 2008-10-20 CAD CoilSupport.jpg (51KB - 360 downloads) D-02 2008-10-20 CAD CoilSupport.jpg (51KB - 360 downloads) D-03 2008-10-20 CAD CoilSupport Assembly.jpg (69KB - 389 downloads) D-03 2008-10-20 CAD CoilSupport Assembly.jpg (69KB - 389 downloads) | ||
| |||
| sermey |
| ||
Expert Posts: 1208    Location: SWITZERLAND | As soon I got the AirFilters from Jan I modeled them to check how the assembly as unit will fit. Then I could start to work on the real parts. These are 3D-CAD Pics. Unfortunately I cannot touch these parts - just look at! The reality, later on, will be exact as shown. - SERGE - ;) ;) Edited by sermey 2009-12-01 5:39 PM (F-01 2008-11-01 DualAirFilter Top.jpg) (F-02 2008-11-01 DualAirFilter Filter.jpg) (F-03 2008-11-01 DualAirFilter Bottom.jpg) (F-04 2008-11-11 DualAirFilter Spacer.jpg) (F-05 2008-11-11 DualAirFilter Assembly SectionView.jpg) (F-06 2008-11-11 DualAirFilterAssembly Exploded View.jpg) (F-07 2008-11-11 Spacer Mounted.jpg) Attachments ----------------  F-01 2008-11-01 DualAirFilter Top.jpg (77KB - 392 downloads) F-01 2008-11-01 DualAirFilter Top.jpg (77KB - 392 downloads) F-02 2008-11-01 DualAirFilter Filter.jpg (58KB - 394 downloads) F-02 2008-11-01 DualAirFilter Filter.jpg (58KB - 394 downloads) F-03 2008-11-01 DualAirFilter Bottom.jpg (72KB - 373 downloads) F-03 2008-11-01 DualAirFilter Bottom.jpg (72KB - 373 downloads) F-04 2008-11-11 DualAirFilter Spacer.jpg (40KB - 382 downloads) F-04 2008-11-11 DualAirFilter Spacer.jpg (40KB - 382 downloads) F-05 2008-11-11 DualAirFilter Assembly SectionView.jpg (63KB - 447 downloads) F-05 2008-11-11 DualAirFilter Assembly SectionView.jpg (63KB - 447 downloads) F-06 2008-11-11 DualAirFilterAssembly Exploded View.jpg (118KB - 351 downloads) F-06 2008-11-11 DualAirFilterAssembly Exploded View.jpg (118KB - 351 downloads) F-07 2008-11-11 Spacer Mounted.jpg (41KB - 377 downloads) F-07 2008-11-11 Spacer Mounted.jpg (41KB - 377 downloads) | ||
| |||
| 59CRL |
| ||
Expert Posts: 2679       | Wow!! Your new parts look great! I run an Edelbrock like the one in your pic, which is a 1406 650 CFM..... running dual 4's will be cool. I will add my dual 4's on in the spring. | ||
| |||
| sermey |
| ||
Expert Posts: 1208    Location: SWITZERLAND | The Main Link to the first Carburetor has to be shortened, from the initial axis distance of 37cm to 28cm, the adjustment screw keeping in the center of the range. With the used interconnection (thread M6 or 1/4") the original lenght can easily be restored, to be fixed with Loctite (hard) in the correct angle. Edited by sermey 2009-12-02 8:59 AM (I-01 2008-12-02 Single Quad Lenght.jpg) (I-02 2008-12-02 Dual Quad Lenght.jpg) (I-03 2008-12-02 Final Dual Quad Carb Link.jpg) Attachments ----------------  I-01 2008-12-02 Single Quad Lenght.jpg (36KB - 370 downloads) I-01 2008-12-02 Single Quad Lenght.jpg (36KB - 370 downloads) I-02 2008-12-02 Dual Quad Lenght.jpg (40KB - 396 downloads) I-02 2008-12-02 Dual Quad Lenght.jpg (40KB - 396 downloads) I-03 2008-12-02 Final Dual Quad Carb Link.jpg (75KB - 390 downloads) I-03 2008-12-02 Final Dual Quad Carb Link.jpg (75KB - 390 downloads) | ||
| |||
| dukeboy |
| ||
Expert 5K+ Posts: 6203     Location: Big pimpin' | VERY Clever idea Sermey...Looks GREAT! Excellent fab work....Will not be noticable when done..I likey... | ||
| |||
| Mike M |
| ||
Extreme Veteran Posts: 409     Location: Tampa, Florida | I commend you for all your work, but for those of us that can't do all the machining, etc. Most of the parts are available from venders. The linkage rod connecting the carbs is the same as the one they sell for the '60s hemi cars. Alumcan on this site has reproduced the coil bracket. At Garlit's this year was a vendor selling the correct thickness spacers for the carbs. | ||
| |||
| Mike M |
| ||
Extreme Veteran Posts: 409     Location: Tampa, Florida | I forgot to mention that the choke is also being reproduced, I bought one and it looks just like the original. As for prices, the choke complete was about $90. The linkage about $100, I can't remember what the spacers were, but they weren't cheap. And I had my carbs restored for $200 each. | ||
| |||
| sermey |
| ||
Expert Posts: 1208    Location: SWITZERLAND | Mike M: At Garlit's this year was a vendor selling the correct thickness spacers for the carbs. I can't remember what the spacers were, but they weren't cheap. I purchased two pairs of Spacers at eBays, in polished Aluminium, very nice. Finally I couldn't use them because they where too thin to apply screws. The design I showed is optimal matched to the Bottom AirFilter as to the Carbs for a solid and tight mount. My Spacers have been made by a mechanics, the holes with the threads handcrafted by myself, as you will be shown. | ||
| |||
| sermey |
| ||
Expert Posts: 1208    Location: SWITZERLAND | The 1 : 1 Hardcopy of the CarbSpacers Drafting is centered and glued on the Bottom. On the other Bottoms side the centers of the Holes are punched, the oval opening cut out along the line, and the holes drilled to fit M3 screws. The comparison shows the difference of the two Quad Carbs, lefthand Edelbrock 1406 and righthand the Original Quad Carter, one Pic without and the other with Airfilter (now this is real view!). The aperture of the Edelbrock is estimated to be about 30% greater than of the Carter, without affecting the Airflow through the Airfilter. Attached is a PDF-File (S-00) according Pic S-01 to be printed 1: 1 on A4-sheet for direct use. - SERGE - . Edited by sermey 2009-12-02 5:44 PM (S-01 2008-11-14 CarbSpacer Draft.jpg) (S-02 2008-11-18 Draft on Bottom.jpg) (S-03 2008-11-18 Cut-Drill References.jpg) (S-04 Comparison 1 Edelbrock-Carter.jpg) (S-05 Comparison 2 Edelbrock-Carter wFilter.jpg) Attachments ----------------  S-00 2008-11-14 CarbSpacer Draft.pdf (33KB - 374 downloads) S-00 2008-11-14 CarbSpacer Draft.pdf (33KB - 374 downloads) S-01 2008-11-14 CarbSpacer Draft.jpg (97KB - 413 downloads) S-01 2008-11-14 CarbSpacer Draft.jpg (97KB - 413 downloads) S-02 2008-11-18 Draft on Bottom.jpg (56KB - 400 downloads) S-02 2008-11-18 Draft on Bottom.jpg (56KB - 400 downloads) S-03 2008-11-18 Cut-Drill References.jpg (84KB - 405 downloads) S-03 2008-11-18 Cut-Drill References.jpg (84KB - 405 downloads) S-04 Comparison 1 Edelbrock-Carter.jpg (101KB - 392 downloads) S-04 Comparison 1 Edelbrock-Carter.jpg (101KB - 392 downloads) S-05 Comparison 2 Edelbrock-Carter wFilter.jpg (93KB - 368 downloads) S-05 Comparison 2 Edelbrock-Carter wFilter.jpg (93KB - 368 downloads) | ||
| |||
| sermey |
| ||
Expert Posts: 1208    Location: SWITZERLAND | For an accurate result, when the aperture is cut-out, it makes sense to drill first two holes in the diameter and pre-fix the spacer to the bottom. After that all other holes can be drilled in one process through the bottom and the spacer.(Pic-00). The Oval Filters are sprayed in Golden, a brighter color than original by Jan, and coated with a transparent protective, same as the Horns shown in http://www.forwardlook.net/forums/forums/thread-view.asp?tid=23691&start=1 Impressive, there is no visible difference between the earlier CAD-Model and the Real Oval Filter here.The two yellow Stickers on the Oval Filter, inducing rather the impression of a warehouse device (my personal impression), I removed and left the single existing one at its original place. On the second Edelbrock, the Electric Choke with all the unnecessary links have been removed or disabled. On the Fuel Side I had to remove a bracket touching the Intake Manifold. Using a higher Spacer, this could be left, but I cared to keep the Original Total Height of the Carbs Unit and as well, not to expose the Spacer.The Original Carburetor Bolt, for fixing the Oval Air Filter, was too short. I replaced it by a Stud in Aluminium, offering the option to replace the ordinary Wingnut by a more esthetic Knob. There are plenty of shapes offered in the market, in plastic and in stainless steel. The front one in stainless steel I preferred to the ball-shaped one. Now the Dual Quad Setup was ready to install. – SERGE -
Edited by sermey 2009-12-03 5:04 PM (K-00 2008-11-30 Bottom Inside.jpg) (K-01 2008-11-30 Carter-Edelbrock.jpg) (K-02 2008-11-21 Golden Sprayed Top.jpg) (K-03 2008-11-30 Assembly Fuel Side .jpg) (K-04 2008-11-30 Linkage-Bottom Outside.jpg) (K-05 2008-11-30 Fixing Stud.jpg) (K-06 2008-11-30 Fixing Knobs.jpg) (K-07 2008-11-30 Final Assembly.jpg) Attachments ----------------  K-00 2008-11-30 Bottom Inside.jpg (79KB - 390 downloads) K-00 2008-11-30 Bottom Inside.jpg (79KB - 390 downloads) K-01 2008-11-30 Carter-Edelbrock.jpg (92KB - 388 downloads) K-01 2008-11-30 Carter-Edelbrock.jpg (92KB - 388 downloads) K-02 2008-11-21 Golden Sprayed Top.jpg (53KB - 397 downloads) K-02 2008-11-21 Golden Sprayed Top.jpg (53KB - 397 downloads) K-03 2008-11-30 Assembly Fuel Side .jpg (87KB - 402 downloads) K-03 2008-11-30 Assembly Fuel Side .jpg (87KB - 402 downloads) K-04 2008-11-30 Linkage-Bottom Outside.jpg (92KB - 382 downloads) K-04 2008-11-30 Linkage-Bottom Outside.jpg (92KB - 382 downloads) K-05 2008-11-30 Fixing Stud.jpg (97KB - 424 downloads) K-05 2008-11-30 Fixing Stud.jpg (97KB - 424 downloads) K-06 2008-11-30 Fixing Knobs.jpg (74KB - 443 downloads) K-06 2008-11-30 Fixing Knobs.jpg (74KB - 443 downloads) K-07 2008-11-30 Final Assembly.jpg (79KB - 393 downloads) K-07 2008-11-30 Final Assembly.jpg (79KB - 393 downloads) | ||
| |||
| 1959Dodge |
| ||
Expert Posts: 2244     Location: Yorba Linda, Ca | Nice Job Serge. You will love the dual carbs. I have the same 2 Edelbrocks on my car, 1405 and 1406 (one has an electric heated choke and the other has no choke)--I forgot which is which Börje (He has a 383 with 2 four barrels) raced them on the freeway, from about 55 to (well doc might see this so we just say didnt reach tripple digits before we quit) Guess who won His High Compression 383? Nope Guess again!!! Aivar's Regal Lancer is a 361 with dual four barrels and it runs great too(See the Video of it on UTube) Continued good luck and enjoyment with your car!!!! Gary | ||
| |||
| sermey |
| ||
Expert Posts: 1208    Location: SWITZERLAND | First the Induction Coil was mounted over the Fuel Pump with the prepared Bracket, then the Intake Manifold. For the Vacuum connection I used the Original Hose Fitting with included connection for the Heater Control.
Edited by sermey 2009-12-04 9:29 AM (L-01 2008-12-05 Induction Coil.jpg) (L-02 2008-12-09 Bolted Intake Manifold.jpg) (L-03 2008-12-10 Intake Vacuum Connection.jpg) Attachments ----------------  L-01 2008-12-05 Induction Coil.jpg (79KB - 375 downloads) L-01 2008-12-05 Induction Coil.jpg (79KB - 375 downloads) L-02 2008-12-09 Bolted Intake Manifold.jpg (84KB - 365 downloads) L-02 2008-12-09 Bolted Intake Manifold.jpg (84KB - 365 downloads) L-03 2008-12-10 Intake Vacuum Connection.jpg (67KB - 385 downloads) L-03 2008-12-10 Intake Vacuum Connection.jpg (67KB - 385 downloads) | ||
| |||
| sermey |
| ||
Expert Posts: 1208    Location: SWITZERLAND | Here the final Pics of my Dual Quad Setup. There is still the Points Ignition, the Electronic Ignition Conversion I did later. I tried to keep my "harmonic" style of the car: Golden, Chrome and Black. To the Single Quad now I can say: Thank you and GoodBye! - SERGE - Edited by sermey 2009-12-04 12:33 PM (M-01 2008-12-28 Front View Open .jpg) (M-02 2008-12-28 Left View Open.jpg) (M-03 2008-12-28 Right View Open.jpg) (M-04 2008-12-28 Left View Oval.jpg) (M-05 2008-12-28 Front View Oval .jpg) (M-06 2008-12-28 Right View Oval.jpg) (M-07 2003-07-14 Single Quad GoodBye.jpg) Attachments ----------------  M-01 2008-12-28 Front View Open .jpg (119KB - 394 downloads) M-01 2008-12-28 Front View Open .jpg (119KB - 394 downloads) M-02 2008-12-28 Left View Open.jpg (128KB - 379 downloads) M-02 2008-12-28 Left View Open.jpg (128KB - 379 downloads) M-03 2008-12-28 Right View Open.jpg (125KB - 374 downloads) M-03 2008-12-28 Right View Open.jpg (125KB - 374 downloads) M-04 2008-12-28 Left View Oval.jpg (117KB - 355 downloads) M-04 2008-12-28 Left View Oval.jpg (117KB - 355 downloads) M-05 2008-12-28 Front View Oval .jpg (97KB - 437 downloads) M-05 2008-12-28 Front View Oval .jpg (97KB - 437 downloads) M-06 2008-12-28 Right View Oval.jpg (114KB - 414 downloads) M-06 2008-12-28 Right View Oval.jpg (114KB - 414 downloads) M-07 2003-07-14 Single Quad GoodBye.jpg (117KB - 386 downloads) M-07 2003-07-14 Single Quad GoodBye.jpg (117KB - 386 downloads) | ||
| |||
| wizard |
| ||
Board Moderator & Exner Expert 10K+ Posts: 13049      Location: Southern Sweden - Sturkö island | As usual, Serge, you did a great job! Also as usual, even greater to share it to us others - thank's, you da man! | ||
| |||
| sermey |
| ||
Expert Posts: 1208    Location: SWITZERLAND | wizard - 2009-12-04 6:31 PM As usual, Serge, you did a great job! Also as usual, even greater to share it to us others - thank's, you da man! Thank you for the flowers, Sven. I have learned from you to do a good job on this site to enjoy all our members, as I do as well when reading your interesting Guide-Lines. - SERGE -
| ||
| |||
| 1959Dodge |
| ||
Expert Posts: 2244     Location: Yorba Linda, Ca | Well, why wait till next spring-summer to find out how She runs? Bring her out here to Calif and You and Aivar in his 58 Regal Lancer can see which 361 is Faster?¿ Very Nice Job, your plumbing for it is very similar to mine. I just have round chrome air-cleaners thou--sniff sniff Gary | ||
| |||
| big m |
| ||
Expert 5K+ Posts: 7806       Location: Williams California | Excellent job on your conversion, Serge!! ---John | ||
| |||
| sermey |
| ||
Expert Posts: 1208    Location: SWITZERLAND | 1959Dodge - . . . can see which 361 is faster . . . Thanks for the motivating words, Gary and John. Next I will comment how I adjusted the linkage, the Carbs and the difference in power I have experienced. - SERGE - Edited by sermey 2009-12-04 5:26 PM | ||
| |||
| 1959Dodge |
| ||
Expert Posts: 2244     Location: Yorba Linda, Ca | Sounds Great, Serge, Keep it coming!!!! Gary | ||
| |||
| mogge65 |
| ||
Expert Posts: 1295       Location: Nasco , SWEDEN | Thank´s for all pic´s and info. it makes it a little bit easier for all who wants to make there engine stand out in the crowd Edited by mogge65 2009-12-05 9:33 AM | ||
| |||
| 59CRL |
| ||
Expert Posts: 2679       | Wow.... looks really nice!! The Edelbrocks look great, intake too..... nice setup for sure | ||
| |||
| sermey |
| ||
Expert Posts: 1208    Location: SWITZERLAND | sermey - 2009-12-01 10:41 PM Then I had to move the Induction Coil sitting on the Intake Manifold. According the Picture of Larry I designed a support for mounting with the Fuel Pump Bolts.. I built this part using a plate of stainless Steel and used the existing bracket. These are CAD Pics. On special request for Imperial252 here the eDrawing of the CoilSupport, as shown (eDrawing Viewer to Download for free). - SERGE - Edited by sermey 2011-02-19 3:05 AM Attachments ----------------  2008-10-20 CoilSupport.EPRT (186KB - 376 downloads) 2008-10-20 CoilSupport.EPRT (186KB - 376 downloads) | ||
| |||
| Powerflite |
| ||
Expert 5K+ Posts: 9666        Location: So. Cal | Which air filters do people use for these? I am only able to find the taller filters for the single carb applications. Where do I get the shorter ones for the dual carbs? I checked K&N as well, and they have the E-1957, but they list it for the single carb application as well as the dual carb. But their picture of it looks too tall, like the single carb version. | ||
| |||
| mstrug |
| ||
Expert 5K+ Posts: 6500    Location: Newark, Texas (Fort Worth) | It is too tall. we need 2-1/4'' tall filters. I have some old nos filters from fram and the like. Ii believe most people use a hot rod filter the is circular and fits inside the housing. I can't remember the outer diameter, but it should be about 5'' inner diameter: http://www.oreillyauto.com/site/c/detail/KAN0/E3360/N2072.oap?ck=Se... may need a gasket but you see what I mean, it will be inside the cover. marc. I don't know if 8'' will fit but, some of these can be oval-ed and shaped to go in the housing. http://www.ebay.com/itm/SPECTRE-RED-HI-FLOW-ROUND-AIR-FILTER-K-N-OI... Edited by mstrug 2016-01-14 1:04 PM | ||
| |||
| Powerflite |
| ||
Expert 5K+ Posts: 9666        Location: So. Cal | Do you mean like this? I was hoping not to have to do that. Or are you suggesting that you can get a round filter with the same circumference and squeeze it into the same shape as the oval one? (P1010209r.jpg) (P1010208r.jpg) Attachments ----------------  P1010209r.jpg (169KB - 313 downloads) P1010209r.jpg (169KB - 313 downloads) P1010208r.jpg (153KB - 346 downloads) P1010208r.jpg (153KB - 346 downloads) | ||
| |||
| Powerflite |
| ||
Expert 5K+ Posts: 9666        Location: So. Cal | I measured the outside circumference of an oval filter and got 29.25". Divide by pi, and you get a circle that is 9.3" in outside diameter. To check it, I measured the inside circumference at 21.625". Divide by pi, and you get a circle that is 6.88". The thickness of the filter is 1.16" from outside to inside, so 6.88 + 2.32 = 9.2". So it comes out to the same number by measuring the inside circumference as well. Ideally, it looks like a filter with 9.25" outside diameter is ideal, but it might be easier to find a 9" diameter instead. | ||
| |||
| Powerflite |
| ||
Expert 5K+ Posts: 9666        Location: So. Cal | A filter from a 1978 Honda Civic 1.4L motor has an advertised outside diameter of 9.15" and a height of 2.59" so I thought I would give that a try. It is really a 9.06" diameter. It turns out pretty well even though it is visibly short, but the screen and the paper gets crushed a little at the inside corners and the outside flat areas. It looks to be a good height as well. I will probably use this until if/when I can get something better. There is a Fiat filter that looks close too, Mazda Rx7, and a Ford truck filter maybe, but they all must be ordered so you have to order one and try it. Edit: I forgot to include the part no. of the Honda filter. It is: WIX 42909 Edited by Powerflite 2016-01-16 3:44 PM (Filter Crush.jpg) (Filter Height.jpg) Attachments ----------------  Filter Crush.jpg (131KB - 312 downloads) Filter Crush.jpg (131KB - 312 downloads) Filter Height.jpg (71KB - 317 downloads) Filter Height.jpg (71KB - 317 downloads) | ||
| |||
| Mike M |
| ||
Extreme Veteran Posts: 409     Location: Tampa, Florida | Don't know if this has been mentioned K & N now makes the air filter elements for the 1958 and newer oval air cleaners. I received an email last week from K & N and promptly ordered a pair. Just got them today and they are correct. Part number E-1959. They cost about $40 each, but you never replace them. | ||
| |||
| Jump to page : 1 Now viewing page 1 [50 messages per page] |
| Search this forum Printer friendly version E-mail a link to this thread |
| (Delete all cookies set by this site) | |