| The Forward Look Network | ||
| ||
 '55 Plaza Suburban arrives today '55 Plaza Suburban arrives todayJump to page : < 1 2 3 4 5 6 7 8 9 10 11 ... > Now viewing page 6 [50 messages per page] | View previous thread :: View next thread |
| Forward Look NON-Technical Discussions -> 1955-1961 Forward Look MoPar General Discussion | Message format |
| 56D500boy |
| ||
Expert 5K+ Posts: 9899      Location: Lower Mainland BC | 71charger_fan - 2017-10-19 10:47 PM That looks like the same mechanism that's in my car. It seems to work fine. It's the vent itself that seems to be jammed. I disconnected the linkage and can't pull the vent open.. Please don't make the same mistake as I made in that situation. Please read through this thread before forcing anything. http://www.forwardlook.net/forums/forums/thread-view.asp?tid=65057&... I still haven't fixed that problem. Very Very UGLY.  Edited by 56D500boy 2017-10-20 1:31 AM | ||
| |||
| 71charger_fan |
| ||
Elite Veteran Posts: 667 Location: Frederick, MD | I just read through that thread. What a mess. Hopefully, having my heater box off the firewall will make mine less of an ordeal. However, it's still almost impossible to see in there. I did just order one of those Mercury Marine bellows for my car. Thanks for that tip. | ||
| |||
| 56D500boy |
| ||
Expert 5K+ Posts: 9899 Location: Lower Mainland BC | 71charger_fan - 2017-10-20 9:05 AM I just read through that thread. What a mess. Hopefully, having my heater box off the firewall will make mine less of an ordeal. However, it's still almost impossible to see in there. I did just order one of those Mercury Marine bellows for my car. Thanks for that tip. Yeh, as soon as I read that about your stiff cowl vent I knew that I had to help you avoid my mess. Use an inspection mirror to locate the two hinges and spray the heck out them with PB Blaster or the like and let it soak in for a day or so before trying to work the hinges. And then, make sure that you are actually moving the hinged bit not ripping the hinge from the body like I inadvertently did. The Mercury Marine bellows needed ZERO cutting. I just pulled the big end through the firewall hole and sealed it to the inside with black messy sticky hate it silicone sealant. I will post a photo of that hopefully later today. (It was done weeks ago, I just forgot to take a photo).  | ||
| |||
| 71charger_fan |
| ||
Elite Veteran Posts: 667 Location: Frederick, MD | Today, I worked the cowl a little to see if maybe it would loosen up on its own. It didn't. I vacuumed out all the packed dirt then sprayed the crap out of that section of cowl with WD-40 since it has a long bendable nozzle and I could really get it up in there. I started working at the screws that hold the cowl flap to the hinge. They do not want to come out, but I got one to turn about half a rotation without breaking off. Not sure how I'll get them back in once I get them out, but we'll cross that bridge when we get to it. I added the photo of my open cowl to your thread as I thought it might be helpful there. Edited by 71charger_fan 2017-10-20 8:27 PM | ||
| |||
| 56D500boy |
| ||
Expert 5K+ Posts: 9899 Location: Lower Mainland BC | I think only one of my screws came out whole. The others broke off but I was able to turn them from the back as if they were going in and because the threads were cleaner going that way, they came out, leaving okay threads for new screws (yet to be sourced). PS: Try something other than WD40 on the rusty hinges, e.g. PB Blaster or Liquid Wrench. | ||
| |||
| Powerflite |
| ||
Expert 5K+ Posts: 9650 Location: So. Cal | If you use a torch to heat the screws up red hot, and then turn them while still hot, they should come out without breaking. That is if you can get the torch etc up there to get to them without setting the car on fire. | ||
| |||
| 71charger_fan |
| ||
Elite Veteran Posts: 667 Location: Frederick, MD | Given the amount of penetrate I've sprayed up in there, I'd be very afraid to take a torch to the area. | ||
| |||
| Old Ray |
| ||
Extreme Veteran Posts: 507 Location: Invermere B.C. Canada - Rocky Mountains | 56D500boy - 2017-10-20 6:48 PM PS: Try something other than WD40 on the rusty hinges, e.g. PB Blaster. What he said | ||
| |||
| 71charger_fan |
| ||
Elite Veteran Posts: 667 Location: Frederick, MD | I got the cowl vent out today and successfully snapped off all three screws. Go big or go home. The hinge is well and truly stuck. It's soaking in PB Blaster now. I took a piece of scrap wood and, with a small ball pein, gave it a few sharp taps to see if it would magically break free. It didn't. Hopefully, given enough penetrant and time, it'll move. If I can get any movement at all, it'll help work the penetrating oil in and hopefully restore its range of motion. (Plaza Cowl.jpg) (Plaza Cowl Vent.jpg) (Plaza Cowl Vent Rod Bellows.jpg) Attachments ----------------  Plaza Cowl.jpg (86KB - 392 downloads) Plaza Cowl Vent.jpg (153KB - 382 downloads) Plaza Cowl Vent Rod Bellows.jpg (126KB - 384 downloads) Plaza Cowl.jpg (86KB - 392 downloads) Plaza Cowl Vent.jpg (153KB - 382 downloads) Plaza Cowl Vent Rod Bellows.jpg (126KB - 384 downloads) | ||
| |||
| 71charger_fan |
| ||
Elite Veteran Posts: 667 Location: Frederick, MD | I also removed the insulation pad from the heater box and dug out the accumulated dirt and mud with a screw driver. Next, I'll give it a good scrubbing with soap and water, then clean and POR-15 the metal plate. I'll probably get some Thermo-Tec to replace the insulation. (Plaza Heater Box.jpg) Attachments ---------------- Plaza Heater Box.jpg (135KB - 387 downloads) | ||
| |||
| 56D500boy |
| ||
Expert 5K+ Posts: 9899 Location: Lower Mainland BC | Grab those broken screws from the back side with needle-nosed vicegrips and turn them in the "in" direction. They will hopefully, like mine, break loose and turn so you can remove them. Save the bits to check the thread size for the new replacements that you will eventually need. Be patient with the hinge. You do NOT want to break it (at either end). | ||
| |||
| 71charger_fan |
| ||
Elite Veteran Posts: 667 Location: Frederick, MD | I got my Mercruiser replacement bellows for my cowl vent rod. Still no luck getting the hinge to move Edited by 71charger_fan 2017-10-23 2:33 PM (Plaza Bellows New.jpg) (Plaza Bellows New (2).jpg) Attachments ---------------- Plaza Bellows New.jpg (122KB - 369 downloads) Plaza Bellows New (2).jpg (114KB - 372 downloads) | ||
| |||
| 71charger_fan |
| ||
Elite Veteran Posts: 667 Location: Frederick, MD | I did get two out of the three snapped off screws out today. The one in the middle still won't budge. (phpWHkxezPM.jpg) Attachments ---------------- phpWHkxezPM.jpg (60KB - 420 downloads) | ||
| |||
| 56D500boy |
| ||
Expert 5K+ Posts: 9899 Location: Lower Mainland BC | 71charger_fan - 2017-10-23 8:03 PM I did get two out of the three snapped off screws out today. The one in the middle still won't budge. Keep spraying it (and the hinges with PB Blaster, etc. Patience grasshopper patience  | ||
| |||
| Old Ray |
| ||
Extreme Veteran Posts: 507 Location: Invermere B.C. Canada - Rocky Mountains | 71charger_fan - 2017-10-23 6:03 PM I did get two out of the three snapped off screws out today. The one in the middle still won't budge. ....time to upgrade to a rust removing spray chemical, huh? (like CLR, or better) .......and do I have a vent screw story for you two, .....new film and news sometime tomorrow! | ||
| |||
| Old Ray |
| ||
Extreme Veteran Posts: 507 Location: Invermere B.C. Canada - Rocky Mountains | Sorry if I’m hijacking this thread. Thought this might be helpful to future readers. Seeing the trials and tribulations that the vent hinge has caused I was getting paranoid about mine, so Sunday, instead of grinding mig welds (boring), I tackled my vent hinge, the heater box was already off so easy access, So I have many good things to say about the semi-arid climate where I live and where this car came from. The screws and parts were out in less than 10 minutes. (Sorry).
Would this be a bad time to ask where to get the cowl vent seal from?
(1956 VENT.jpg) Attachments ---------------- 1956 VENT.jpg (55KB - 383 downloads) | ||
| |||
| 71charger_fan |
| ||
Elite Veteran Posts: 667 Location: Frederick, MD | I got a cowl vent seal from Bernbaum (http://store.oldmoparts.com/index.php?) Since your screws seem to have come out in good shape, can you post what size they are? Mine (what little bit came out) are badly rusted. I'm afraid they're something odd like 12-24 that won't be available locally. Edited by 71charger_fan 2017-10-24 3:46 PM | ||
| |||
| 71charger_fan |
| ||
Elite Veteran Posts: 667 Location: Frederick, MD | Today, I wire brushed the back side of the cowl vent and the steel plate in the heater box and gave them each a coat of POR-15. I was quite happy to have been able to get some movement on the cowl vent hinge. With the heater box out, it's relatively easy to reach in there with a small pry bar and move it. I got a little movement, sprayed it with more PB B'laster, waited a while, then moved it back. It's still nowhere near having its full range of motion, but any movement is encouraging. (Plaza heater box (2).jpg) (Plaza cowl vent.jpg) Attachments ---------------- Plaza heater box (2).jpg (139KB - 368 downloads) Plaza cowl vent.jpg (109KB - 360 downloads) | ||
| |||
| Old Ray |
| ||
Extreme Veteran Posts: 507 Location: Invermere B.C. Canada - Rocky Mountains | Will do gladly.... probably be tomorrow, | ||
| |||
| 71charger_fan |
| ||
Elite Veteran Posts: 667 Location: Frederick, MD | Thanks, appreciate it. | ||
| |||
| 56D500boy |
| ||
Expert 5K+ Posts: 9899 Location: Lower Mainland BC | 71charger_fan - 2017-10-24 3:38 PM I was quite happy to have been able to get some movement on the cowl vent hinge. With the heater box out, it's relatively easy to reach in there with a small pry bar and move it. I got a little movement, sprayed it with more PB B'laster, waited a while, then moved it back. It's still nowhere near having its full range of motion, but any movement is encouraging. I was happy with the motion that I got to. UNTIL I realized that it was the hinge mount fatiguing and breaking off. Personally I would have avoided the small pry bar  and only wiggled the hinge by hand. and only wiggled the hinge by hand. Good luck. | ||
| |||
| Powerflite |
| ||
Expert 5K+ Posts: 9650 Location: So. Cal | If you notice it isn't going to budge, break out the torch before you do any damage. Heat performs miracles to free up rusted parts. | ||
| |||
| 71charger_fan |
| ||
Elite Veteran Posts: 667 Location: Frederick, MD | I've come to realize that, with the unique shape of the wagon's fuel tank, I really needed the wagon fuel sender hooked up to the original wagon gauge. So, many dollars later, I have an NOS one. (Plaza Fuel Sender (9).jpg) Attachments ---------------- Plaza Fuel Sender (9).jpg (65KB - 390 downloads) | ||
| |||
| 71charger_fan |
| ||
Elite Veteran Posts: 667 Location: Frederick, MD | I'm also continuing to collect old, NOS suspension parts trying to avoid Chinesium components as much as possible. (Plaza LCA Pivot Bar.jpg) Attachments ---------------- Plaza LCA Pivot Bar.jpg (64KB - 362 downloads) | ||
| |||
| Old Ray |
| ||
Extreme Veteran Posts: 507 Location: Invermere B.C. Canada - Rocky Mountains | Cowl vent hinge screws appear to be; 3/16 dia X ¼-or 5/16 long stove bolts ......OR....... #10-24 dia X ¾ or 5/16 long machine screws (they are the same thing). The threads appear to be a bit sloppy but the threaded bracket is not very thick, an anal Vergio (me) would use a longer screw and double nut it, your average Mopar guy would complicate it as much as possible. | ||
| |||
| 71charger_fan |
| ||
Elite Veteran Posts: 667 Location: Frederick, MD | Thanks. I dug around and found one #10-24 machine screw in the garage and tried it. It fit perfectly. I took the propane torch to the third screw and it finally came out. I was a little worried when a few wisps of smoke came from the defroster vent inside the car, but all seems okay. (Plaza Cowl Vent Screw Out.jpg) Attachments ---------------- Plaza Cowl Vent Screw Out.jpg (87KB - 383 downloads) | ||
| |||
| 71charger_fan |
| ||
Elite Veteran Posts: 667 Location: Frederick, MD | The front of the underside of the cowl vent was pretty heavily rusted. Today, I wire brushed and sanded it, then sealed that surface with some POR-15. If only the hinge was bolted in instead of welded in. It would be nice to be able to strip and coat that. Edited by 71charger_fan 2017-10-25 4:08 PM (Plaza Cowl Vent (3).jpg) (Plaza Cowl Vent (4).jpg) Attachments ---------------- Plaza Cowl Vent (3).jpg (91KB - 383 downloads) Plaza Cowl Vent (4).jpg (96KB - 387 downloads) | ||
| |||
| 71charger_fan |
| ||
Elite Veteran Posts: 667 Location: Frederick, MD | I cleaned up the length of the cowl vent rod and coated most of it with POR-15. Eventually, I'll sandblast the clevis and coat that too. I didn't coat the bottom as I was afraid it would make it too hard to get the clip back on it. (Plaza Cowl Vent Rod.jpg) Attachments ---------------- Plaza Cowl Vent Rod.jpg (124KB - 372 downloads) | ||
| |||
| 71charger_fan |
| ||
Elite Veteran Posts: 667 Location: Frederick, MD | My heater box insulation came today. I'll probably cut and fit that tomorrow. (Plaza Heater Box Insulation.jpg) Attachments ---------------- Plaza Heater Box Insulation.jpg (142KB - 385 downloads) | ||
| |||
| 71charger_fan |
| ||
Elite Veteran Posts: 667 Location: Frederick, MD | The hinge has loosened enough that I can now move it to the fully closed position. A bag of #10-24 button-head cap screws came today. They're a little long, but they'll work. (Plaza Cowl Vent Screw.jpg) Attachments ---------------- Plaza Cowl Vent Screw.jpg (132KB - 368 downloads) | ||
| |||
| 56D500boy |
| ||
Expert 5K+ Posts: 9899 Location: Lower Mainland BC | 71charger_fan - 2017-10-27 4:08 PM The hinge has loosened enough that I can now move it to the fully closed position. A bag of #10-24 button-head cap screws came today. They're a little long, but they'll work. I am envious.  Too bad nobody had broken their hinge before me and stopped me from breaking mine Too bad nobody had broken their hinge before me and stopped me from breaking mine  I still have to put the lid on that can of worms. I can do that in the garage over the winter. Right now the weather is fantastic for working outside on the car. You can trim those cap screws down to a shorter length using a Dremel with the small abrasive cutting disc. Works great (wear I protection and go slow). | ||
| |||
| 71charger_fan |
| ||
Elite Veteran Posts: 667 Location: Frederick, MD | It's still extremely tight and impossible to move by hand. I'm still having to pry it to move it. So, I'm not yet safe from the possibility of breaking the hinge, but I'm optimistic. | ||
| |||
| Old Ray |
| ||
Extreme Veteran Posts: 507 Location: Invermere B.C. Canada - Rocky Mountains | 71charger_fan - 2017-10-27 7:35 PM It's still extremely tight and impossible to move by hand. I'm still having to pry it to move it. So, I'm not yet safe from the possibility of breaking the hinge, but I'm optimistic. SO! I made some seat belt upper anchors (this is not my first rodeo) as Dave Forgie is doing and these are the brackets one before and one after being soaked in Phosphoric acid. I have tried to buy some more unsuccessfully but I did get a pail of new stuff that I haven't tried yet. In the old days there was a product called navel jelly (I think) and there many new ones that EAT rust. (hint) (seat belt bracket rust.jpg) Attachments ---------------- seat belt bracket rust.jpg (93KB - 355 downloads) | ||
| |||
| 71charger_fan |
| ||
Elite Veteran Posts: 667 Location: Frederick, MD | Home Depot has a phosphoric prep and etch for sale (at least in the U.S.). I may have to give that a try. | ||
| |||
| 71charger_fan |
| ||
Elite Veteran Posts: 667 Location: Frederick, MD | Today, I moved and sprayed the hinge some more and made new insulation for the heater box. (Plaza Heater Box Insulation.jpg) (Plaza Heater Box Insulation (2).jpg) Attachments ---------------- Plaza Heater Box Insulation.jpg (141KB - 352 downloads) Plaza Heater Box Insulation (2).jpg (119KB - 344 downloads) | ||
| |||
| 56D500boy |
| ||
Expert 5K+ Posts: 9899 Location: Lower Mainland BC | 56D500boy - 2017-10-02 5:14 PM I'll see how ambitious I get later (during the winter) when I start dealing with the seats. :) 56D500boy - 2017-10-02 7:03 PM I was just out there playing with the seat base/frame and found that I could remove the outermost two hold down bolts with a 1/2" box end wrench without removing the side panels. I removed and replaced all 8 bolts, 4 per side, adding never-sieze to the threads so when I do actually take the front seat out (to install carpet, etc.) there won't be issues. :) Well it must be winter because I have taken both the rear seat totally out AND the front seat it out too ( a little tricky by myself but slowly slowly it was doable). In the end, it was faster to take the metal seat bottom covers off, made the access to the outer bolts easier, I could get a socket on the outside forward bolt (but NOT the rear outside bolt). At least now I can paint the inside of those covers (Tremclad Royal Blue is almost a perfect match for my situation)> Somewhere somehow, I ordered carpet and I want to see it if fits (because it turns out to be for a 55-56 Desoto Fireflite (4 dr Sedan). Question: How is the front seat back attached to the seat frame? I would like to remove it to paint the seat frame (well at least the bottom). | ||
| |||
| 71charger_fan |
| ||
Elite Veteran Posts: 667 Location: Frederick, MD | I haven't yet figured that one out. It seems that the seat back pieces probably have to be bent to clear the pins on the seat frame. I was hesitant to try it, but I'll have to deal with it some day. I'm reasonably sure there's at least one old yet undiscovered mouse nest in my front seat back. I bought carpet for mine and I'm kicking myself for not checking the fit while all the seats were out. Definitely easier to deal with the front seats with the metal side covers off. I'm not reinstalling mine until after I put on new seat covers. Edited by 71charger_fan 2017-10-28 9:53 PM | ||
| |||
| Powerflite |
| ||
Expert 5K+ Posts: 9650 Location: So. Cal | I bought the carpet for mine, and the fit isn't great but it works. Most of the trouble is under the front seat so it is workable. | ||
| |||
| 56D500boy |
| ||
Expert 5K+ Posts: 9899 Location: Lower Mainland BC | Powerflite - 2017-10-28 10:28 PM I bought the carpet for mine, and the fit isn't great but it works. Most of the trouble is under the front seat so it is workable. Nathan: Where did you get your carpet and what did you order for which car? | ||
| |||
| Powerflite |
| ||
Expert 5K+ Posts: 9650 Location: So. Cal | Same as yours, from AC. I think all of them are made by the same place no matter who you buy it from. This was for my '56 Savoy. | ||
| |||
| 71charger_fan |
| ||
Elite Veteran Posts: 667 Location: Frederick, MD | Well crap. I guess it was inevitable. (Plaza Cowl Vent Hinge Broken.jpg) Attachments ---------------- Plaza Cowl Vent Hinge Broken.jpg (103KB - 347 downloads) | ||
| |||
| 56D500boy |
| ||
Expert 5K+ Posts: 9899 Location: Lower Mainland BC | 71charger_fan - 2017-10-30 8:28 PM Well crap. I guess it was inevitable. Sorry. I laughed (ironically, with a tinge of pity but a lot of compassion). Hopefully the other end is still working. Now that there are two of us in this situation, together we might be able to come up with a solution. I have a sketch of my idea to fix mine that I will scan and post up. | ||
| |||
| 71charger_fan |
| ||
Elite Veteran Posts: 667 Location: Frederick, MD | I was thinking of making a hinge bracket that attached to the firewall behind the heater box that would be long enough to reach up in there. | ||
| |||
| Powerflite |
| ||
Expert 5K+ Posts: 9650 Location: So. Cal | Shoot, mine is still working great. Maybe I should get under there and oil it up! | ||
| |||
| 56D500boy |
| ||
Expert 5K+ Posts: 9899 Location: Lower Mainland BC | Powerflite - 2017-10-30 10:04 PM Shoot, mine is still working great. Maybe I should get under there and oil it up! Did you miss this thread?: http://www.forwardlook.net/forums/forums/thread-view.asp?tid=65057&... Edited by 56D500boy 2017-10-30 11:45 PM | ||
| |||
| 71charger_fan |
| ||
Elite Veteran Posts: 667 Location: Frederick, MD | I haven't touched the car in more than a week, but I'm still gathering old suspension parts. (Plaza Control Arm Bushing and Pin Kit.jpg) Attachments ---------------- Plaza Control Arm Bushing and Pin Kit.jpg (60KB - 336 downloads) | ||
| |||
| 71charger_fan |
| ||
Elite Veteran Posts: 667 Location: Frederick, MD | I did find a suitable substitute for the curved heater hose from the heater control valve to the heater core. http://www.forwardlook.net/forums/forums/thread-view.asp?tid=67019&... | ||
| |||
| 71charger_fan |
| ||
Elite Veteran Posts: 667 Location: Frederick, MD | Today, I drilled (and Dremel'd) the frozen bracket off of the cowl vent hinge. I'm trying to figure out a suitable work around to replace that passenger side pivot. (Plaza Cowl Vent Hinge.jpg) Attachments ---------------- Plaza Cowl Vent Hinge.jpg (108KB - 348 downloads) | ||
| |||
| 56D500boy |
| ||
Expert 5K+ Posts: 9899 Location: Lower Mainland BC | 71charger_fan - 2017-11-06 3:59 PM Today, I drilled (and Dremel'd) the frozen bracket off of the cowl vent hinge. I'm trying to figure out a suitable work around to replace that passenger side pivot. Thanks for kicking my butt. That is one of my oldest untamed cans of worms http://www.forwardlook.net/forums/forums/thread-view.asp?tid=65057&... My idea was to Dremel off the Hinge pin (but I see drilling it off works well too), and then using an angle/corner bracket to create the new hinge. One leg of the brace would be vertical and attached to the cowl vent hinge with a small bolt and nyloc nut. The other leg would be horizontal and bolted to the flat part of the cowl. The location for that would be a bit of trial and error using a drill to create trial holes. Initially the bolt head would be exposed beside the cowl vent. Once the location was fixed and the cowl vent was operating fine (enough), I would remove the vertical bolt and drill a larger hole in the upper cowl, through the top layer but not the bottom layer (there are several). Then I would reinstall the vertical bolt and, after confirming that it the hinge still works, fill in the larger hole and refinish and paint the cowl. To decrease the "Trial and Error" on the location of the new hinge bracket, I can use the cowl piece that I got from John at Big M to get it within half a millimeter (see below) Proposed 3/4" x 3/4" angle bracket (not too scale) (might need to be smaller or purpose made from flat stock): 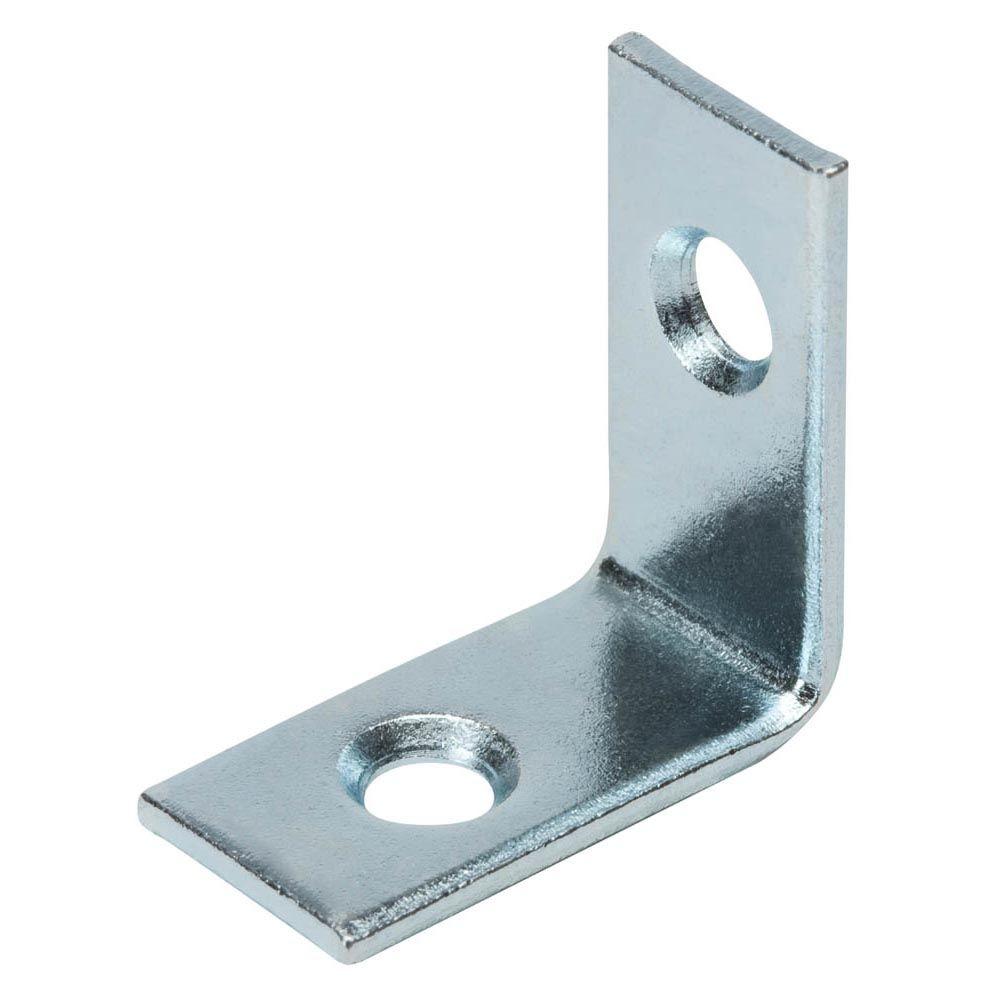 My initial probe holes from back in March: I can measure sizes and locations using the cowl and hinge shown in this photo, *IF* we can establish the proper measurement reference points: PAUSE While I go down to basement and find the cowl section and probing size drill bit. I felt inside where I thought the hole should go. Got through the first layer but made no progress (maybe hitting the hinge). So I moved over a bit and tried again. Very close but needed to be over a bit more (for the angle bracket that I have). Third hole lucky. Location is 18 mm back from the rounded edge of the cowl vent depression and either about 4" from the centerline of the right windshield washer nozzle or about 15/16" from the outer metal lip (at it's widest point) where the gasket sits. See below (Ignore the some of the measurements that you see and read the above and the photo label). Distances would vary depending on the bracket chosen. Thanks for kicking my butt. I have other things to do today but I decided that I should at least post this: Edited by 56D500boy 2017-11-06 6:09 PM (CowlVentHingeProbeHoleNo2CloseButNeedsToBeMoreOutboard.jpg) (CowlVentHingeProbeHoleNo2CloseButNeedsToBeMoreOutboardFromTheTop.jpg) (CowlVentHingeProbeHoleNo3CloseButNeedsToBeMoreInBoard.jpg) (CowlVentHingeProbeHoleNo3CloseButNeedsToBeMoreInBoardFromTop.jpg) (ProbeHoleLocationLineAbout18point5mmFromLipOfCowlDepression.jpg) (LocationOfThirdProbeHole4inchesFromCenterOfWindshieldWasherNozzleCenter.jpg) (LocationOfThirdProbeHole15_16thsFromEdgeOfVentGasketLip.jpg) Attachments ---------------- CowlVentHingeProbeHoleNo2CloseButNeedsToBeMoreOutboard.jpg (222KB - 339 downloads) CowlVentHingeProbeHoleNo2CloseButNeedsToBeMoreOutboardFromTheTop.jpg (159KB - 381 downloads) CowlVentHingeProbeHoleNo3CloseButNeedsToBeMoreInBoard.jpg (211KB - 331 downloads) CowlVentHingeProbeHoleNo3CloseButNeedsToBeMoreInBoardFromTop.jpg (174KB - 326 downloads) ProbeHoleLocationLineAbout18point5mmFromLipOfCowlDepression.jpg (148KB - 329 downloads) LocationOfThirdProbeHole4inchesFromCenterOfWindshieldWasherNozzleCenter.jpg (178KB - 328 downloads) LocationOfThirdProbeHole15_16thsFromEdgeOfVentGasketLip.jpg (181KB - 339 downloads) | ||
| |||
| 56D500boy |
| ||
Expert 5K+ Posts: 9899 Location: Lower Mainland BC | Went back down to measure the height of the hinge pin off the "floor" (upside down ceiling) and had a thought. First - the distance is around 5/16" (hard to measure) The thought: I might be easier to mount the new hinge bracket on the inboard side of the hinge rather than on the outboard side which is not flat like the inboard side. This will require more probing (on Weds. busy tomorrow) Inboard is the left in this photo: Edited by 56D500boy 2017-11-06 6:35 PM | ||
| |||
| Jump to page : < 1 2 3 4 5 6 7 8 9 10 11 ... > Now viewing page 6 [50 messages per page] |
| Search this forum Printer friendly version E-mail a link to this thread |
| (Delete all cookies set by this site) | |


 ................... (with my emphasis)