| The Forward Look Network | ||
| ||
 Rose / White '56 Belvedere 2dr Hardtop Rose / White '56 Belvedere 2dr HardtopJump to page : 1 2 3 Now viewing page 2 [50 messages per page] | View previous thread :: View next thread |
| Forward Look NON-Technical Discussions -> Members Rides | Message format |
| Powerflite |
| ||
Expert 5K+ Posts: 9650      Location: So. Cal | Thanks Jim. I'm not very good with videos, but I'll give it a shot once I get it closer to being driveable. I did get a replacement fuel line from MoparPro, we'll see how it goes. The home-made PCV setup that was on here was leaking terribly. The hoses were bad, one of the connections was loose, and the restrictor valve wasn't sealed well. So I intended to take it all out and replace it with some steel lines. But I couldn't do that because the connections to the intake aren't threaded. They are just jammed in there. I didn't want to thread the intake now and risk getting metal in the motor so I used some JB weld and epoxied them back in and replaced valve and the hoses. It's ugly, I know, but it'll have to do for now. I also cleaned up the hood hinges & sprayed the new springs from Ebay an appropriate color. (56Belv Ugly PCV.jpg) Attachments ----------------  56Belv Ugly PCV.jpg (169KB - 284 downloads) 56Belv Ugly PCV.jpg (169KB - 284 downloads) | ||
| |||
| Powerflite |
| ||
Expert 5K+ Posts: 9650 Location: So. Cal | I also cleaned up the floors yesterday to see where they stand. They aren't as good as I had hoped they would be, unfortunately. The right side is worse than the left, and has rusted through multiple layers into the top of the rocker. Thankfully, the rear floors are pretty clean. Because there aren't really good replacement panels available, I will likely patch this with multiple small panels to get it looking right afterward. That's required anyway to get all the layers done right at the hole above the rocker. The driver's side should be a lot easier to do. Because I am determined to get this car drive-able, I will go ahead and do the floor repair work now. (56Belv Floor Rust.jpg) Attachments ---------------- 56Belv Floor Rust.jpg (141KB - 282 downloads) | ||
| |||
| 56D500boy |
| ||
Expert 5K+ Posts: 9899 Location: Lower Mainland BC | . Nathan: Did you add the newly painted hood springs to the newly cleaned and painted hood hinges when the hinges were off the car? If so, how did you stretch the spring the needed 1.5" or so to do that? (I'm going to work on my second set of hinges and springs (all off the car) and would appreciate a method that is simpler than my Sven-inspired threaded hood spring "jack" | ||
| |||
| Powerflite |
| ||
Expert 5K+ Posts: 9650 Location: So. Cal | Yep, stick the flat flange end of the hinge in a vice (with cloth so it doesn't ruin the paint), put the top end of the spring in position on the hinge, put a thick wire like a clothes hanger on the bottom part of the spring, wear heavy gloves, put your foot on the vice for leverage, and pull the wire to bring the spring to the proper position. It's amazing that the wire (& gloves) allows you to pull with much more force than you can otherwise apply to it. I used the same approach to replace the spring on my gold New Yorker without removing the hood nor hinge. I stood on a chair with my knee on the back of the hinge for leverage, and pulled up on the wire to install the upper point of the spring on the hinge. And a similar approach to replace the broken spring on my yellow Fury, but the hood was already removed, so it was easier. Edited by Powerflite 2021-03-21 2:56 PM | ||
| |||
| Powerflite |
| ||
Expert 5K+ Posts: 9650 Location: So. Cal | I found this tag behind both rear arm rest panels. It looks like it would have had more information on it at one point, but these just have the 1554273 part number on them....which I can't find in the '55-'58 catalog. The meaning of LA seems obvious as this car was manufactured in the Los Angeles plant, but I wish I knew what NAFI stood for. National Automotive Fabrics Industry? That's my best guess. (56Belv Rear Arm Rest Number.jpg) Attachments ---------------- 56Belv Rear Arm Rest Number.jpg (166KB - 281 downloads) | ||
| |||
| Powerflite |
| ||
Expert 5K+ Posts: 9650 Location: So. Cal | The problem with fixing rust is it extends to every layer. You peel back more and more to reveal more problems. But I've figured it will take about 8 patches on the right side with the different layers and 4 or 5 on the left. Would be a lot easier if good replacement panels were available, but oh well. I cut the main patch from the rear floor of my '57 New Yorker parts car. I used the section which has the two beads extending up onto the tunnel. I had to extend the beads a little after I cut it out, but it was pretty easy with them already formed there. I had to fix the holes in it from removing the under floor brace and modify the bend a little to fit properly. I also had to add the step into the side of it. Since it's relatively small, I was able to add those bends using my vice, and then cleaned up the bends with an elevated anvil. I've got it mostly welded into the floor now, but I've still got to clean it up. Next, I'll patch in the large hole at the top of the rocker & fix the pocket for the body mount. Edited by Powerflite 2021-03-28 12:21 AM (56Belv Rt Floor Layers Cut.jpg) (56Belv Rt Floor Main Patch.jpg) Attachments ---------------- 56Belv Rt Floor Layers Cut.jpg (196KB - 286 downloads) 56Belv Rt Floor Main Patch.jpg (152KB - 278 downloads) | ||
| |||
| westaus29 |
| ||
Veteran Posts: 148 Location: Mandurah, Western Australia | Like Shrek says, they are like onions, they have layers! I had fun doing the sills on my 55 wagon, 4 layers deep around the rear doglegs, was lucky enough to get some sill repair panels bent up by a local trailer fabrication shop for $40. Rebuilding the 29 Plymouth was a breeze by comparison. (DSC00176.JPG) Attachments ---------------- DSC00176.JPG (246KB - 276 downloads) | ||
| |||
| 56' Savoy |
| ||
Member Posts: 30 | I've done the exact same job,both sides on my 55' wagon,so I know how difficult and time consuming it is. Luckily I found a very kind guy in Nebraska who sent me lots of panels in better shape from a car he butchered..but,you are moving fast forward Nathan,so you'll get there ! | ||
| |||
| Rahhstah |
| ||
Member Posts: 18 | Powerflite - 2021-03-07 12:29 AM I replaced the distributor with an electronic one, an HEI module, and a powerful E-core coil, gave it some fresh oil and gas in the carb, and put a battery in it for the first time. This caught my attention as I'm working on getting my 56 running again and following your thread, what is the HEI modeul & E-Core coil? Thanks | ||
| |||
| Powerflite |
| ||
Expert 5K+ Posts: 9650 Location: So. Cal | The later electronic ignition small block distributors are a direct drop in replacement in the '56 Plymouth poly motor. So I use one of them, but couple it with a GM HEI ignition module that I mount to the bottom of the distributor. The remaining 2 connections go to the coil. So no ignition box that I have to mount on my firewall or fender. Works really well and eliminates the required ballast, with an appropriate coil. This 60103 coil from Pertronix has very low .32 ohms primary resistance to provide lots of power. It allows me to open the spark plug gap up to .052", depending on compression ratio. I make and sell the conversions on my website here. http://www.designed2drive.com/ (HEI and Coil.jpg) Attachments ---------------- HEI and Coil.jpg (72KB - 271 downloads) | ||
| |||
| Powerflite |
| ||
Expert 5K+ Posts: 9650 Location: So. Cal | Thanks Jim and Geir, just got to keep at it to get it done. I welded in the 2nd patch today over the top front of the rocker. That closed it up nicely. Then I cut up a new patch for the outer section of the upper floor and got it spot welded in. It surprised me that the inner metal under that floor was like brand new, unpainted as if it had left the factory yesterday. Kind of odd that it didn't even get a coating of rust on it. I didn't hesitate to put a coat of paint over it before I buttoned it up though.  (56Belv 2nd Patch & Pocket.jpg) Attachments ---------------- 56Belv 2nd Patch & Pocket.jpg (169KB - 266 downloads) | ||
| |||
| Powerflite |
| ||
Expert 5K+ Posts: 9650 Location: So. Cal | I welded four more patches into the floor. I seem to have started a little patch garden here. But I feel good about how it's turning out. I'll need to clean up the majority of these welds now before I proceed to repair the vertical kick panel area. So that's what I'll do next. I also need to test fit the sill plate cover afterward to make sure things didn't shift around before I call it good. (56Belv Patch Garden.jpg) Attachments ---------------- 56Belv Patch Garden.jpg (209KB - 264 downloads) | ||
| |||
| 1960fury |
| ||
Expert 5K+ Posts: 7393 Location: northern germany | Looks great Nathan. I too always try to save as much of the original sheet metal as possible, that is the only way to do it and the original contours remain. Better than replacing the whole section with a cheap, thin, out of shape repro. | ||
| |||
| Powerflite |
| ||
Expert 5K+ Posts: 9650 Location: So. Cal | Yeah, I won't touch those crappy replacement panels. So far off from reality, they are like cartoon versions. But I prefer to have full replacement OE panels rather than having to replace them in parts like this, but since good full panels aren't available to me, this is a good alternative. After these are cleaned up, I'll only need a little more work to finish up the right side of the car. Fortunately, the left is quite a bit better than this side. | ||
| |||
| Powerflite |
| ||
Expert 5K+ Posts: 9650 Location: So. Cal | Since I am reattaching the hood, I thought I would make it look a little better. The underhood trim on the front of this car was really rusted out on the left side, but the right side still looked great. Nevertheless, the right side had some deep pitting in places that fortunately hadn't worked their way through the part yet. These chromed trim parts are some of the most susceptible parts on a '55-'56 Plymouth for rust, because the factory just left them with only the thin chrome plating on the backside to protect them. But sitting upside down most of their lives means they catch all sorts of dirt and water in there, left to sit and rust. So even though I'm replacing the rusted trim with an NOS version, I'm painting the backside of it to protect it better. I really should do this to all the pot metal trim parts too. Much of the worst pitting often starts at the backside. I'll clean up any paint that might be visible from the other side after the paint dries, with some acetone. (56Belv Hood Trim Backside.jpg) Attachments ---------------- 56Belv Hood Trim Backside.jpg (186KB - 257 downloads) | ||
| |||
| westaus29 |
| ||
Veteran Posts: 148 Location: Mandurah, Western Australia | The 55 has the same hood front side trims and mine were bad. I managed to get used replacements but they cost an arm and a leg to get rechromed as local environmental regulations have put most such services out of business. I painted the inside of mine likewise. Next time I will try and hang out for good user quality chrome parts as am not trying to create a trailer queen. One problem with this trim is every time it rains or I wash the car, it fills with water that only drains out when I open the hood, usually over me. I wonder if anyone has come up with a solution to this? | ||
| |||
| Powerflite |
| ||
Expert 5K+ Posts: 9650 Location: So. Cal |  That's how it works alright! Always have to remember to lift the hood to drain it out of there. I agree with rechrome costs. Almost not worth it. I was lucky and managed to pick up some NOS parts, and that's why I am so keen on protecting them. That's how it works alright! Always have to remember to lift the hood to drain it out of there. I agree with rechrome costs. Almost not worth it. I was lucky and managed to pick up some NOS parts, and that's why I am so keen on protecting them. Amazing how much better the front end of the car looks after a little clean up, and after replacing that rusted chrome strip. I also tested & replaced both headlamps. They were all bad except for the high beam on one of them....which went bad after 7 seconds of testing. But the headlamps still don't work, so their issue seems to be multi-faceted. I know the wiring works, so I'll have to trace down the problem from the high beam switch to the light switch. Edited by Powerflite 2021-04-16 12:04 PM (56Belv Frontend Cleaned.jpg) Attachments ---------------- 56Belv Frontend Cleaned.jpg (213KB - 257 downloads) | ||
| |||
| Powerflite |
| ||
Expert 5K+ Posts: 9650 Location: So. Cal | I did some of the clean up and welded in three more patches to the right side yesterday, two in the vertical section and one at the rear rocker. This should be the last ones required for the right side. It'll probably take a full day to finish cleaning up all the welds and re-weld any holes or low spots in it afterward, before I can move on to the left side. I'll also do a little clean up to the underside & paint it as well, but with the body on the frame, I am limited with what I can do under there. It's nice to see it starting to look like a decent floor again. (56Belv Right Vertical Patches.jpg) (56Belv Right Rear Uppper Rocker Patch.jpg) Attachments ---------------- 56Belv Right Vertical Patches.jpg (142KB - 259 downloads) 56Belv Right Rear Uppper Rocker Patch.jpg (205KB - 266 downloads) | ||
| |||
| 56' Savoy |
| ||
Member Posts: 30 | Great work Nathan ! You're almost there ! | ||
| |||
| Powerflite |
| ||
Expert 5K+ Posts: 9650 Location: So. Cal | Thanks Geir. I haven't had as much time to work on it as I would have liked, but I managed to get most of the clean-up work done on it. I also put in one more patch because there was too much pitting on that section for my liking. I also fixed a couple of small issues on the driver's side rear, in front of the seat, so I could paint a majority of the floor and put the rear seat back into it. After painting, I found a couple of issues that I couldn't see before, so I'll need to touch those up, and I already fixed a couple of issues that need to be cleaned up still. I also need to hammer up the weld area from below in order to properly clean up the visible weld at the lower part of the photo. But definitely coming into the home stretch on the right side repairs. But once I get the rear seat back into it, I think I will concentrate on getting the brakes working & the motor fuel & cooling systems working so that I can make it driveable. I want to have that done so I can easily move it out of the way when I need to before I tear into the driver's side floor issues. Edited by Powerflite 2021-05-02 12:32 PM (56Belv Right Floor Primed.jpg) (56Belv Floor Primed.jpg) Attachments ---------------- 56Belv Right Floor Primed.jpg (76KB - 222 downloads) 56Belv Floor Primed.jpg (97KB - 217 downloads) | ||
| |||
| 56' Savoy |
| ||
Member Posts: 30 | Just a fantastic job Nathan ! It's much more difficult to do this kind of massive work,and be true to the original profiles and stamped patterns,even though it all will be hidden under rubber mats or carpets..I've done it the same way,and for me,it's gives me greather satisfaction just to know it's done right. Curious to how you made round lowered area where the body mount bolt is ? Took me hours of hammering to make mine,and they didn't come out this nice.. | ||
| |||
| Powerflite |
| ||
Expert 5K+ Posts: 9650 Location: So. Cal | Thanks Geir. I asked the guy in Finland who makes the floor braces to press a bunch of body mounts in a panel for me. He put about 8 of them in a single panel and sent them to me with the floor braces that I purchased. Unfortunately, they turned out to be too deep for the '57-'59 floors, but almost perfect for the '55-'56. So I just cut them from the panel and weld them in where needed. It makes it easier than trying to make them myself. Ideally, I would have the roller dies to make my own panels, but my shop is too small for that so I have to make do with what I can. I obsessed over the small imperfections and went over the floor 3 more times, fixing imperfections that I could see, especially up along the top weld and the innermost line. I got it to a point that I am happy with, other than the lower section that I still have to hammer up from the bottom, so I am going to leave it for now. I have run out of time to work on the left side so I put the seat back in; and I'm going to work on the power disc brake conversion & motor now so that hopefully, I can get it driveable. (56Belv Right Floor.jpg) Attachments ---------------- 56Belv Right Floor.jpg (74KB - 211 downloads) | ||
| |||
| 56' Savoy |
| ||
Member Posts: 30 | Wow,is there a guy in Finland,here in Scandinavia,that makes parts for old Mopars ? Never heard of him..? I've done with the bodywork on my wagon ( I hope ),but still curious to know who this guy is,and what parts he fabricates..? Nathan,you can move on to other issues with this car,with the satisfaction of a great job done with these floors,and,I shure will be following the opcoming tasks with brakes and engine.. | ||
| |||
| Powerflite |
| ||
Expert 5K+ Posts: 9650 Location: So. Cal | Yes, he sells them on ebay under the user name: eriksson1765. He just makes the braces that go under the floor and the floor panel at the seat mount for the '57-'59 cars. https://www.ebay.com/sch/eriksson1765/m.html | ||
| |||
| Powerflite |
| ||
Expert 5K+ Posts: 9650 Location: So. Cal | I dug into the nice paint job on my pedal assembly and welded a brake light switch mount onto it. Would have been much better to have done this before painting, but sometimes I'm not as smart as I would like to be. But it looks decent after repainting. I'm using a Japanese switch because it's all-metal and actually cheaper than the all-plastic GM version. I also mostly finished the modifications required to the AAJ 12" disc brake conversion to make it work with my Plymouth hubs. There is a quite a bit of fab work required to make it work so it isn't as quick as just assembling a kit. But I like the final results. I used this conversion on my white '56 Fury and the brakes worked really well, to the extent that I was able to test them on it. (56Belv Brake Light Switch.jpg) (56Belv 12in Disc Conversion.jpg) Attachments ---------------- 56Belv Brake Light Switch.jpg (145KB - 218 downloads) 56Belv 12in Disc Conversion.jpg (103KB - 219 downloads) | ||
| |||
| Powerflite |
| ||
Expert 5K+ Posts: 9650 Location: So. Cal | I was a little surprised to find out that the manual pedal assembly mounts completely differently from the power brake pedal assembly. The upper part of the mount isn't even the same width. They've made the holes in the firewall extra large to accommodate the difference in width between them. The master for the power setup also sits much lower than the master for the manual brakes. That accounts for the extra large hole in the firewall down there. I'm not sure what the holes in the middle are for, but I suspect that they are used by the power brake setup for cars with manual transmissions. I guess it's fitting that a Swiss army knife design like this ends up looking like Swiss cheese. Edited by Powerflite 2021-05-20 11:01 AM (56Belv Firewall Brake Pedal Mount.jpg) Attachments ---------------- 56Belv Firewall Brake Pedal Mount.jpg (138KB - 204 downloads) | ||
| |||
| 58coupe |
| ||
Expert Posts: 1740  Location: Alaska | I believe the reason for the difference in the master mounting between manual and power is for the pedal ratio difference. | ||
| |||
| Powerflite |
| ||
Expert 5K+ Posts: 9650 Location: So. Cal | Yeah, that makes sense, but this made me realize that it would make it difficult for me to convert my savoy to power brakes as the lower master would end up colliding with the hemi valve cover. I installed the power pedal assembly and it fought me the whole way. I didn't realize that the two little brackets that mount to the dash were specific to the car. Every make is different. So I had to transfer my old ones to the new pedal assembly. After I got it all in, the mounting position at the dash was too wide for some reason. It's like the pedal assembly had been widened out. I think I had to straighten it at one point and might have got it a little too straight. So I had to take it back out and smack it with a hammer against my anvil to get it back to the proper width. After taking it back out again to keep from clamping the insulation with it, I managed to get it all together. It fits well now and I didn't have to modify the pushrod so that was nice. I'm glad that I took the time to make up extra brake lines when I was converting my white Fury to discs, as it made it really easy to install the new lines into this one. I'm waiting for a union for the rear line and I still need to mount the hoses to the frame, so I'll do that tomorrow. I don't have an extra vacuum can for the Plymouth/Dodge, but I am converting a '56 Chrysler can to work on this car. I just need to move & modify one of the legs to make it mount well on the Plymouth. Now would be a good time to convert to power steering as well, since I have the steering column down, but I don't have any of the parts for the pump setup so it'll have to wait for another time. Edited by Powerflite 2021-05-22 2:35 AM (56Belv Power Brake Booster.jpg) Attachments ---------------- 56Belv Power Brake Booster.jpg (138KB - 204 downloads) | ||
| |||
| 1960fury |
| ||
Expert 5K+ Posts: 7393 Location: northern germany | Love this thread. Beautiful car, great work. I will never buy and never ever bought restored cars. This one would be the exception. | ||
| |||
| Powerflite |
| ||
Expert 5K+ Posts: 9650 Location: So. Cal | Thanks Sid. I probably won't fully restore this car as it is for my daughter who doesn't care what the engine bay looks like, but I'll clean it up as I go. Eventually, it should look nice as I work on different parts of it. The vacuum tank had a hard dent in it that I didn't notice before. I was contemplating using a stud welder on it, but I remembered that it sometimes causes a hole that needs to be welded back up, and I didn't want to have to deal with that on this. Then I realized that I could pressurize it and use the pressure to take out the dent as I heat it up. My son is gone for summer job training, so my daughter stepped in to help me instead. She held the pressure while I heated it up. I plugged the other hole with a pipe plug to make it easier. It worked out amazingly well. It's really close to being perfect now and was amazingly easy to do. Edited by Powerflite 2021-05-22 2:48 PM (56Belv Vacuum Tank Dent Fix.jpg) Attachments ---------------- 56Belv Vacuum Tank Dent Fix.jpg (166KB - 212 downloads) | ||
| |||
| 22mafeja |
| ||
Elite Veteran Posts: 649 Location: Finland | That was some smart thinking to fix the dent that way. Not to recommend on fuel tanks though! | ||
| |||
| 56' Savoy |
| ||
Member Posts: 30 | Great work as always Nathan. What M/C are you using,and do you know the bore ? And,hey,it's good to see a youth like your daughter working on old cars ! Gives hope for the future ! | ||
| |||
| Powerflite |
| ||
Expert 5K+ Posts: 9650 Location: So. Cal | Yeah Ralf, probably wouldn't be smart on a fuel tank! My daughter enjoys helping her father, but unfortunately her interest in cars goes only as far as driving to where she wants to go. Still, I can't complain because she's awesome. The master is for a '73-up Mopar with 1.032" bore diameter. A very similar master that I used on my white '56 Fury, and it worked out really well. I have the brake system all tightened up and bled with Dot 4 brake fluid now. The pedal feels firm and tight with no sponginess. But I haven't bled the rear brakes at all. That's an indication that the rear brake hose is likely plugged up. It was the same way on the Fury. I'll just leave it like that for a while until I get it ready to drive. I'm still waiting to receive the 1/2" hose in the mail to hook up the vacuum tank, but the dent is practically non-existent now with zero filler applied. It just required that I slap a small ripple in it down, and sand it out with a layer of primer over it. I'll have to remember that trick for the future. I didn't bother to take out the small dent at the edge of it. I probably should have, but I didn't mind leaving it there. Next, I'll get some wheels on it that are compatible with the discs, and work on getting it driveable.(56Belv Vacuum Tank Painted.jpg) Attachments ---------------- 56Belv Vacuum Tank Painted.jpg (122KB - 190 downloads) | ||
| |||
| Powerflite |
| ||
Expert 5K+ Posts: 9650 Location: So. Cal | I spent some time to clean up the dash on this car. I didn't think my daughter would appreciate the rusty looking dash, so I decided to clean it up and give it a coat of paint, just to make it look a little better. It's a semi-gloss, but it should flatten out to more of a sheen finish over time. I also pulled the plug for the lighter and added one in there as I am sure my daughter will require one for her phone. I am undecided if I will convert the speaker cover to the later version or not, but in the mean time, this one looks much better after it's cleaned up. I really like the look of the red power brake pedal with the pink dash. Matches quite well . But I really need to replace that accelerator pedal. It looks pretty bad. Edited by Powerflite 2021-05-29 10:49 AM (56Belv Dash Cleaned.jpg) Attachments ---------------- 56Belv Dash Cleaned.jpg (115KB - 194 downloads) | ||
| |||
| Powerflite |
| ||
Expert 5K+ Posts: 9650 Location: So. Cal | I posted this on facebook and found that my car isn't the only one that was born without a lighter. The lighter seems to have been a separate option on these cars. (56Plym Lighter_Radio Delete.jpg) (56Plym Lighter_Radio Delete_Aftermarket Guages2.jpg) Attachments ---------------- 56Plym Lighter_Radio Delete.jpg (147KB - 199 downloads) 56Plym Lighter_Radio Delete_Aftermarket Guages2.jpg (63KB - 191 downloads) | ||
| |||
| 56D500boy |
| ||
Expert 5K+ Posts: 9899 Location: Lower Mainland BC | Powerflite - 2021-05-29 7:44 AM I posted this on facebook and found that my car isn't the only one that was born without a lighter. The lighter seems to have been a separate option on these cars. Probably depends on the model. On the Belvederes it was probably standard. For the Savoys and Plazas, it was probably optional. As an example for 1955 Dodges, the cigarette lighter (Actually "CIGAR LIGHTER") was option No. 443 but it was standard on the Custom Royal and Royals and an extra cost option on the Coronet. Edited by 56D500boy 2021-05-29 12:23 PM | ||
| |||
| Powerflite |
| ||
Expert 5K+ Posts: 9650 Location: So. Cal | Except that this car is a Belvedere, and it appears to have the lighter deleted from the options. Odd that it would have so many expensive options like the hollywood wheel, dash clock & bumper wings, yet not have a lighter, but that seems to be the case. I had always thought the headliner in this car was a white cloth like my other cars, but it turns out that it was originally a pink color. I pulled these small remnants from behind the dome lights. The rest of it just looks brown. (56Belv Pink Headliner.jpg) Attachments ---------------- 56Belv Pink Headliner.jpg (102KB - 203 downloads) | ||
| |||
| 58coupe |
| ||
Expert Posts: 1740 Location: Alaska | Could it be that your Belvedere was purposely designed to mimic the Dodge LaFeme but Plymouth didn't have an official name for it? | ||
| |||
| 56D500boy |
| ||
Expert 5K+ Posts: 9899 Location: Lower Mainland BC | 58coupe - 2021-05-30 8:45 AM Could it be that your Belvedere was purposely designed to mimic the Dodge LaFeme but Plymouth didn't have an official name for it? Here is another pink and white 56 Belvedere Sport Coupe that was purchased *new* for a daughter: " For the record, this color is called “Briar Rose”. It reminds me of Dodge’s La Femme models for 1955 and 1956, boy those were sure colorful! The seller says this is a “rust free CA car that was purchased new in the Bay Area.” It was purchased by a father as a graduation present for his daughter when she graduated from Stanford. " 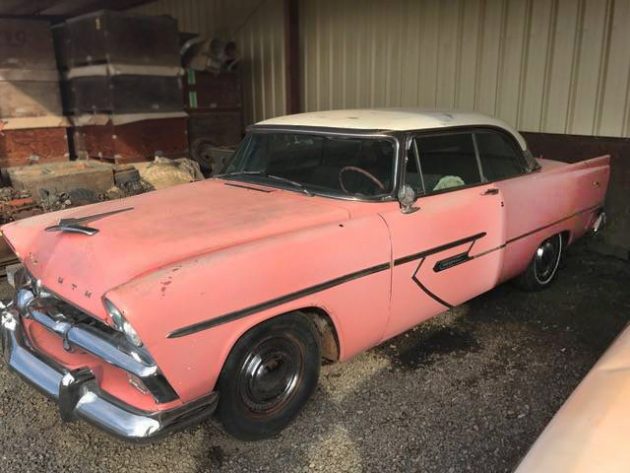 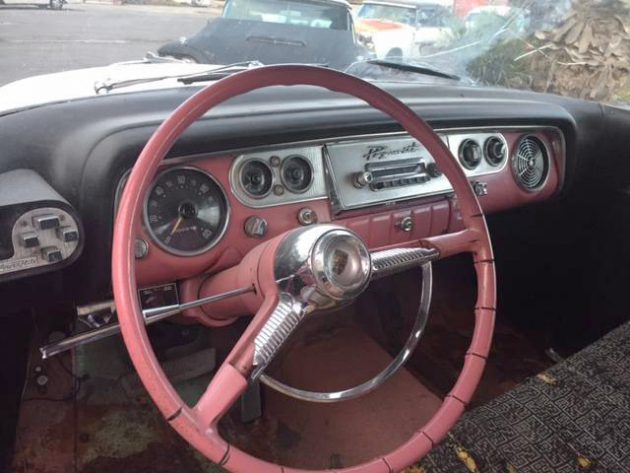 REFERENCE: https://barnfinds.com/pepto-plymouth-1956-plymouth-belvedere/ | ||
| |||
| Powerflite |
| ||
Expert 5K+ Posts: 9650 Location: So. Cal | I've never thought about a connection between the pink Belvedere and the Le Femme, but could be plausible. Mine is a California car as well, but I wish it were more rust free than it is. But eventually, it will be. I replaced the fuel pump on the car because the old one was shot. Got it running again out of a gas can, and then for some reason, I couldn't get it to fire anymore. Turns out the connector on my coil got twisted and shorted itself out. I moved it and it fired right up again. So I put the radiator back in and started to fill it with water, only to find it literally pouring out of the bottom of the water pump. That's not going to work. I checked the status of the pump from my rusty fury, and it seems to be good. At least it isn't pouring out when I put water into it. I'll swap that in to see if that fixes the problem, otherwise, I'll have to put a later 318 pump into it because I don't have time to rebuild the original. I then filled the trans with 5 quarts of oil until it registered full, and drove it back & forth on my driveway. Reverse seems to have good power & torque, but the forward gears are less impressive. Not sure why that is. Another problem is that every time I press on the power brake pedal, the engine struggles to keep running. I suppose that means there is an inner seal that is leaking vacuum? I bench tested it with a vacuum pump before I installed it and didn't notice anything leaking. Also, it seems that the brakes are always on, to some degree, unless I pull up on the pedal. When I pull up, the tang presses on the button on the back of the booster, and it stops boosting. But that tang doesn't seem to be pulled into place by the spring. How is that supposed to work? I don't remember having issues with it on my other cars. Edited by Powerflite 2021-05-31 1:18 AM (56Belv Fuel Pump Replaced.jpg) Attachments ---------------- 56Belv Fuel Pump Replaced.jpg (137KB - 203 downloads) | ||
| |||
| Powerflite |
| ||
Expert 5K+ Posts: 9650 Location: So. Cal | I swapped the water pump from the motor in my rusty '56 Fury over to this car and gave it a shot. I made a new gasket before I put it in and it came out OK. After putting it back together, I noticed a small leak in the thermostat neck. So I removed that and welded up two holes in it, and also gave it some material on the inside where it had become thin. I put it back together and so far it seems to be working great. No issues at all, including with the heater core & valve. So the cooling system is good to go now. I also adjusted the brake push rod to reduce the slack in it, and that seems to have, at least partially, solved the problem with it. I'll look into it more as I start to drive it. I adjusted the timing one more time, and at that point it was ready for a test drive. So I started out and noticed that the brake calipers are hitting the wheel every time I hit the brakes. Doh! The tire people had balanced the wheel using stick-on weights that were deep inside the wheel, and those were hitting it when it extends out. I continued to drive up the street a bit, and turned around when the motor died. It ran out of gasoline, when I still have plenty of gas for it. I don't know what happened if the carb became plugged or if my new pump died for some reason. I gave it a shot of fuel to get it going again, and it wouldn't turn over. The starter solenoid decided to die at that point too. It figures, just my luck. So I walked back to the house and had my lovely wife push me back home. She really hates doing that, so I'll probably be sleeping in the dog house tonight...except I don't have a dog... | ||
| |||
| 22mafeja |
| ||
Elite Veteran Posts: 649 Location: Finland | The first small testdrives tend to be events to remember(forget?). That is typical to have not one issue but two or three at the same time then. Never never go anywhere without cell phone.. | ||
| |||
| Powerflite |
| ||
Expert 5K+ Posts: 9650 Location: So. Cal | I'm one of the few people left that doesn't own a cell phone. Occasionally, I've had one through my work, but I just used it as a camera. I feel really dumb. The starter relay wasn't working so I replaced it with a new one that I had. After I installed it, it still didn't work. So I checked it out and realized I had to put the transmission in neutral first!  When the motor died, I neglected to put the car back into neutral. Not the first time I have made this dumb mistake either. The old relay works perfectly fine! When the motor died, I neglected to put the car back into neutral. Not the first time I have made this dumb mistake either. The old relay works perfectly fine! The rubbing on the wheel turned out not to be from the wheel weights, but from an extra large blob of weld on the rim that was hitting the caliper. So I cut down the obvious excess blob on the rim and also cut down the clearance chamfer on the calipers where it was hitting (circled in the photo), and now it doesn't rub any more. The fuel pump seems to be working fine, so I'm still not sure what caused it to run out of fuel when it did. I'm going to clean the carburetor inlet with carb cleaner, and clean out the filter as well, and hopefully that will fix it. I took it for another, longer run uphill to bring the motor up to full temperature. There was a very slight shudder in drive that made me think there may be issues with a stuck brake. But when I got it up to 2nd gear, the car stopped pulling and coasted. Brake the speed to get back to 1st gear, and it would pull again. Is it possible to fix with a band adjustment? Sounds like the trans needs to be gone through before I can have fun with it. After I got home, I checked the brakes for heat and found that the right rear drum was hot. The other side and parking brake were fine. So that right rear brake is hanging up a little while moving forward. The cooling system & temperature gauge worked great and did get up to normal operating temperature, so that was nice. But I'm not ready to deal with a bad transmission now, so this car may have to wait a while until I get things together for it. Edited by Powerflite 2021-06-09 5:02 PM (56Belv 12in Caliper Clearance.jpg) Attachments ---------------- 56Belv 12in Caliper Clearance.jpg (104KB - 197 downloads) | ||
| |||
| westaus29 |
| ||
Veteran Posts: 148 Location: Mandurah, Western Australia | Sounds like you had a senior's moment with the starter on that first drive, glad to hear I am not the only one. Re the fuel issue, maybe there is a floater in the fuel tank? I had a problem with a chrysler flathead in a Bombardier we used on the ski hill in Canada, turned out to be a sycamore seed in the tank and had to pull the front end apart to get it out. Re the auto shift, you possibly already know about the Imperial Club site and its Master Technician articles. The website appears to be half broken at present but I was able to find the link thru their search facility .... http://www.web.imperialclub.info/Repair/Lit/Master/ There is an article there on Powerflite maintenance. | ||
| |||
| Powerflite |
| ||
Expert 5K+ Posts: 9650 Location: So. Cal | That seed sounds awful to get lodged in there! I'm just running this from a can in front of the radiator, so no sender or tank involved in the process yet. But I do think it likely has to do with something plugging the carb inlet. I think I found the problem when I pulled the right rear drum. The nut on the axle was only finger tight and I found some creative engineering inside there. I foolishly gave my front brakes to the metal recyclers so I don't have a replacement spring for it yet, but I'll get one from the front brakes on the yellow Fury when I open it up. In the mean-time, I installed a brake spring from a '60's car that was the right length, size and tension, and it seems to work fine. That should make it roll easier now.(56Belv RR Brake Spring Jimmy.jpg) Attachments ---------------- 56Belv RR Brake Spring Jimmy.jpg (76KB - 189 downloads) | ||
| |||
| Powerflite |
| ||
Expert 5K+ Posts: 9650 Location: So. Cal | The car rolls a lot easier now with the brake spring fixed. The trans still has issues, of course, so I parked it in it's resting spot to wait until I can get to it. I also drained the coolant, which is just water at this point. I'm going to do some bodywork on a friends car and work on some of my muscle cars & commuter cars for a while. The wheels in the front stick out a little too far for my liking. They are large 235x70 on 7" wide rims, but I would prefer the tire to sit a little further in the fender. That's why I took so much effort to get back some of the offset that these disc brakes take up. I'll likely purchase custom offset wheels for the car eventually to move them even further inward. Edited by Powerflite 2021-06-11 2:48 AM (56Belv Waiting.jpg) (56Belv Engine Waiting.jpg) Attachments ---------------- 56Belv Waiting.jpg (152KB - 185 downloads) 56Belv Engine Waiting.jpg (145KB - 180 downloads) | ||
| |||
| 56D500boy |
| ||
Expert 5K+ Posts: 9899 Location: Lower Mainland BC | . Nathan: Watch out for the inside of the tire hitting the frame rail if you change the offset to move the wheel and tire inwards. I am running 235/75/15s on 7" Cop Car wheels and that kind of tire rubbing happens from time to time (slow speed maneuvering). Just sayin' There's always compromises. Personally I would say that the fronts look fine and it's the rears that need to move out more. But hey... | ||
| |||
| 57burb |
| ||
Expert Posts: 3967 Location: DFW, TX | A 7" wide front wheel is really large for a 1950s car. What about a 5-6" wheel? I think you saw a post I made on FB, but you can find inexpensive steel racing wheels at Summit in a variety of widths and offsets. Car is looking REALLY good! Your daughter may not be really "into" old cars now, but she will be when she has to work on it every day to get to school! | ||
| |||
| Powerflite |
| ||
Expert 5K+ Posts: 9650 Location: So. Cal | I agree with you Dave. The rears do need to be wider, but I still think the fronts are too far out. But it's a good point that I need to put the same wheels on the rear to do a good comparison. I stole these from the rear of my '60 New Yorker so I wouldn't have to go purchase new ones. These wheels & tires give me a good way to compare what I want, and can get away with in terms of turning radius etc. I'll measure out how much room I have with these before I purchase anything else for it. Thanks Danny, I think it's a great looking car too. But my daughter isn't the wrenching type, unfortunately. So I don't know what that means for her. Maybe this car will change that? We'll see. I usually get my wheels from Summit, so I'll take a look at what is there. I prefer the 7" wide rims, but for this car, I think the 235/70's are probably too big. I am thinking that 225/70's would look better, and those could be run with either 7" or 6" rims, so I may consider going a bit smaller. Edited by Powerflite 2021-06-11 8:30 PM | ||
| |||
| 56D500boy |
| ||
Expert 5K+ Posts: 9899 Location: Lower Mainland BC | Powerflite - 2021-06-11 5:28 PM I agree with you Dave. The rears do need to be wider, but I still think the fronts are too far out. But it's a good point that I need to put the same wheels on the rear to do a good comparison. I stole these from the rear of my '60 New Yorker so I wouldn't have to go purchase new ones. Nathan: Here are some photos of my rear wheel well lip that I had to trim about 5/8" to 3/4" at the maximum point to fit the 7" cop car wheels with 235/75/15 tires. (Note: I did the trimming back in Oct. 2016 with a Bosch jigsaw (and metal blade) (wheel removed) - before I discovered the "magic" of a 4" angle grinder and zip cut blade) The first photo is of a clone of my car that I used to estimate the area that I would have to trim back in Oct. 2016 (ExampleWheelWellTrimWidthsForTireClearanceTrimming.jpg) (56DodgeRearWheelWellLipWith7inchCopCarWheelAnd235_75_15Tire_1.jpg) (56DodgeRearWheelWellLipWith7inchCopCarWheelAnd235_75_15Tire_2.jpg) (56DodgeRearWheelWellLipWith7inchCopCarWheelAnd235_75_15Tire_3.jpg) Attachments ---------------- ExampleWheelWellTrimWidthsForTireClearanceTrimming.jpg (91KB - 186 downloads) 56DodgeRearWheelWellLipWith7inchCopCarWheelAnd235_75_15Tire_1.jpg (79KB - 194 downloads) 56DodgeRearWheelWellLipWith7inchCopCarWheelAnd235_75_15Tire_2.jpg (141KB - 192 downloads) 56DodgeRearWheelWellLipWith7inchCopCarWheelAnd235_75_15Tire_3.jpg (121KB - 185 downloads) | ||
| |||
| Jump to page : 1 2 3 Now viewing page 2 [50 messages per page] |
| Search this forum Printer friendly version E-mail a link to this thread |
| (Delete all cookies set by this site) | |


