
Home | Pics | Christine | Riding the Bullet | Data | History | Links | Wallpaper | Mailing List | '57 Resto | Email me | AIM me
|
Progress of New Zealand's prize Plymouth '57 resto cont'd. With the rear quarters completed, the trunk floor is ready for removal. It was so rusty that it looked like it had been shot with a shotgun. There was not a square inch that did not have a hole or a rust pit through it and had also been molested with poor repair work in it�s past, with many old patches. Initially I was going to have a trunk floor panel made from scratch, but a friend came up with a panel removed from a 59. It was in real good shape with no holes anywhere. It had however been cut short at the rear and the front, and these areas required extensive re-fabrication. The piece of panel under the rear parcel shelf was missing, gas axed short of the radiused up-stand. This panel has the double rolled swage the entire width from left to right, so required special tools to be manufactured to put this swage into the new repair panel. Finding someone with a machine heavy enough for the job, and big enough to pass an entire trunk floor section through it, was no easy task. By chance I stumbled across a shop that specialises in Jaguar restoration, "Jaguar Restorations" owned and operated by Tony Katterns, of East Tamaki, Auckland, New Zealand. Tony is an enthusiastic collector of very useful old school heavy restoration machinery, and he is an excellent craftsman as well. I employed the services of ace toolmaker Kris Clark, of Glen Eden, Auckland, to make the necessary male and female rolling wheels that fit Tony's huge wheeling machine, which Tony used to perform an awesome job replicating the factory swages of the trunk floor. Also I discovered that 58/59 trunk panels are slightly different to 57. On the right hand side-the 58/59 floor panel has a rectangular shallow recessed swage running from front to back-almost the entire length of the trunk floor whereas the 57 has a double rolled swage in the same location, of only about 8 inches long. My body-man removed the 58/59 swage, and welded in a flat piece of steel, with the double rolled swage, as factory. Also the spare wheel hold-down hook is slightly different in 59, so I had him remove my old one from my 57 trunk floor and weld it back on to the new trunk floor panel.
In order to be able to repair some shallow dents on the trunk-lid, and some areas of rust along the fold over seam, the trunk-lid skin was separated from it�s frame. This is just a folded edge-it is not welded at all. These 2 parts are assembled as bare metal from the factory, and the hidden area is another great rust trap. While it was apart, I had the two panels acid dipped again to be sure to get the inside of the panel as clean as possible for paint. After the repairs had been made, the two pieces were sprayed in a metal etch, then an undercoat, then with several coats of 2 pack MoPar trunk blue/grey, matched from a friends 58 Fury trunk-lid. The edge was then carefully folded back over the outer skin.
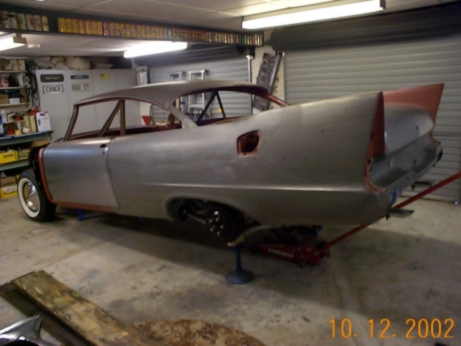
For the first time in 2 years, it is time to reunite the body with the frame. The body is supported at the front by the same means as the FWDLK 58 Plymouth assembly line photos-via chains attached through the firewall hood hinge bolt holes. These chains are attached at their other end through holes in the timber of the upper floor of my house. With the body as high as I could get it, I manouevered the frame underneath with a floor jack, and slowly lowered the body back onto the frame. New body to frame rubbers were fitted, and the body to frame fasteners re-zincplated. The trunk floor, rear quarters, rear panel, parcel shelf panel, trunk deck lid and doors are then fitted (temporarily with screws to enable removal again for paint in seams, behind panels etc).
After aquiring a left hand drive dashboard to replace my incorrect right hand drive dashboard, I acid dipped it back to bare metal, then had the color and detailed texture reproduced to factory look. For ease of working on the newly painted dashboard without scratching it, I built a dashboard rotisserie using some steel shelf brackets which support the dash at the ends of the dash, meaning the whole assembly can be rotated with ease for working on both sides of the dash, with no risk of marking it. The original wiring loom had been cut and spliced during the cars previous right hand drive conversion, it was crusty and baring copper in places, and many of the original connections had been replaced over time, so I purchased a reproduction wiring loom from Greg Leggatt of Canada leggatt@kos.net. Greg�s attention to detail in this reproduction harness is excellent quality, and every wire is labelled for easy installation. All gauges are replaced with NOS guages. NOS handbrake warning light package. NOS glovebox light package. Original clock rebuilt. NOS cigarette lighter with light and ash guard. NOS light bulbs. NOS rear speaker fader. Re-chromed radio faceplate, instrument surround, heater control. Gary Goers cardboard glovebox. Original radio speaker reconed. 150mph speedo disassembled, cleaned, and rolled back to 000000. I polished all of the scratches out of the clear lens using Brasso, and a lot of elbow grease. The entire pushbutton selector unit was disassembled so that every part could be re-zinc plated as original, and reassembled. New Gary Goers rubber snubbers. Gold buttons for transmission control re-anodised in bright gold. Ashtray receiver and all under-dash brackets etc stripped and re-zinc plated as original. Restored 7 button 917HSV (Highway Hifi model) Search-tune radio is installed after finding that these units have operating problems from new, and required some modifications before getting it to function correctly. The aluminum trim around the dash controls/switches has a pattern of gold dots, which only became obvious when I purchased some NOS trim pieces. Many cars have lost their gold dots over time. Because my left hand drive dash had lost it�s dashpad, I decided to have a new one made. It was going to cost as much to make a one-off pad as it would cost to make 6 using a mould, so I had 6 made, and have the mould available for future runs of dashpads should anyone else require one. The workmanship on these pads is outstanding, and every detail from the original has been replicated, including color, texture, shape, heights, contours, fit. They are available in both 57 and 58 models, and in any color. To top off the restored dash, I purchased a NOS complete heater package.
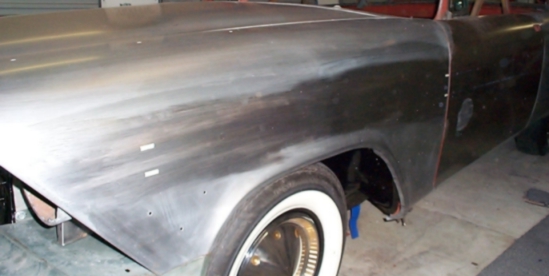
For the first time in over 30 years, the Fury is about to receive her original 57 front clip back. The grille, lower grille, side valances, lower shields, hood stainless trim, headlight buckets, headlight surrounds and headlight eyebrows are all pre-fitted to make sure there will be no dramas when the body comes back from the paint shop. With the factory poor alignment of panels, much bodywork was required to perfect the fitting of the hood-to-fender gaps, and the fender-to-door gaps. In some cases my body-man had to make cuts in panels to close up gaps and then weld in a new slither of metal. After looking at pictures of other 57/58 Plymouths, even prize winning examples, it became evident that these areas of bodywork are often neglected during a restoration, due to the huge amounts of time required to correct the problems. This also applies to the fitting of the side mounted Sport-tone stainless trim. The side trim mounting locations were measured on other Furys, 2 dead straight chalk lines were struck from one end of the Fury to the other, and the stainless side trim was temporarily taped onto the car at the correct positions. It was discovered, as suspected, that the hole punching of the front fenders on my Fury was a long way out, causing the side trim to be straight from the rear quarter to the front door, but then dive down about � of an inch towards the front of the front fender. After looking at pictures of other Furys and Belvederes, this is a very common problem. I believe Virgil Exner designed the side trim to be laser straight, and that the poor alignment was due to rushed workmanship at the time. The only sure-fire way to fix this problem, was to tig weld the front fender trim holes up, and start again. Tig welding specialist Chris Stanley of Chris� Custom Metalworx in Silverdale, Auckland undertook the job, and did a fine job of tig welding the holes up, and hammer and filing the panels back into shape. Aside from this work, all of the rest of the metal work on this restoration so far has been completed by Mike Wood, of Restoration Panelbeaters, Auckland.
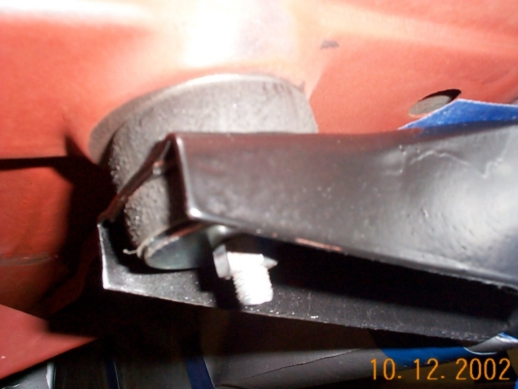
The re-fabricated rocker panels are a work of art. What many people do not realise is that these panels have a slight convex curve along the edge where they meet the door to ensure a good fit. Replacement rocker panels like the ones on Ebay have no such curve, and also have none of the intricate work required at the ends of the panels where they meet the body. Also the Ebay panels have no drain holes. Having no drain holes in your rocker panels is a fatal mistake. All the water which rains into the rear quarter via the unsealed entrance at the top where the body meets the rear side glass, escapes into the rocker panel, and if it cannot drain out, will cause rust in the future.
 
Can you help me locate any of the following parts that I am missing, so that my restoration will proceed through to completion unhindered? You can count on this being current-if a part is on the list then I need it, and you could get to see the part that you supply appear on this page installed onto this very 57 Fury! Fair prices paid for good parts. Any help appreciated. Contact me here. PARTS WANTED For 1957 Plymouth, Fury. Parts colored in green have been found with your help! Shaft to carb linkage, with stud, w/auto 3sp, Fury, Part# 1827-691. (Supplied by Johnny P, Auckland, NZ) Shaft to carb linkage, with slot, w/auto 3sp, Fury, Part# 1822-008. (Missing part turned up) Accelerator pedal lever (what the rubber pedal attaches to) w/auto 3sp, Part# 1734-024. (Supplied by Wendy at glnos@iserv.net) Clips for retaining narrow side stainless mouldings. (Supplied by Ed Sitek, Tolland, Ct.06084) Clips for retaining roof rail stainless mouldings-original-used OK. (supplied by Tim Ridl.) Clips for retaining chrome fin cap mouldings (Supplied by Florida Auto Fastener. 67cayne@gtcom.net. Tony and John.) Clips for retaining stainless moulding that goes directly under trunk lid (Supplied by Florida Auto Fastener. 67cayne@gtcom.net. Tony and John.) Clip that holds windshield washer hose to underside of hood-used OK. (Supplied by John Garofalo, Florida) 6 inch wheel rims (5 needed). Transmission front & lower inspection covers. (2). (Supplied by Tim Ridl, Dickinson, ND 58601) Highway Hi-fi mounting brackets(1957). Highway Hi-fi records. Radiator support to hood bumpers x 2. (Rubber stops with threaded steel). (Supplied by John Garofalo, Florida) Identification tags for carburettors, brass triangular, to suit carbs 2631S & 2632S. (Supplied by Ebay user "Mztercarb.") Fuel pump-Stamped M2501S. (Supplied by Greg Pickens, Ebay user purepony) Ballast resistor, ceramic thing that mounts on coil, want correct one as shown in manual, not later model. Muffler support package-muffler end-dual exhaust, Part # 1843-009 (2) Muffler support & clamp-muffler end-dual exhaust, Part # 1843-008 (2) Exhaust support & clamp-exhaust end-dual exhaust, Part #1843-010 (2) Tail pipe extensions, Part # Clips for retaining chrome hood letters. (Kindly supplied by Louis Guzman from Freeport, New York.) and any NOS parts.
|


Furyworld v5.0 - Plymouth Run is copyright Lion's Gate Web Services 1999-2004.